1. Product Overview
The MARVOWARE 10'x 20' Heavy Duty Carport is a versatile and robust outdoor shelter designed for various uses, including vehicle storage, temporary garages, and event canopies. It features a durable alloy steel frame and a polyethylene tarp, offering protection against sun, rain, and snow. Key features include adjustable height settings, roll-up ventilated windows, and reinforced ground support for enhanced stability.
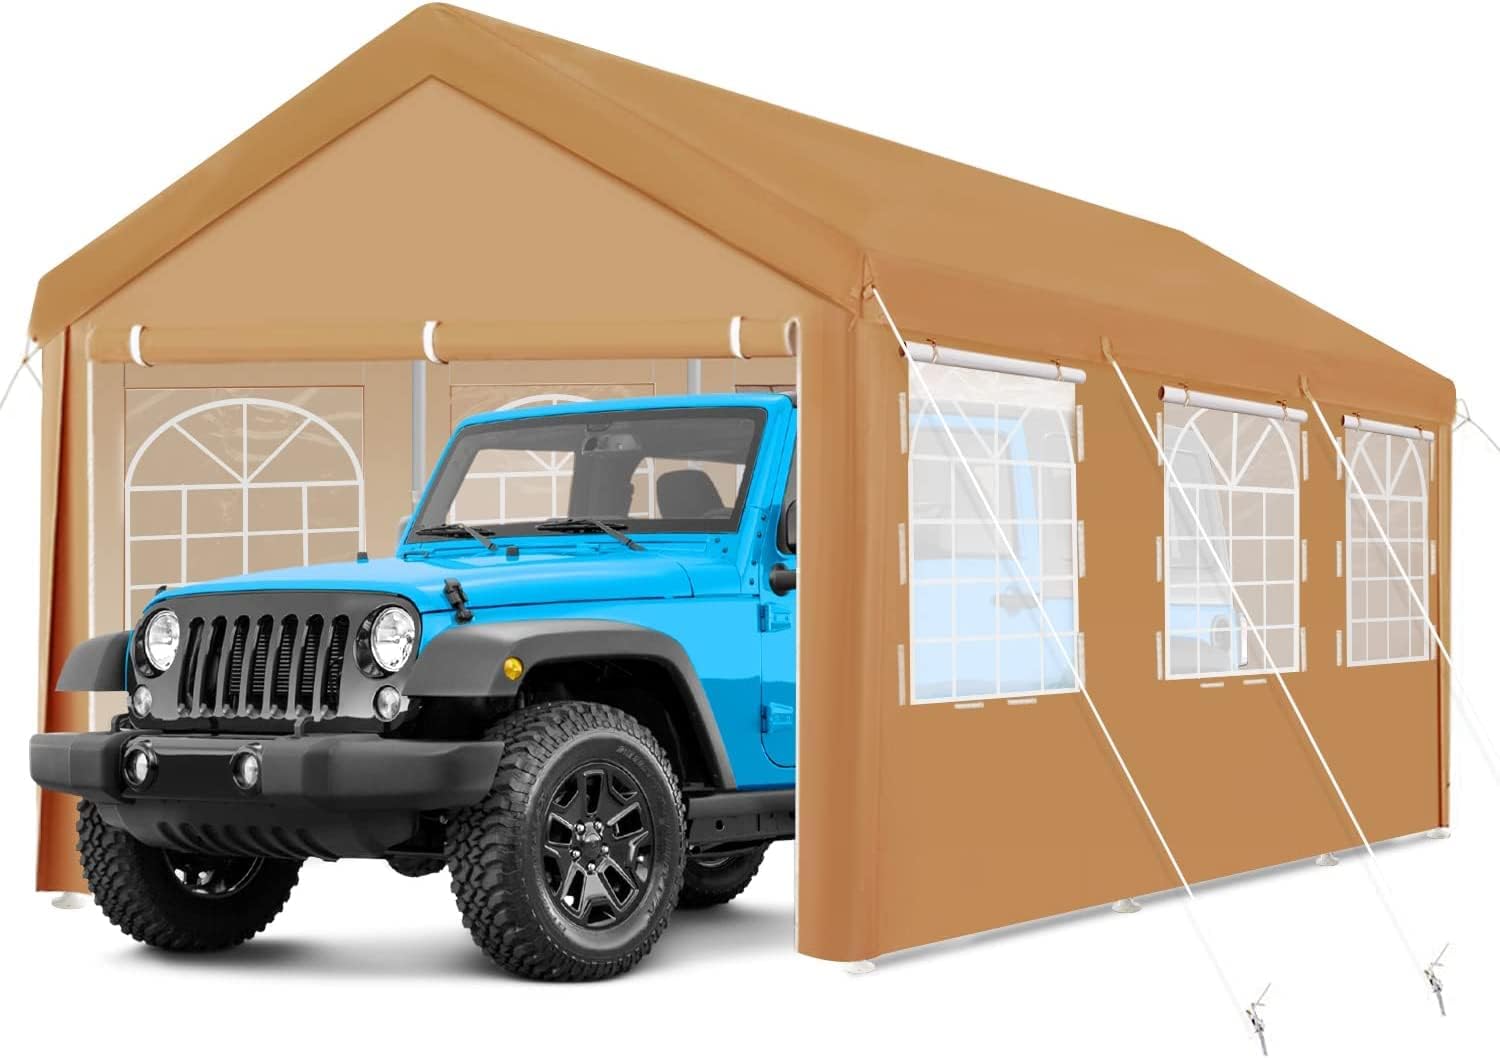
Image 1.1: The MARVOWARE 10'x 20' Heavy Duty Carport providing shelter for a vehicle. This image illustrates the overall structure and size of the carport.
2. Safety Instructions
Read all instructions carefully before assembly and use. Failure to follow these instructions may result in injury or damage to the product.
- Ensure all components are present and undamaged before beginning assembly.
- Assemble the carport on a level surface.
- Securely anchor the carport to the ground using the provided ground spikes and ropes. For soft ground, consider using sandbags for additional stability.
- Do not assemble or use the carport in strong winds, heavy rain, or snow conditions. Disassemble or secure the carport immediately if severe weather is anticipated.
- Keep children and pets away from the assembly area.
- Do not use open flames or heating devices inside or near the carport.
- Regularly inspect the frame and tarp for any signs of wear or damage.
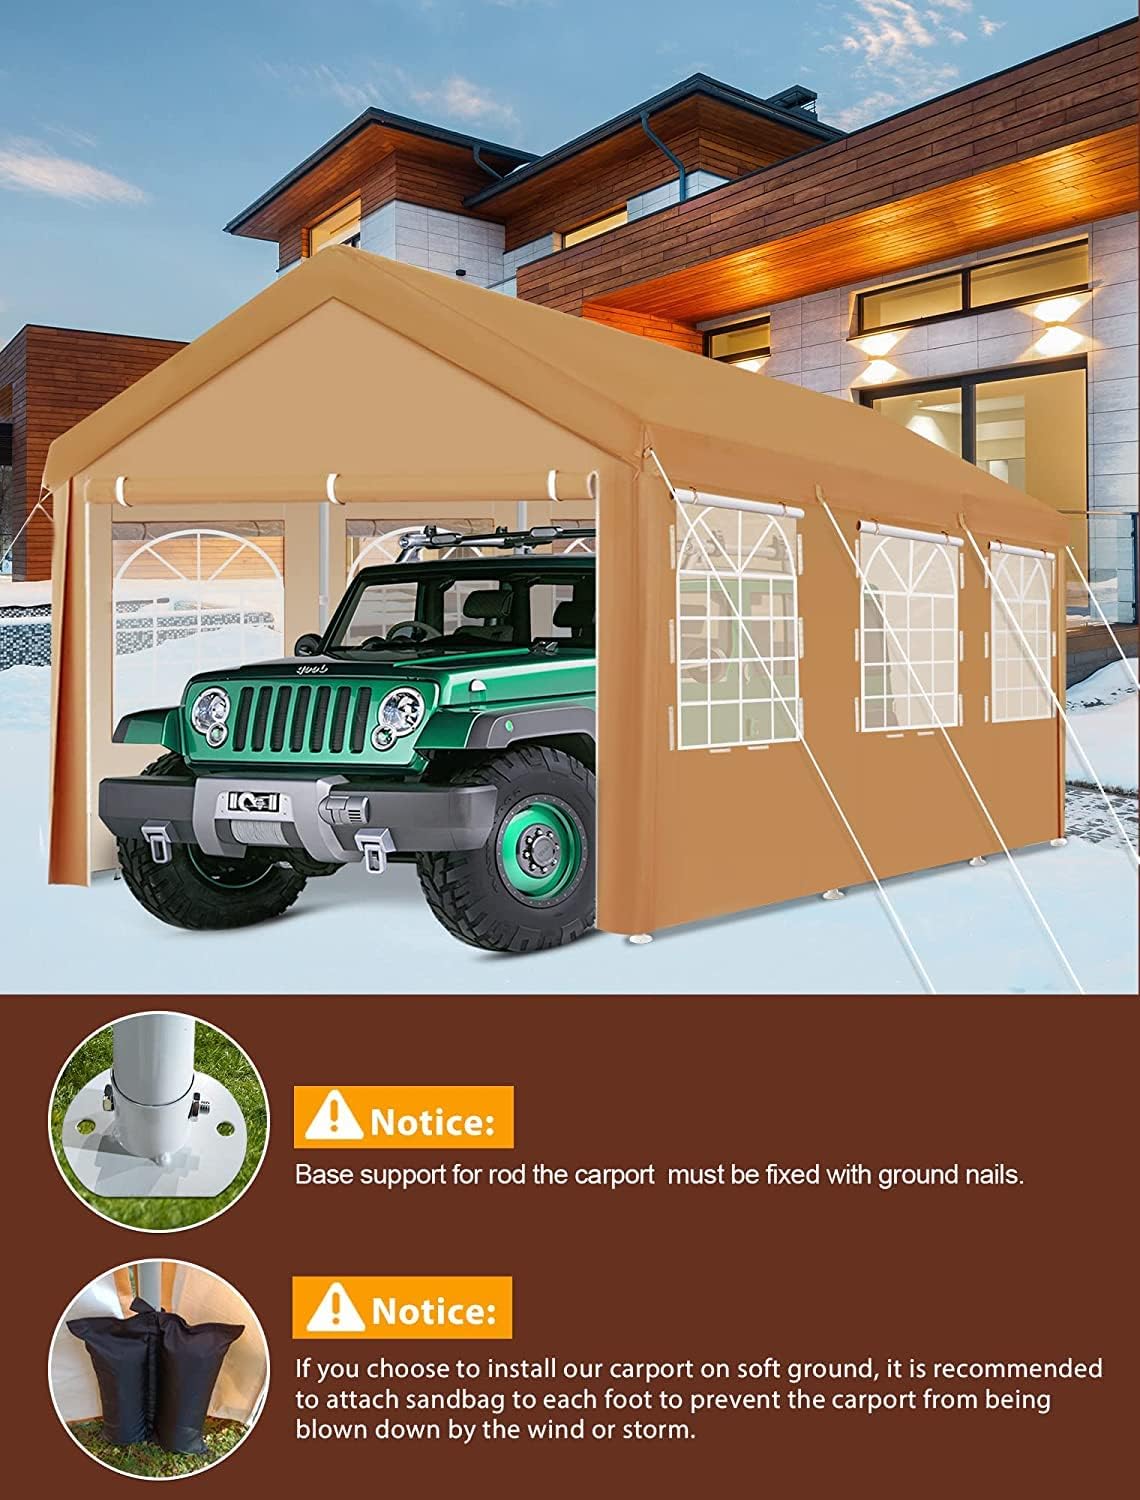
Image 2.1: Illustration of the carport in a winter setting, emphasizing the importance of securing the structure with ground nails and sandbags, especially on soft ground, to prevent displacement by wind or storm.
3. Components List
Before assembly, verify that all parts are included and undamaged. Refer to the assembly diagram for visual identification of components.
| Component | Description | Quantity |
|---|---|---|
| Main Frame Pipes | Alloy steel pipes forming the primary structure. | Varies by section |
| Connectors | 4-way joints and other connectors for frame assembly. | Varies |
| Main Tarp Cover | Polyethylene roof cover. | 1 |
| Sidewalls | Removable polyethylene sidewalls with mesh windows. | 2 |
| Zipper Doors | Polyethylene end panels with zippers for entry/exit. | 2 |
| Ball Bungees | Elastic cords for attaching tarp and sidewalls to frame. | 68 pcs |
| Ground Spikes/Pegs | For anchoring the carport to the ground. | Varies |
| Ropes | For additional stability and anchoring. | Varies |
| Adjustable Height Rods | Pipes with holes for height adjustment. | Varies |

Image 3.1: Close-up view of various components including ball bungees, pipes for height adjustment, top triangular structure, Velcro fixing, double zippers, and ground nails for securing ropes.
4. Setup and Assembly
Assembly typically requires two or more people. Follow these steps for proper setup:
- Prepare the Area: Choose a level, clear area for assembly. Ensure sufficient space for the 10'x 20' footprint and surrounding working area.
- Assemble the Frame: Connect the alloy steel pipes according to the included assembly diagram. Pay attention to the orientation of connectors and pipes. Ensure all connections are secure. The frame features a top triangular structure for enhanced stability.
- Attach the Main Tarp: Drape the polyethylene main tarp over the assembled frame. Ensure it is centered and evenly distributed.
- Secure Tarp with Bungees: Use the provided ball bungees (68 pcs) to securely attach the tarp to the frame. Thread the bungees through the grommets on the tarp and around the frame pipes.
- Install Sidewalls and Doors: Attach the two removable sidewalls and two zipper doors to the frame using the bungee cords. The sidewalls feature 6 large mesh windows for ventilation, with roll-up covers.
- Adjust Height (Optional): The carport offers 4 adjustable height levels. Use the liftable rods to set the side height to 6.5ft, 7.0ft, 7.5ft, or 8.0ft. Corresponding peak heights will be 9.5ft, 10.0ft, 10.5ft, and 11.0ft.
- Anchor the Carport: Firmly plant the reinforced ground spikes into the soil through each foot pad of the main frame. For additional stability, especially on soft ground or in windy conditions, attach sandbags to each foot and use the provided ropes to secure the carport to the ground.
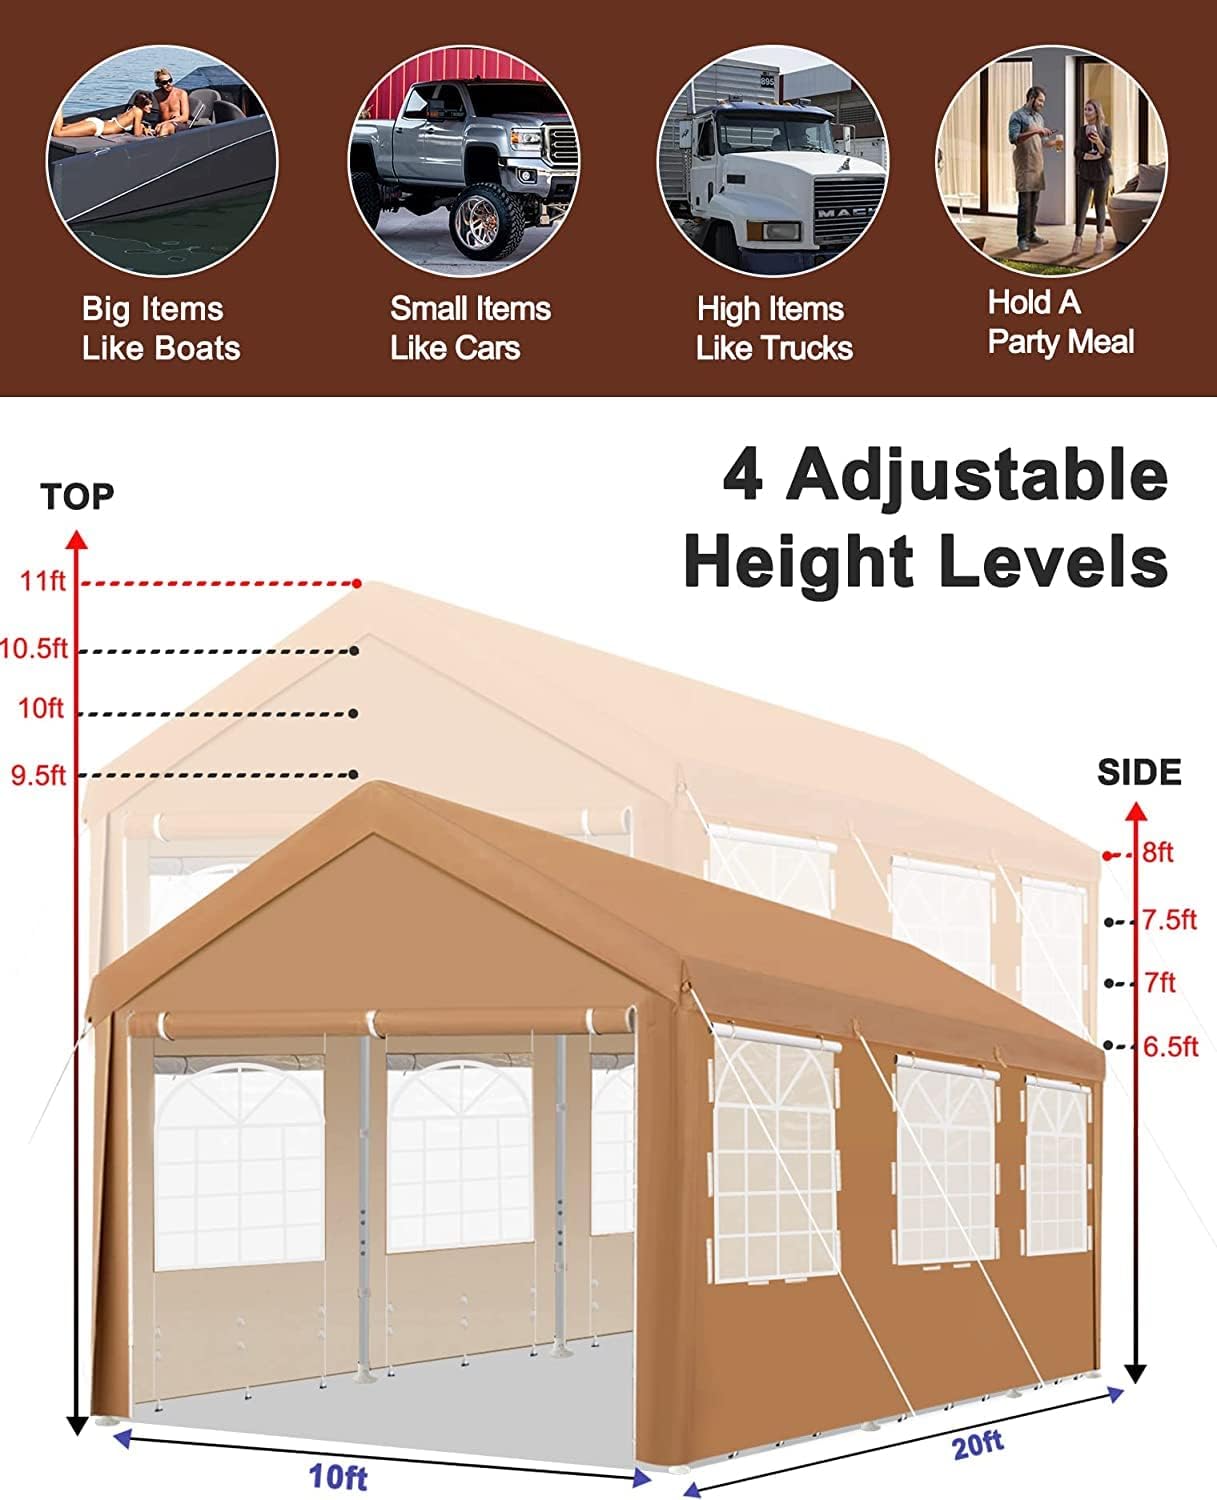
Image 4.1: This diagram illustrates the 4 adjustable height levels of the carport, ranging from 9.5ft to 11ft peak height and 6.5ft to 8ft side height, along with the overall 10ft x 20ft dimensions.

Image 4.2: A view of the carport with a tractor inside, emphasizing the robust top triangular structure and the waterproof PVC material, crucial for stable setup.

Image 4.3: A visual guide demonstrating the importance of fixing the base support with ground nails and attaching sandbags to prevent the carport from being blown away, especially on soft ground.
5. Operating Instructions
The MARVOWARE carport is designed for flexible use throughout the year.
- Ventilation: Utilize the 6 large mesh windows on the sidewalls for air circulation. Roll up the outside window covers as needed to increase airflow and prevent moisture buildup.
- Access: Use the two zipper doors for easy entry and exit of vehicles or equipment.
- Seasonal Use: The removable sidewalls and zipper doors allow for different configurations based on weather and needs. For open-air events, remove the sidewalls. For maximum protection, keep all panels attached.
- Height Adjustment: To change the height, carefully lift the frame and adjust the liftable rods to the desired setting (6.5ft, 7.0ft, 7.5ft, or 8.0ft side height). Ensure both sides are adjusted evenly.

Image 5.1: This image demonstrates the versatility of the carport, showing configurations with removable sidewalls for events, open ventilation windows for airflow, and curtains rolled down for privacy or storage.

Image 5.2: A visual comparison illustrating the temperature regulation benefit of the carport, showing a cooler environment inside compared to a car parked directly under the sun.

Image 5.3: The carport providing shelter for a boat, demonstrating its utility for storing large items and its all-season applicability.
6. Maintenance and Care
Proper maintenance will extend the life of your carport.
- Cleaning: Clean the polyethylene tarp and frame with mild soap and water. Avoid harsh chemicals or abrasive cleaners. Rinse thoroughly and allow to air dry completely before storage.
- Inspection: Regularly inspect all frame connections, bungee cords, and tarp for any signs of wear, tears, or damage. Replace worn or damaged parts promptly.
- Anchoring: Periodically check the ground anchors to ensure they remain firmly in place, especially after strong winds or heavy precipitation.
- Snow Removal: In areas with heavy snowfall, regularly remove accumulated snow from the roof to prevent structural collapse. Do not allow heavy snow loads to remain on the tarp.
- Storage: When not in use for extended periods, disassemble the carport and store all components in a dry, cool place away from direct sunlight to prevent material degradation.
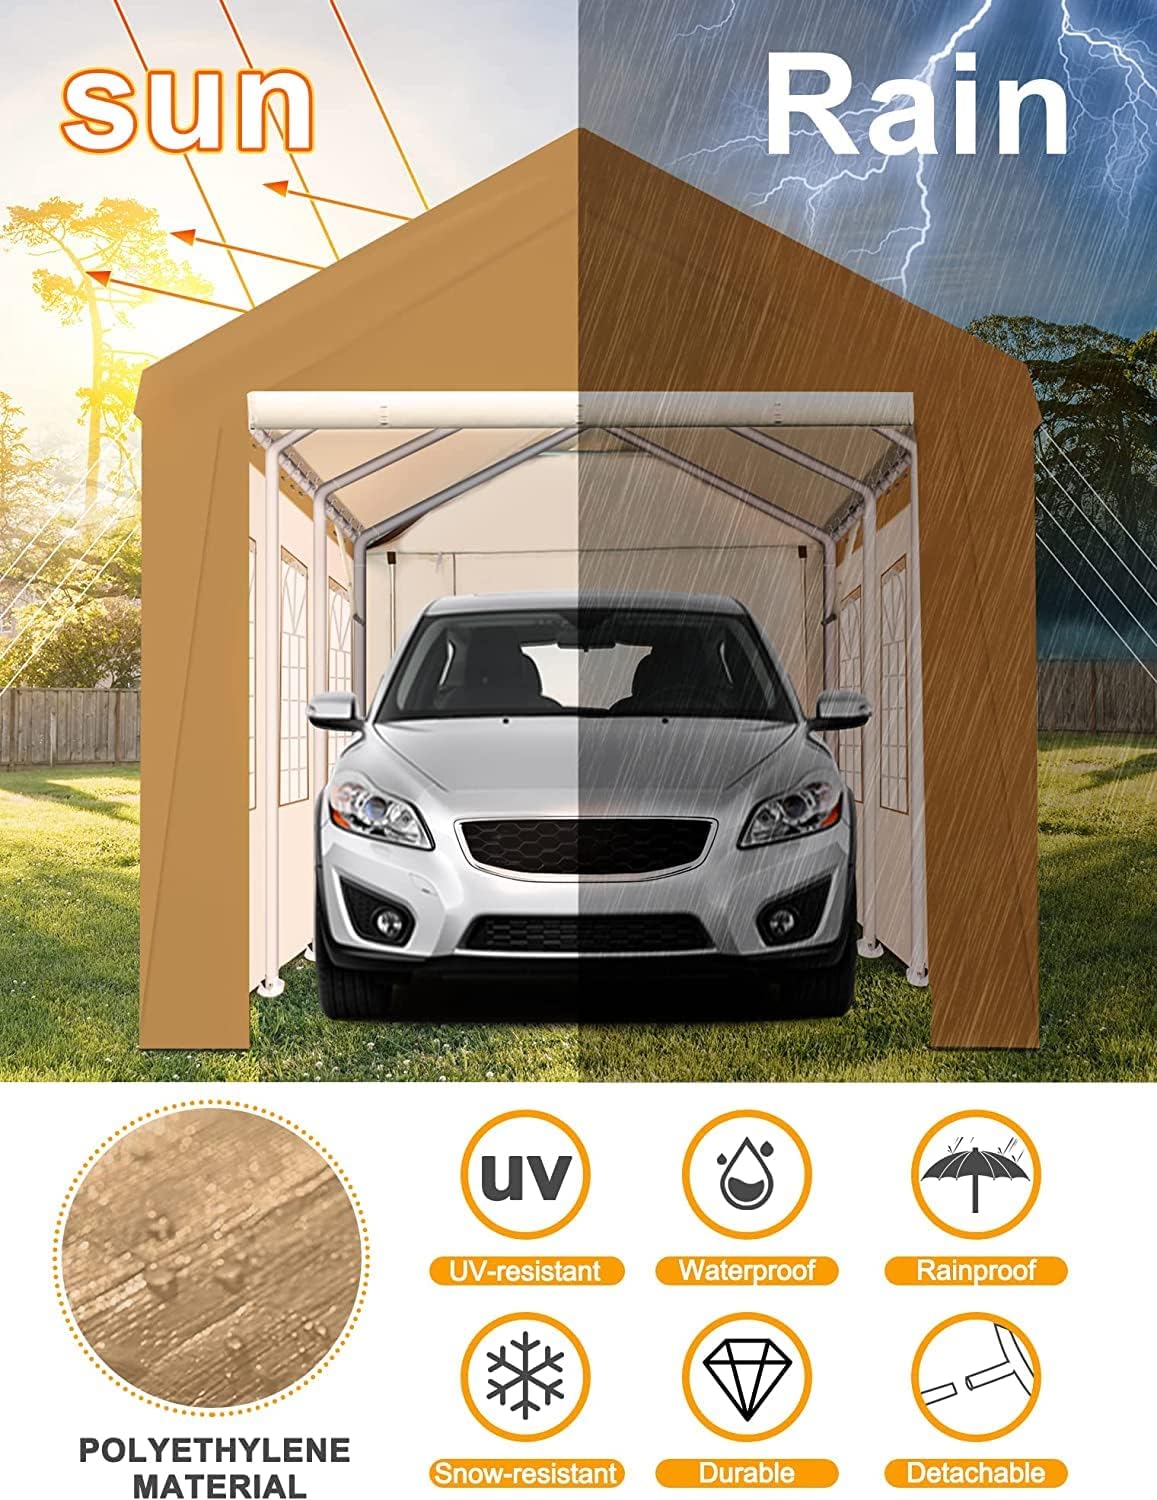
Image 6.1: This graphic highlights the all-season properties of the carport's polyethylene material, including UV-resistance, waterproofing, rainproofing, snow-resistance, durability, and detachability, which are crucial for proper maintenance.
7. Troubleshooting
| Problem | Possible Cause | Solution |
|---|---|---|
| Carport is unstable or sways in wind. | Insufficient anchoring; loose frame connections; uneven ground. | Ensure all ground spikes are fully inserted. Add sandbags for extra weight. Check all frame connections are tight. Relocate to a more level surface if possible. |
| Water pooling on roof. | Tarp not taut enough; improper assembly; excessive snow/rain load. | Re-tension bungee cords to make tarp taut. Verify frame assembly is correct. Remove snow/water accumulation immediately. |
| Difficulty with height adjustment. | Pins not aligning; obstruction in pipes. | Ensure the liftable rods are clean and free of debris. Apply slight pressure to align holes. Adjust one side at a time. |
| Zipper sticking or not closing. | Dirt/debris in zipper teeth; misalignment. | Clean zipper teeth with a brush. Apply a silicone-based lubricant. Ensure the door panel is properly aligned and not under tension. |
8. Specifications
- Brand: MARVOWARE
- Model: 4 Height Adjustable
- Product Dimensions: 240"L x 120"W x 132"H (20 ft L x 10 ft W x 11 ft H at max height)
- Adjustable Side Heights: 6.5ft, 7.0ft, 7.5ft, 8.0ft
- Adjustable Peak Heights: 9.5ft, 10.0ft, 10.5ft, 11.0ft
- Frame Material: Alloy Steel
- Tarp Material: Polyethylene
- Water Resistance: Waterproof
- UV Protection: Yes
- Shape: Rectangular
- Assembly Required: Yes
- Color: Beige/Tan (as depicted in product images)
9. Warranty and Support
MARVOWARE provides the following support for this product:
- Money-Back Guarantee: 30-day money-back policy.
- Limited Warranty: 12-month limited warranty covering manufacturer defects.
- Technical Support: Lifetime technical support for all customers.
For any problems during the use of this carport, please contact MARVOWARE customer service directly for assistance. Contact information can typically be found on the product packaging or the official MARVOWARE website.