Litime L12V40A-DC-Z

LiTime 12V 40A DC-DC Battery Charger with MPPT Solar Controller User Manual

Model: L12V40A-DC-Z

1. Setup Instructions

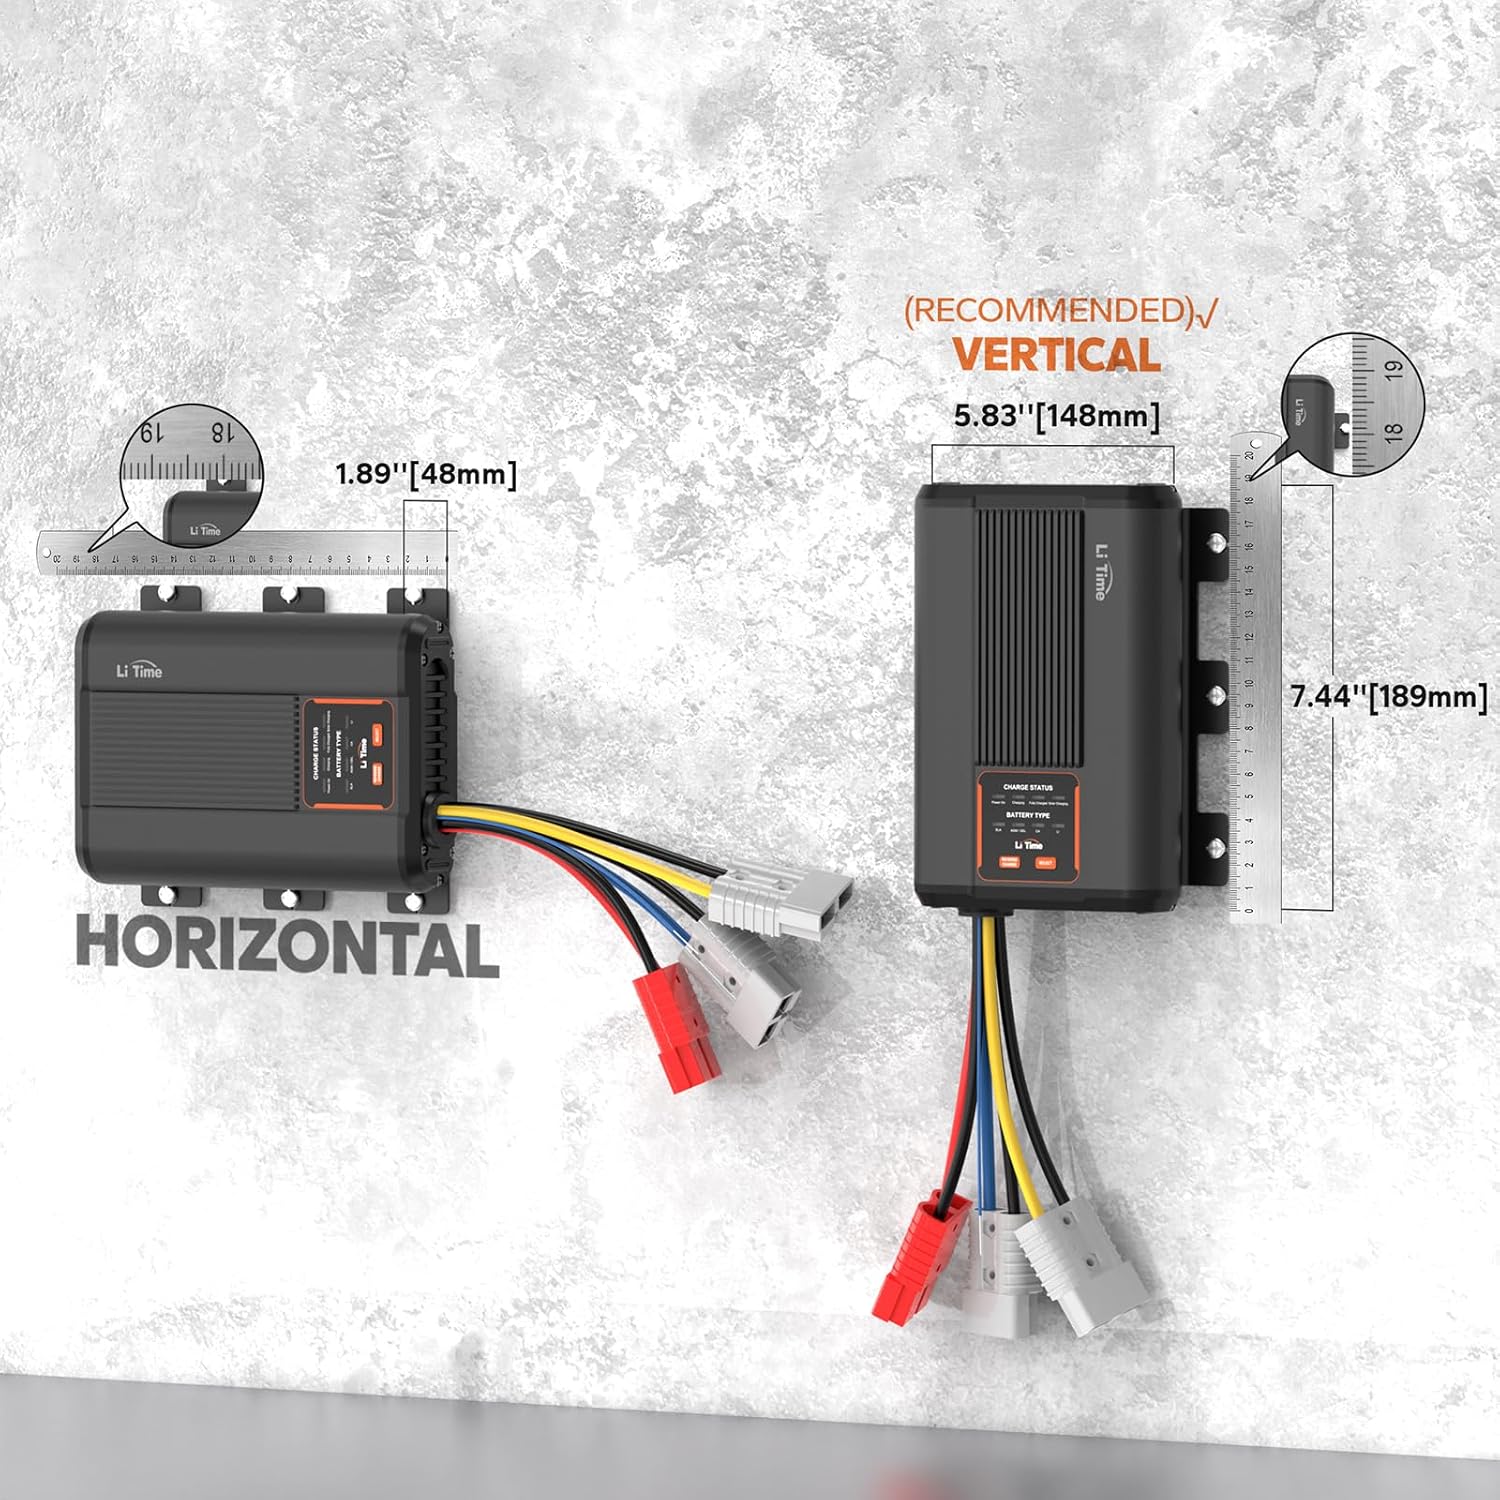
1.1 Mounting the Charger

The LiTime 12V 40A DC-DC Battery Charger can be mounted horizontally or vertically. Vertical mounting is recommended for optimal heat dissipation.

LiTime 12V 40A DC-DC Battery Charger dimensions for horizontal and vertical mounting
Figure 1: Recommended mounting orientations and dimensions. The charger measures 7.44"D x 5.83"W x 1.89"H. Vertical mounting is recommended.

1.2 Wiring Diagram and Connections

This charger supports dual input from both a DC source (starter battery/alternator) and solar panels. Ensure all connections are secure and follow polarity guidelines (Red = Positive, Black = Negative).

Wiring diagram for LiTime DC-DC Battery Charger in an RV setup
Figure 2: Typical wiring diagram showing connections for starter battery, service battery, and optional solar panel (Max 600W/26V) in an RV setup.
Detailed connection points for the LiTime DC-DC Battery Charger
Figure 3: Detailed view of the charger's connection terminals: ACC Wire, Output Terminal (to service battery), Solar Input Terminal (Max 600W/26V), and DC Input Terminal (from starter battery).

1.3 Cable Sizing and Fusing

Proper cable sizing and fusing are crucial for safe and efficient operation. Refer to the table below for recommended cable sizes and fuse ratings based on cable length and charging current.

Table showing recommended cable sizing and fusing for the 40A DC-DC charger
Figure 4: Recommended Cable Sizing and Fusing. For a rated charging current of 40A, use a 60A fuse for Input (Starter Battery/PV) and a 50A fuse for Output (Service Battery). Cable length 3-16 ft (1-5m) requires 8 AWG, while 16-30 ft (5-9m) requires 6 AWG.

1.4 Battery Compatibility

The charger is compatible with various 12V battery types. Select the correct battery type using the LED indicator operation button.

Image showing compatibility with LiFePO4, Lead-acid, GEL/AGM, and Calcium battery types
Figure 5: The 12V 40A DC-DC Charger is compatible with LiFePO4, Lead-acid, GEL/AGM, and Calcium battery types.

2. Operating Instructions

2.1 Charging Process Overview

The charger employs a smart 3-stage charging process to ensure efficient and safe battery charging:

  1. Stage 1: Pre-charge - For deeply discharged batteries, a gentle current is applied to safely raise the voltage, protecting both the charger and battery from sudden stress.
  2. Stage 2: Constant Current - Once the battery voltage is stable, the charger delivers full, steady, and efficient power. This is where the majority of the energy is transferred.
  3. Stage 3: Constant Voltage - As the battery approaches full capacity, the charger holds the voltage steady and slowly reduces the current, ensuring the battery cells are protected and fully absorbed.
Video 1: Explanation of the 3-stage charging process for LiFePO4 batteries, detailing pre-charge, constant current, and constant voltage stages.

2.2 LED Indicator and Battery Type Selection

The charger features an LED indicator and a 'SELECT' button to choose the appropriate battery type. This product has a memory function that retains settings even if power is disconnected, until the backup battery type is changed. Settings for the same type of backup battery will be preserved.

Close-up of the charger's LED indicator and operation button
Figure 6: The LED indicator displays charge status (Power On, Charging, Fully Charged, Solar Charging) and selected battery type (SLA, AGM/GEL, CA, LI). Use the 'SELECT' button to cycle through battery types.

Before using the DC-DC charger to recharge your batteries, please select the correct battery type. Also, confirm the charging requirements with the battery manufacturer.

Table of charging voltage limits for different 12V battery types
Figure 7: Charging Voltage Limits for 12V Batteries. Max. Voltage: LiFePO4 14.4V, Lead Acid 14.4V, GEL/AGM 14.7V, Calcium 15.4V. Float Charge: Lead Acid 13.8V, GEL/AGM 13.8V, Calcium 13.8V.

2.3 Emergency Reverse Charging

In situations where your starter battery is depleted, this 12V DC-DC charger can initiate reverse charging directly from the auxiliary (service) battery. This feature allows for quick recovery to get your vehicle operational without external assistance.

3. Maintenance

3.1 General Precautions

  • The charger voltage must match the battery voltage.
  • Ensure terminals are tight to prevent overheating or melting.
  • Check polarity: Red = Positive, Black = Negative.
  • For adjustable voltage chargers, ensure adjustable chargers match the battery voltage before connecting.
  • Place the charger in a stable, well-ventilated place when using it.
  • Do not disassemble the charger. Disassembly may cause malfunction and void the warranty.
Visual guide to precautions for LiTime battery chargers
Figure 8: Visual representation of general precautions for using LiTime battery chargers.

3.2 Environmental Considerations

Warning: This 12 volt 40 amp DC to DC battery charger is not waterproof. It is not suitable for marine environments such as boats, ships, yachts, or trolling motors.

Image describing waterproof function and warning against marine use
Figure 9: This charger is designed for standard environments like RVs, homes, and garages, not for waterproof applications.

4. Troubleshooting

4.1 Battery Not Working or Charging

If your 12V LiFePO4 battery is not working, won't charge, or shows a voltage less than 9V, it's likely that its Battery Management System (BMS) has shut it down for protection. Follow these steps to reactivate it:

  1. Disconnect Everything: Unplug the battery from all devices.
  2. Rest Period: Leave the battery alone for 30 minutes. It may automatically recover to greater than 10V (normal voltage).
  3. Full Charge: If recovered, fully charge it as usual.
  4. Activation Methods (if still not working):
    • Method 1: Use a charger with a lithium battery activation function to fully charge the battery.
    • Method 2: On a sunny day, connect a 12V LiFePO4 solar charge controller and charge for 3-10 seconds to wake it up.

For 24V batteries, double all voltage values (e.g., if it's < 18V, the protection mode kicks in). The same applies to 36V and 48V batteries.

Video 2: Guide on how to reactivate a LiFePO4 battery if it stops working or won't charge, including steps for disconnection, resting, and using specific activation methods.

4.2 Multi-Protection Features

This LiTime battery charger incorporates several protection features to ensure safe operation and extend battery lifespan:

  • Over-voltage input protection
  • Output reverse connection protection
  • Battery overvoltage protection
  • Over-temperature protection
  • Charging timeout protection
  • BMS protection (for LFP battery)

It can also reactivate lithium batteries after a BMS shutdown.

Diagram illustrating the safety measures for optimum protection in the charger
Figure 10: Safety measures include protection against overvoltage input, output reverse connection, battery overvoltage, over temperature, charging timeout, and BMS protection for LFP batteries.

5. Specifications

FeatureSpecification
BrandLitime
Model NumberL12V40A-DC-Z
Product Dimensions7.44"D x 5.83"W x 1.89"H
Item Weight2.43 Pounds
Output Voltage12 Volts
Input Voltage12 Volts (DC)
Battery Charge Time3 Hours (typical)
Current Rating40 Amps
Amperage40 Amps
Number of Ports2
MPPT Tracking Efficiency99%
Conversion EfficiencyUp to 93%
CertificationsFCC, CE, RoHS

6. Warranty & Support

6.1 Product Warranty

This LiTime product comes with a 2-Year Warranty. For detailed terms and conditions, please refer to the warranty documentation included with your purchase or contact customer support.

Icon indicating up to 5-year service
Figure 11: LiTime offers up to 5-Year Service on its products.

6.2 Customer Support

For any questions, technical assistance, or warranty claims, please contact LiTime customer support. We aim to provide prompt responses to all inquiries.

Icon indicating 24-hour prompt response for service
Figure 12: LiTime provides 24-hour prompt response for customer service.

© 2024 LiTime. All rights reserved.

Related Documents - L12V40A-DC-Z

Preview KickAss PowerBoss KAPB2K1280 Quick Start Guide
A comprehensive quick start guide for the KickAss PowerBoss KAPB2K1280 2000W All-in-One Power System, detailing electrical connections, wiring, and initial configuration via Bluetooth app or LCD display.
Preview KickAss PowerBoss KAPB2K1280 Owner's Manual
Comprehensive owner's manual for the KickAss PowerBoss KAPB2K1280, detailing safety, specifications, features, installation, configuration, and troubleshooting for this 2000W pure sine wave inverter charger.
Preview DC MONT MPPT Controller User Manual: DC-MPPT-MPK2 Series
Comprehensive user manual for DC MONT MPPT Solar Charge Controllers (DC-MPPT-MPK2-40A, -60A, -100A). Features include built-in Bluetooth, backlit LCD display, and compatibility with Flooded, AGM, Gel, and Lithium-ion batteries. Covers safe installation, operation, parameter settings, and troubleshooting for efficient solar energy management.
Preview Renogy Off-Grid Solutions for RVs, Caravans, and Campers | Product Catalog
Explore Renogy's comprehensive range of trusted off-grid power solutions, including solar panels, batteries, charge controllers, and inverters, designed for RVs, caravans, campers, and homes. Discover innovative technology for energy independence.
Preview DUNE 4WD DC-DC Charger Product Manual: Installation, Operation, and Specifications
Comprehensive product manual for the DUNE 4WD DC-DC Charger (20A and 40A models). Includes safety instructions, operating procedures, technical specifications, troubleshooting, and warranty information for charging 12V auxiliary batteries from alternators and solar panels.
Preview iTECHDCDC40 40A Intelligent DC-DC Battery Charger User Guide | iTECHWORLD
Comprehensive user guide for the iTECHDCDC40, a 40A intelligent DC-DC and MPPT solar battery charger. Learn about safety precautions, product function, installation, wiring, and specifications for charging lead-acid and LiFePO4 batteries in vehicles.

Ask a question about this manual

Ask about setup, troubleshooting, compatibility, parts, safety, or missing instructions. Manuals+ will review the question and use this page’s manual context to help answer it.