1. Introduction
Thank you for choosing the Alpina AL4 46SA Self-Propelled Thermal Lawnmower. This manual provides essential information for the safe assembly, operation, maintenance, and troubleshooting of your new lawnmower. Please read this manual thoroughly before using the machine and keep it for future reference. Proper use and maintenance will ensure optimal performance and extend the life of your equipment.
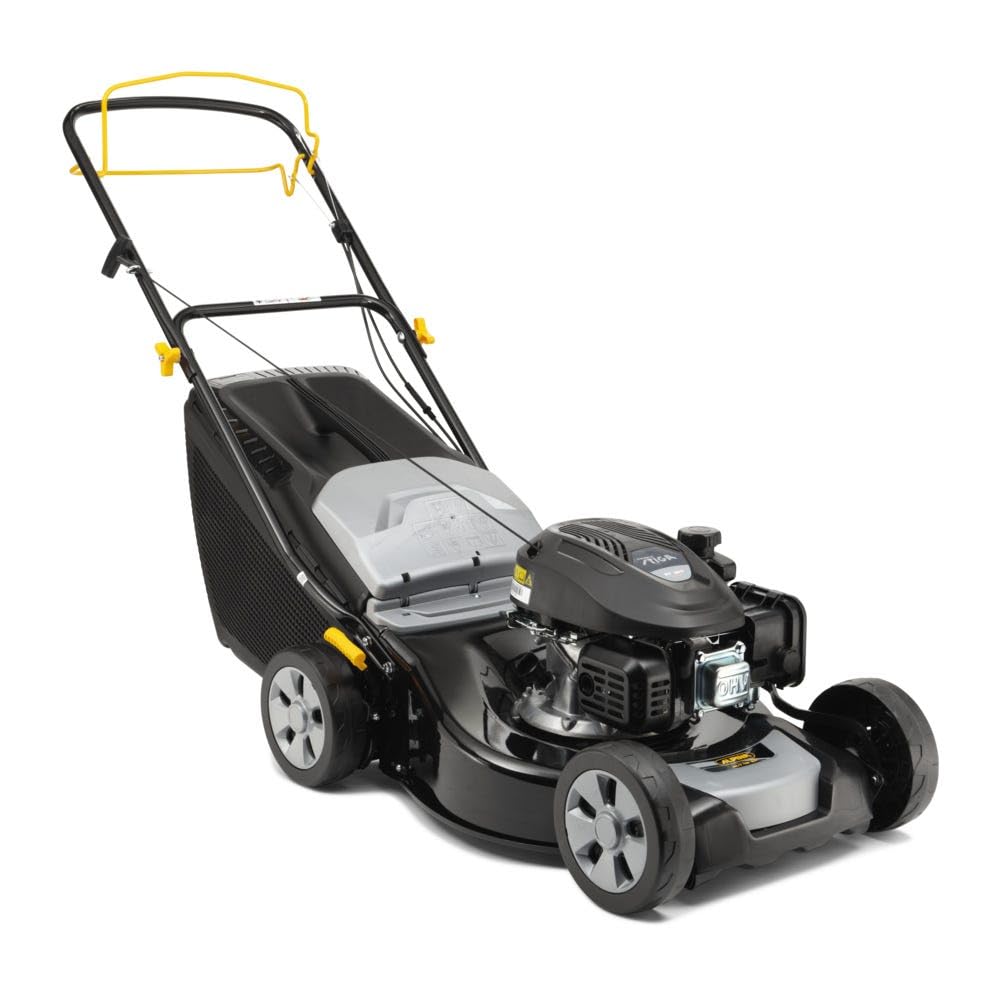
Figure 1.1: Overview of the Alpina AL4 46SA self-propelled thermal lawnmower. This image shows the complete lawnmower with its engine, cutting deck, grass collector, and handle assembly.
2. Safety Instructions
Always prioritize safety when operating the lawnmower. Failure to follow these instructions can result in serious injury or damage to the equipment.
2.1 General Safety
- Read and understand all instructions in this manual before operating the machine.
- Never allow children or people unfamiliar with these instructions to operate the lawnmower. Local regulations may restrict the age of the operator.
- Always wear appropriate personal protective equipment (PPE), including sturdy footwear, long trousers, and eye protection. Hearing protection is also recommended.
- Inspect the area where the lawnmower is to be used and remove all objects that can be thrown by the blade (e.g., stones, toys, wires).
- Do not operate the lawnmower when barefoot or wearing open sandals.
- Keep all spectators, especially children and pets, at a safe distance from the operating area.
2.2 Fuel Safety
- Handle fuel with extreme care; it is highly flammable.
- Store fuel in containers specifically designed for this purpose.
- Refuel outdoors only and do not smoke while refueling.
- Add fuel before starting the engine. Never remove the fuel cap or add fuel while the engine is running or hot.
- If fuel is spilled, do not attempt to start the engine. Move the machine away from the area of spillage and avoid creating any ignition source until fuel vapors have dissipated.
3. Assembly and Setup
Your lawnmower requires some assembly before its first use. Follow these steps carefully.
3.1 Handle Assembly
Attach the upper handle to the lower handle, and then secure the entire handle assembly to the main body of the lawnmower using the provided bolts and knobs. Ensure all connections are tight.

Figure 3.1: Detail of the handle and control levers. This image highlights the ergonomic handle design and the yellow bail bars for engine and drive engagement.
3.2 Grass Collector Assembly
Assemble the fabric grass collector bag onto its frame. Lift the rear discharge flap of the lawnmower and hook the grass collector onto the designated mounting points.

Figure 3.2: The 60-liter grass collector. This image shows the large capacity grass collection bag attached to the rear of the lawnmower.
3.3 Adding Fuel and Oil
Before starting, ensure the engine has the correct type and amount of oil and fresh unleaded gasoline. Refer to the engine manual for specific oil recommendations and capacities. Do not overfill.

Figure 3.3: The STIGA ST 120 engine. This image provides a detailed view of the engine, including the fuel cap and oil fill point.
3.4 Adjusting Cutting Height
The cutting height can be adjusted using a single lever. The Alpina AL4 46SA offers 6 cutting height positions, ranging from 20 mm to 110 mm. Select the desired height based on your lawn conditions.

Figure 3.4: Cutting height adjustment lever. This image shows the yellow lever used to easily adjust the cutting height of the lawnmower.
4. Operating Instructions
Follow these steps for safe and effective operation of your lawnmower.
4.1 Starting the Engine
- Ensure the spark plug wire is securely attached.
- Push the primer bulb (if equipped) 3-5 times until fuel is visible.
- Hold the engine brake lever (upper bail bar) against the handle.
- Pull the starter cord firmly until the engine starts.
4.2 Operating the Lawnmower
Once the engine is running, engage the drive lever (lower bail bar) to activate the self-propelled function. Guide the lawnmower in overlapping rows for an even cut. Avoid mowing wet grass, as it can clog the discharge chute and reduce cutting efficiency.

Figure 4.1: Side view of the lawnmower in operation. This image illustrates the self-propelled design and the position of the grass collector during use.
4.3 Emptying the Grass Collector
The 60-liter grass collector is equipped with a full indicator. When the indicator shows full, or when you notice a decrease in collection efficiency, stop the engine, release the engine brake lever, and allow the blade to stop completely before removing and emptying the collector.

Figure 4.2: Grass collector full indicator. This image shows the transparent window on the grass collector that indicates when it needs to be emptied.
4.4 Stopping the Engine
Release the engine brake lever to stop the engine. Always ensure the engine has completely stopped before leaving the lawnmower unattended.
5. Maintenance
Regular maintenance is crucial for the longevity and safe operation of your lawnmower. Always disconnect the spark plug wire before performing any maintenance.
5.1 Cleaning
- After each use, clean the cutting deck and grass collector to prevent grass buildup.
- Use a brush or cloth; avoid using high-pressure water directly on the engine or electrical components.
5.2 Blade Inspection and Sharpening
Regularly inspect the cutting blade for sharpness and damage. A dull blade can tear grass, leading to an unhealthy lawn. If the blade is damaged or excessively worn, replace it with an original Alpina spare part. Sharpening should be done by a qualified service technician to ensure proper balance.
5.3 Engine Maintenance
Refer to the separate STIGA engine manual for detailed maintenance schedules for the spark plug, air filter, and oil changes. Generally:
- Spark Plug: Inspect and clean annually, replace if necessary.
- Air Filter: Clean or replace regularly, especially in dusty conditions.
- Oil Change: Change engine oil after the first 5 hours of operation, then every 25-50 hours or annually.
6. Troubleshooting
This section addresses common issues you might encounter with your lawnmower.
| Problem | Possible Cause | Solution |
|---|---|---|
| Engine does not start | No fuel; Spark plug wire loose; Engine brake not engaged; Stale fuel; Clogged fuel filter; Faulty spark plug. | Add fresh fuel; Connect spark plug wire; Hold engine brake lever; Drain and refill with fresh fuel; Clean/replace fuel filter; Clean/replace spark plug. |
| Uneven cut | Dull or bent blade; Incorrect cutting height setting; Wheels not properly aligned. | Sharpen or replace blade; Adjust cutting height evenly; Check wheel alignment. |
| Excessive vibration | Bent or unbalanced blade; Loose engine mounting bolts; Debris caught in blade area. | Inspect and replace/balance blade; Tighten bolts; Clear debris (with engine off and spark plug disconnected). |
| Lawnmower not self-propelling | Drive belt loose or broken; Drive cable not engaged; Drive lever not held. | Inspect/replace drive belt; Check drive cable tension; Ensure drive lever is fully engaged. |
7. Specifications
Technical data for the Alpina AL4 46SA Lawnmower.
| Feature | Specification |
|---|---|
| Model Number | 2L0482044/A22 |
| Brand | Alpina |
| Engine | STIGA ST 120, 125 cc |
| Power Source | Gas-powered |
| Cutting Width | 46 cm |
| Cutting Height Positions | 6 positions |
| Cutting Height Range | 20 mm - 110 mm (2 cm - 11 cm) |
| Grass Collector Capacity | 60 Liters |
| Operating Mode | Self-propelled |
| Deck Material | Steel |
| Product Dimensions (L x W x H) | 157 cm x 54 cm x 110 cm |
| Weight | 25 kg |
8. Warranty and Support
Alpina products are manufactured to high-quality standards and are guaranteed against manufacturing defects. For specific warranty terms and conditions, please refer to the warranty card included with your product or visit the official Alpina website. For technical support, spare parts, or service, please contact your authorized Alpina dealer or customer service center.
Availability of spare parts in the EU is 5 years from the date of purchase.