1. Safety Information
Operating a laser welding machine requires strict adherence to safety protocols to prevent injury and equipment damage. Read and understand all safety warnings before operation.
1.1 Personal Protective Equipment (PPE)
- Always wear appropriate laser safety glasses with the correct optical density for 1080nm wavelength.
- Wear welding gloves, flame-retardant clothing, and protective footwear.
- Ensure adequate ventilation to remove welding fumes.
1.2 Laser Safety
- This is a Class 2 laser product. Avoid direct exposure to the laser beam.
- Never point the laser at people or animals.
- Ensure the work area is free of reflective materials.
- A red warning reminder on the welding head indicates potential issues like dirt on the inner lens or high temperature. Address these warnings immediately to prevent damage.
1.3 Electrical Safety
- The machine operates on AC380V±7% 3-phase power. Ensure proper electrical installation by a qualified electrician.
- Do not operate the machine with damaged cables or connections.
- Ensure the machine is properly grounded.
2. Introduction
The WTTTOOLS BLW-3000 is a 3000W 2-in-1 handheld fiber laser welding machine designed for efficient welding and weld seam cleaning. It features a high-quality MAX laser source and an upgraded welding gun for improved performance and reliability.
2.1 Key Features
- 2-in-1 Functionality: Seamlessly switch between welding and weld seam cleaning with a single click.
- High Power Output: 3000W laser power for fast and deep penetration welding.
- Upgraded Welding Gun: Lightweight (1.65 lbs) with integrated design to reduce failure rates and includes a red warning reminder for lens/temperature issues.
- Auto Wire Feeder: Included for enhanced welding strength and gap filling.
- Wide Material Compatibility: Suitable for stainless steel, carbon steel, galvanized sheet, aluminum alloy, and titanium alloy.
2.2 Package Contents
Verify that all components are present upon unpacking:
- Laser Welding Machine (1 unit)
- Wire Feeder (1 set)
- Protective Lens (5 Pcs)
- Welding Gun Nozzle (1 set)
- Protective Gloves (1 Pair)
- Wrench (1 set)
- Wire Guiding Tube (1 Pcs)
- Control Cable (1 Pcs)
- Serial Line (2 Pcs)

Image: Detailed packing list showing all included accessories for the laser welding machine.
3. Setup
3.1 Unpacking and Placement
- Carefully unpack the machine and inspect for any shipping damage. Report any damage to the carrier immediately.
- Place the machine on a stable, level surface in a well-ventilated area. Ensure sufficient space around the machine for air circulation and maintenance.
- The machine is equipped with universal casters for mobility.

Image: The WTTTOOLS BLW-3000 laser welding machine unit with the handheld welding gun and wire feeder.
3.2 Electrical Connection
- Connect the machine to a stable AC380V±7% 3-phase power supply. A transformer is provided if needed.
- Ensure the power source meets the machine's requirements (3000W, 380V).
- Use the provided control cable and serial line for connections.
3.3 Water Cooling System
- Fill the water tank with 14-15 liters of distilled water, deionized water, or pure water. Do not use tap water.
- Regularly check the water level and quality.
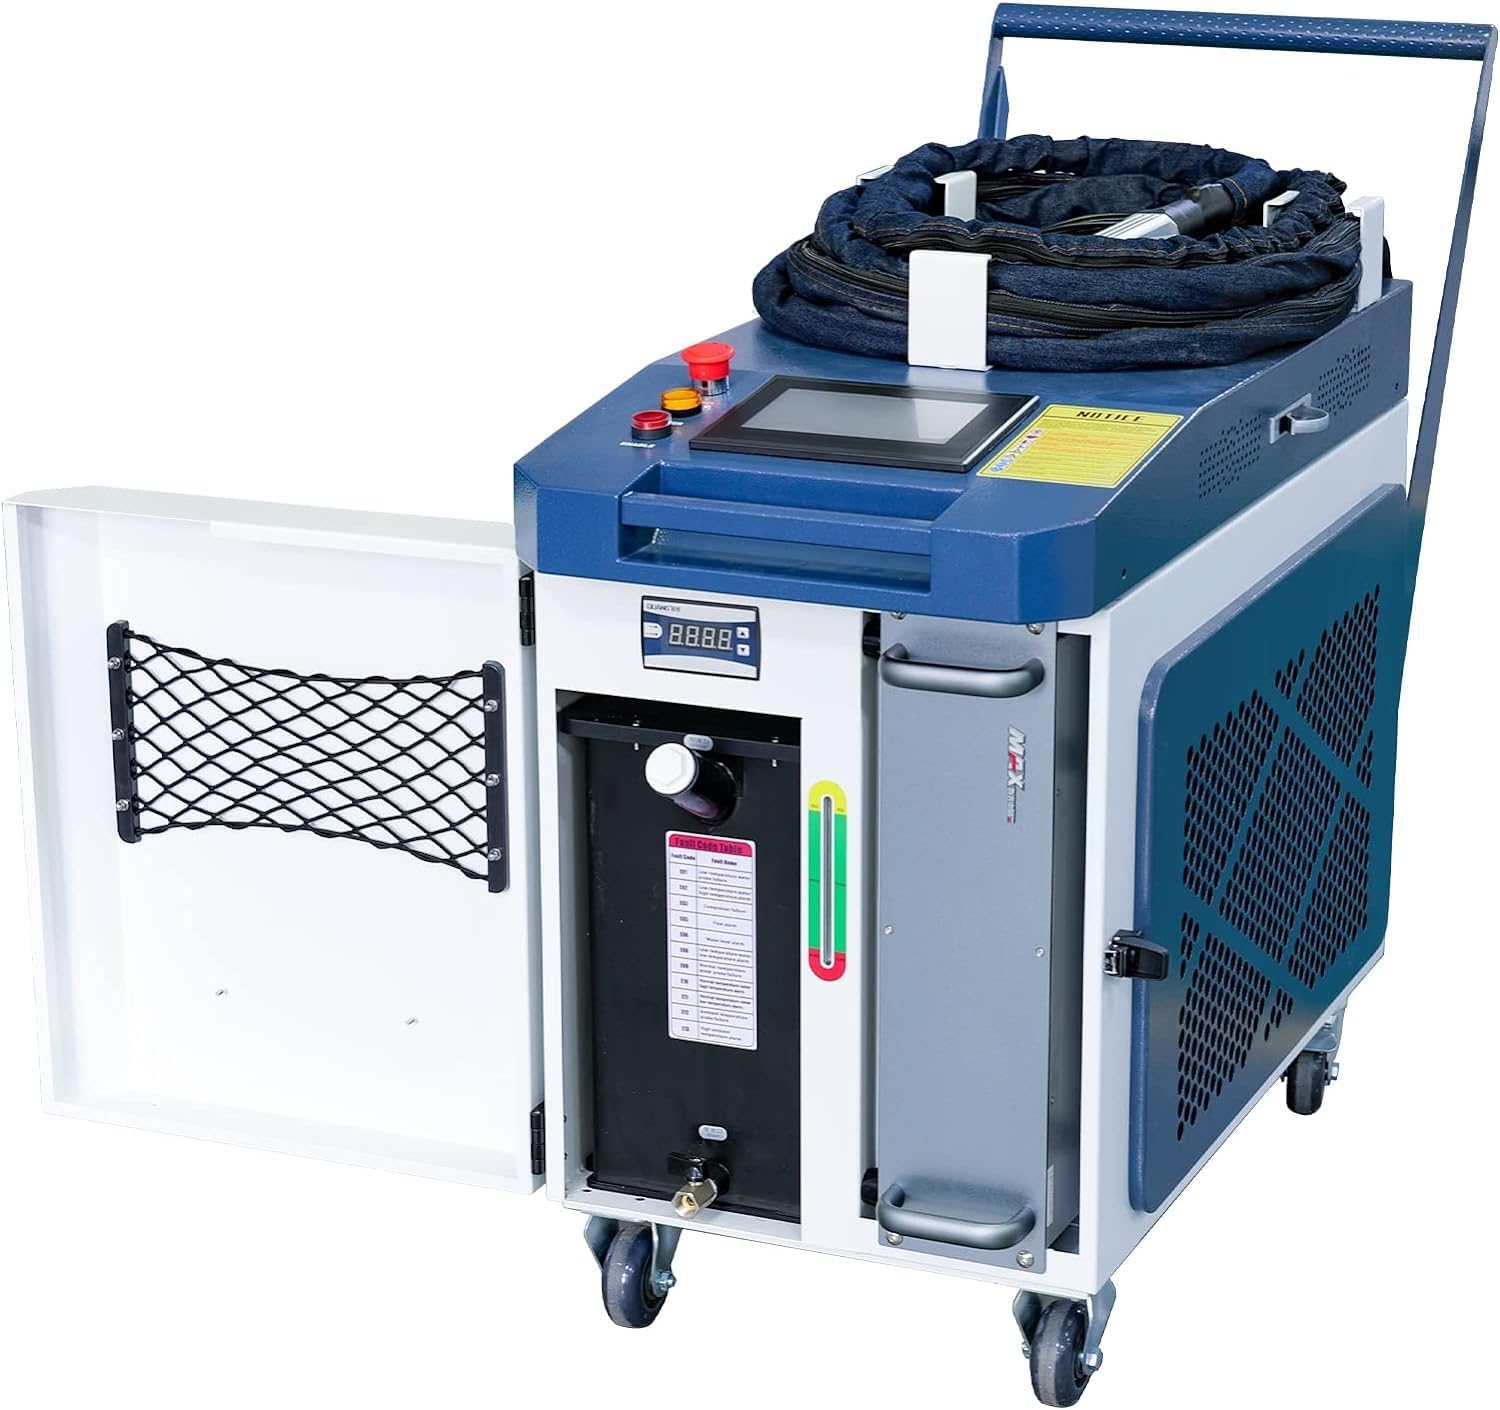
Image: The laser welding machine with its side panel open, revealing the internal water tank and cooling system components.
3.4 Wire Feeder and Welding Gun Connection
- Connect the auto wire feeder to the main unit as per the diagram.
- Attach the handheld welding gun securely to the machine. Ensure all connections are tight to prevent air leakage.
- Install a welding gun nozzle and protective lens.

Image: A close-up view of the auto wire feeder unit, a key component for continuous welding.
4. Operating Instructions
4.1 Control Panel Overview
The machine features a full touch screen control panel with a multilingual interface. The process library design allows for easy setup and recall of welding parameters.

Image: A detailed view of the smart control panel, highlighting the touch screen interface and control buttons.
4.2 Switching Between Welding and Cleaning
The 2-in-1 function allows for quick switching between welding and weld seam cleaning modes. Use the control panel to select the desired mode with a single click. This eliminates the need to shut down and replace system components, saving time and improving efficiency.

Image: Visual comparison demonstrating the welding process and the weld seam cleaning process using the same 2-in-1 handheld head.
4.3 Welding Process
- Select the appropriate welding parameters (power, scan width, wire feed speed) based on the material and thickness.
- The welding gun is designed for 360° welding and can be used at various angles.
- For materials like stainless steel, carbon steel, and galvanized sheet, the single-side melting depth can reach ≥5mm. For aluminum alloy, it is ≥4mm, and for titanium alloy, it is ≥5mm.
- The auto wire feeder can be engaged for stronger welds or when filling larger gaps. The feeder function can be turned off if not needed.

Image: Illustrations showing different welding angles and types, including butt welding, lap welding, overlap welding, and more.
4.4 Weld Seam Cleaning
After welding, switch to the cleaning mode to prepare the surface for painting or to improve the aesthetic finish. This process enhances adhesion during subsequent treatments.
5. Maintenance
Regular maintenance ensures the longevity and optimal performance of your laser welding machine.
5.1 Cleaning the Welding Gun and Lenses
- Periodically inspect the welding gun nozzle and protective lenses for dirt or damage.
- Clean lenses with appropriate optical cleaning solutions and lint-free wipes. Replace damaged lenses immediately.
- The red warning reminder on the welding head indicates when the inner lens may be dirty or the temperature is high, prompting necessary cleaning or cooling.
5.2 Water Cooling System Maintenance
- Check the water level in the tank regularly and refill with distilled, deionized, or pure water as needed.
- Replace the cooling water periodically (e.g., every 3-6 months, depending on usage) to prevent algae growth and maintain cooling efficiency.
- Clean the cooling system filters if present.
5.3 General Machine Care
- Keep the machine exterior clean and free of dust and debris.
- Inspect all cables and connections for wear or damage. The outside cloth of the cable is designed with flame-retardant fabric for added safety.
- Ensure proper air circulation around the machine by keeping vents clear.
6. Troubleshooting
This section addresses common issues you might encounter during operation.
6.1 Common Issues and Solutions
- No Laser Output: Check power connection, emergency stop button, and ensure the machine is in operating mode. Verify laser source status on the control panel.
- Red Warning on Welding Head: This indicates dirt on the inner lens or high temperature. Power off the machine, allow it to cool, and clean the inner lens according to maintenance instructions.
- Poor Weld Quality: Adjust welding parameters (power, speed, scan width). Ensure the workpiece is clean and properly prepared. Check wire feeder settings if using filler wire.
- Wire Feeder Malfunction: Check wire spool installation, ensure wire is not tangled, and verify feeder motor connection.
- Overheating: Check water cooling system. Ensure water level is adequate and water quality is good. Clean any blocked air vents on the machine.
If you encounter issues not listed here or require further assistance, please contact customer support.
7. Specifications
Detailed technical specifications for the WTTTOOLS BLW-3000 laser welding machine.

Image: Table detailing technical parameters for various BLW models, including the BLW-3000.
| Parameter | Value |
|---|---|
| Model | BLW-3000 |
| Laser Power | 3000 W |
| Laser Source | High quality MAX laser source |
| Laser Wavelength | 1080±10nm |
| Operating Mode | Continuous |
| Maximum Modulation Frequency | 20KHz |
| Scan Width | 0-6mm |
| Input Voltage | AC380V±7% 3-phase (transformer provided) |
| Cooling Method | Water cooling (distilled water, deionized water or pure water) |
| Machine Dimensions | 1260 x 590 x 1190 mm (approx. 50 x 23 x 47 inches) |
| Item Weight | 611 pounds (approx. 277 kg) |
| Laser Level | Class 2 |
| Output Power | 0.874mW |
| Reach Distance of the Laser | 0.83ft |
7.1 Welding Capacity (Single-Side Melting Depth)
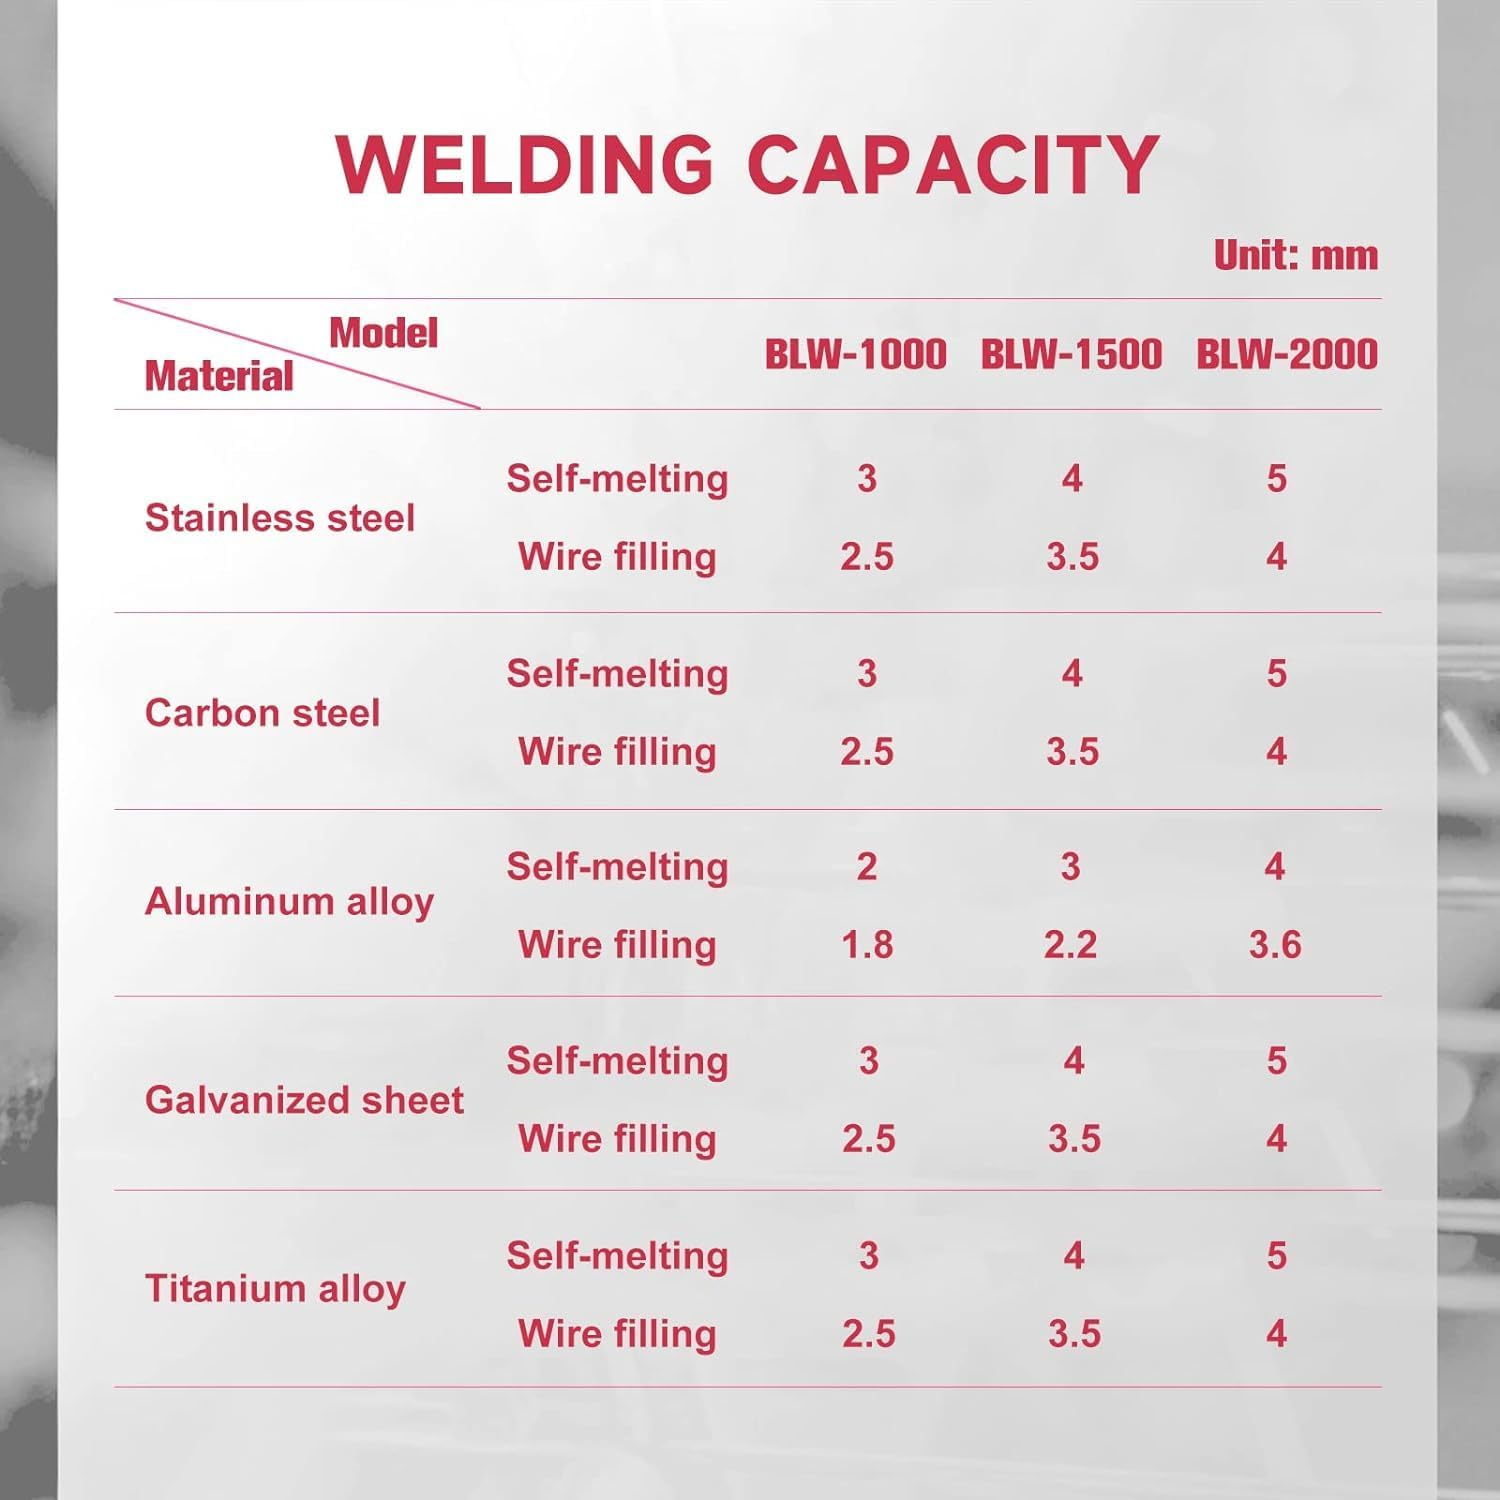
Image: Table showing welding capacity (melting depth) for different materials with and without wire filling.
| Material | Method | Melting Depth (mm) |
|---|---|---|
| Stainless Steel | Self-melting | ≥5 |
| Wire filling | 4 | |
| Carbon Steel | Self-melting | ≥5 |
| Wire filling | 4 | |
| Aluminum Alloy | Self-melting | ≥4 |
| Wire filling | 3.6 | |
| Galvanized Sheet | Self-melting | ≥5 |
| Wire filling | 4 | |
| Titanium Alloy | Self-melting | ≥5 |
| Wire filling | 4 |
8. Warranty and Support
8.1 Product Warranty
- The laser source is covered by a 2-year warranty.
- The WTTTOOLS BLW-3000 laser welding machine is covered by a 1-year warranty.
- Warranty terms and conditions apply. Please refer to your purchase documentation for full details.
8.2 Customer Support
WTTTOOLS is a subsidiary company of SFX Laser, a manufacturer of laser products since 2004. We are committed to providing quality products and customer satisfaction.
- For any questions or problems, please contact us via Amazon Email.
- Various offices are available across the United States for support.