1. Introduction
Thank you for choosing the superallure K6 Pro Max Solar Power Bank. This device is designed to provide reliable and versatile power on the go, featuring a high-capacity battery, multiple charging options including solar and wireless, and a powerful integrated flashlight. This manual provides essential information for safe and efficient operation of your power bank.
2. Product Features
- Ultra-High Capacity: 43800mAh battery for extended power supply.
- Efficient Solar Charging: Four high-conversion solar panels (16W, 1.68A input) for continuous charging under sunlight.
- Versatile Output Options: Built-in USB-A input cable, Type-C output cable, and iOS output cable. Additional USB output port and Type-C output/input port.
- Wireless Charging: 15W Qi wireless fast charging compatible with various devices.
- Fast Charging Technology: Supports QC3.0 and 2.0 protocols for both input and output.
- Powerful Flashlight: Integrated 680 Lumen flashlight with SOS distress signal and strobe modes.
- Rugged Design: IP67 waterproof, dust-resistant, and drop-resistant for outdoor use.
- Advanced Safety: Upgraded smart chip with multi-protection features including overcharge, overcurrent, over-discharge, overvoltage, overpower, short circuit, recovery, electromagnetic field, and temperature protection.
3. Package Contents
Please check the package for the following items:
- superallure K6 Pro Max Solar Power Bank
- USB Charging Cable (for wall charging the power bank)
- Lanyard
- User Manual

Image: The superallure K6 Pro Max Solar Power Bank, showcasing its foldable solar panels, built-in cables, and powerful flashlight.
4. Getting Started (Setup)
4.1 Initial Charge
Before first use, it is recommended to fully charge the power bank using a wall adapter. This ensures the internal battery is properly calibrated and ready for optimal performance.
- Connect the provided USB charging cable to the power bank's USB-C input port or use the built-in USB-A input cable.
- Plug the other end into a compatible USB wall adapter (not included).
- The power indicator lights will illuminate, indicating charging status. Allow the device to charge until all indicator lights are solid, signifying a full charge.
4.2 Understanding Indicator Lights

Image: Close-up of the power bank's indicator lights, showing red for fast charging, blue for power level, and green for solar charging.
- Red Indicator: Indicates fast charging is active.
- Blue Indicators: Represent the current power level of the internal battery. Typically, multiple lights indicate a higher charge.
- Green Indicator: Illuminates when solar charging is active and sufficient sunlight is detected.
5. Operating Instructions
5.1 Charging the Power Bank
Your power bank can be charged via wall adapter or solar panels.

Image: Visual representation of the various ways to charge the power bank, including USB-C, solar panels, and USB-A.
5.1.1 Wall Charging (Recommended for fastest charge)
- Use the built-in USB-A input cable or a USB-C cable (not included) to connect the power bank to a wall adapter.
- Ensure the wall adapter provides sufficient power for fast charging (e.g., QC3.0 compatible).
- The power bank will automatically begin charging.

Image: A close-up showing the power bank's USB-C port labeled 'PD15W Input', indicating its fast charging capability.
5.1.2 Solar Charging
The integrated solar panels provide a convenient way to recharge the power bank using sunlight, especially useful in outdoor environments. Solar charging is slower than wall charging and is primarily intended for emergency power or maintaining charge, not as a primary charging method.
- Unfold the solar panels and place them in direct sunlight.
- Ensure the panels are facing the sun directly for maximum efficiency.
- The green solar charging indicator light will illuminate when sufficient sunlight is detected and charging is active.

Image: The power bank with its solar panels unfolded and attached to a backpack, demonstrating solar charging in an outdoor setting.
5.2 Charging External Devices
The power bank offers multiple ways to charge your devices simultaneously.

Image: The power bank charging a smartphone and a tablet simultaneously using its built-in Type-C and iOS cables, highlighting its convenience for travel.
5.2.1 Wired Charging (Built-in Cables & USB Ports)
- Identify the appropriate built-in cable (Type-C or iOS) for your device, or use your own USB cable with the available USB-A or Type-C output ports.
- Connect the cable to your device.
- The power bank will automatically detect the device and begin charging.

Image: A top-down view of the power bank on a table, simultaneously charging a smartphone and a smartwatch, demonstrating its multi-device charging capability.
5.2.2 Wireless Charging
The power bank supports 15W Qi wireless charging for compatible devices.
- Place your Qi-compatible device (e.g., smartphone) on the designated wireless charging pad area of the power bank.
- Ensure the device is centered on the charging pad for optimal connection.
- The device's screen should indicate that wireless charging has begun.

Image: A smartphone wirelessly charging on the power bank's solar panel, illustrating the fast wireless charging feature with power output modes (5W, 7.5W, 10W).
5.3 Flashlight Operation
The power bank features a powerful 680 Lumen flashlight with multiple modes.
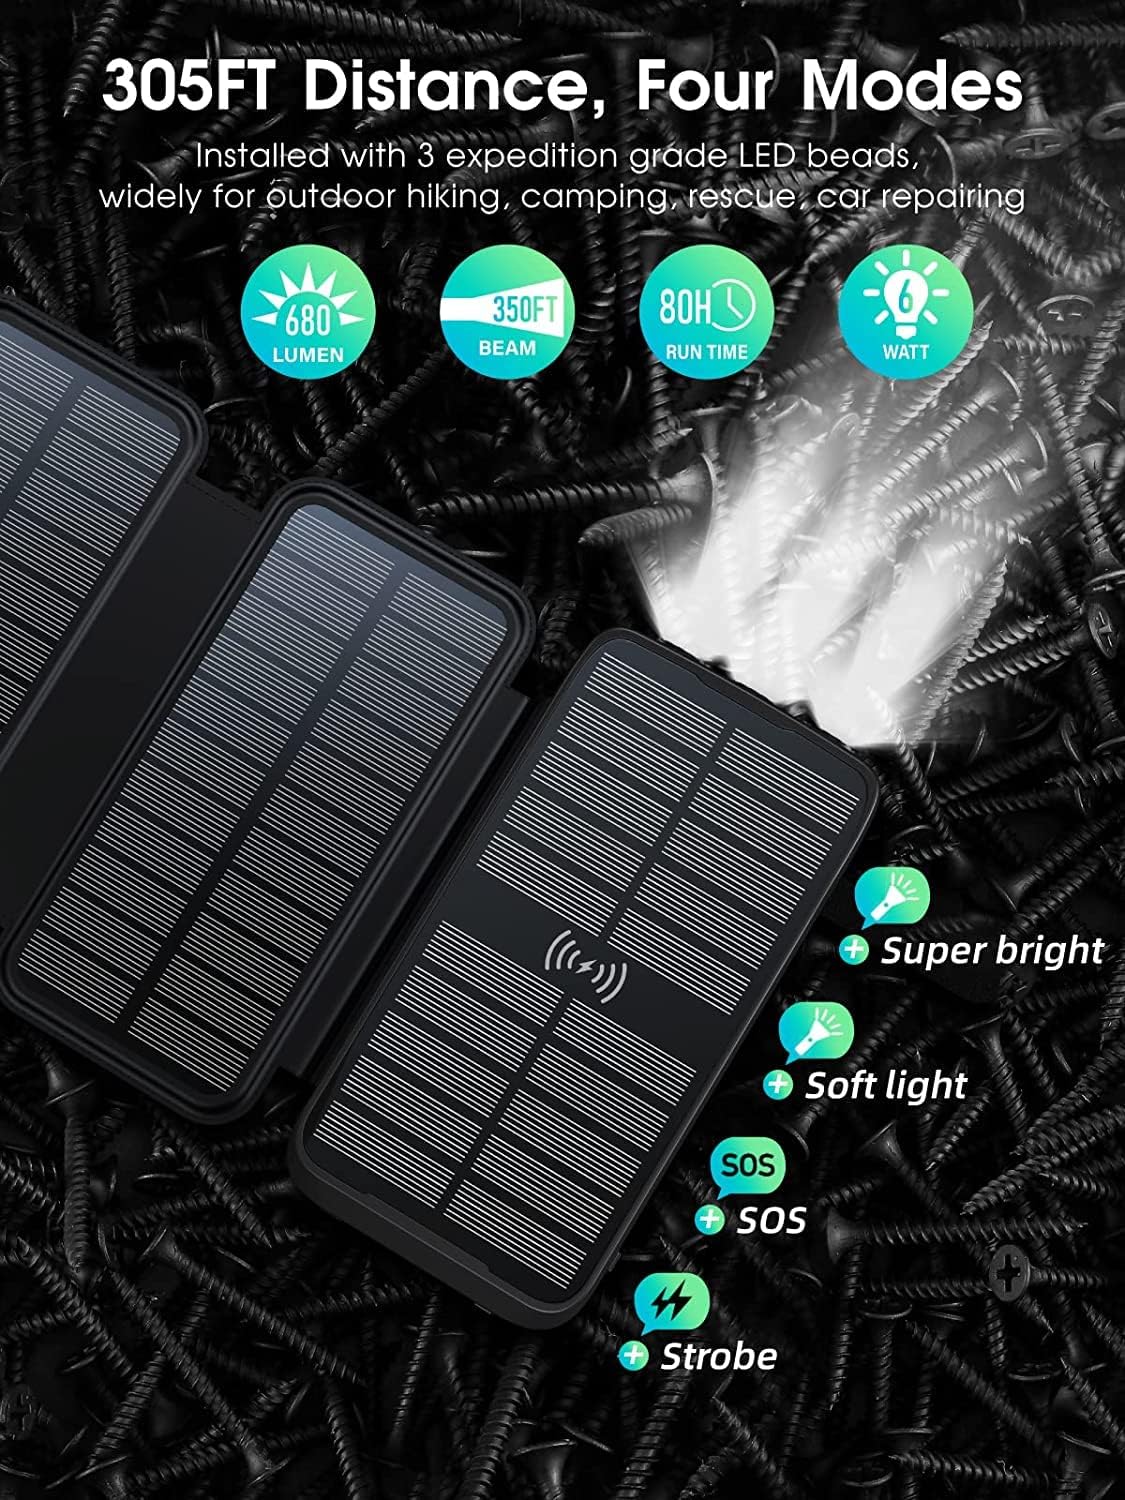
Image: The power bank's flashlight illuminating an area, with icons indicating its four modes: Super bright, Soft light, SOS, and Strobe.
- To Turn On/Off: Press and hold the power button for approximately 3 seconds.
- To Cycle Modes: Once the flashlight is on, short press the power button to switch between modes: Super Bright > Soft Light > SOS > Strobe.
- To Turn Off: Press and hold the power button again for 3 seconds, or cycle through all modes until it turns off.

Image: The power bank's flashlight beam extending into a dark outdoor environment, demonstrating its powerful illumination for camping or hiking.
6. Maintenance and Care
- Cleaning: Wipe the power bank with a soft, dry cloth. Avoid using harsh chemicals or abrasive materials.
- Storage: Store the power bank in a cool, dry place away from direct sunlight and extreme temperatures. For long-term storage, ensure the battery is charged to about 50-70% and recharge every 3-6 months to prevent deep discharge.
- Water Resistance: While the device is IP67 waterproof, avoid prolonged submersion in water. Ensure all ports are dry before charging.
- Drop Resistance: The rugged design offers protection against drops, but avoid intentional impacts or dropping from excessive heights.

Image: A hand holding the power bank under running water, illustrating its waterproof feature.

Image: A visual depicting the power bank in mid-air above a set of stairs, symbolizing its drop-resistant construction.

Image: The power bank partially covered in sand, demonstrating its dust-resistant properties suitable for outdoor use.
7. Troubleshooting
| Problem | Possible Cause | Solution |
|---|---|---|
| Power bank not charging | Cable not connected properly; Wall adapter faulty; Power bank fully charged; Insufficient sunlight for solar charging. | Ensure cables are securely connected; Try a different wall adapter/cable; Check power indicators; Move to direct sunlight for solar charging. |
| Device not charging from power bank | Power bank battery depleted; Cable not connected properly; Device not compatible with wireless charging; Device requires more power than available. | Recharge the power bank; Ensure cables are securely connected; Verify device supports Qi wireless charging and is placed correctly; Check device power requirements. |
| Slow charging | Using a non-fast charging adapter/cable; Solar charging in low light; Multiple devices charging simultaneously. | Use a QC3.0 compatible adapter/cable; Ensure direct, strong sunlight for solar charging; Charge fewer devices at once. |
| Flashlight not working | Power bank battery depleted; Button not pressed correctly. | Recharge the power bank; Press and hold the power button for 3 seconds to activate. |
8. Specifications
| Feature | Detail |
|---|---|
| Model Number | K6 Pro Max |
| Battery Capacity | 43800mAh |
| Solar Panel Power | 16W (4 panels) |
| Solar Input Current | 1.68A |
| Wired Input | USB-A (built-in), USB Type-C (PD15W) |
| Wired Output | USB Type-C (built-in), iOS (built-in), USB Type-A, USB Type-C |
| Wireless Charging Output | 15W Qi compatible |
| Fast Charging Protocols | QC3.0, QC2.0 |
| Flashlight Brightness | 680 Lumens |
| Waterproof Rating | IP67 |
| Dimensions | 7.48 x 4.96 x 1.73 inches |
| Weight | 1.46 pounds |
| Color | Black |
9. Safety Information
Please read and follow these safety guidelines to prevent damage to the device or injury:
- Do not disassemble, modify, or repair the device yourself.
- Keep the power bank away from fire, high temperatures, and direct heat sources.
- Avoid exposing the device to extreme cold.
- Do not use the power bank in wet environments or submerge it in water beyond its IP67 rating. Ensure ports are dry before use.
- Keep out of reach of children.
- Do not drop, hit, or shake the device violently.
- Use only approved charging cables and adapters.
- If the power bank swells, overheats, or emits an unusual odor, discontinue use immediately and contact support.

Image: A grid of icons illustrating the power bank's multi-protection features, including overcharge, overcurrent, over-discharge, overvoltage, overpower, short circuit, recovery, electromagnetic field, and temperature protection.
10. Warranty and Support
The superallure K6 Pro Max Solar Power Bank comes with a standard manufacturer's warranty. For specific warranty details, duration, and terms, please refer to the warranty card included in your product packaging or contact superallure customer support directly.
For technical support, troubleshooting assistance, or any product-related inquiries, please visit the official superallure brand store or contact their customer service department. Contact information can typically be found on the product packaging or the brand's official website.
No official product videos were provided for embedding in this manual.


