1. Product Overview
The NDNCZDHC MD917 Digital Concrete Moisture Meter is designed for non-invasive moisture measurement in various building materials, primarily concrete. Utilizing high-frequency electromagnetic wave technology, it provides accurate readings without damaging the surface. Its wide LCD screen and alarm function make it a practical tool for detecting moisture content.

Image 1.1: The MD917 Digital Concrete Moisture Meter with its protective carrying case.
2. Safety Information
Please read and understand all safety instructions before operating the device. Failure to do so may result in inaccurate readings or damage to the unit.
- Do not expose the meter to extreme temperatures or high humidity.
- Avoid dropping the device or subjecting it to strong impacts.
- Keep the device away from strong electromagnetic fields, which may interfere with readings.
- Do not attempt to open or repair the device yourself. Refer all servicing to qualified personnel.
- Dispose of batteries according to local regulations.
3. Package Contents
Verify that all items are present and in good condition upon opening the package.
- 1 x NDNCZDHC MD917 Digital Concrete Moisture Meter
- 1 x User Manual (this document)
- 1 x Carrying Bag

Image 3.1: The MD917 meter and its included blue carrying bag.
4. Product Components
Familiarize yourself with the different parts of your MD917 moisture meter.

Image 4.1: Front view of the MD917 meter.
- LCD Display: Shows moisture readings, density settings, and other indicators.
- MODE Button: Used to select different measurement modes or settings.
- Power Button (⏻): Turns the device ON or OFF.
- DENSITY Button: Adjusts the material density setting for more accurate measurements.
- SWITCH Button: Likely used to toggle between different display units or functions.
- Measurement Sensor: Located on the back of the device (not visible in front view), this is the area that makes contact with the material for measurement.
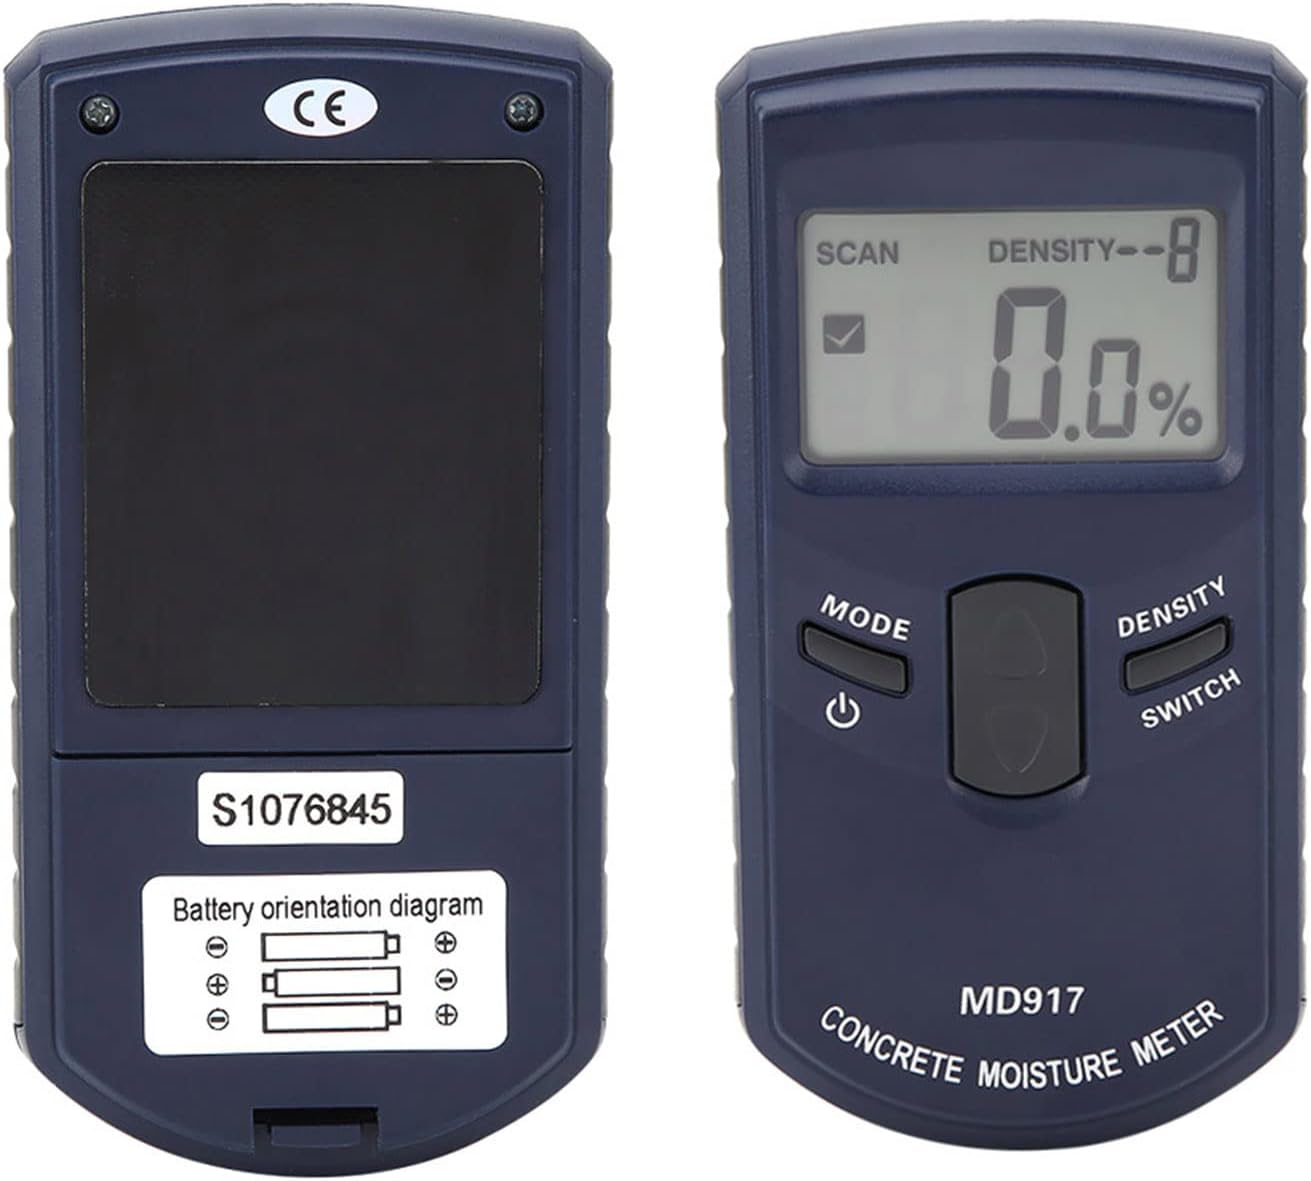
Image 4.2: Front and back view of the MD917 meter, highlighting the battery compartment.
5. Setup
5.1 Battery Installation
The MD917 requires three (3) 1.5V AAA batteries (not included).
- Locate the battery compartment cover on the back of the device.
- Slide or unclip the cover to open the compartment.
- Insert three 1.5V AAA batteries, ensuring correct polarity (+/-) as indicated inside the compartment.
- Replace the battery compartment cover securely.
Image 5.1: The back of the MD917 meter with battery orientation diagram.
6. Operating Instructions
6.1 Powering On/Off
- To turn ON: Press the Power button (⏻). The LCD display will illuminate.
- To turn OFF: Press and hold the Power button (⏻) for a few seconds until the display turns off. The device may also have an auto-off feature to conserve battery.
6.2 Selecting Material Density
The MD917 offers 10 options for material density, allowing for more accurate measurements across different materials. Concrete, drywall, and other building materials have varying densities that affect moisture readings.
- Turn on the device.
- Press the DENSITY button to cycle through the available density settings (e.g., Density-1, Density-2, ..., Density-10).
- Select the setting that best matches the material you are testing. Refer to the device's internal guide or external resources for appropriate density settings for specific materials.
6.3 Taking a Measurement
The MD917 uses non-invasive high-frequency electromagnetic wave technology.
- Ensure the correct material density setting is selected (refer to Section 6.2).
- Place the back of the meter (where the sensor is located) flat against the surface of the material you wish to measure.
- Hold the meter steady. The moisture reading will appear on the LCD display.
- Move the meter across the surface to scan for variations in moisture content.

Image 6.1: Demonstrating the MD917 in use, held against a wall surface.
6.4 Setting Moisture Content Alarm
The device can alert you if the measured moisture content exceeds a preset upper limit.
- While the device is on, press the MODE button to enter the alarm setting mode (if available, consult the device's specific interface for exact steps).
- Use the DENSITY or SWITCH buttons (or other indicated buttons) to adjust the upper limit percentage for the moisture content.
- Confirm the setting. If a measurement exceeds this limit, the device will emit an audible or visual alarm.
7. Specifications
| Feature | Specification |
|---|---|
| Measuring Range | 0 to 40% |
| Accuracy | ±(1% + 1 digit) |
| Resolution | 0.5% |
| Operating Temperature | 0°C to 40°C (32°F to 104°F) |
| Operating Humidity | 10% to 80% RH |
| Power Supply | 3 x 1.5V AAA battery |
| Dimensions | 132 x 67 x 26 mm (5.2 x 2.6 x 1.0 in) |
| Weight | 173 g (6.1 oz) (without batteries) |
| Measurement Technology | High-frequency electromagnetic wave |
8. Maintenance
- Cleaning: Wipe the device with a soft, dry cloth. Do not use abrasive cleaners or solvents.
- Storage: When not in use for extended periods, remove the batteries to prevent leakage. Store the meter in its carrying bag in a cool, dry place, away from direct sunlight and extreme temperatures.
- Battery Replacement: Replace batteries when the low battery indicator appears on the display.
9. Troubleshooting
| Problem | Possible Cause | Solution |
|---|---|---|
| Device does not power on. | Batteries are dead or incorrectly installed. | Check battery polarity. Replace with new AAA batteries. |
| Inaccurate readings. | Incorrect density setting; sensor not flush with surface; strong electromagnetic interference. | Verify density setting. Ensure full contact with surface. Move away from potential interference sources. |
| Display is blank or flickering. | Low battery power. | Replace batteries. |
| Alarm sounds frequently. | Moisture content exceeds set limit; alarm limit set too low. | Check the material for actual moisture. Adjust the alarm threshold if necessary (refer to Section 6.4). |
10. Warranty and Support
For warranty information, technical support, or service inquiries, please contact NDNCZDHC customer service. Refer to the product packaging or the official NDNCZDHC website for contact details.
Note: Keep your purchase receipt as proof of purchase for warranty claims.