1. Introduction and Overview
The Beelink SER3 3200U Mini PC is a compact and versatile computing device designed for a wide range of applications, from office productivity to 4K media playback. This manual provides essential information for the proper setup, operation, maintenance, and troubleshooting of your device. Please read this manual thoroughly before using your Mini PC.
2. Package Contents
Upon unboxing your Beelink SER3 3200U Mini PC, please verify that all the following items are included:
- Beelink SER3 3200U Mini PC
- Power Adapter (19V/3.42A)
- HDMI Cables (100cm)
- Wall-Mounted Bracket with screws
- User Manual

Description: This image shows the standard accessories provided with the Beelink SER3 Mini PC, including the user manual, wall-mounted bracket, HDMI cables, and the power adapter.
3. Product Features
The Beelink SER3 3200U Mini PC offers a robust set of features for efficient performance:
- Processor: AMD Ryzen 3 3200U (2C/4T, 2.6GHz up to 3.5GHz)
- Graphics: 3-core AMD Radeon Vega 3 Graphics (1200MHz)
- Memory: Dual-channel DDR4 16GB RAM (expandable up to 32GB)
- Storage: 500GB M.2 PCIe 3.0 X4 SSD (supports up to 2TB M.2 NVMe SSD and 2.5-inch SATA HDD/SSD)
- Operating System: Pre-installed Windows 11 Pro
- Display Output: Dual HDMI outputs supporting up to 4K 60Hz
- Connectivity: WiFi 5 (2.4G+5GHz), Bluetooth 5.0, Gigabit Ethernet (1000M LAN)
- Ports: 1x DC Jack, 2x HDMI, 4x USB 3.2 10Gbps, 1x RJ45 1000M LAN, 1x Audio Jack (HP&MIC)
- Cooling: Efficient cooling system with a quiet large fan and dual heat pipes
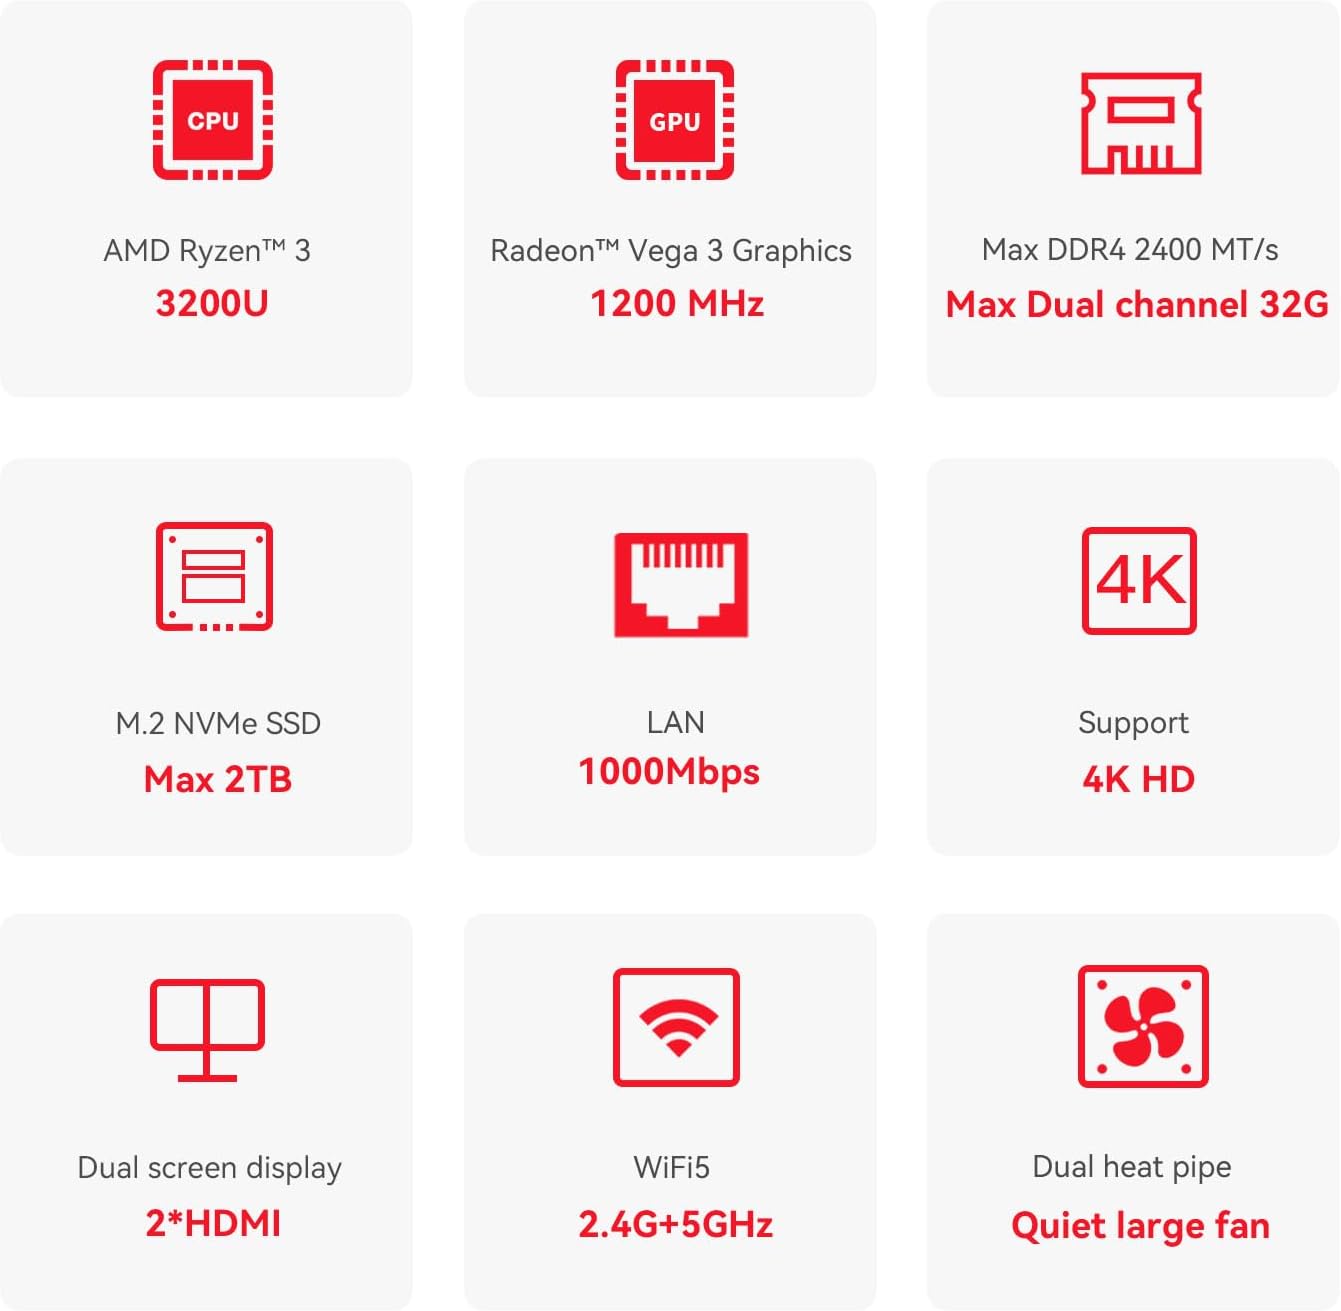
Description: This diagram highlights the core specifications and features of the Beelink SER3 Mini PC, such as its AMD Ryzen 3 3200U CPU, Radeon Vega 3 Graphics, expandable DDR4 RAM, M.2 NVMe SSD support, 4K display capability, dual HDMI outputs, WiFi 5, 1000Mbps LAN, and efficient cooling system.
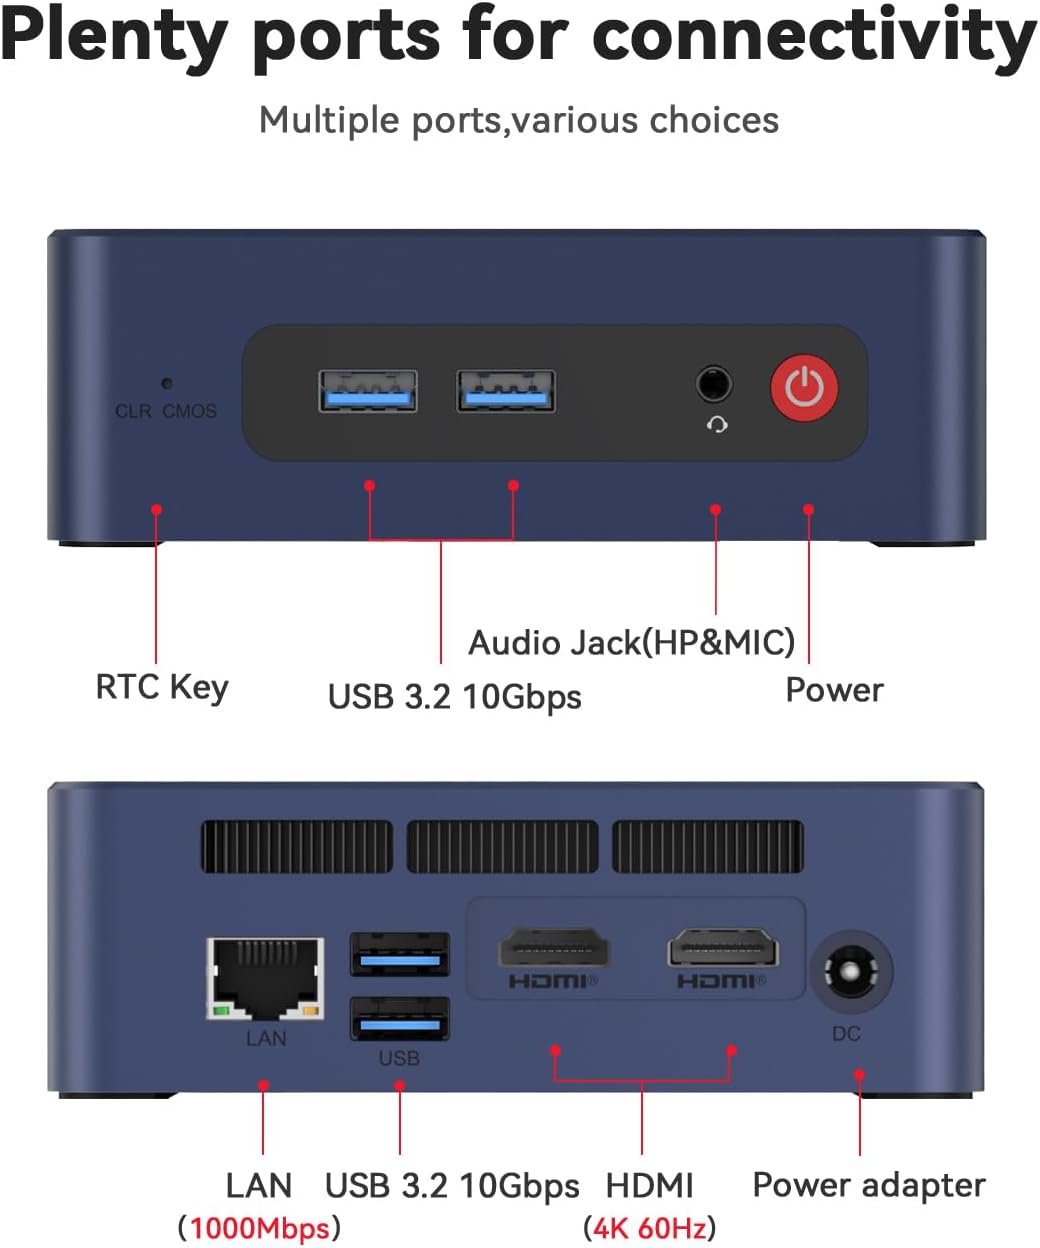
Description: This image provides a detailed view of the front and rear ports of the Beelink SER3 Mini PC, illustrating the location of the RTC Key, USB 3.2 ports, Audio Jack, Power button, LAN port, HDMI outputs, and DC power input.
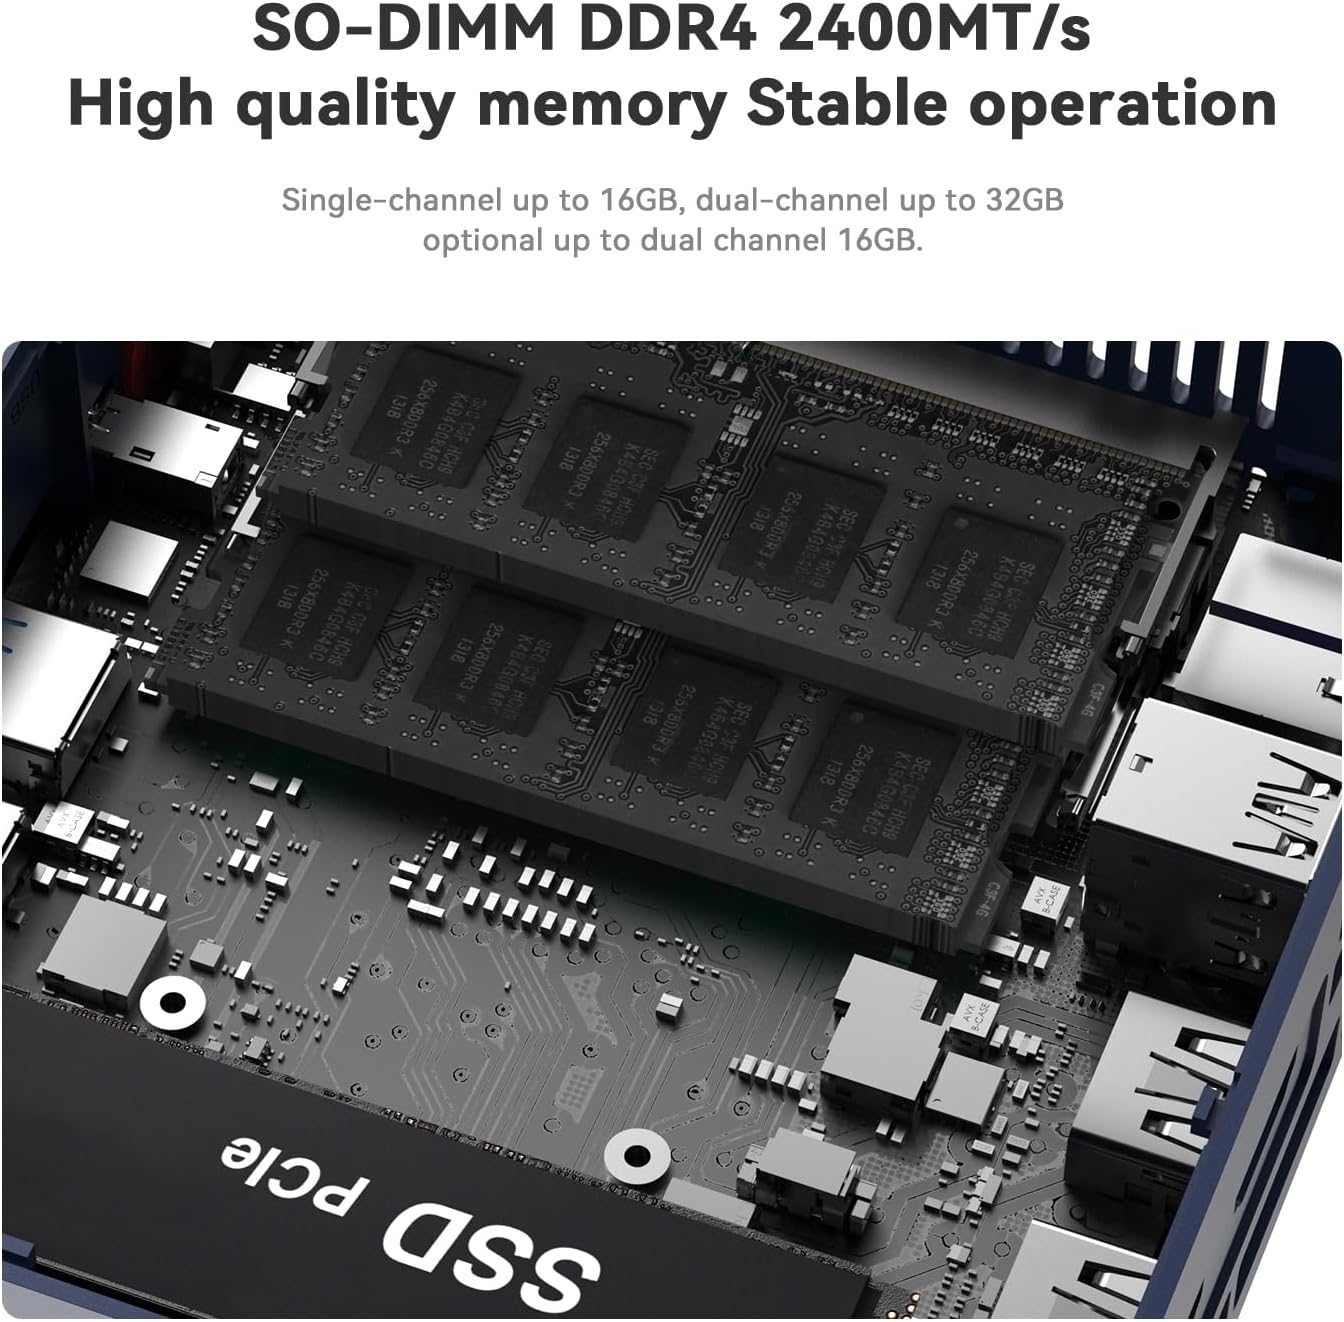
Description: An internal view of the Beelink SER3 Mini PC, showcasing the SO-DIMM DDR4 memory slots and the M.2 NVMe SSD slot, indicating upgrade possibilities.
4. Setup Guide
4.1 Initial Connection
- Connect Display: Use an HDMI cable to connect your monitor(s) to the HDMI ports on the back of the Mini PC. The device supports dual 4K displays.
- Connect Peripherals: Plug in your USB keyboard and mouse into the available USB 3.2 ports.
- Connect Power: Insert the power adapter into the DC Jack on the Mini PC and then plug it into a power outlet.
- Power On: Press the power button located on the front of the Mini PC.

Description: This image demonstrates the Beelink SER3 Mini PC connected to two external monitors, highlighting its dual-screen display capability for enhanced productivity.
4.2 Network Connection
- Wired Connection: Connect an Ethernet cable from your router or modem to the RJ45 LAN port on the Mini PC.
- Wireless Connection: Once powered on, Windows 11 Pro will guide you through connecting to a Wi-Fi network. The device supports WiFi 5 (802.11ac).
4.3 Wall Mounting (Optional)
The Beelink SER3 Mini PC can be mounted behind a monitor using the included wall-mounted bracket for a clutter-free setup.
- Attach the bracket to the Mini PC using the provided screws.
- Fix the bracket to the back of your display (if VESA compatible) or a wall using appropriate screws.

Description: This diagram visually explains how to easily install the Beelink SER3 Mini PC using the provided wall-mounted bracket, showing it attached to the back of a monitor.
5. Operating Instructions
5.1 First Boot and Windows Setup
On the first boot, follow the on-screen instructions to complete the Windows 11 Pro setup, including language selection, network connection, and user account creation.
5.2 Daily Operation
- Power On/Off: Press the power button to turn the device on. To turn off, use the Windows Shut Down option or press and hold the power button for a few seconds.
- Restart: Use the Windows Restart option for system reboots.
- Sleep Mode: The system will enter sleep mode after a period of inactivity, or you can manually select it from the Windows power options.
5.3 Dual Display Configuration
With two HDMI ports, you can extend your desktop across two screens or duplicate your display. Configure these settings through Windows Display Settings (Right-click on desktop > Display settings).
6. Maintenance
6.1 Cleaning
- Regularly clean the exterior of the Mini PC with a soft, dry cloth.
- Use compressed air to gently clear dust from the ventilation openings to ensure proper airflow and cooling.
6.2 Software Updates
Keep your Windows operating system and drivers updated to ensure optimal performance and security. Windows Update will typically handle this automatically, but you can check manually via Settings > Windows Update.
6.3 Storage Expansion
The Mini PC supports storage expansion:
- An additional 2.5-inch SATA HDD or SSD (500GB~2TB) can be installed.
- The M.2 PCIe 3.0 X4 SSD can be upgraded to a larger capacity (up to 2TB).
6.4 Cooling System
The Beelink SER3 Mini PC features a large fan and dual heat conduction tubes for efficient heat dissipation. Ensure the vents are not obstructed to maintain optimal operating temperatures.

Description: This image provides an internal view of the Beelink SER3 Mini PC's cooling solution, highlighting the large fan and dual heat pipes designed to efficiently dissipate heat and maintain system stability.
7. Troubleshooting
If you encounter issues with your Beelink SER3 Mini PC, refer to the following common solutions:
| Problem | Possible Cause | Solution |
|---|---|---|
| No power/Device does not turn on | Power adapter not connected or faulty; Power button issue | Ensure power adapter is securely connected to both the Mini PC and a working power outlet. Try a different outlet. |
| No display on monitor | HDMI cable loose or faulty; Incorrect input selected on monitor | Check HDMI cable connections. Ensure your monitor is set to the correct HDMI input source. Try a different HDMI cable or monitor. |
| Wi-Fi or Bluetooth not working | Drivers not installed; Wireless adapter disabled | Check Device Manager in Windows for wireless adapter status. Ensure Wi-Fi/Bluetooth is enabled in Windows settings. Update drivers if necessary. |
| System is slow or unresponsive | Too many applications running; Insufficient RAM; Overheating | Close unnecessary applications. Check Task Manager for resource usage. Ensure proper ventilation and clean dust from vents. Consider upgrading RAM or SSD if frequently slow. |
| Cannot connect to LAN | Ethernet cable loose or faulty; Network driver issue | Check Ethernet cable connection. Verify network settings in Windows. Update LAN drivers. |
If the problem persists after attempting these solutions, please contact Beelink customer service for further assistance.
8. Specifications
Detailed technical specifications for the Beelink SER3 3200U Mini PC:

Description: This image presents a comprehensive table of the Beelink SER3 Mini PC's product specifications, detailing its dimensions, CPU, graphics, system disk, internal slots, interfaces, wireless LAN, power components, operating environment, storage environment, accessories, and additional functions.
| Feature | Detail |
|---|---|
| Brand | Beelink |
| Model Number | SER |
| Operating System | Windows 11 Pro |
| CPU Model | AMD Ryzen 3 3200U |
| CPU Speed | 2.6 GHz (up to 3.5 GHz boost) |
| Graphics Coprocessor | AMD Radeon Vega 3 Graphics (1200MHz) |
| Memory Storage Capacity | 16 GB DDR4 (2400 MHz, expandable to 32 GB) |
| Hard Disk Description | 500GB NVMe M.2 SSD (PCIe 3.0 X4) |
| Additional Storage Support | 1x 2.5-inch SATA HDD/SSD slot (500GB~2TB) |
| Wireless Technology | Wi-Fi 5 (802.11ac), Bluetooth 5.0 |
| Ethernet | 1000M LAN (RJ45) |
| Video Output | 2x HDMI (supports 4K@60Hz dual display) |
| USB Ports | 4x USB 3.2 10Gbps |
| Audio Jack | 1x HP&MIC Audio Jack |
| Power Input | DC Jack (19V/3.42A) |
| Dimensions | 124 x 113 x 42 mm |
| Item Weight | 0.95 Kilograms |
| Cooling Method | Air (Quiet large fan, dual heat pipe) |
9. Warranty and Support
Beelink is committed to providing excellent customer service and product reliability.
- Warranty: Your Beelink SER3 3200U Mini PC comes with a 3-year worry-free warranty.
- Technical Support: Lifetime technical support is available for all Beelink products.
- Customer Service: 24-hour customer service is provided to assist with any inquiries or issues.
For support, please refer to the contact information provided in your product packaging or visit the official Beelink website.