1. Introduction
The Redodo 40 Amp MPPT Solar Charge Controller is designed to efficiently manage power from your solar panels to charge your batteries and power your DC loads. Featuring advanced Maximum Power Point Tracking (MPPT) technology, it ensures optimal energy harvesting with up to 99% tracking efficiency and 98% peak conversion efficiency. This controller is equipped with a built-in Bluetooth module for convenient remote monitoring and parameter adjustment, an LCD display, and LED indicators for easy status checks. It supports various battery types, including LiFePO4, flooded, sealed, and gel lead-acid batteries.

Image 1.1: Front view of the Redodo 40 Amp MPPT Solar Charge Controller, highlighting its LCD display and control buttons.
2. Safety Information
The Redodo MPPT solar charge controller is constructed from durable aluminum alloy, designed for effective heat dissipation and environmental safety. It incorporates multiple built-in protection mechanisms to ensure the safety and longevity of your solar system. Always adhere to local electrical codes and safety guidelines during installation and operation.
- Reverse Connection Protection: Prevents damage from incorrect wiring of solar panels, batteries, or loads.
- Overpower Protection: Safeguards the system from excessive power input.
- Overvoltage Protection: Protects connected devices from voltage surges.
- Short-circuit Protection: Automatically shuts down in case of a short circuit.
- Over-temperature Protection: Prevents overheating of the controller.
- Reverse Charging Protection: Stops current flow from battery to solar panel at night.
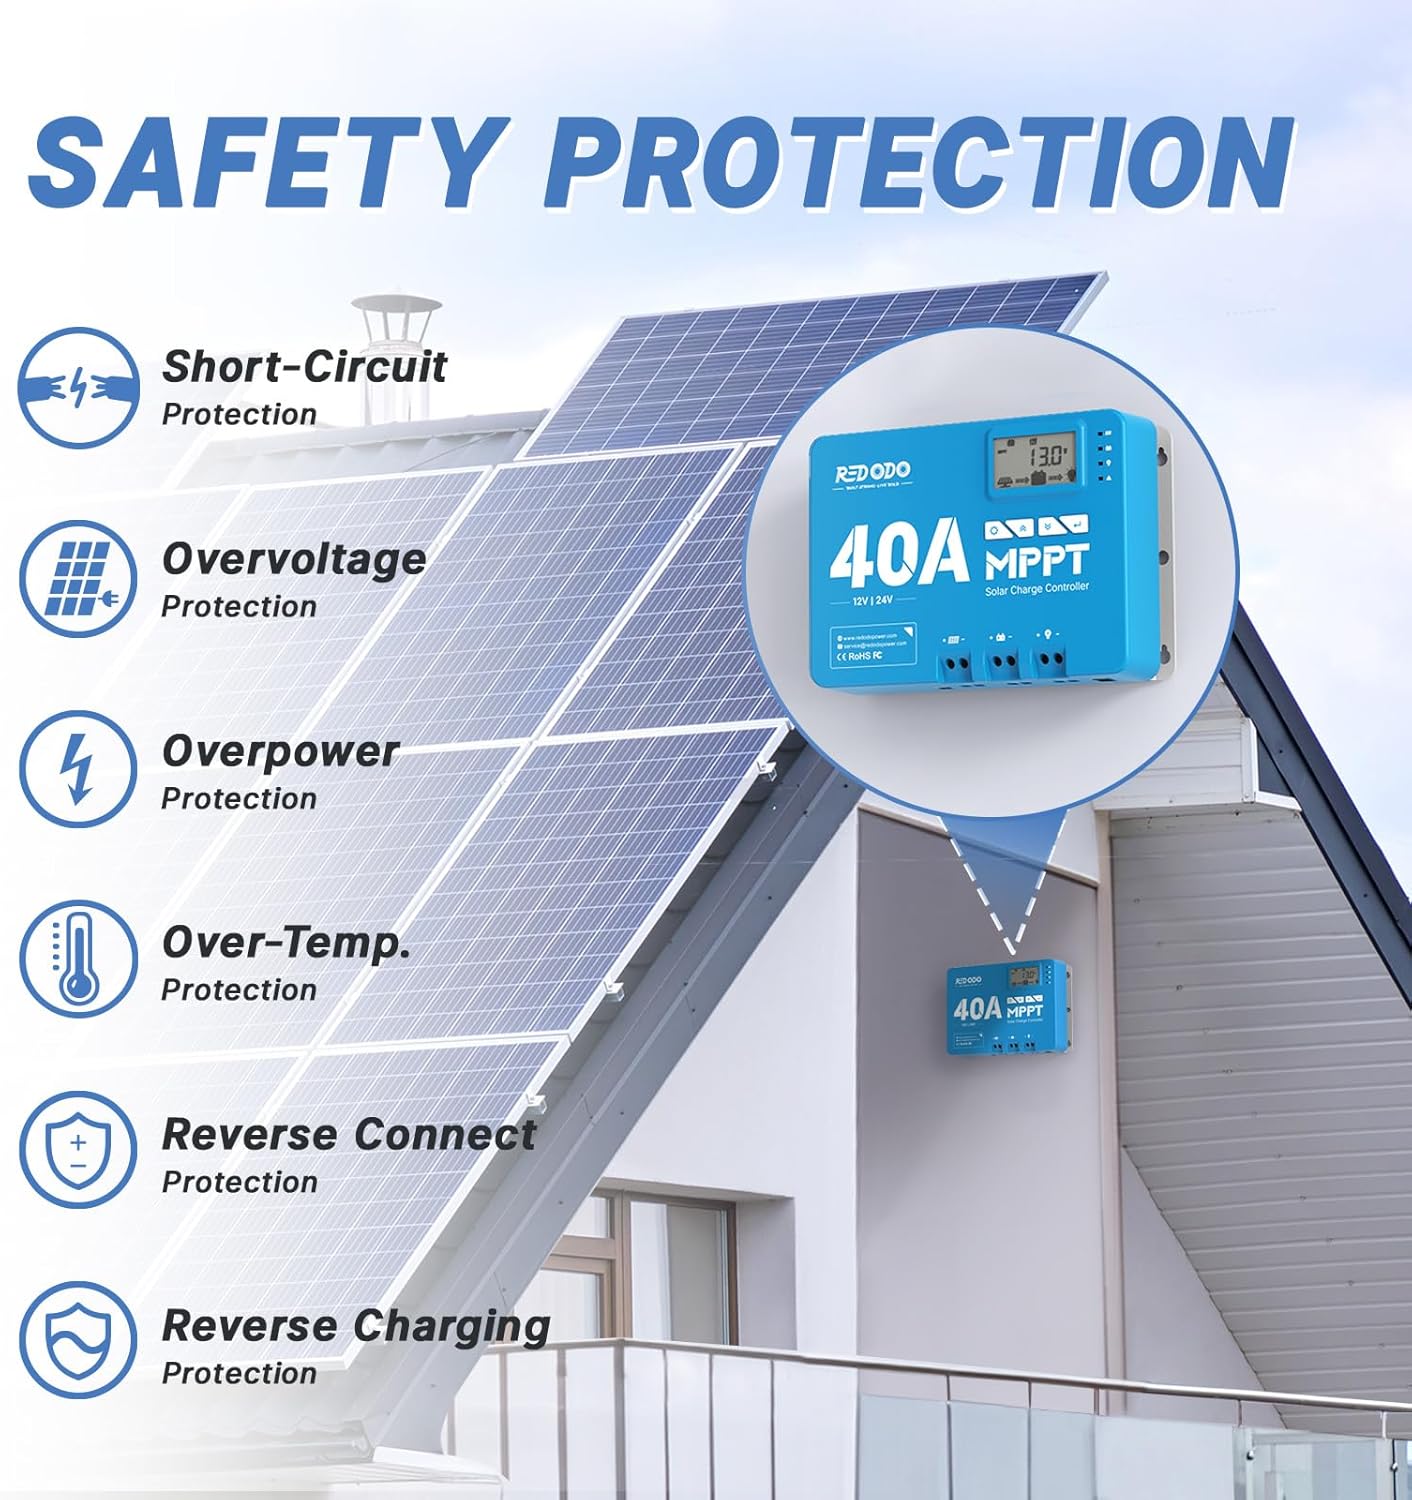
Image 2.1: Visual representation of the comprehensive safety protections integrated into the Redodo MPPT Solar Charge Controller.
3. Product Features
The Redodo 40 Amp MPPT Solar Charge Controller offers a range of features designed for efficient and user-friendly solar power management:
- Advanced MPPT Technology: Achieves up to 99% tracking efficiency and 98% peak conversion efficiency, maximizing power harvest from solar panels.
- Built-in Bluetooth Module: Enables remote monitoring and parameter adjustment via a smartphone application, enhancing operational convenience.
- LCD Display & LED Indicators: Provides clear real-time data display and visual status monitoring for solar, battery, load, and fault conditions.
- Multi-Battery Compatibility: Default LiFePO4 charging mode, with adjustable parameters to support FLD (Flooded), Sealed, and Gel type lead-acid batteries.
- Efficient Charging: Capable of achieving a full charge for a 12V 100Ah battery in approximately 2 hours with a 600W solar panel.

Image 3.1: The Redodo MPPT Controller is specifically designed for LiFePO4 batteries, while also being compatible with Flooded, Sealed, and Gel battery types.

Image 3.2: The controller features a built-in Bluetooth module, allowing operation and monitoring via a smartphone application.

Image 3.3: Detailed explanation of the LCD screen settings and various indicators for monitoring system status.

Image 3.4: Illustration demonstrating the controller's ability to achieve a full charge for a 12V 100Ah battery in approximately 2 hours with a 600W solar panel.
4. Package Contents
Upon opening the package, please verify that all the following items are included:
- Redodo 40A MPPT Charge Controller
- Product Manual (User Manual)
- Mounting Brackets
- Screws for mounting
- Heat Shrink Tubing
- Copper Wire Connector
- Installation Guide

Image 4.1: An overview of all items included in the Redodo MPPT Solar Charge Controller package.
5. Installation
Proper installation is crucial for the safe and efficient operation of your Redodo MPPT Solar Charge Controller. Please follow these general guidelines. Refer to the included Installation Guide for detailed, step-by-step instructions and diagrams.
5.1 Mounting
Select a suitable location for mounting the controller. Ensure it is a dry, well-ventilated area, away from direct sunlight and heat sources. Use the provided mounting brackets and screws to securely attach the controller to a stable surface.

Image 5.1: Dimensions of the Redodo MPPT Controller, useful for planning installation space.
5.2 Wiring Connections
Connect the solar panels, battery, and DC load to the appropriate terminals on the controller. Always connect the battery first, then the solar panels, and finally the load. Ensure correct polarity for all connections to prevent damage to the controller and other components. The controller supports a maximum wire gauge of 7AWG for solar panel and battery connections, and 10AWG for load connections.

Image 5.2: A detailed diagram showing the various ports and features of the Redodo MPPT Controller, including solar panel terminals, battery terminals, DC load terminals, RS485 communication port, and remote temperature sensor port.

Image 5.3: A comprehensive diagram illustrating the typical connection setup for a solar power system with the Redodo MPPT Charge Controller, including solar panels, battery, DC load, and an optional inverter for AC loads.
6. Setup and Operation
6.1 Initial Power-Up
Once all connections are secure, the controller will power on automatically. The LCD display will show system information, and LED indicators will illuminate to indicate status.
6.2 LCD Display and Buttons
The LCD screen provides real-time data such as solar status, battery status, DC load status, error codes, system voltage, and charging stage. Use the four operating buttons (Settings, Up, Down, Enter) to navigate through menus and adjust parameters.

Image 6.1: The controller features clear LED indicators for PV (solar panel), BAT (battery), LOAD, and FAULT status, providing intuitive visual feedback.
6.3 Bluetooth Connectivity and App
The built-in Bluetooth module allows for remote monitoring and control via a dedicated smartphone application. This provides a convenient way to view real-time data and adjust settings without direct interaction with the controller.
- Step 1: Turn on your phone's Bluetooth.
- Step 2: Open the Bluetooth APP. Tap the Bluetooth icon on the upper right corner of the interface and connect Bluetooth with the device named "BT-ROCC2440".
- Step 3: Check whether all parameters in "Real-Time Monitoring" are displayed.
- Step 4: Enter the "Parameter Settings" and unlock the settings. Set the battery type and system voltage and tap confirm to save the setting.
For detailed instructions on the Bluetooth APP installation and operation, please visit the official Redodo Power website: https://www.redodopower.com/pages/mppt-controller-bluetooth-installation-and-operation
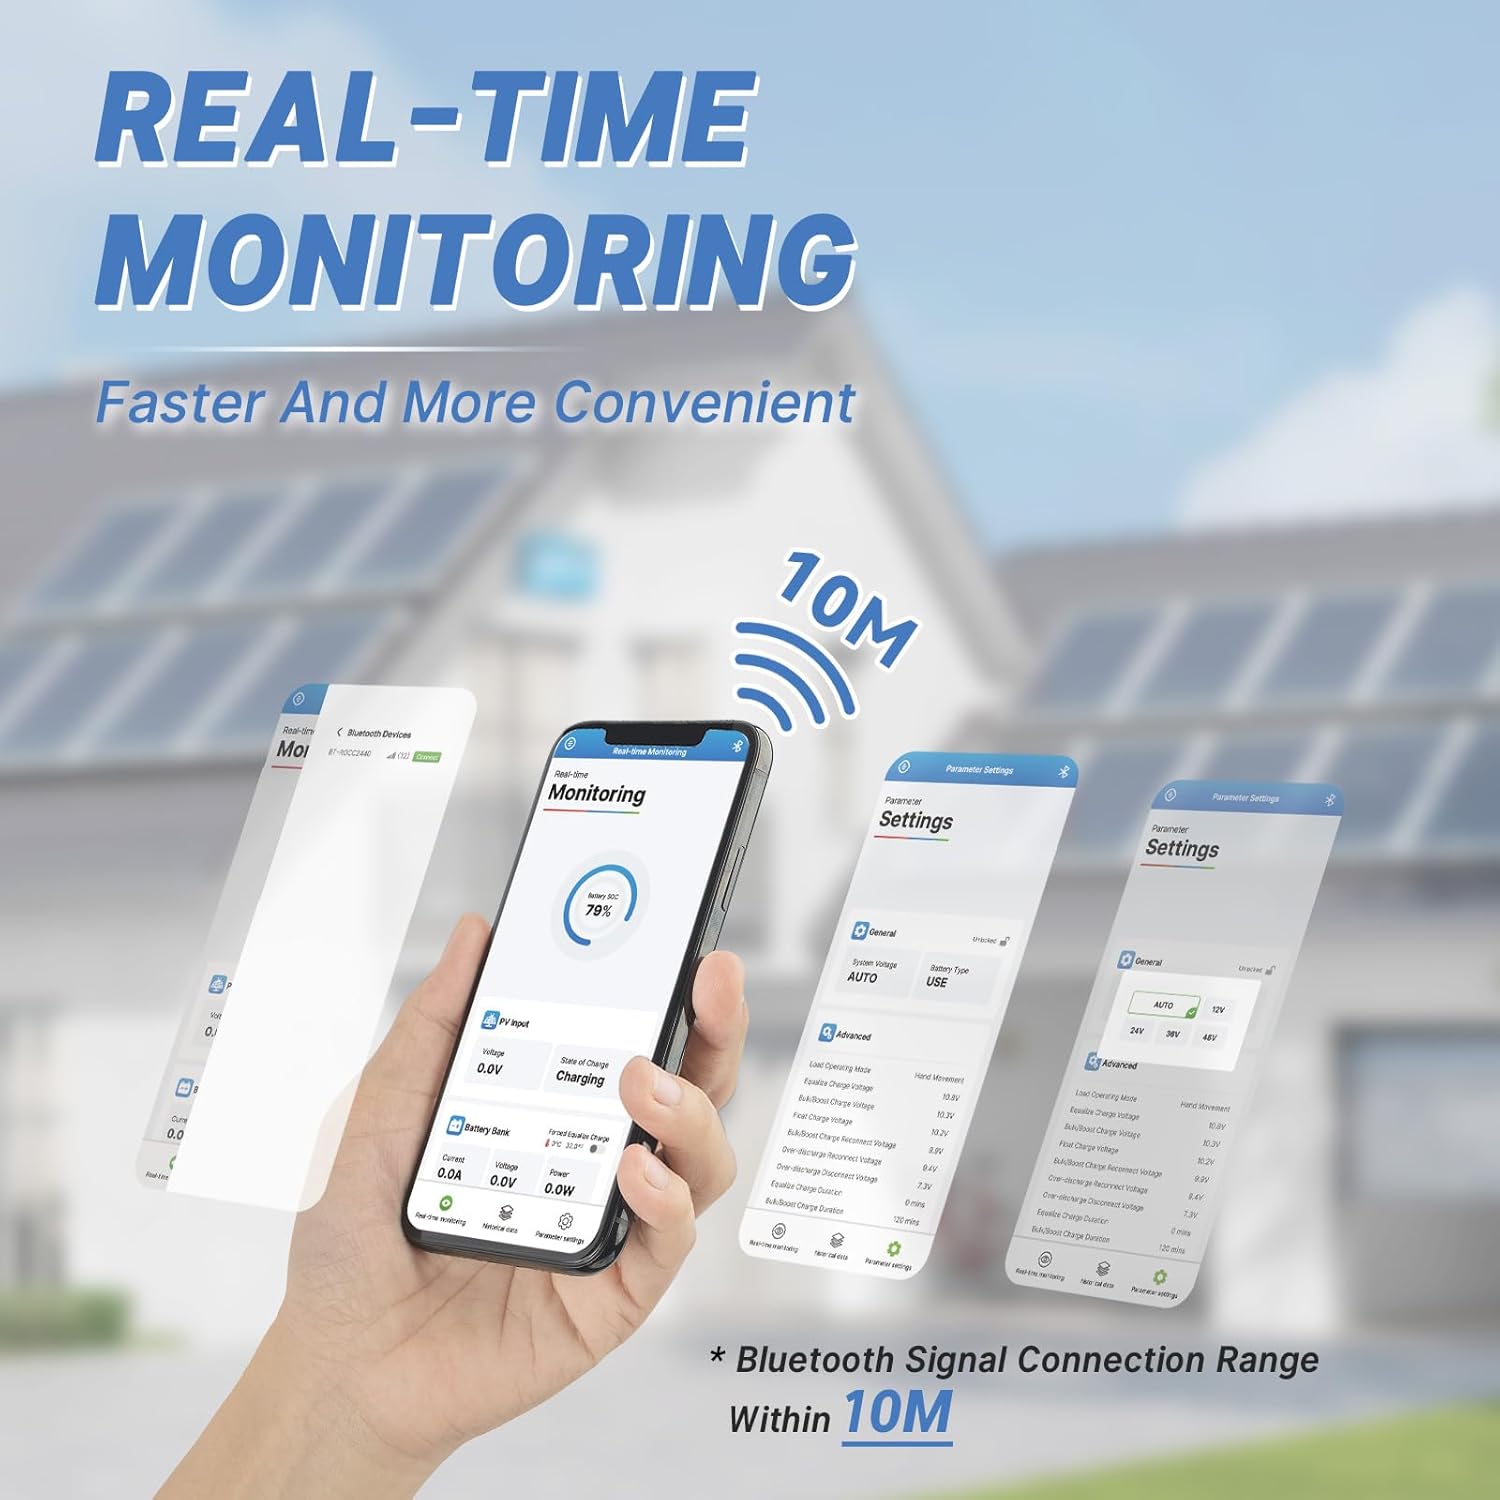
Image 6.2: The smartphone application provides real-time monitoring of the solar charge controller, offering a faster and more convenient way to check system status within a 10-meter Bluetooth range.

Image 6.3: Step-by-step guide on how to connect and operate the Redodo MPPT Controller using the Bluetooth application on a smartphone.
7. Maintenance
To ensure the long-term performance and reliability of your Redodo MPPT Solar Charge Controller, regular maintenance is recommended:
- Cleanliness: Keep the controller clean and free from dust and debris. Use a dry cloth to wipe the exterior.
- Connections: Periodically check all wiring connections to ensure they are tight and free from corrosion. Loose connections can lead to power loss or overheating.
- Ventilation: Ensure that the ventilation fins are not obstructed to allow for proper heat dissipation.
- Firmware Updates: Check the Redodo Power website periodically for any available firmware updates for your controller model.
8. Troubleshooting
This section provides solutions to common issues you might encounter with your Redodo MPPT Solar Charge Controller. For more complex problems, please contact Redodo customer support.
| Problem | Possible Cause | Solution |
|---|---|---|
| Controller not powering on | No battery connection or reverse polarity. | Check battery connections and ensure correct polarity. The battery must be connected first. |
| No charging from solar panels | Solar panel connection issues, insufficient sunlight, or panel fault. | Verify solar panel connections and polarity. Ensure panels are receiving adequate sunlight. Check panel voltage. |
| Load not working | Load connection issues, overload, or battery low voltage disconnect. | Check load connections and ensure correct polarity. Reduce load if overloaded. Charge battery. |
| Bluetooth connection unstable | Distance too far, interference, or app issue. | Ensure device is within 10m range. Minimize interference. Restart app or phone. |
9. Specifications
Detailed technical specifications for the Redodo 40 Amp MPPT Solar Charge Controller:
- Model Number: 24V 40A MPPT
- Display Type: LCD
- Voltage: 12V/24V DC Input (Auto-sensing)
- Max. Charge Current: 40A
- Max. Solar Panel Input Power: 600W for 12V system, 1200W for 24V system
- Tracking Efficiency: Up to 99%
- Peak Conversion Efficiency: Up to 98%
- Battery Compatibility: LiFePO4 (default), Flooded, Sealed, Gel (adjustable)
- Communication: Built-in Bluetooth Module, RS485 (RJ12 port)
- Product Dimensions: 7.08 x 9.64 x 3.24 inches (18 x 24.5 x 8.2 cm)
- Item Weight: 5.72 pounds (2.6 kg)
- Material: Aluminum alloy
- UPC: 644097643773
10. Warranty and Support
Redodo is committed to providing high-quality products and excellent customer service. Your Redodo MPPT Solar Charge Controller comes with the following assurances:
- 10 Years Lifespan: Designed for long-term durability.
- 5 Years Guarantee: Comprehensive warranty coverage.
- 24 Hours Response: Dedicated customer support available to assist you promptly.
- Local Warehouses: Efficient service and support through local distribution.
For further assistance, technical support, or warranty claims, please contact Redodo customer service:
- Email: service@redodopower.com
- Website: www.redodopower.com
- Redodo Store: Redodo Official Store on Amazon

Image 10.1: Icons representing Redodo's commitment to product lifespan, guarantee, customer response, and local support.


