1. Product Overview
The Noua Diamond C112 is an ATX PC gaming case designed for ATX, Micro-ATX, and Mini-ITX motherboards. It features a 0.50mm SPCC high-performance structure with a mesh/ABS front panel and a tempered glass side panel, suitable for various computing environments.
This case supports efficient cooling with one pre-installed ARGB fan at the rear and expandability for up to 8 x 12cm fans (3 front, 2 top, 1 rear, 2 PSU shroud). Liquid cooling is also supported with radiators up to 28cm at the front, 24cm at the top, and 12cm at the rear.
High-performance components are accommodated, including graphics cards up to 33cm in length and CPU air coolers up to 16cm in height. Dust filters are included on the top and bottom panels for system longevity. The top panel offers convenient connectivity with USB 3.0, USB 2.0, microphone, HD audio ports, and power, reset, and LED control buttons. Internal drive bays support up to 4 drives (2 x 2.5" SSD + 2 x 3.5" HDD).

Figure 1: Angled view of the Noua Diamond C112 PC case.
2. Setup Instructions
2.1 Preparing the Case
- Unpack the case and remove all packaging materials.
- Carefully remove the tempered glass side panel by unscrewing the four thumb screws and gently pulling it away. Place it on a soft, flat surface to prevent damage.

Figure 2: Side view of the case with the tempered glass panel.
2.2 Motherboard Installation
- Install the I/O shield into the rear opening of the case.
- Align your motherboard with the standoffs inside the case. Ensure all screw holes match.
- Secure the motherboard with the appropriate screws.

Figure 3: Interior view of the PC case, ready for component installation.
2.3 Power Supply Unit (PSU) Installation
- Position the PSU in the dedicated compartment at the bottom rear of the case.
- Secure the PSU with screws from the rear of the case.
2.4 Drive Installation
- For 3.5" HDDs, slide them into the drive cages located under the PSU shroud. Secure with screws if necessary.
- For 2.5" SSDs, mount them on the designated trays behind the motherboard tray or on top of the PSU shroud. Secure with screws.
2.5 Graphics Card and Expansion Card Installation
- Remove the necessary PCIe slot covers from the rear of the case.
- Insert your graphics card or other expansion cards into the appropriate PCIe slots on the motherboard.
- Secure the cards with screws.
- If your graphics card is long or heavy, utilize the included GPU support bracket for stability.

Figure 4: GPU support bracket for graphics card stability.
2.6 Cable Management
- Route all cables (power, data, front panel connectors) through the cutouts in the motherboard tray to the rear of the case.
- Use cable ties or Velcro straps to organize cables behind the motherboard tray for a clean build and improved airflow.
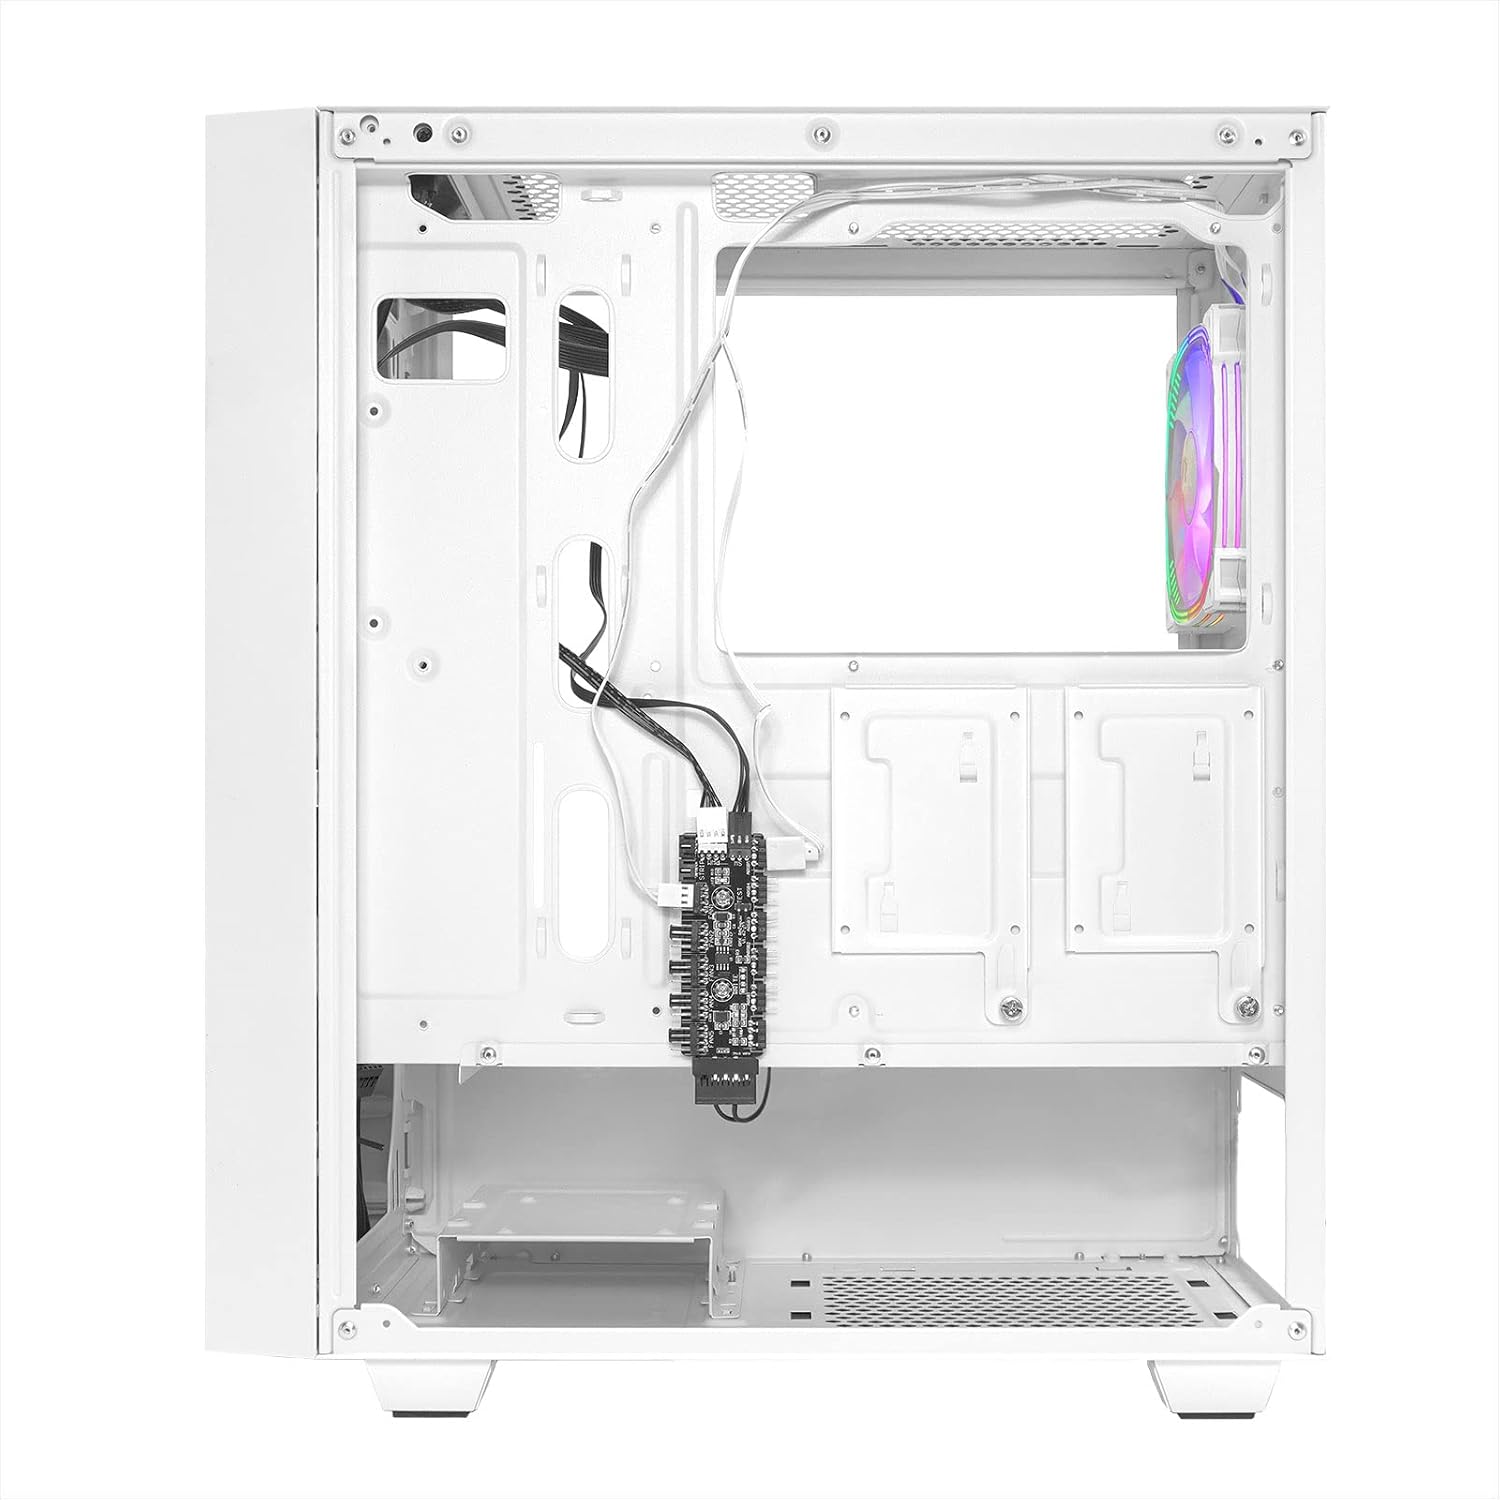
Figure 5: Rear interior view demonstrating cable management area.
2.7 Connecting Front Panel Cables
- Connect the USB 3.0, USB 2.0, HD Audio, Power SW, Reset SW, Power LED, and HDD LED cables from the front panel to the corresponding headers on your motherboard.
- Ensure correct polarity for LED connectors.

Figure 6: Wiring diagram for internal components and front panel connections.
2.8 Fan and Radiator Installation (Optional)
- Additional 120mm fans can be installed at the front (3), top (2), and PSU shroud (2).
- Liquid cooling radiators can be installed at the front (up to 28cm), top (up to 24cm), and rear (12cm).
- Secure fans and radiators with appropriate screws.
3. Operating Instructions
3.1 Powering On/Off
- Press the Power button on the top panel to turn on your PC.
- To turn off, use the operating system's shutdown function or press and hold the Power button for several seconds.
3.2 Using Front Panel Ports
- Connect USB devices to the USB 3.0 or USB 2.0 ports.
- Plug in headphones or a microphone into the HD Audio jacks.
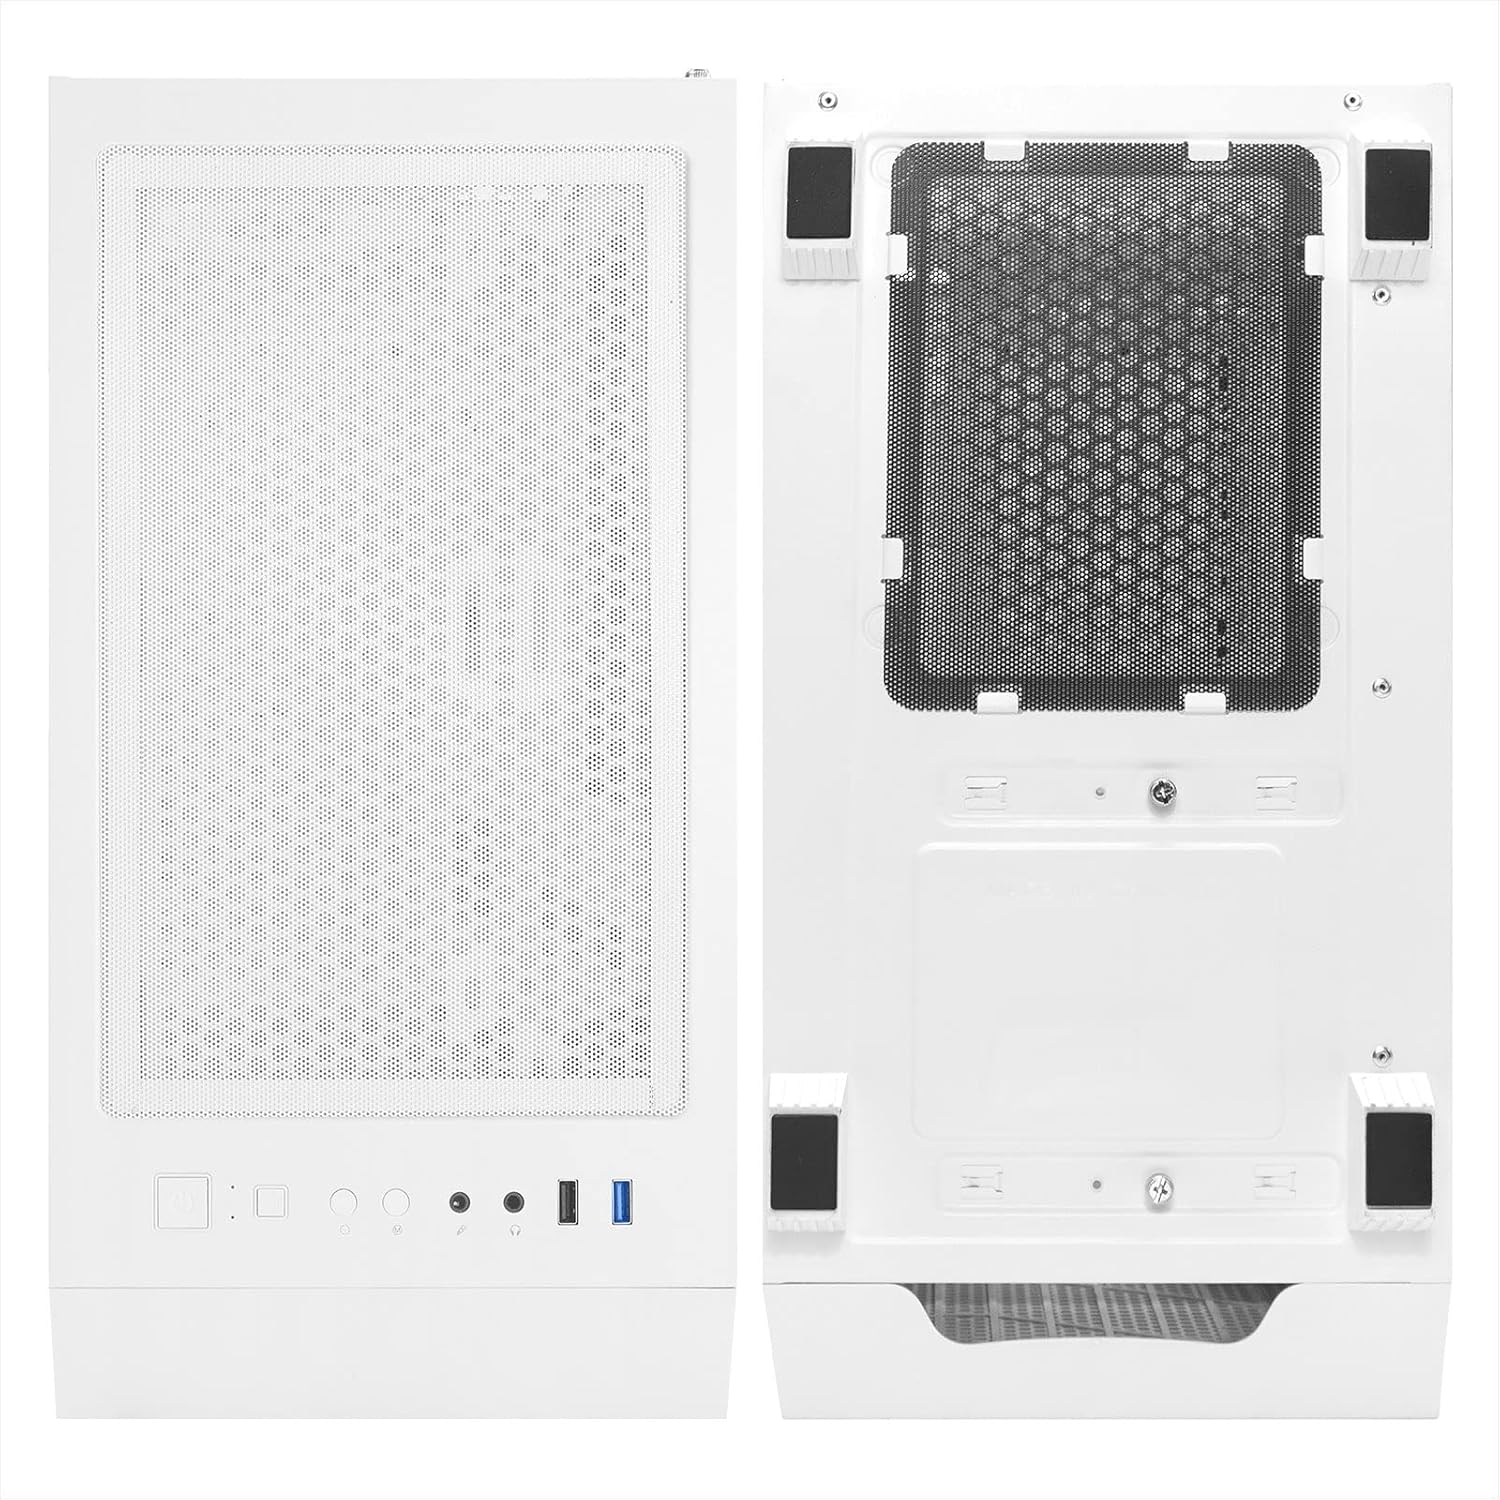
Figure 7: Top panel with I/O ports and controls.
3.3 ARGB Lighting Control
- The pre-installed ARGB fan and any additional ARGB components connected to the case's controller can be controlled via the dedicated LED button on the top panel.
- Press the LED button to cycle through various lighting modes and colors.
- If connected to a compatible motherboard, ARGB lighting can also be synchronized and controlled via motherboard software.
4. Maintenance
4.1 Dust Filter Cleaning
- The case includes removable dust filters on the top and bottom panels.
- Regularly remove and clean these filters to maintain optimal airflow and prevent dust buildup inside the system.
- Clean filters with water and mild soap, then allow them to dry completely before reinstallation.
4.2 Exterior Cleaning
- Wipe the exterior surfaces with a soft, damp cloth.
- Avoid using harsh chemicals or abrasive materials that could damage the finish or tempered glass.
5. Troubleshooting
5.1 System Does Not Power On
- Ensure the PSU is properly connected to the wall outlet and the power switch on the PSU is in the 'ON' position.
- Verify that the 24-pin ATX power cable and the 8-pin (or 4+4-pin) CPU power cable are securely connected to the motherboard.
- Check that the front panel 'Power SW' cable is correctly connected to the motherboard header.
5.2 Fans Not Spinning / LEDs Not Lighting Up
- Ensure all fan power cables are correctly connected to the motherboard fan headers or the case's fan controller.
- Verify that ARGB cables are properly connected to the ARGB controller or motherboard ARGB headers.
- If using the case's ARGB controller, ensure it is powered (e.g., via SATA power connector) and try pressing the LED control button.
5.3 USB Ports Not Functioning
- Check that the USB 3.0 and USB 2.0 front panel cables are securely connected to the corresponding headers on your motherboard.
6. Specifications
| Brand | Noua |
| Model Name | DIAMOND C112 |
| Model Number | CS0223GM-C112W619 |
| Color | White (C112) |
| Motherboard Compatibility | ATX, Micro-ATX, Mini-ITX, Extended ATX |
| Case Type | Mid-Tower |
| Material | Metal, Tempered Glass, Acrylonitrile Butadiene Styrene (ABS) |
| Cooling Method | Air, Water |
| Pre-installed Fans | 1 x 120mm ARGB (Rear) |
| Max Fan Support | 8 x 120mm (3 Front, 2 Top, 1 Rear, 2 PSU Shroud) |
| Radiator Support | Front: Up to 280mm; Top: Up to 240mm; Rear: 120mm |
| Max GPU Length | 33 cm |
| Max CPU Cooler Height | 16 cm |
| Drive Bays | 2 x 2.5" SSD, 2 x 3.5" HDD |
| Front I/O Ports | 1 x USB 3.0, 1 x USB 2.0, HD Audio (Mic/Headphone), Power, Reset, LED Control |
| Special Features | LED control button, Dust filters, Integrated fan, RGB lighting |
7. Warranty and Support
For warranty information and technical support, please refer to the documentation provided with your purchase or contact your retailer. Specific details regarding warranty periods and support procedures are typically provided by the manufacturer or the point of sale.