1. Introduction
The NEPIVEL H17 Emergency Radio is a versatile, multi-functional device designed for emergency preparedness and outdoor activities. It integrates an AM/FM/NOAA weather radio, a powerful 12000mAh power bank, a bright flashlight, a reading lamp, an SOS alarm, and a compass. With multiple charging options including Type-C, solar, and hand crank, it ensures you stay connected and powered in various situations.

Figure 1: NEPIVEL H17 Emergency Radio - Front View
2. Product Components
Familiarize yourself with the various parts of your NEPIVEL H17 Emergency Radio:

Figure 2: Labeled Components of the NEPIVEL H17 Emergency Radio
What's Included:
- Emergency Radio x1
- Handle x1
- Owners Manual x1
- Type-C Cable x1
3. Charging the Radio
The NEPIVEL H17 radio features a 12000mAh battery and offers three charging methods to ensure continuous power.
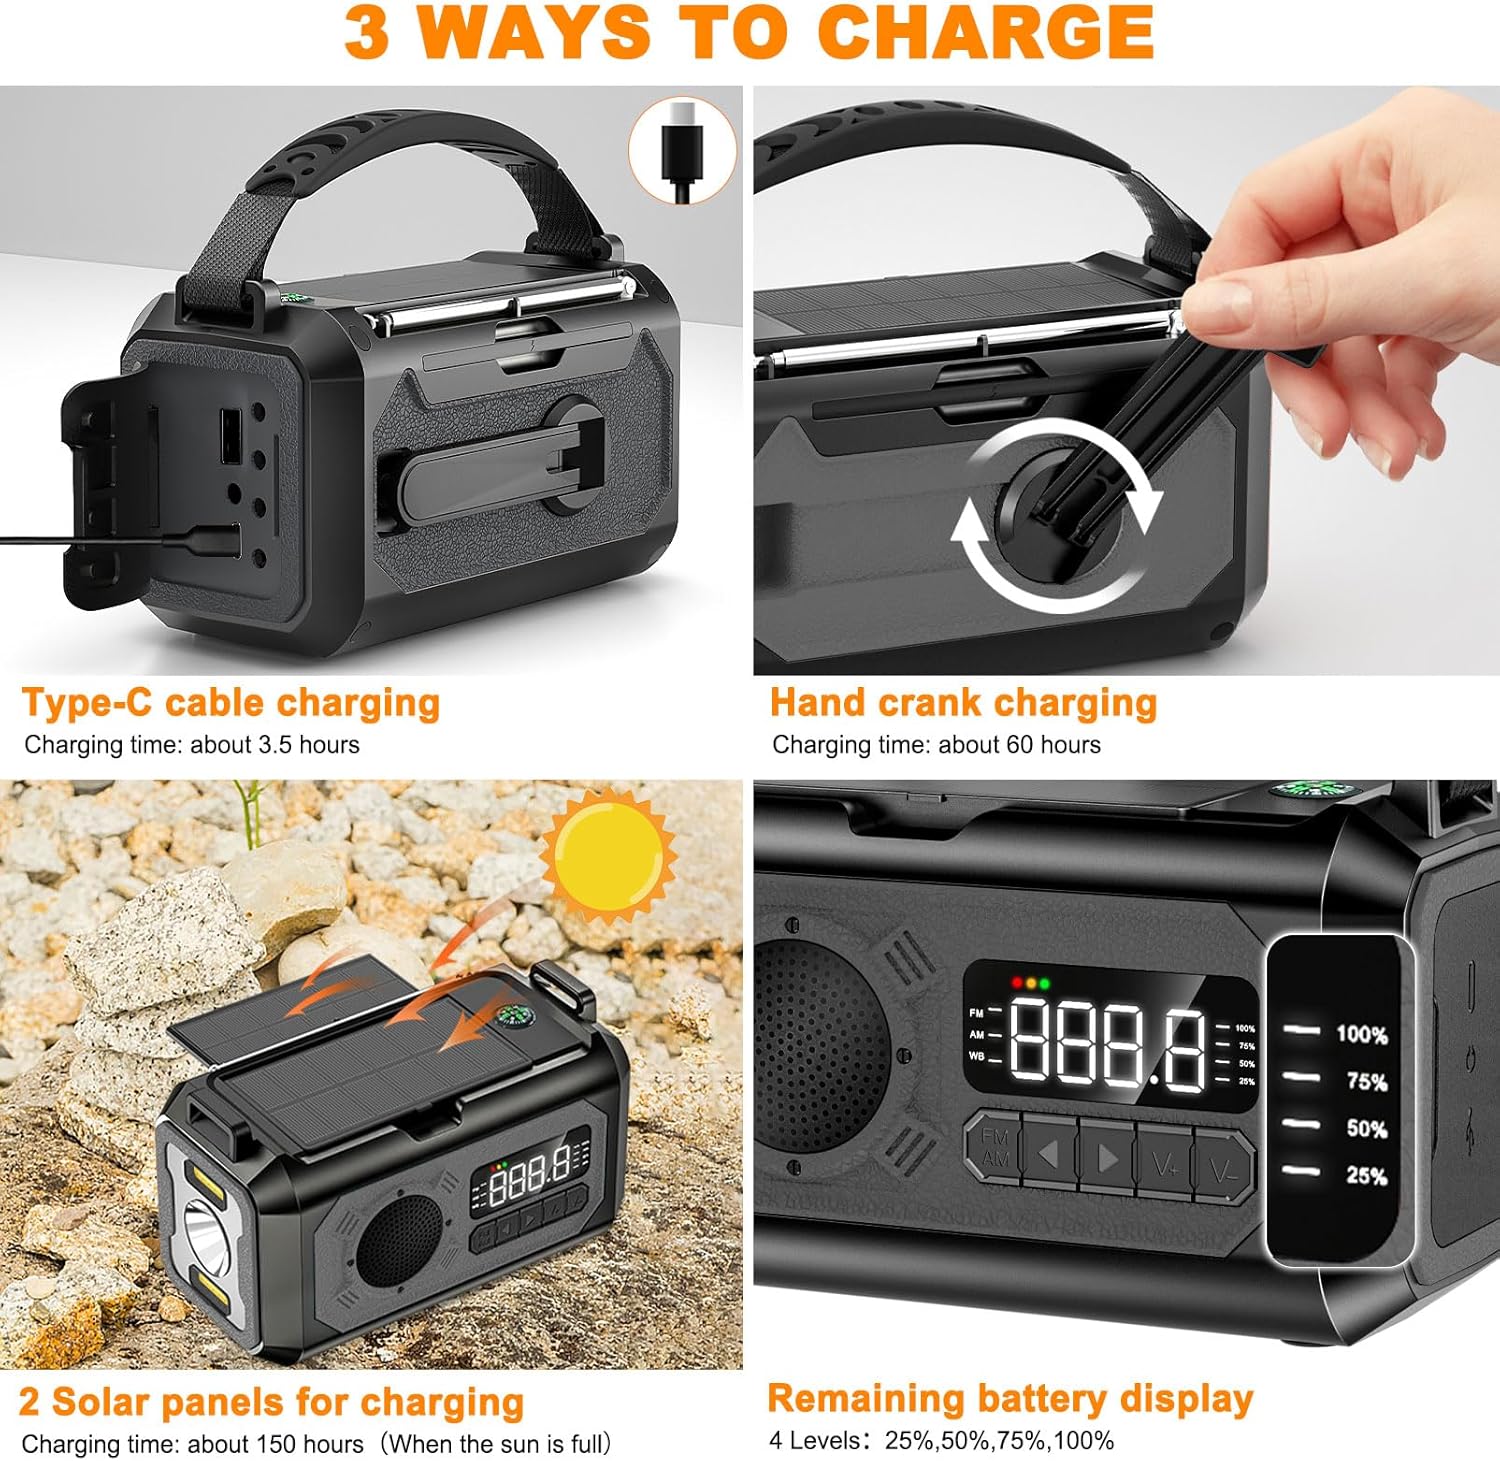
Figure 3: Three Charging Methods and Battery Display
3.1. Type-C Cable Charging
- Connect the provided Type-C cable to the radio's Type-C charging port and a USB power adapter (not included).
- The battery indicator lights will illuminate to show charging progress.
- Charging time is approximately 3.5 hours for a full charge.
3.2. Solar Charging
- Extend the two solar panels on top of the radio.
- Place the radio in direct sunlight. The solar charging indicator will light up.
- Solar charging is primarily for maintaining battery life or for emergency top-ups, not as a primary charging method due to its slower speed (approx. 150 hours for a full charge in optimal sunlight).
3.3. Hand Crank Charging
- Unfold the hand crank handle located on the side of the radio.
- Rotate the hand crank clockwise or counter-clockwise at a steady pace.
- Crank for a few minutes to generate enough power for short-term use of the radio or flashlight. Continuous cranking can provide more significant charge.
3.4. Battery Level Indicator
The LED display shows the remaining power in four levels: 25%, 50%, 75%, and 100%.
4. Radio Operation
Your NEPIVEL H17 radio supports AM, FM, and NOAA weather bands.
Video 1: Demonstration of the NEPIVEL 12000mAh Emergency Radio's features, including radio tuning, charging, and emergency functions.
4.1. Power On/Off
- Press and hold the power button for 2 seconds to turn the radio on or off.
4.2. Band Selection (AM/FM/NOAA)
- Short press the FM/AM button to cycle through FM, AM, and NOAA weather bands.
4.3. Automatic Channel Search
- To initiate an automatic search, long press the FM/AM button for 2 seconds. The radio will scan for available frequencies and store stations with strong signals.
- Avoid pressing any other buttons during the search process to prevent interruption.
- After the search is complete, the radio will automatically tune to the first found station.
4.4. Manual Tuning and Channel Switching
- Use the ◀ (previous) and ▶ (next) buttons to manually tune the frequency or switch between stored channels.
- To manually search for stations, press and hold the ◀ or ▶ button. The radio will scan until a signal is found. Release the button to stop scanning.
4.5. Volume Adjustment
- Use the V+ and V- buttons to increase or decrease the volume.
4.6. Antenna Usage
- For optimal reception, fully extend the telescopic antenna when listening to FM or NOAA bands.
4.7. Headphone Jack
- Plug standard 3.5mm headphones (not included) into the headphone jack for private listening.
5. Emergency Functions
The NEPIVEL H17 is equipped with several features crucial for emergency situations.

Figure 4: Multifunctional Features
5.1. Flashlight
- Press the flashlight switch button to activate the flashlight.
- The flashlight offers multiple modes (e.g., low beam, high beam, combined) and can illuminate up to 20 meters.
- Press the button repeatedly to cycle through the modes.

Figure 5: Flashlight Modes and Range
5.2. Reading Lamp
- Press the reading light switch button to turn on the integrated reading lamp.
- This feature provides ambient light for reading or general illumination in low-light conditions.
5.3. SOS Alarm
- Press the SOS alarm switch button to activate a loud siren and flashing light.
- This function is designed to attract attention in emergency situations.
5.4. Compass
- The radio includes a built-in compass to assist with navigation.
- Ensure the radio is held level for accurate readings.
6. Power Bank Feature
The integrated 12000mAh battery can be used to charge external devices.
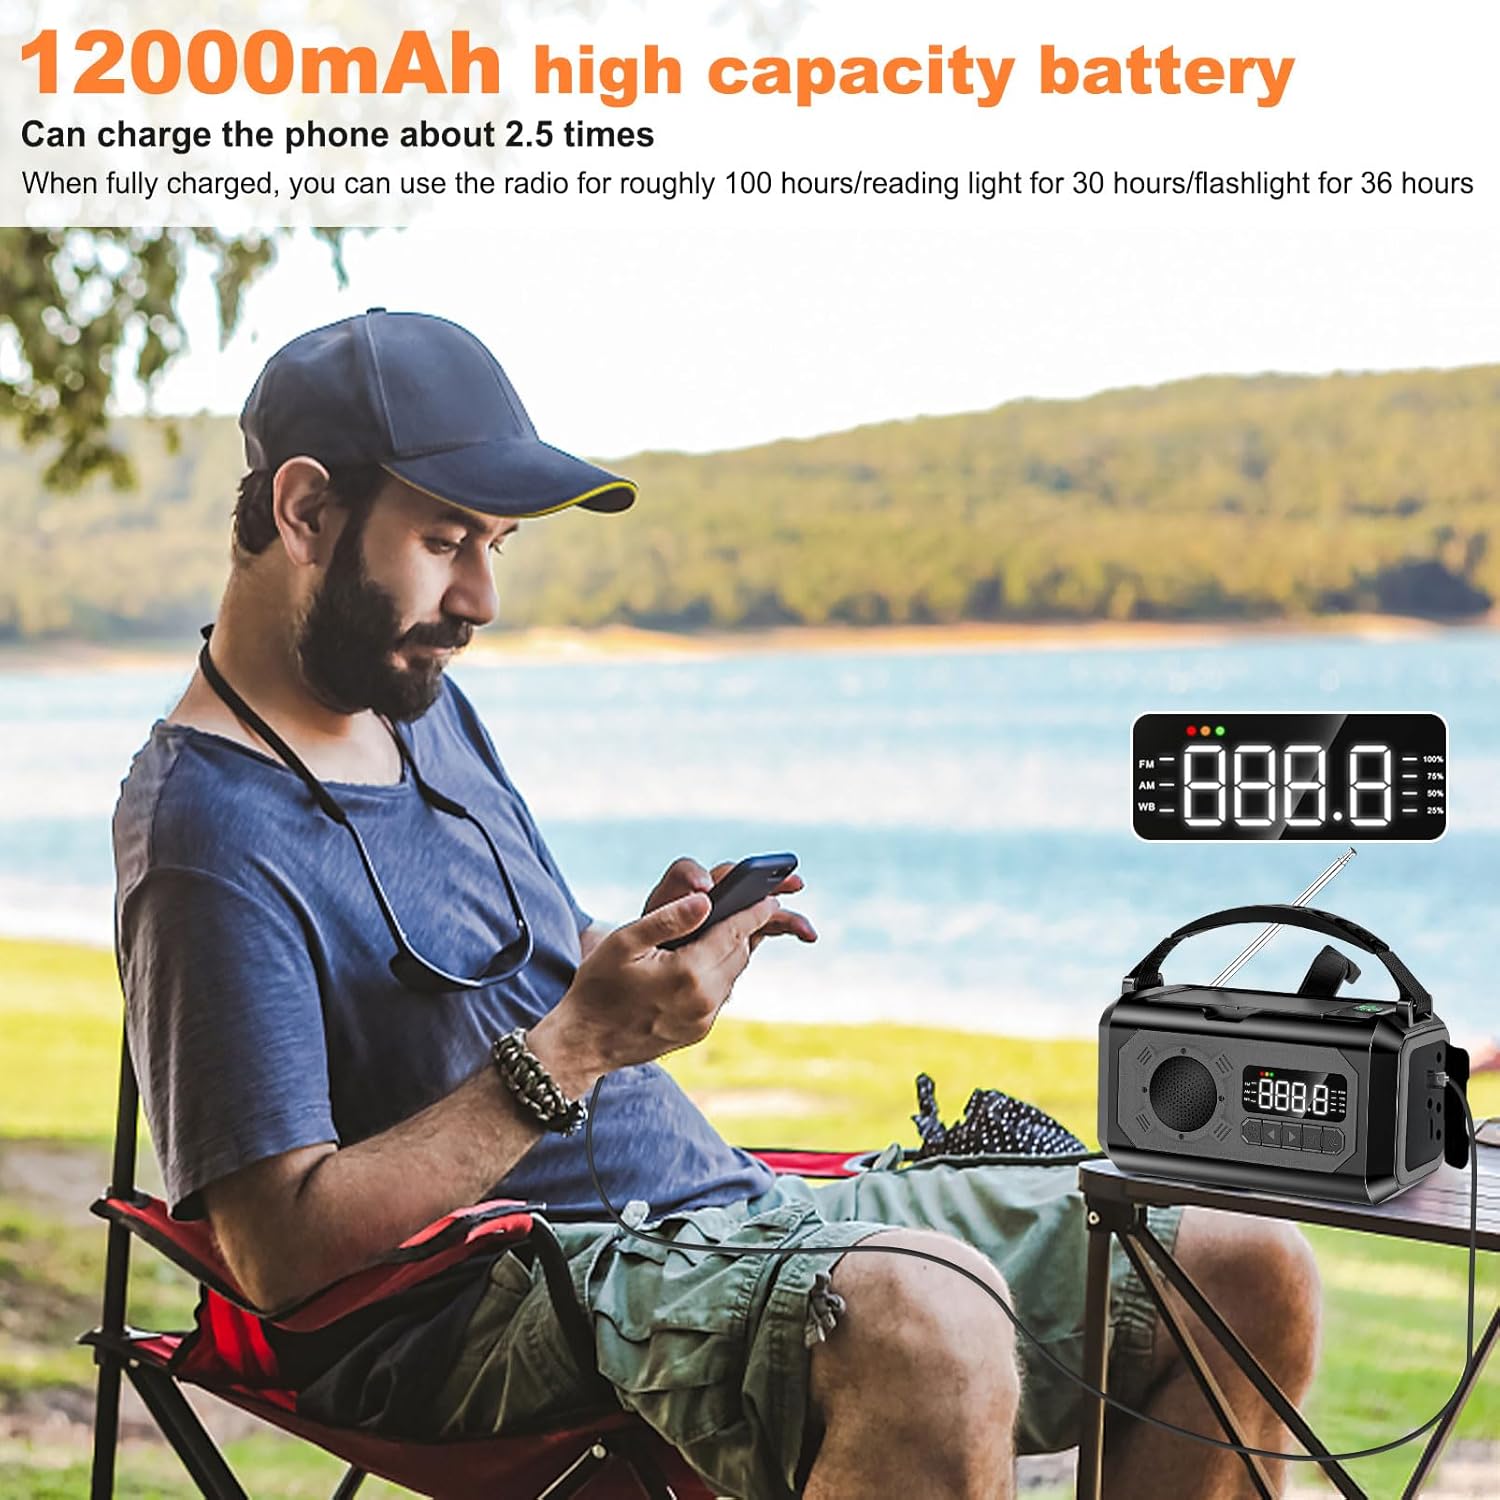
Figure 6: Charging External Devices
- Connect your device's charging cable to the USB-A output port on the radio.
- The radio can charge a typical smartphone approximately 2.5 times on a full charge.
7. Specifications
| Feature | Detail |
|---|---|
| Model Number | H17 |
| Product Dimensions | 5.94 x 3.15 x 3.38 inches |
| Item Weight | 1.33 pounds |
| Battery Capacity | 12000mAh (Nonstandard Battery included) |
| Charging Methods | Type-C, Solar, Hand Crank |
| Radio Bands Supported | AM, FM, NOAA Weather Band |
| Flashlight Range | Up to 20 meters |
| Special Features | SOS Alarm, Flashlight, Reading Lamp, Compass, Phone Charger, Headphone Jack |
| Material | High quality ABS material |
8. Troubleshooting
If you encounter issues with your NEPIVEL H17 Emergency Radio, refer to the following solutions:
8.1. Radio Functions Not Working (but charging works)
If your radio can charge external devices but other functions (like radio tuning) are not operational, you may need to restore factory settings. This can occur if internal connections are loose during shipping.
- Carefully remove the housing of the radio.
- Take away the button cover to expose the circuit board.
- Use a metal clip or wire to simultaneously touch the lower right corner of the S1 button and the left corner of the resistor (as indicated by arrows in the video/diagram). This will restore factory settings.
- The LCD screen battery indicator will blink once to confirm successful restoration.
- Reinstall the button cover and housing.
Video 2: Step-by-step guide to restore factory settings if the radio functions are not working.
8.2. Poor Radio Reception
- Ensure the telescopic antenna is fully extended.
- Try repositioning the radio to find a clearer signal.
- Perform an automatic channel search to find the strongest available signals.
8.3. Solar Charging Not Working
- Ensure the solar panels are fully extended and exposed to direct sunlight.
- Wipe the solar panels clean if they are dusty or dirty.
- Note that solar charging is supplementary and slower than Type-C charging.
9. Care and Maintenance
- Keep the radio dry and away from extreme temperatures.
- Clean the exterior with a soft, damp cloth. Do not use harsh chemicals or abrasive cleaners.
- Regularly check the Type-C port and USB-A port for debris.
- Store the radio in a cool, dry place when not in use for extended periods.
10. Warranty and Support
10.1. Warranty Information
The NEPIVEL H17 Emergency Radio comes with a 6-month guarantee. If the product is found to be defective, please contact customer support for assistance.
10.2. Customer Support
For any questions, concerns, or warranty claims, please contact NEPIVEL customer service through the retailer's platform or the contact information provided with your purchase. We aim to provide satisfactory after-sales service and will assist with exchanges or refunds within 24 hours for defective products.