Introduction
Thank you for purchasing the Aheaplus Corner Bar Cabinet. This manual provides detailed instructions for the assembly, operation, and maintenance of your new cabinet. Please read this manual thoroughly before beginning assembly or use to ensure safe and proper functionality. Keep this manual for future reference.
Important Safety Information
For your safety, please observe the following:
- Ensure secure mounting and avoid overloading shelves for safe operation.
- Always place the cabinet on a flat, stable, and level surface to prevent tipping.
- Do not exceed the maximum weight capacity for each shelf. Refer to the Specifications section for details.
- Keep small parts and packaging materials away from children and pets during assembly.
- Use only the provided hardware for assembly. Substituting parts may compromise stability.
- When using the power outlet, ensure that connected devices do not exceed the specified electrical ratings.
- Periodically check all connections and fasteners to ensure they remain tight.
- The anti-toppling fittings must be installed to ensure safety and stability, especially in households with children or pets.
Package Contents
Before assembly, verify that all components listed below are present and undamaged. If any parts are missing or damaged, please contact Aheaplus customer support.
- Cabinet Panels (various sizes)
- Metal Frame Components
- Hardware Pack (screws, bolts, nuts, etc.)
- Power Outlet Unit with USB Ports
- LED Strip Light Kit
- Glass Holders
- Adjustable Leg Pads
- Anti-toppling Fittings
- Assembly Tools (e.g., Allen wrench, screwdriver)
- Instruction Manual (this document)
Assembly Instructions
Assembly typically requires two adults. Lay out all parts on a soft, clean surface to prevent scratches. Follow the numbered steps in the included assembly diagram. Do not overtighten screws.
- Step 1: Unpack and Identify Components. Carefully remove all parts from the packaging. Refer to the parts list to ensure everything is present.
- Step 2: Assemble the Base Frame. Connect the metal frame components for the base using the provided screws. Ensure all connections are secure.
- Step 3: Attach Cabinet Panels. Secure the engineered wood panels to the metal frame, starting with the bottom cabinet section.
- Step 4: Install Mesh Doors. Attach the mesh doors to the bottom cabinet using the hinges and align them properly.
- Step 5: Assemble Upper Shelves. Continue assembling the upper shelves and their supporting metal frames.
- Step 6: Install Glass Holders. Secure the hanging wine glass holders to the designated upper shelf.
- Step 7: Integrate Power Outlet. Install the power outlet unit into its designated slot on one of the shelves. Route the power cord safely.
- Step 8: Attach LED Strip Light. Adhere the LED strip light to the interior frame or shelves as desired. Connect it to the power source.
- Step 9: Install Adjustable Leg Pads. Screw the adjustable leg pads into the bottom of the cabinet legs. Adjust them to ensure the cabinet is level.
- Step 10: Secure Anti-Toppling Fittings. Attach the anti-toppling fittings to the top rear of the cabinet and secure them to a wall stud using appropriate wall anchors (not always included, depending on wall type). This step is crucial for stability.

Figure 1: Product Dimensions. The cabinet measures 18.1 inches deep, 18.1 inches wide, and 64.2 inches high. Detailed measurements for each section are provided.

Figure 2: Key Features. This image highlights the hanging wine glass holder, the built-in power outlet, the LED strip lights, and the design of the bottom cabinet with mesh doors.
Operating Instructions
Using the Power Outlet
The cabinet is equipped with a built-in power strip featuring 3 AC outlets and 2 USB ports. The power cord length is 6.56 feet (approximately 2 meters).
- Plug the cabinet's main power cord into a standard 120V/12A wall outlet.
- Connect your devices (e.g., coffee maker, juicers, phone chargers) to the AC outlets or USB ports.
- Do not overload the power strip. Ensure the total power consumption of connected devices does not exceed the rated capacity.

Figure 3: Built-in Power Strip. This image shows the integrated power strip with its 3 AC outlets and 2 USB ports, designed for convenient charging of various devices.
Controlling the LED RGB Light
The cabinet features an RGB LED light strip with multiple color options and flashing modes. The LED lights can be controlled via an app or a remote control.
- App Control: Download the specified mobile application (refer to the LED light kit instructions for app name and QR code). Connect the LED lights to your device via Bluetooth. The app allows for color selection (over 60,000 colors), mode changes (29 flashing modes), music sync function, and timing functions.
- Remote Control: Use the provided remote control to switch colors, adjust brightness, change modes, and activate music sync. Ensure the remote has a clear line of sight to the LED receiver.
- Music Sync Function: The LED lights can change color and rhythm with sound and music, enhancing the ambiance of your space.
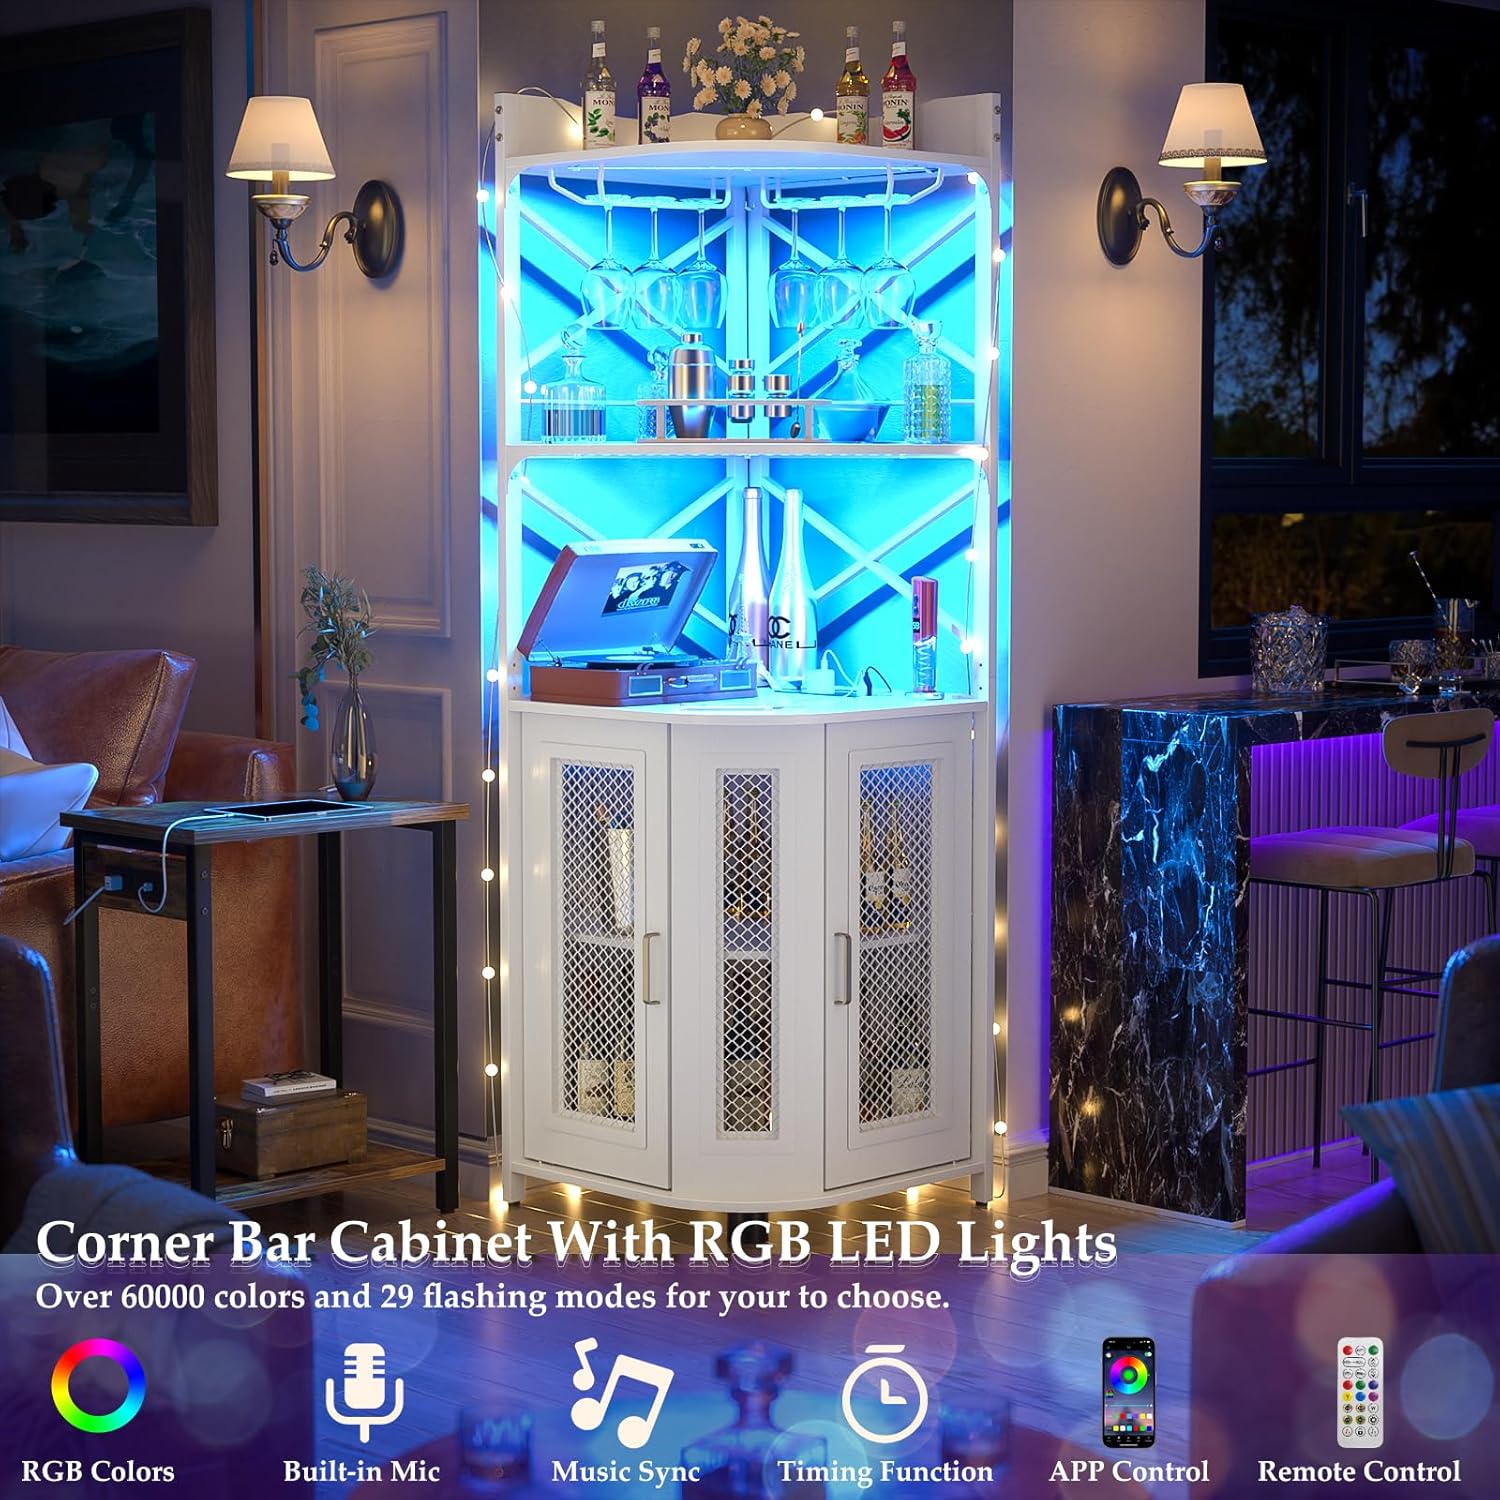
Figure 4: LED Lighting in Use. This image demonstrates the cabinet with its RGB LED lights set to a blue hue, highlighting the contents and creating an atmospheric effect.

Figure 5: Versatile LED Colors. The cabinet is shown in a game room with blue LED lighting, and smaller insets display the cabinet with various other LED colors, illustrating the customizable ambiance.
Maintenance
Regular maintenance will help prolong the life and appearance of your Aheaplus Corner Bar Cabinet.
- Cleaning: Wipe surfaces with a soft, damp cloth. Avoid harsh chemicals or abrasive cleaners, which can damage the finish.
- Dusting: Regularly dust the cabinet to prevent buildup.
- Hardware Check: Periodically check all screws and fasteners to ensure they are tight. Retighten if necessary.
- Electrical Components: Ensure the power cord and LED light connections are not pinched or damaged. If any electrical component is damaged, discontinue use and contact customer support.
- Spills: Immediately wipe up any spills to prevent staining or damage to the wood and metal components.
Troubleshooting
If you encounter issues with your cabinet, refer to the following common problems and solutions:
| Problem | Possible Cause | Solution |
|---|---|---|
| Cabinet is wobbly/unstable. | Uneven floor; loose fasteners; anti-toppling fittings not installed. | Adjust leg pads to level the cabinet. Tighten all assembly screws. Install anti-toppling fittings to a wall stud. |
| Power outlet not working. | Not plugged into wall; wall outlet not active; power strip switch off; overloaded. | Ensure the main power cord is securely plugged into a live wall outlet. Check if the power strip has an on/off switch. Unplug some devices if overloaded. Test the wall outlet with another device. |
| LED lights not turning on/responding. | LED strip not connected to power; remote battery dead; app not connected. | Check all LED strip connections to the power source. Replace remote control batteries. Ensure Bluetooth is enabled and the app is correctly paired with the LED lights. |
| Doors do not close properly. | Misaligned hinges; cabinet not level. | Adjust the hinges for proper alignment. Ensure the cabinet is level using the adjustable leg pads. |
If the problem persists after trying these solutions, please contact Aheaplus customer support for further assistance.
Specifications
| Brand | Aheaplus |
| Model Number | YHWC-01B |
| Color | White |
| Product Dimensions | 18.1"D x 18.1"W x 64.2"H |
| Material | Engineered Wood, Metal |
| Number of Shelves | 5 |
| Power Outlet | 3 AC Outlets, 2 USB Ports (5V/2A) |
| Power Cord Length | 6.56 FT |
| LED Light Features | RGB, Over 60,000 colors, Multiple flashing modes, Music Sync, App Control, Remote Control |
| Assembly Required | Yes |
| Item Weight | 46.3 pounds |
| Special Features | Adjustable Feet, Built-In USB Outlet, LED Light, Glass Holders, Mesh Doors |
Warranty and Support
Aheaplus stands behind the quality of its products. For warranty information, product support, or to order replacement parts, please contact Aheaplus customer service through the retailer where you purchased the product or visit the official Aheaplus website.
Please have your model number (YHWC-01B) and purchase date ready when contacting support.