1. Introduction
Thank you for choosing the Relaxdays Partytent. This manual provides essential information for the safe and correct assembly, use, and maintenance of your new party tent. Please read these instructions carefully before setup and retain them for future reference.
This party tent is designed to provide temporary shelter from sun and light rain, making it ideal for garden parties, barbecues, and other outdoor events. It features a robust steel frame and a tear-resistant, waterproof PE fabric canopy.
2. Safety Information
- Always check weather conditions before setting up and using the tent. Do not use in strong winds, heavy rain, or snow.
- Ensure the canopy is securely anchored to the ground using all provided ropes and stakes to prevent it from being lifted by wind.
- Keep the tent away from heat sources, open flames, and barbecues to prevent fire hazards.
- Do not hang heavy objects from the tent frame.
- Supervise children around the tent.
- Regularly inspect all components for damage or wear. Do not use if any parts are damaged.
3. Package Contents
Please verify that all components are present before beginning assembly:
- 1 x Pavilion canopy (dark grey PE fabric)
- Steel frame poles (various lengths)
- Plastic connectors
- Guy ropes
- Ground stakes
4. Specifications
| Feature | Detail |
|---|---|
| Brand | Relaxdays |
| Model Number | 10046002 |
| Material | PE fabric (90g/m²), Alloy Steel frame |
| Color | Dark Grey |
| Product Dimensions (L x W x H) | 3 x 3 x 2.5 meters |
| Maximum Ceiling Height | 250 cm |
| Floor Area | 7.5 square meters |
| Water Resistance Level | Water-resistant |
| UV Protection | Yes |
| Number of Guy Ropes | 4 |
| Item Weight | 5.66 Kilograms |
| Assembly Required | Yes |
The tent provides protection against sunlight and rain.
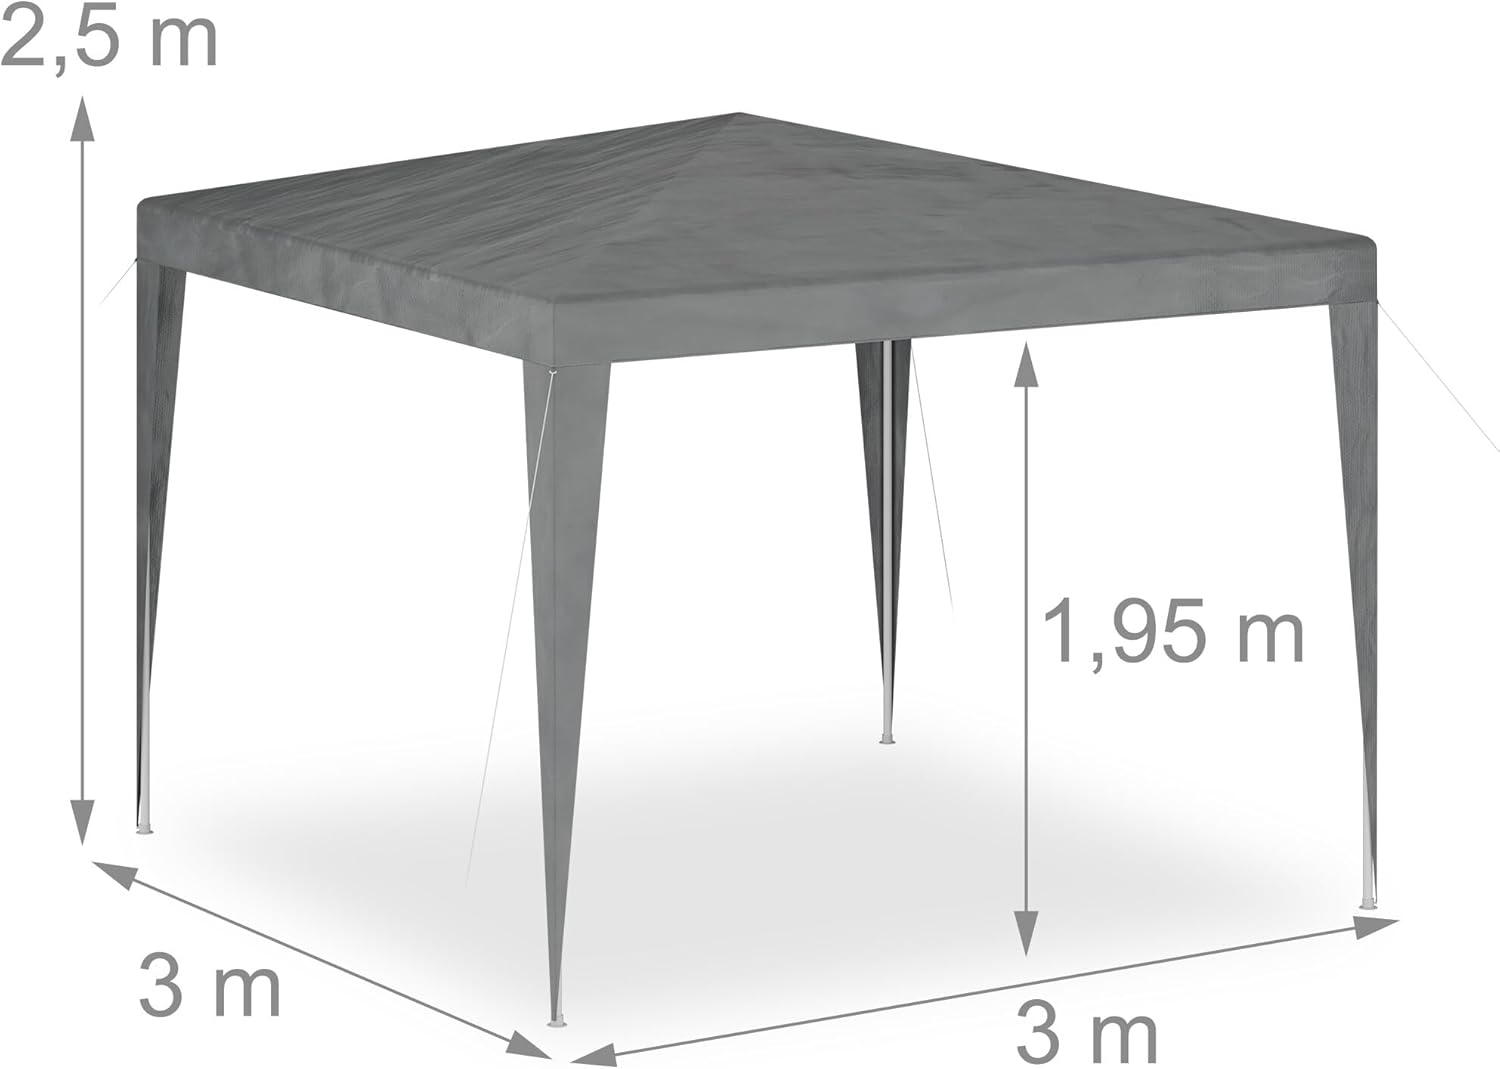
Figure 4.1: Partytent dimensions (3m x 3m base, 2.5m height).
5. Setup and Assembly
Assembly is straightforward thanks to the plug-in system. It is recommended that two people assemble the tent.
- Unpack Components: Lay out all poles, connectors, canopy, ropes, and stakes on a clean, flat surface. Verify all parts are present according to the package contents list.
- Assemble the Roof Frame: Connect the shorter steel poles to the central plastic connector and the corner plastic connectors to form the top square frame. Ensure all connections are secure.
- Attach the Canopy: Drape the PE fabric canopy over the assembled roof frame. Ensure the canopy is correctly oriented with the corners aligning with the frame's corners.
- Secure Canopy to Frame: Use the integrated Velcro straps to secure the canopy to the frame poles. This helps keep the canopy taut and prevents it from shifting.
- Attach Leg Poles: Insert the longer leg poles into the corner plastic connectors of the roof frame.
- Raise the Tent: With assistance, carefully lift the tent to its full height.
- Anchor the Tent: Attach the guy ropes to the designated points on the canopy corners. Extend the ropes outwards at an angle and secure them firmly to the ground using the provided stakes. Ensure the ropes are taut to provide stability.
- Final Check: Double-check all connections, ropes, and stakes to ensure the tent is stable and secure before use.

Figure 5.1: Canopy secured with Velcro strap.

Figure 5.2: Leg pole connection detail.

Figure 5.3: Waterproof canopy fabric.

Figure 5.4: Assembled partytent with detailed features.
6. Operating Instructions
Your Relaxdays Partytent is designed for temporary outdoor use to provide shade and protection from light rain.
- Placement: Choose a flat, level area for setup, away from overhead power lines, trees, or other structures that could cause damage.
- Weather Conditions: This tent is not designed for extreme weather. Disassemble and store the tent during strong winds, heavy rain, thunderstorms, or snow to prevent damage and ensure safety.
- Ventilation: Ensure adequate ventilation, especially if using the tent in warm weather, to prevent heat buildup.
- Anchoring: Always use all provided guy ropes and ground stakes to secure the tent. In soft ground, consider using additional or larger stakes for increased stability.

Figure 6.1: Partytent in use in a garden setting.
7. Maintenance
Proper maintenance will extend the life of your partytent.
- Cleaning: Clean the canopy fabric with a soft brush or cloth and mild soapy water. Do not use harsh chemicals or abrasive cleaners, as these can damage the material. Rinse thoroughly and allow to air dry completely before storage.
- Frame Care: Wipe down the steel frame poles with a damp cloth to remove dirt. Ensure they are dry before storage to prevent rust.
- Storage: When not in use, disassemble the tent and store all components in a dry, cool place, away from direct sunlight and extreme temperatures. Ensure the canopy is completely dry to prevent mold and mildew.
- Inspection: Periodically check all poles, connectors, ropes, and the canopy for any signs of wear, tear, or damage. Replace damaged parts immediately.
8. Troubleshooting
Here are solutions to common issues you might encounter:
| Problem | Possible Cause | Solution |
|---|---|---|
| Tent is unstable or sways in light wind. | Inadequate anchoring; loose ropes or stakes. | Ensure all guy ropes are taut and securely staked into the ground. Consider using heavier stakes or sandbags in windy conditions. |
| Water pooling on the canopy. | Canopy not taut enough; improper assembly. | Re-adjust the canopy and frame to ensure it is stretched tightly. Check that all poles are fully extended and connected correctly. |
| Poles do not fit into connectors. | Incorrect pole or connector; debris in connection point. | Verify you are using the correct poles for each connection point. Clear any debris from inside the connectors or ends of the poles. |
9. Warranty and Support
Relaxdays products are manufactured with quality and durability in mind. For warranty information, product support, or to order replacement parts, please contact Relaxdays customer service through the retailer where you purchased the product or visit the official Relaxdays website.
Please have your model number (10046002) and purchase date available when contacting support.