ReadyWired Replacement Stylus for Magnavox AS305M, 3702, AS9406, AS9408, AS9506, MD699, MX1800
ReadyWired Turntable Needle Stylus Instruction Manual
For Magnavox Models: AS305M, 3702, AS9406, AS9408, AS9506, MD699, MX1800
Introduction
This manual provides detailed instructions for the installation, operation, and maintenance of your new ReadyWired Turntable Needle Stylus. This stylus is designed as a high-quality replacement component for specific Magnavox turntable models, ensuring optimal audio reproduction from your vinyl records. Please read this manual thoroughly before installation to ensure correct usage and to prevent damage to your equipment or the stylus.
Compatible Magnavox Models: AS305M, 3702, AS9406, AS9408, AS9506, MD699, MX1800.
Safety Information
- Always disconnect power to your turntable before attempting any installation or maintenance.
- Handle the stylus with extreme care. The diamond tip is delicate and can be easily damaged.
- Avoid touching the stylus tip with your fingers, as oils and dirt can degrade sound quality and damage the tip.
- Keep the stylus out of reach of children and pets.
- Dispose of old styli responsibly.
Setup and Installation
Replacing your turntable stylus requires careful handling. Follow these steps to ensure proper installation:
- Power Off: Ensure your turntable is powered off and unplugged from the electrical outlet.
- Locate Cartridge: Gently lift the tonearm and secure it in its rest. Identify the cartridge assembly at the end of the tonearm. The stylus is typically a small, removable component attached to the front of the cartridge.
- Remove Old Stylus: Carefully grasp the sides of the old stylus assembly (the plastic housing, not the needle itself) and gently pull it forward and slightly downward. It should slide out of the cartridge. Avoid excessive force.
- Inspect New Stylus: Unpack your new ReadyWired stylus. Inspect it for any visible damage.
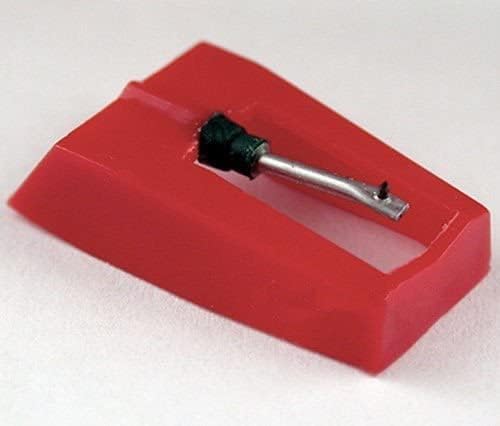
Image 1: Front view of the ReadyWired Turntable Needle Stylus. This image shows the red plastic housing with the metal cantilever and diamond tip protruding from the front opening. The stylus is designed to be inserted into a compatible cartridge.
- Install New Stylus: Align the new stylus with the cartridge opening. Gently push it upwards and backward until it clicks securely into place. Ensure it is fully seated and flush with the cartridge body. Do not force it.

Image 2: Side view of the ReadyWired Turntable Needle Stylus. This perspective highlights the overall shape of the red plastic housing and the angle of the cantilever, which holds the diamond tip. Proper alignment is crucial for correct installation.
- Verify Installation: Visually confirm that the stylus is correctly installed and the needle is visible and straight.
- Reconnect Power: Plug in and power on your turntable.
Operating Instructions
Once the new stylus is installed, your turntable is ready for use. Observe the following for optimal performance:
- Record Speed: This stylus is designed for 16, 33⅓, and 45 RPM records. It is NOT compatible with 78 RPM records. Ensure your turntable is set to the correct speed for the record you are playing.
- Tracking Force: The recommended tracking pressure for this stylus is between 1.0 and 3.0 grams. Refer to your turntable's manual for instructions on how to adjust the tracking force, if applicable. Incorrect tracking force can lead to poor sound quality or record wear.
- Gentle Handling: Always lower the tonearm gently onto the record. Avoid dropping the tonearm or dragging the stylus across the record surface.
Maintenance
- Stylus Cleaning: Regularly clean the stylus tip to remove dust and debris. Use a soft stylus brush, gently brushing from back to front (the direction the record spins) to avoid damaging the cantilever. Never brush side-to-side.
- Record Cleaning: Keep your records clean. Dust and grime on records are the primary causes of stylus wear and poor sound quality.
- Stylus Replacement: A stylus typically lasts between 500 and 1000 hours of playback, depending on care and record condition. Signs of wear include distorted sound, sibilance, or a dull high-frequency response. Replace the stylus promptly when wear is detected to prevent damage to your records.
Troubleshooting
| Problem | Possible Cause | Solution |
|---|---|---|
| No sound or very low sound | Stylus not fully seated; turntable not powered on; amplifier/receiver issues. | Ensure stylus is securely installed. Check all power connections and audio cables. |
| Distorted or muffled sound | Dirty stylus; worn stylus; incorrect tracking force; dirty record. | Clean stylus. If sound persists, replace stylus. Adjust tracking force. Clean record. |
| Skipping or jumping | Dirty record; incorrect tracking force; damaged record; turntable not level. | Clean record. Adjust tracking force (increase slightly within recommended range). Ensure turntable is on a stable, level surface. |
| Humming or buzzing noise | Grounding issue; interference from other electronics. | Ensure turntable is properly grounded. Move turntable away from other electronic devices. |
Specifications
- Stylus Type: Diamond Conical Tip
- Tip Radius: 0.7 mil
- Compatible Speeds: 16 RPM, 33⅓ RPM, 45 RPM (Not for 78 RPM records)
- Recommended Tracking Pressure: 1.0 – 3.0 grams
- Brand: ReadyWired
- Compatible Turntable Models (Magnavox): AS305M, 3702, AS9406, AS9408, AS9506, MD699, MX1800
Warranty and Support
For warranty information or technical support regarding your ReadyWired Turntable Needle Stylus, please contact the retailer or manufacturer directly. Keep your purchase receipt as proof of purchase.
Ask a question about this manual
Ask about setup, troubleshooting, compatibility, parts, safety, or missing instructions. Manuals+ will review the question and use this page’s manual context to help answer it.