1. Introduction
Thank you for choosing the Leaton 10000mAh Hand Crank Emergency Radio. This device is designed to provide essential communication, illumination, and power in emergency situations, as well as for daily use. It features AM/FM/NOAA weather band radio reception, multiple charging methods (hand crank, solar, USB-C), a powerful LED flashlight, a reading lamp, an SOS alarm, and a power bank function for charging mobile devices. Please read this manual thoroughly to understand its functions and ensure proper operation and maintenance.

Image 1.1: The Leaton Emergency Radio, showcasing its primary functions including radio, flashlight, and mobile phone charging capability.
2. Product Overview
2.1 Key Features
- High Capacity Battery: Built-in 10000mAh polymer battery for extended use and mobile device charging.
- Multi-Band Radio: Receives AM (520-1710kHz), FM (87-108MHz), and NOAA Weather Band (162.400-162.550MHz).
- Emergency Lighting: Integrated 3-mode LED flashlight (20 LED) and a 48-LED reading lamp.
- Multiple Charging Methods: Rechargeable via USB Type-C, hand crank, and solar panel.
- Power Bank Function: USB output port for charging external devices like smartphones.
- Safety Features: SOS alarm siren and an integrated compass.
- Durable Design: IPX3 water-resistant rating, compact and portable.
2.2 Components and Controls

Image 2.1: Labeled diagram illustrating the various parts and controls of the Leaton Emergency Radio, including handle, antenna, power display, tuner dial, volume dial, band switch, flashlight button, reading light button, SOS button, USB input, USB output, hand crank, and solar panel.
- Handle: For easy carrying.
- Antenna: Extend for optimal radio reception.
- Power Display: Indicates battery level.
- Tuner Dial: Adjusts radio frequency.
- Volume Dial: Controls audio output level.
- Band Switch: Selects AM, FM, or WB (Weather Band).
- Flashlight Button: Activates and cycles flashlight modes.
- Reading Light Button: Turns the reading lamp on/off.
- SOS Button: Activates the emergency alarm.
- USB Input (Type-C): For charging the radio.
- USB Output: For charging external devices.
- Hand Crank: Manual power generation.
- Solar Panel: Charges the internal battery using sunlight.
- Compass: Integrated for navigation.
2.3 Included Components
- Leaton Emergency Radio (1 unit)
- USB Type-C Charging Cable (1 unit)
- User Manual (this document)
3. Setup
3.1 Initial Charging
Before first use, it is recommended to fully charge the radio using the USB Type-C cable.
- Connect the provided USB Type-C cable to the USB Input port on the radio.
- Connect the other end of the cable to a standard USB power adapter (not included) or a computer USB port.
- The power indicator lights will illuminate to show charging status. The radio is fully charged when all indicator lights are solid.
A full charge ensures the internal 10000mAh battery is ready for use, including its power bank function.

Image 3.1: Visual representation of the radio's 10000mAh battery capacity, highlighting its robust power storage for emergencies.
4. Operating Instructions
4.1 Radio Operation (AM/FM/NOAA)
- Power On/Off: Rotate the Volume Dial clockwise to turn the radio on. Rotate counter-clockwise until it clicks to turn off.
- Select Band: Use the Band Switch to select between AM, FM, or WB (Weather Band).
- Extend Antenna: For optimal reception, fully extend the telescopic antenna.
- Tune Frequency: Rotate the Tuner Dial to find your desired station or weather alert channel. The tuning indicator light will illuminate when a strong signal is received.
- Adjust Volume: Use the Volume Dial to set the listening level.

Image 4.1: The emergency radio in use, illustrating its capability for strong reception across AM, FM, and Weather Bands with its extended antenna.
4.2 Charging External Devices (Power Bank Function)
The radio's 10000mAh battery can be used to charge your mobile phone or other USB-powered devices.
- Connect your device's USB charging cable to the USB Output port on the radio.
- The radio will automatically begin charging your device.
- Monitor your device's charging status. Disconnect once charging is complete to conserve the radio's battery.
5. Charging the Radio
The Leaton Emergency Radio offers three methods to recharge its internal battery: USB Type-C, Hand Crank, and Solar Panel.
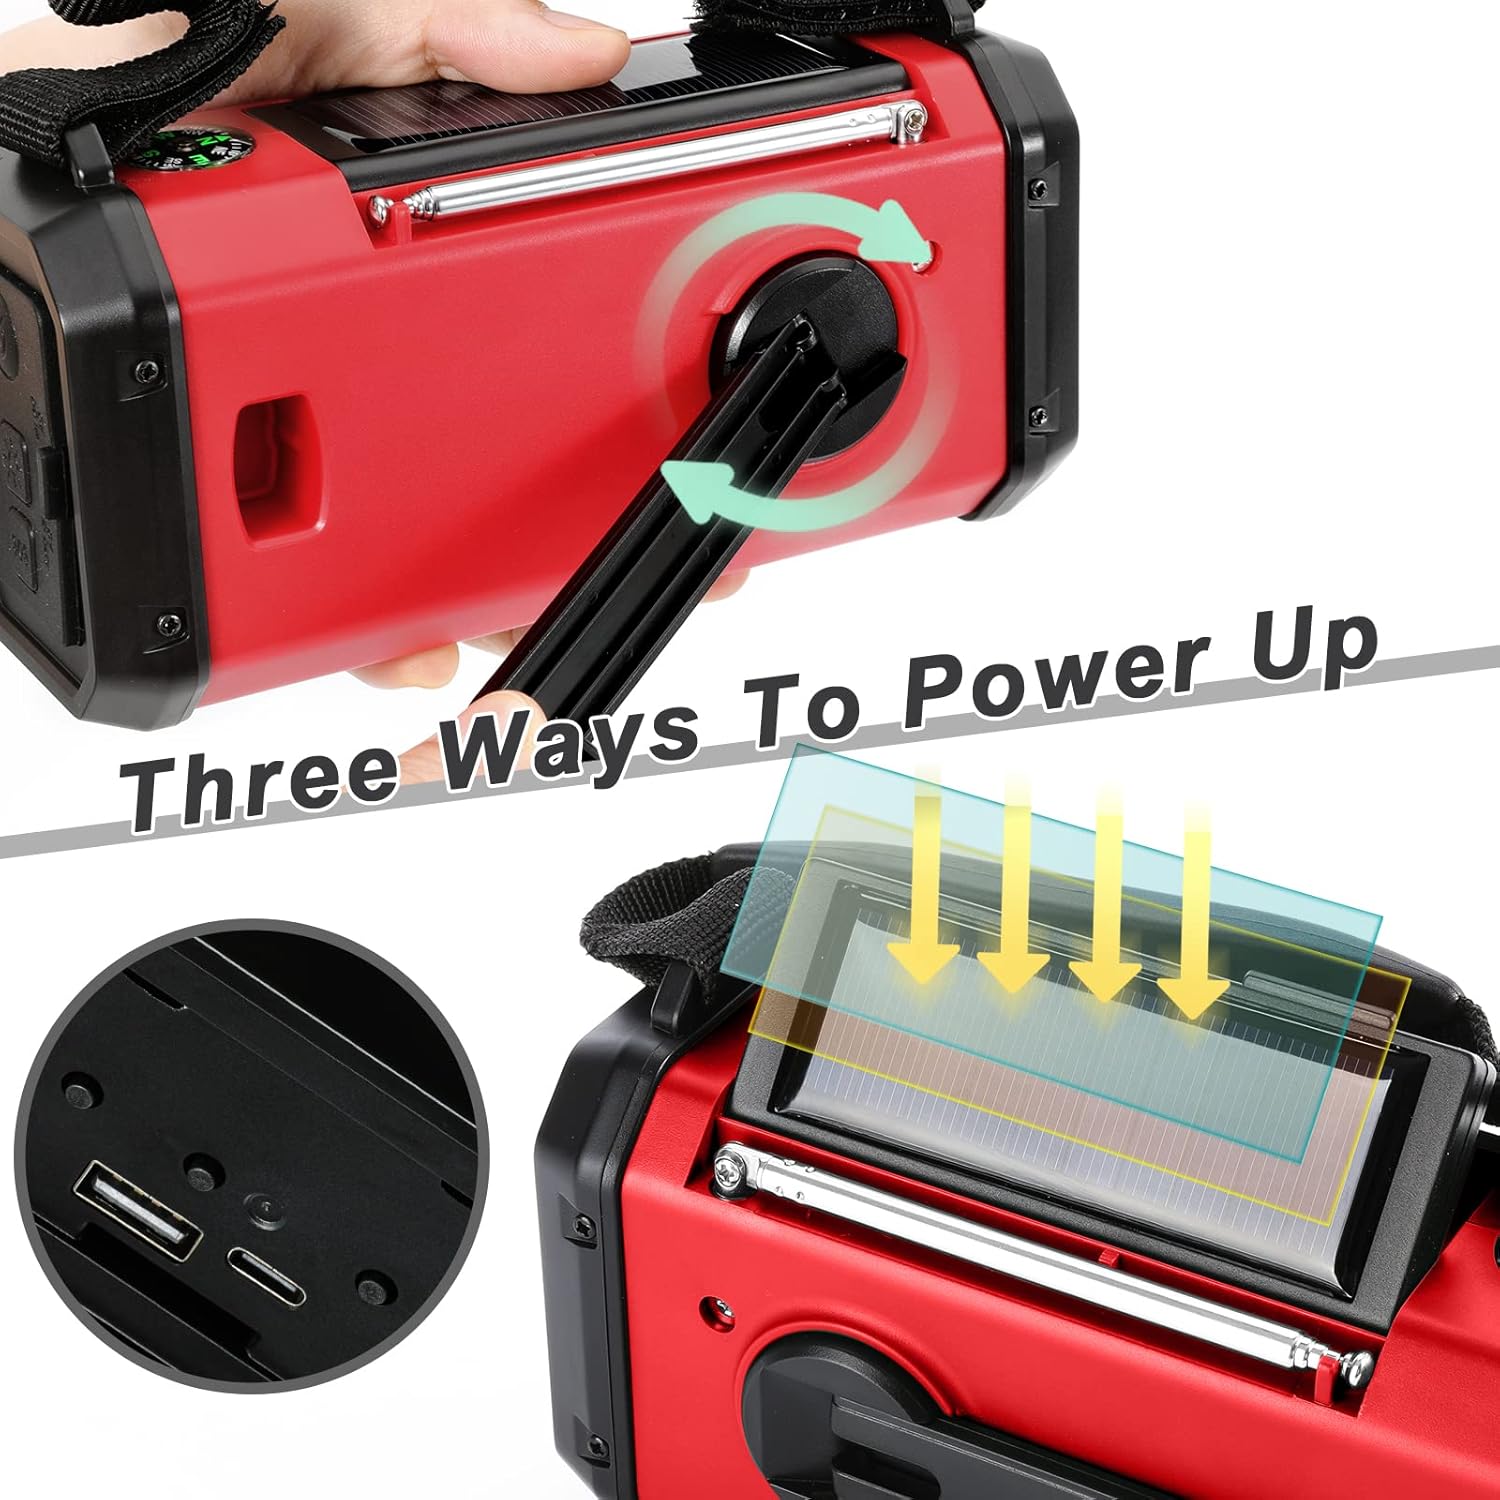
Image 5.1: Illustration of the three distinct charging methods for the emergency radio: USB-C input, manual hand cranking, and solar panel exposure.
5.1 USB Type-C Charging
This is the primary and fastest charging method.
- Connect the USB Type-C cable to the radio's USB Input port and a 5V USB power source.
- The battery indicator lights will show charging progress.
5.2 Hand Crank Charging
For emergency power when other sources are unavailable.
- Unfold the hand crank handle located on the back of the radio.
- Rotate the hand crank clockwise or counter-clockwise at a steady pace (approximately 130-150 RPM) for 3-5 minutes to generate enough power for short-term use.
- Continuous cranking will charge the internal battery.
5.3 Solar Panel Charging
Provides supplementary charging and maintains battery life.
- Place the radio with the solar panel facing direct sunlight.
- The solar panel charges the internal battery slowly. This method is ideal for maintaining charge or providing minimal power in prolonged outdoor situations. It is not intended as the primary charging method for a depleted battery.
6. Flashlight and Reading Lamp
6.1 Flashlight Operation
The radio features a powerful LED flashlight with three modes.
- Press the Flashlight Button once for High Beam mode.
- Press again for Low Beam mode.
- Press a third time for Mixed Beam mode (High and Low combined).
- Press a fourth time to turn the flashlight off.

Image 6.1: Depiction of the flashlight's three distinct modes: Far beam for long-distance illumination, Low beam for close-range, and Mixed beam for broader coverage.
6.2 Reading Lamp Operation
The 48-LED reading lamp provides ambient light for reading or general illumination.
- Press the Reading Light Button once to turn the lamp on.
- Press again to turn the lamp off.

Image 6.2: The reading lamp providing sufficient light for activities such as reading, demonstrating its utility in low-light conditions.
7. SOS Alarm and Compass
7.1 SOS Alarm
In an emergency, the SOS alarm can be activated to attract attention.
- Press and hold the SOS Button to activate a loud siren and flashing light.
- Release the SOS Button to deactivate the alarm.
7.2 Compass
The integrated compass provides basic directional guidance.
- Refer to the compass located on the top of the radio for directional orientation.
- Ensure the radio is held level and away from strong magnetic fields for accurate readings.
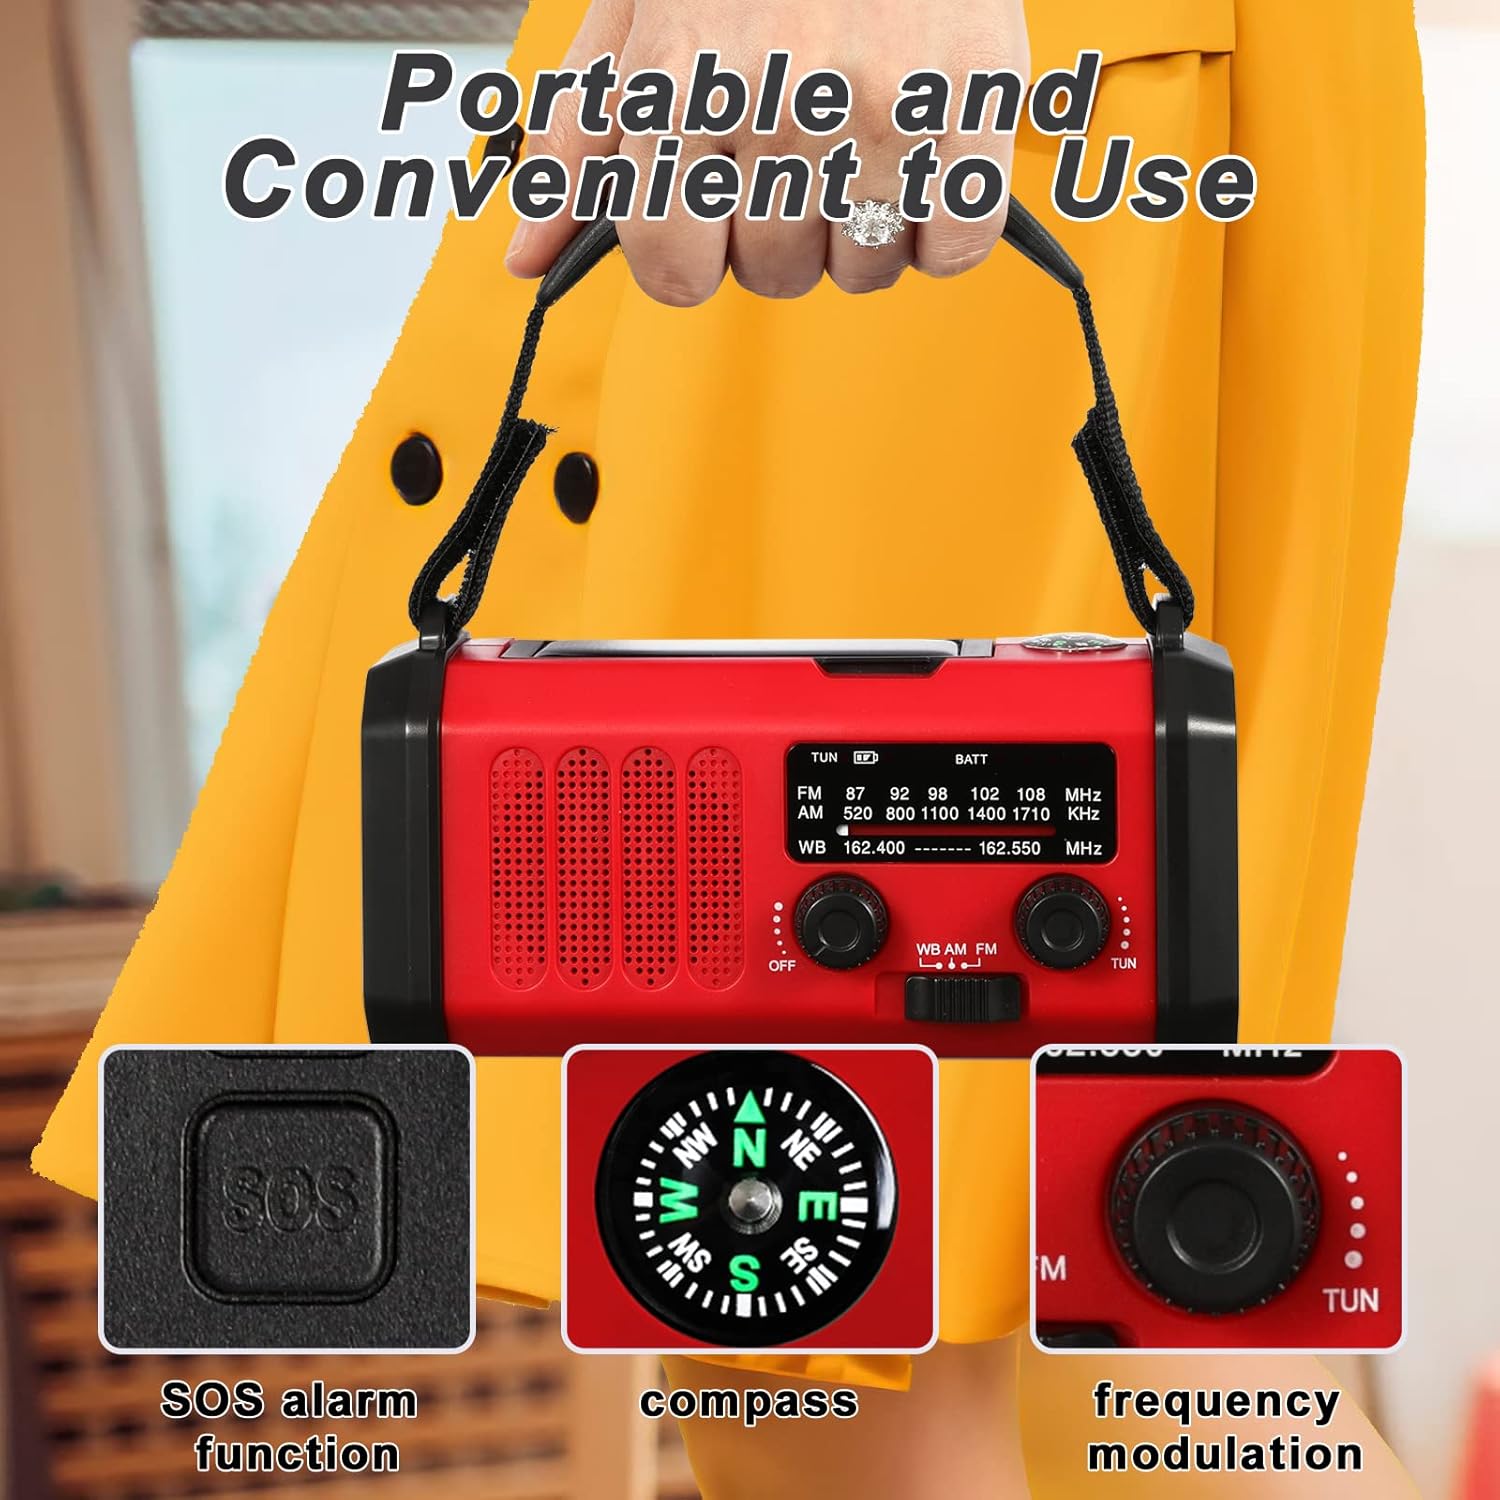
Image 7.1: Close-up view of the radio's top panel, highlighting the SOS alarm button, the integrated compass for navigation, and the frequency modulation dial.
8. Maintenance
- Cleaning: Wipe the radio with a soft, damp cloth. Do not use abrasive cleaners or solvents.
- Storage: Store the radio in a cool, dry place away from direct sunlight and extreme temperatures.
- Battery Care: To prolong battery life, fully charge the radio at least once every three months, even if not in use.
- Water Resistance: The radio is IPX3 water-resistant, meaning it is protected against spraying water. Do not immerse it in water.
9. Troubleshooting
| Problem | Possible Cause | Solution |
|---|---|---|
| Radio not turning on. | Battery is depleted. | Charge the radio using USB-C, hand crank, or solar panel. |
| Poor radio reception. | Antenna not extended; weak signal area. | Fully extend the telescopic antenna. Move to an open area or adjust radio position. |
| Flashlight/Reading lamp not working. | Battery is too low; faulty LED. | Charge the radio. If problem persists, contact customer support. |
| Phone not charging from radio. | Radio battery too low; incorrect cable/connection. | Ensure radio is sufficiently charged. Use a functional USB cable and ensure it's connected to the USB Output port. |
| Solar charging is slow. | Solar charging is supplementary; insufficient direct sunlight. | Solar charging is designed for maintenance, not rapid charging. Ensure direct, strong sunlight. Use USB-C or hand crank for faster charging. |
10. Specifications
- Model: ab06e69f-7212-4cad-a81d-4dd9c4621719
- Brand: Leaton
- Battery Capacity: 10000mAh Polymer Battery
- Radio Bands: AM (520-1710kHz), FM (87-108MHz), NOAA Weather Band (162.400-162.550MHz)
- Flashlight: 20 LED, 3 Modes (High Beam, Low Beam, Mixed Beam)
- Reading Lamp: 48 LED
- Charging Inputs: USB Type-C, Hand Crank, Solar Panel
- Output: USB (for charging external devices)
- Water Resistance: IPX3 (protected against spraying water)
- Product Dimensions: 6.2 x 2.2 x 2.8 inches (160 x 90 x 80 mm)
- Item Weight: 1.3 pounds (500 g)
11. Warranty and Support
11.1 Warranty Information
The Leaton 10000mAh Hand Crank Emergency Radio comes with a 12-month warranty from the date of purchase. This warranty covers manufacturing defects and workmanship under normal use. It does not cover damage caused by misuse, accidents, unauthorized modifications, or natural disasters. Please retain your proof of purchase for warranty claims.
11.2 Customer Support
For any questions, technical assistance, or warranty claims, please contact our customer support team. We offer 24/7 customer support to assist you.
Contact Information:
Please refer to the contact details provided on the product packaging or the official Leaton website.