1. Introduction
This manual provides essential instructions for the safe assembly, operation, and maintenance of your MELLCOM 12V Battery Powered Ride on Excavator with Trailer. Please read this manual thoroughly before first use and retain it for future reference.
1.1 Important Safety Information
To ensure the safety of the user and others, always follow these basic safety precautions:
- Adult supervision is required at all times.
- This product is suitable for children aged 24 months to 7 years.
- Ensure the safety belt is securely fastened before operation.
- Do not operate near roads, motor vehicles, steep inclines, swimming pools, or other bodies of water.
- Always wear appropriate safety gear, such as a helmet.
- Do not allow more than one rider at a time.
- Keep hands, hair, and clothing away from moving parts.
2. Product Overview
The MELLCOM Ride on Excavator is designed to provide an engaging and interactive experience for children, featuring realistic functions and multiple control options.
2.1 Key Features
- Functional Digger Arm: Allows for realistic shoveling and dumping actions.
- Rich Interactive Functions: Includes LED headlights, horn, music player, one-button start, accelerator pedal, and volume adjustment.
- Two Driving Modes: Operable by child via pedal or by parent using the remote control.
- Detachable Trailer: Provides storage for toys and can be easily attached or removed.
- Safety Belt: Ensures the child's security during operation.
2.2 Components and Controls

Figure 1: The MELLCOM 12V Battery Powered Ride on Excavator with its detachable trailer.

Figure 2: Detailed dimensions of the ride-on excavator and trailer, showing overall length of 71.6 inches and height of 22.4 inches.

Figure 3: Close-up view of the manual digging control handle, which operates the excavator's bucket for shoveling and dumping.
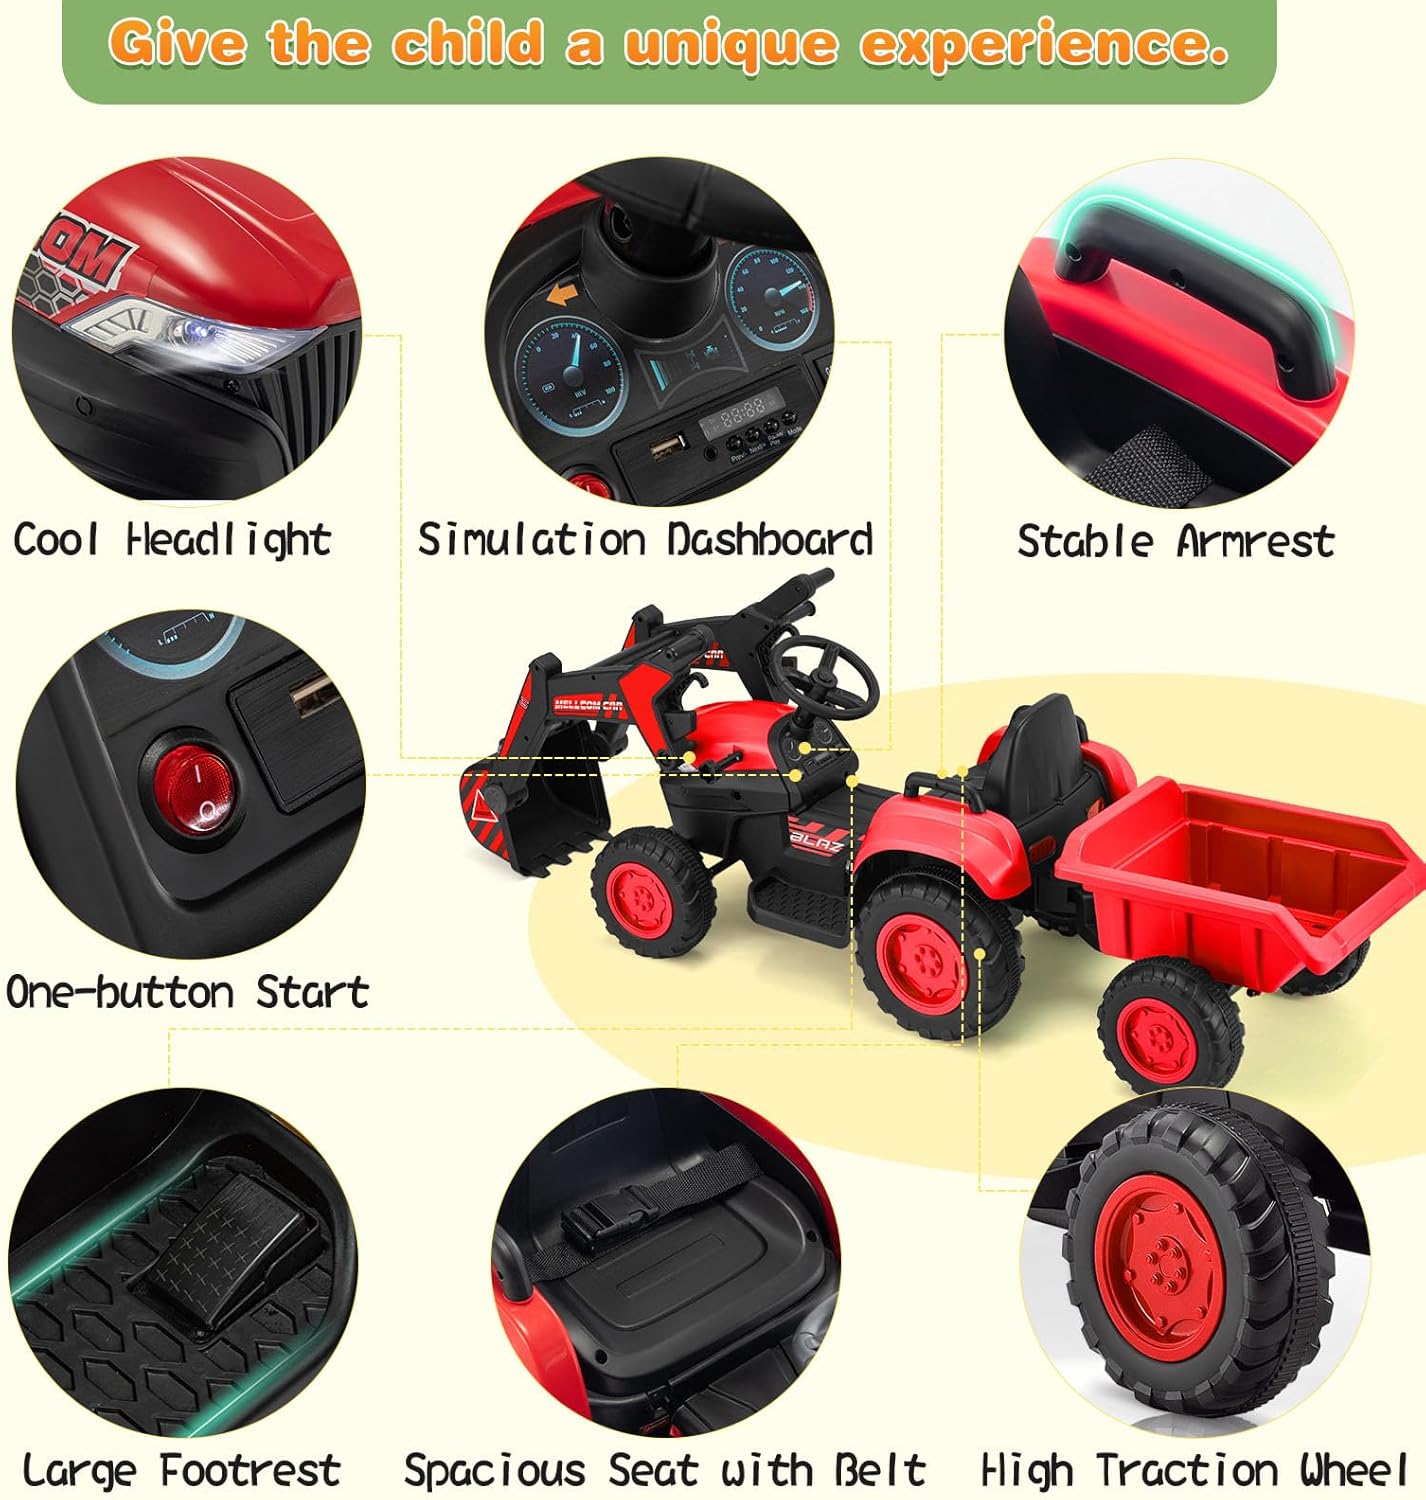
Figure 4: Overview of interactive features including LED headlights, a simulation dashboard, one-button start, large footrest, spacious seat with safety belt, and high traction wheels.

Figure 5: The detachable trailer feature, illustrating its capacity for carrying items and how it can be easily attached or removed from the main vehicle.
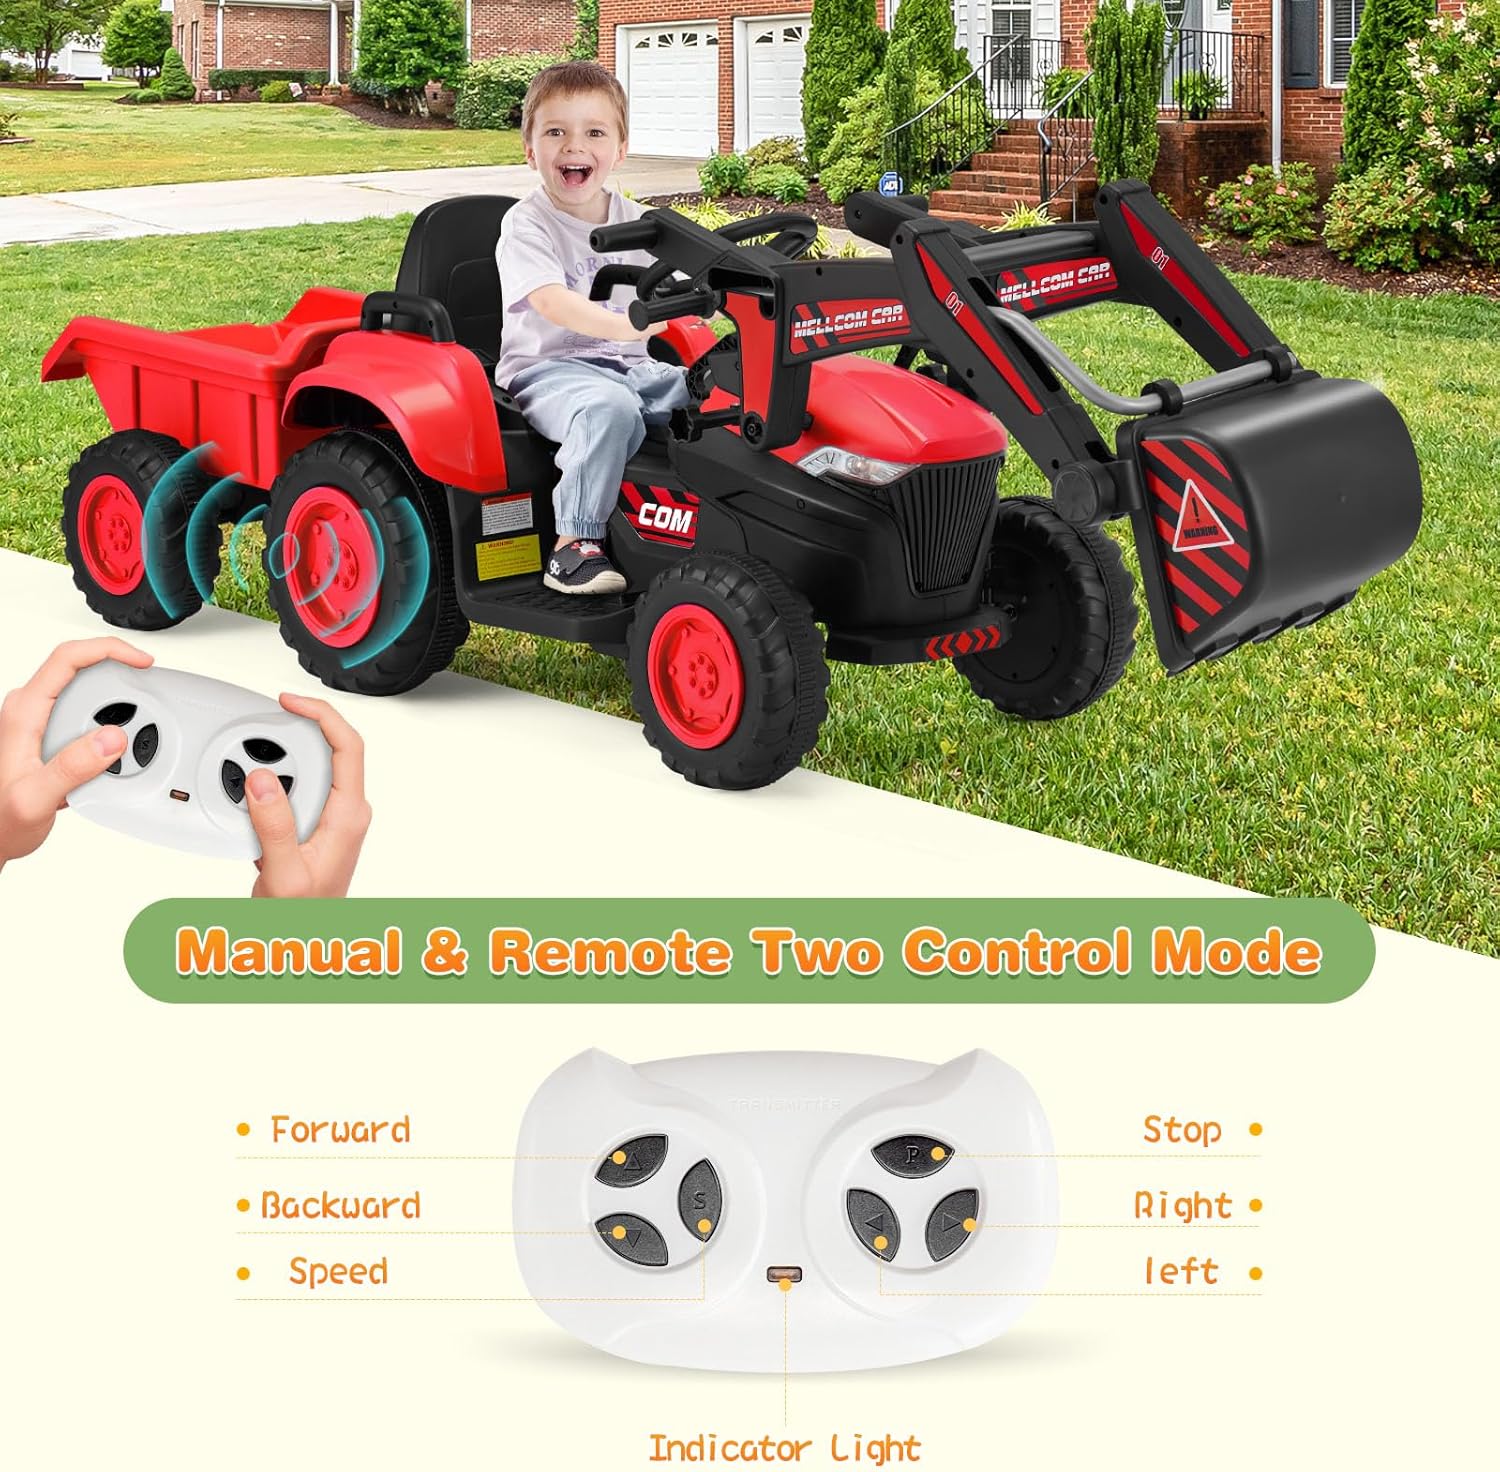
Figure 6: The remote control unit, allowing parents to assist in operating the excavator, shown alongside a child driving the vehicle.

Figure 7: The music player functionality, highlighting USB and Bluetooth connectivity for audio playback during use.
3. Setup and Assembly
Carefully unpack all components and ensure all parts are present before beginning assembly. Refer to the included assembly diagram for detailed steps.
3.1 Unpacking
- Remove all contents from the packaging.
- Verify that all parts listed in the parts list are included and undamaged.
- Keep packaging materials away from children.
3.2 Assembly Steps (General)
- Attach the wheels to the main body of the excavator and the trailer.
- Connect the battery terminals. Ensure connections are secure.
- Install the steering wheel onto the steering column.
- Assemble and attach the digger arm to the front of the vehicle.
- Attach the trailer to the rear hitch of the excavator.
- Perform an initial charge of the battery as described in Section 4.
4. Battery Charging
Proper battery charging is crucial for optimal performance and longevity.
- Before first use, fully charge the battery for eight to twelve hours. Do not overcharge.
- Use only the provided 12V 1000MA charger.
- Connect the charger to the charging port on the vehicle, then plug it into a standard wall outlet.
- Recharge the vehicle when the battery level drops to approximately twenty percent to prevent deep discharge.
- Always turn off the power switch on the vehicle when not in use or during charging.
- Do not charge the battery for more than 12 hours.
5. Operation
Familiarize yourself with the controls and driving modes before operating the vehicle.
5.1 Starting the Vehicle
- Ensure the battery is charged and connected.
- Press the one-button start switch located on the dashboard.
- The LED headlights will illuminate, and the vehicle will be ready for operation.
5.2 Driving Modes
The excavator offers two distinct driving modes:
- Child Operated Mode: The child controls the vehicle using the accelerator pedal for forward and backward movement, and the steering wheel for direction. Speed can be adjusted (high, medium, low) via the control panel.
- Parent Remote Control Mode: Parents can override child control and operate the vehicle using the provided remote control. This mode allows for steering, forward/backward movement, and speed adjustment, ensuring safety and guidance.
5.3 Digger Arm Operation
The functional digger arm is controlled manually using the digging handle. This allows the child to perform realistic shoveling and dumping actions, enhancing the play experience.
5.4 Interactive Features
- LED Headlights: Provide illumination and a realistic appearance.
- Horn: Press the horn button for sound effects.
- Music Player: The central control panel includes a music player with volume adjustment, USB input, and Bluetooth connectivity for playing audio.
6. Maintenance
Regular maintenance helps prolong the life of your ride-on excavator.
- Cleaning: Wipe the vehicle with a soft, damp cloth. Do not use abrasive cleaners or solvents. Avoid spraying water directly onto electrical components.
- Storage: Store the vehicle in a dry, cool place away from direct sunlight when not in use. If storing for extended periods, ensure the battery is fully charged and disconnect it.
- Battery Care: Recharge the battery at least once a month during periods of non-use to maintain its health.
- Inspections: Periodically check all screws, nuts, and connections to ensure they are tight and secure. Inspect wheels and axles for wear.
7. Troubleshooting
If you encounter issues with your MELLCOM Ride on Excavator, refer to the following common problems and solutions:
| Problem | Possible Cause | Solution |
|---|---|---|
| Vehicle does not move | Battery is low or not connected; Power switch is off; Loose wiring connection. | Charge the battery; Ensure battery is properly connected; Turn on the power switch; Check all wiring connections. |
| Vehicle moves slowly | Low battery charge; Overload (too much weight); Operating on rough terrain. | Recharge the battery; Reduce load; Operate on smoother surfaces. |
| Remote control not working | Remote control batteries are dead; Remote not paired with vehicle. | Replace remote control batteries; Refer to pairing instructions (if applicable, not provided in source). |
| Digger arm not functioning | Mechanism jammed; Control handle not engaged properly. | Check for obstructions; Ensure handle is fully engaged. |
If the problem persists after attempting these solutions, please contact customer support.
8. Specifications
Technical details for the MELLCOM 12V Battery Powered Ride on Excavator:
| Feature | Detail |
|---|---|
| Product Dimensions | 71.6 x 20.5 x 22.4 inches |
| Item Weight | 31.5 pounds |
| Recommended Age | 24 months - 7 years |
| Battery | 12V 4.5AH |
| Charger | 12V 1000MA |
| Speed Range | 2-4.5 MPH |
| Charge Time | 8-12 Hours |
| Play Time | 1-2 Hours |
| Material | PP + Iron |
9. Warranty and Support
For warranty information or technical support, please refer to the purchase documentation or contact MELLCOM customer service directly. Keep your proof of purchase for any warranty claims.
Contact information for MELLCOM can typically be found on their official website or through the retailer where the product was purchased.