
GeoMax Zone20 H
GeoMax Zone20 H Self-Leveling Rotary Laser with ZRD105 Digital Receiver - User Manual
Model: Zone20 H | Part Number: 6010637
Introduction
The GeoMax Zone20 H with ZRD105 Digital Receiver is a professional-grade, self-leveling rotary laser kit designed for a wide range of construction applications. This manual provides essential information for the safe and effective operation, setup, maintenance, and troubleshooting of your GeoMax Zone20 H laser and ZRD105 receiver.
It is crucial to read this manual thoroughly before using the device to ensure proper functionality and to prevent potential hazards or damage.
Safety Information
Always adhere to the following safety guidelines to prevent injury or damage to the equipment:
- Laser Radiation: This product is a Class 1 laser product (635 nm, 2.6mW). Avoid direct eye exposure to the laser beam. Do not stare into the beam or view directly with optical instruments.
- Battery Safety: Use only specified battery types (4 D-cell alkaline or Li-Ion). Do not mix old and new batteries, or different types of batteries. Dispose of batteries according to local regulations.
- Environmental Conditions: Do not operate the device in explosive atmospheres or near flammable materials. Protect the device from extreme temperatures, direct sunlight, and excessive moisture.
- Maintenance: Only qualified personnel should perform repairs. Unauthorized modifications can compromise safety and void the warranty.
- Secure Placement: Always ensure the laser is placed on a stable, level surface or securely mounted on a tripod to prevent tipping.
Package Contents
Verify that all items listed below are present in your package:
- GeoMax Zone20 H Self-Leveling Rotary Laser
- GeoMax ZRD105 Digital Receiver
- Receiver Bracket
- Hard Carrying Case
- User Manual (this document)
Product Overview

Figure 1: GeoMax Zone20 H Rotary Laser mounted on a tripod. This image shows the overall setup of the laser level, highlighting its robust design and the rotating head from which the laser beam is emitted.
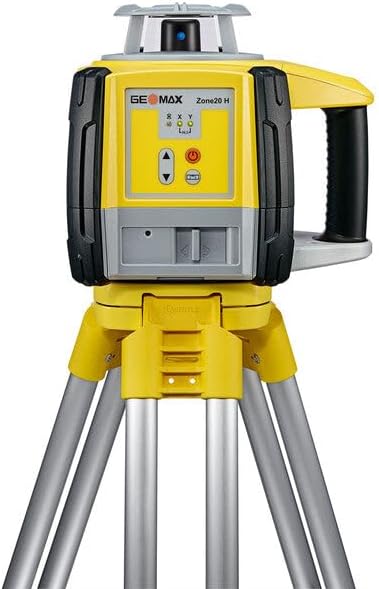
Figure 2: Front view of the GeoMax Zone20 H Rotary Laser. This view details the control panel with power and adjustment buttons, and the laser emission window.
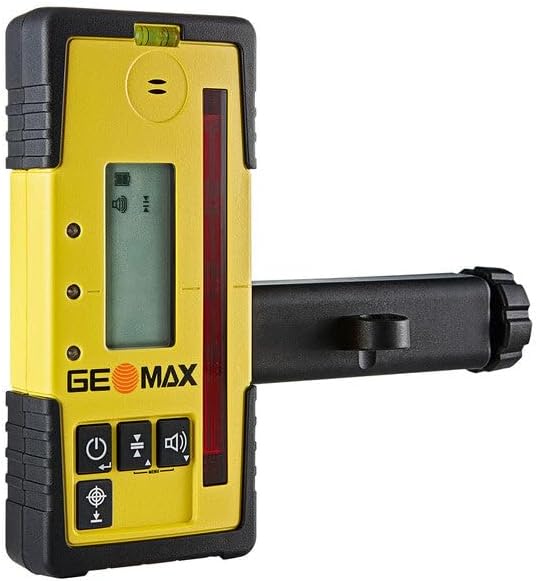
Figure 3: Side view of the GeoMax ZRD105 Digital Receiver with its mounting bracket. This image shows the side profile of the receiver, including the detection window and the attachment point for the bracket.

Figure 4: Front view of the GeoMax ZRD105 Digital Receiver. This view highlights the digital display, audio indicator, and control buttons for power, accuracy settings, and volume.
Key Components:
- Zone20 H Rotary Laser: Emits a highly accurate horizontal laser plane for various leveling tasks. Features self-leveling capabilities and manual slope adjustments.
- ZRD105 Digital Receiver: Detects the laser beam from the Zone20 H, providing visual and audible indications for precise height determination.
- Control Panel: Located on the laser unit, includes power button, manual slope adjustment buttons, and status indicators.
- Battery Compartment: For inserting 4 D-cell alkaline or Li-Ion batteries.
Setup
1. Battery Installation
- Zone20 H Laser:
- Locate the battery compartment on the side or bottom of the laser unit.
- Open the compartment cover.
- Insert 4 D-cell alkaline batteries, ensuring correct polarity (+/-). Alternatively, insert a compatible Li-Ion battery pack if available.
- Close the battery compartment cover securely to maintain the IP67 protection rating.
- ZRD105 Digital Receiver:
- Locate the battery compartment on the back of the receiver.
- Open the cover and insert the required batteries (typically AA or AAA, refer to receiver's specific instructions if different from laser).
- Close the cover securely.
2. Mounting the Laser
- Place the Zone20 H laser on a stable, level surface or mount it securely onto a tripod using the standard tripod thread at the base of the unit.
- Ensure the tripod is stable and positioned where the laser beam can cover the desired work area without obstruction.
3. Attaching the Receiver Bracket
- Attach the ZRD105 Digital Receiver to the provided receiver bracket. This bracket allows the receiver to be mounted on a grade rod or other suitable support.
- Ensure the receiver is firmly secured in the bracket.
Operating Instructions
1. Powering On and Self-Leveling
- Press the power button on the Zone20 H laser unit.
- The laser will automatically begin its self-leveling process. This typically takes a few seconds. The laser will emit a continuous rotating beam once leveled.
- If the laser is outside its self-leveling range (±6 degrees), an indicator light or audible alarm may activate. Adjust the laser's position until it can self-level.
2. Using the ZRD105 Digital Receiver
- Power on the ZRD105 Digital Receiver by pressing its power button.
- Hold the receiver with its detection window facing the rotating laser beam.
- Move the receiver up or down along your grade rod or measurement point.
- The digital display on the receiver will show arrows indicating whether to move up or down to find the laser plane. An audible tone will also guide you. A continuous tone and a centered indicator on the display signify that the receiver is precisely on the laser plane.
- The ZRD105 offers an extended detection window of 3.1 inches and provides accuracy of ±2.5 mm (±1/10 inch).
3. Manual Slope Adjustment (Zone20 H)
- The Zone20 H allows for manual slope adjustments for inclined applications. Refer to the laser's control panel for specific buttons (often labeled with arrows or 'X'/'Y' axes).
- Deactivate the automatic self-leveling function if necessary (consult the laser's specific button layout).
- Use the manual adjustment buttons to tilt the laser plane along the desired axis.
Maintenance
- Cleaning: Use a soft, damp cloth to clean the exterior of the laser and receiver. Do not use harsh chemicals or abrasive cleaners. Keep the laser emission window and receiver detection window clean for optimal performance.
- Storage: When not in use, store the Zone20 H and ZRD105 in their hard carrying case in a dry, temperature-controlled environment. Remove batteries if storing for extended periods to prevent leakage.
- Calibration: While the Zone20 H is a self-leveling unit, periodic professional calibration checks are recommended to ensure continued accuracy, especially after significant impacts or prolonged use.
- Battery Life: The Zone20 H offers over 60 hours of operation with alkaline batteries and over 40 hours with Li-Ion batteries. Replace or recharge batteries promptly when the low battery indicator appears.
Troubleshooting
| Problem | Possible Cause | Solution |
|---|---|---|
| Laser does not power on. | Dead or incorrectly installed batteries. | Check battery polarity. Replace with fresh batteries. |
| Laser beam is not rotating or is blinking. | Laser is out of self-leveling range. | Adjust the laser's position until it is within its ±6 degree self-leveling range. Ensure the surface is stable. |
| Receiver not detecting laser beam. | Receiver is off, batteries are low, or not facing the laser. | Ensure receiver is powered on and has fresh batteries. Orient the receiver's detection window directly towards the laser. Check if laser is powered on and rotating. |
| Inaccurate readings. | Laser or receiver is not stable, or unit needs calibration. | Ensure both units are on stable surfaces. If issues persist, contact GeoMax support for calibration. |
Specifications
| Feature | Detail |
|---|---|
| Product Model | Zone20 H |
| Part Number | 6010637 |
| Laser Class | 1 / 635 nm, 2.6mW |
| Operating Diameter | 900 meters (2,952 feet) |
| Self-Leveling Accuracy | ±1.5 mm at 30 meters (±1/16 inch at 100 feet) / Approximately ± 3/32" at 100 feet |
| Self-Leveling Range | ±6 degrees |
| Rotation Speed | 600 rotations per minute |
| Power Source | 4 D-cell alkaline or Li-Ion batteries |
| Battery Life | > 60 hours (alkaline), > 40 hours (Li-Ion) |
| Protection Level | IP67 |
| Receiver Detection Window | 3.1 inches |
| Receiver Accuracy | ±2.5 mm (±1/10 inch) |
| Material | Aluminum |
| Item Weight | 15 Pounds |
Warranty and Support
For warranty information, technical support, or service inquiries, please contact GeoMax customer service or visit their official website. Keep your purchase receipt as proof of purchase for warranty claims.
GeoMax Official Website: www.geomax-positioning.com
Refer to the official GeoMax warranty policy for detailed terms and conditions.
Related documentsZone20 H


Ask a question about this manual
Ask about setup, troubleshooting, compatibility, parts, safety, or missing instructions. Manuals+ will review the question and use this page’s manual context to help answer it.