1. Introduction
The Geemarc CL610 is a corded emergency telephone designed for individuals seeking enhanced safety and communication features. It includes an amplified receiver, large customizable photo buttons, and a waterproof SOS bracelet for remote emergency activation and call answering. This manual provides essential information for setting up, operating, and maintaining your CL610 phone.
Key Features:
- Hearing Aid Compatibility: Designed for users with hearing aids (T-position compatible).
- Powerful Ringer: Adjustable ringer volume up to 90dB.
- Amplified Reception Volume: Up to 40dB amplification for clear conversations.
- SOS Function: Automatically dials up to 30 pre-programmed emergency numbers, attempting each up to 15 times.
- Waterproof Emergency Bracelet: Activates SOS function and answers calls remotely.
- Voice Caller ID: Announces caller's name for saved contacts.
- Photo Buttons: Three customizable memory buttons for one-touch dialing with pictures.
2. Safety Information
- Read all instructions carefully before using the device.
- Keep the phone and SOS bracelet away from water and excessive moisture.
- Use only the power adapter supplied with the product.
- Do not attempt to open, modify, or repair the device yourself. Refer all servicing to qualified personnel.
- Dispose of batteries and the product responsibly according to local regulations.
3. Package Contents
Ensure all items are present in the package:
- Geemarc CL610 Corded Phone Base
- Handset
- Handset Cord
- Telephone Line Cord
- Power Adapter
- Waterproof SOS Bracelet
- User Manual (this document)
- 1 x AA Battery (for backup power)
4. Product Overview
The Geemarc CL610 phone features a large, easy-to-read keypad and clearly labeled function buttons. The SOS bracelet is lightweight and designed for comfortable wear.
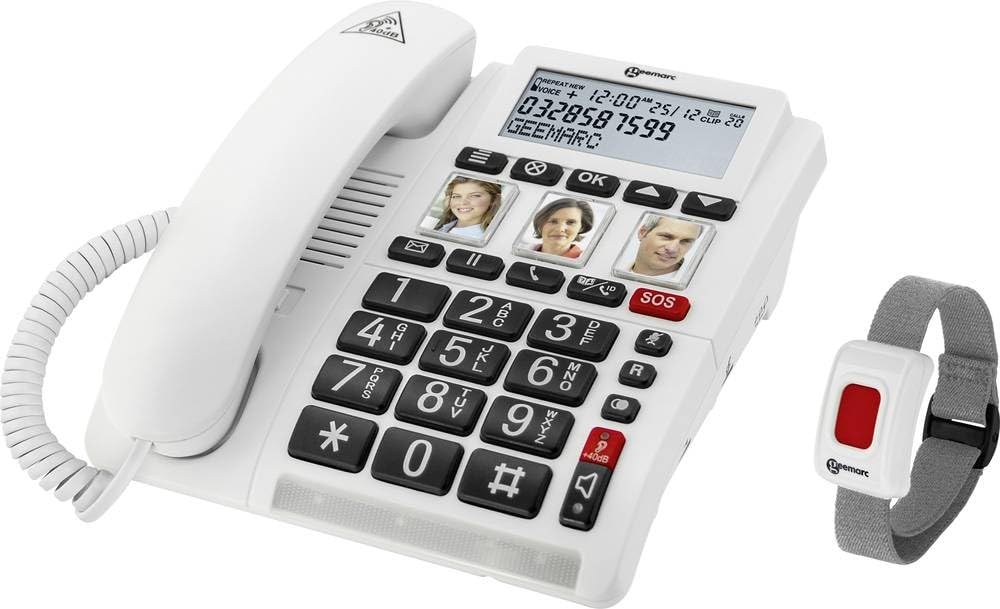
Image: The Geemarc CL610 corded phone, showing the large keypad, photo buttons, and the red SOS button on the base. The accompanying SOS bracelet is also visible.
Main Components:
- Phone Base: Contains the keypad, photo buttons (M1, M2, M3), red SOS button, and volume controls.
- Handset: For standard calls, with an amplification slider underneath.
- SOS Bracelet: A wearable, waterproof device with a single button for remote SOS activation and call answering.
5. Setup
5.1 Connecting the Phone
- Connect one end of the telephone line cord to the wall jack and the other end to the designated port on the phone base.
- Connect the handset cord to the handset and the phone base.
- Plug the power adapter into the phone base and then into a standard electrical outlet.
5.2 Battery Installation (Backup)
The phone requires 1 AA battery for backup power, which helps retain settings and provides limited functionality during a power outage.
- Locate the battery compartment on the underside of the phone base.
- Insert 1 AA battery, ensuring correct polarity (+/-).
- Close the battery compartment cover securely.
5.3 Programming Photo Buttons (M1, M2, M3)
These buttons allow for one-touch dialing to frequently called numbers.
- Lift the handset.
- Press and hold the desired photo button (M1, M2, or M3) until you hear a confirmation tone.
- Dial the phone number you wish to save (up to 24 digits).
- Press the same photo button again to save the number. You will hear another confirmation tone.
- Insert a photo of the contact under the transparent cover of the button.
5.4 Programming SOS Emergency Numbers
The SOS function can dial up to 30 pre-programmed emergency contacts.
- Access the SOS programming mode (refer to the detailed manual for specific menu navigation steps, usually involving a 'SET' or 'PROG' button).
- Enter the first emergency contact number.
- Repeat for up to 30 numbers.
- You may also have the option to record a personalized SOS message that will play when an emergency contact answers.
- Exit programming mode to save settings.
5.5 SOS Bracelet Pairing
The SOS bracelet must be paired with the phone to function correctly.
- Ensure the phone is powered on.
- Initiate pairing mode on the phone (refer to the detailed manual for specific button presses, often a dedicated 'PAIR' button or menu option).
- Press and hold the button on the SOS bracelet until the phone indicates successful pairing.
- Test the bracelet's functionality by briefly pressing its button to ensure it triggers the SOS sequence or answers a call.
6. Operating Instructions
6.1 Making a Call
- Standard Dialing: Lift the handset, dial the desired number using the large keypad, and wait for the call to connect.
- Photo Button Dialing: Lift the handset, then press the desired pre-programmed photo button (M1, M2, or M3). The phone will automatically dial the saved number.
6.2 Receiving a Call
- When the phone rings, lift the handset to answer the call.
- Alternatively, if wearing the SOS bracelet, press the button on the bracelet to answer the call in hands-free (speakerphone) mode.
6.3 Amplified Volume
For users with hearing difficulties, the CL610 offers significant volume amplification.
- During a call, press the dedicated amplification button on the phone base (often marked with a speaker icon or '+').
- Use the slider control located under the handset to adjust the reception volume up to 40dB to a comfortable level.
6.4 Using the SOS Function
In an emergency, the SOS function can be activated in two ways:
- On the Phone Base: Press the large red SOS button on the phone base.
- Via SOS Bracelet: Press the button on the waterproof SOS bracelet.
Upon activation, the phone will automatically dial the pre-programmed emergency numbers sequentially. It will attempt to connect with each number up to 15 times until an answer is detected. If a personalized SOS message was recorded, it will play upon connection.
6.5 Hearing Aid Compatibility
The CL610 is compatible with hearing aids equipped with a 'T' (Telecoil) position. To use this feature, simply switch your hearing aid to the 'T' position during a call for direct audio transmission to your ears.
6.6 Ringer Volume Adjustment
Adjust the ringer volume using the dedicated control on the phone base. The ringer can be set to a loud level, up to 90dB, to ensure you do not miss incoming calls.
6.7 Voice Caller ID
If you have saved contacts in the phone's directory (up to 30 names) with associated voice recordings, the phone will announce the caller's name aloud when they call, instead of just ringing. This feature helps identify callers without needing to look at the display.
7. Maintenance
7.1 Cleaning the Device
To clean your Geemarc CL610 phone and SOS bracelet:
- Wipe the surfaces with a soft, slightly damp cloth.
- Do not use abrasive cleaners, solvents, or strong chemicals.
- Do not immerse the phone base in water. The SOS bracelet is waterproof but should be cleaned gently.
7.2 Battery Replacement
The AA backup battery in the phone base should be replaced periodically, or when the low battery indicator appears (if applicable). The SOS bracelet also contains a battery that may require replacement by a qualified technician if its functionality diminishes.
8. Troubleshooting
If you encounter issues with your Geemarc CL610, try the following solutions:
- No Dial Tone:
- Check that all cables (telephone line, power adapter, handset cord) are securely connected.
- Ensure the phone is powered on and the power adapter is plugged into a working outlet.
- Cannot Hear Caller / Low Volume:
- Adjust the reception volume using the slider under the handset.
- Activate the amplification function by pressing the dedicated button on the phone base.
- Ensure your hearing aid is in the 'T' position if you are using it.
- SOS Function Not Working:
- Verify that emergency numbers are correctly programmed in the phone's memory.
- Check the battery status of the SOS bracelet and ensure it is properly paired with the phone.
- Ensure there is an active telephone line connection.
- Phone Not Ringing:
- Check the ringer volume settings on the phone base.
- Ensure that any 'Do Not Disturb' or silent modes are not activated.
If the problem persists after attempting these steps, please contact customer support.
9. Specifications
| Brand | Geemarc |
| Model Number | CL610_WH_VDE |
| Dimensions (L x W x H) | 20 x 18 x 7 cm |
| Power Source | AC Adapter |
| Backup Battery | 1 x AA (required) |
| Reception Volume Amplification | Up to 40dB |
| Ringer Volume | Up to 90dB |
| SOS Number Capacity | Up to 30 numbers |
| Recording Capacity | 30 Minutes (for voice messages/caller ID) |
| Talk Time | 6 Hours |
| Standby Time | 2 Minutes (Note: This typically refers to handset standby, unusual for a corded phone, but as per source data) |
| Caller ID | Yes |
| Hearing Aid Compatible | Yes (T-position) |
| Material | Plastic |
| Included Accessories | SOS Bracelet |
10. Warranty and Support
This Geemarc CL610 product comes with a standard manufacturer's warranty. For detailed warranty terms and conditions, including coverage period and limitations, please refer to the warranty card included in your product packaging or visit the official Geemarc website.
For technical support, troubleshooting assistance beyond what is provided in this manual, or inquiries regarding spare parts, please contact Geemarc customer service. Contact details, such as phone numbers or email addresses, can typically be found on the manufacturer's website (www.geemarc.com) or in the product packaging.