
Introduction
This user manual provides important information for the safe and efficient operation of your Black+Decker 2-in-1 Sandwich and Waffle Maker, Model TS4130-B5. Please read this manual thoroughly before first use and retain it for future reference.
Your appliance is designed for versatility, offering sandwich making, waffle baking, and grilling functions with its interchangeable non-stick plates and 1400W power. Its compact design allows for convenient storage.
Important Safety Instructions
When using electrical appliances, basic safety precautions should always be followed, including the following:
- Read all instructions before operating the appliance.
- Do not touch hot surfaces. Use handles or knobs.
- To protect against electrical shock, do not immerse cord, plugs, or appliance in water or other liquid.
- Close supervision is necessary when any appliance is used by or near children.
- Unplug from outlet when not in use and before cleaning. Allow to cool before putting on or taking off parts.
- Do not operate any appliance with a damaged cord or plug or after the appliance malfunctions or has been damaged in any manner.
- The use of accessory attachments not recommended by the appliance manufacturer may cause injuries.
- Do not use outdoors.
- Do not let cord hang over edge of table or counter, or touch hot surfaces.
- Do not place on or near a hot gas or electric burner, or in a heated oven.
- Extreme caution must be used when moving an appliance containing hot oil or other hot liquids.
- Always attach plug to appliance first, then plug cord into the wall outlet. To disconnect, turn any control to "off", then remove plug from wall outlet.
- Do not use appliance for other than intended use.
- The appliance is not intended to be operated by means of an external timer or separate remote-control system.
Product Components
Familiarize yourself with the parts of your Black+Decker 2-in-1 Sandwich and Waffle Maker.
- Main Unit: The primary body of the appliance housing the heating elements and controls.
- Interchangeable Plates: Sets of non-stick plates for different cooking functions.
- Handle: For opening and closing the appliance.
- Locking Clip: Secures the appliance during cooking and storage.
- Power Indicator Light (Red): Illuminates when the appliance is plugged in and heating.
- Ready-to-Cook Indicator Light (Green): Illuminates when the appliance has reached the optimal cooking temperature.
- Cord Storage: Integrated storage for the power cord.
- Anti-slip Base: Provides stability during operation.

Image: The Black+Decker 2-in-1 Sandwich and Waffle Maker in its closed position, showing the main unit and indicator lights.
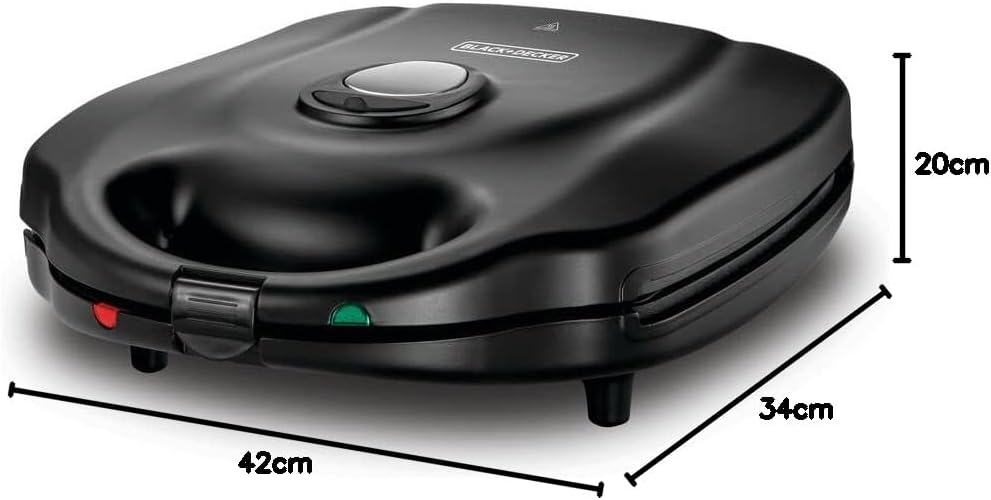
Image: A visual representation of the three types of interchangeable non-stick plates: sandwich, grill, and waffle.
Setup
- Unpacking: Carefully remove the appliance and all accessories from the packaging. Retain packaging for future storage or transport.
- Initial Cleaning: Before first use, wipe the exterior of the appliance with a damp cloth. Remove the interchangeable plates and wash them with warm, soapy water. Rinse thoroughly and dry completely. The plates are dishwasher safe.
- Plate Installation: Ensure the appliance is unplugged and cool. Select the desired plates (sandwich, waffle, or grill). Align the tabs on the plates with the slots on the heating elements and gently press down until they click into place. Ensure both upper and lower plates are securely installed.
- Placement: Place the appliance on a stable, heat-resistant, and flat surface, away from walls and flammable materials. Ensure there is adequate ventilation around the unit.
- Power Connection: Unwind the power cord from the cord storage. Plug the appliance into a suitable grounded electrical outlet. The red power indicator light will illuminate.
Operating Instructions
Your Black+Decker 2-in-1 Sandwich and Waffle Maker is designed for ease of use. Follow these steps for optimal results.
General Operation
- Preheating: After installing the desired plates and plugging in the appliance, allow it to preheat. The red power indicator light will be on. The green ready-to-cook indicator light will illuminate when the appliance has reached the correct temperature. This usually takes 3-5 minutes.
- Preparing Food: While the appliance is preheating, prepare your ingredients. For best results and easy release, lightly grease the non-stick plates with cooking spray or a small amount of oil before each use, especially for the first batch.
- Cooking: Once the green light illuminates, carefully open the appliance using the handle. Place your food onto the lower plate. Close the lid and gently press down until the locking clip engages.
- Monitoring: The green light may cycle on and off during cooking, indicating that the appliance is maintaining its temperature.
- Removing Food: Once cooking is complete (cooking times vary based on food type and desired doneness), carefully open the appliance. Use a heat-resistant plastic or wooden utensil to remove the cooked food. Do not use metal utensils as they can damage the non-stick coating.
- After Use: Unplug the appliance from the wall outlet. Allow it to cool completely before cleaning or storing.
Specific Functions
Sandwich Making
- Install the sandwich plates.
- Preheat the appliance until the green light illuminates.
- Place bread with fillings onto the lower sandwich plate. Close and lock the lid.
- Cook for approximately 3-5 minutes, or until golden brown and heated through.

Image: The appliance opened, showing the triangular sandwich plates ready for use.
Waffle Baking
- Install the waffle plates.
- Preheat the appliance until the green light illuminates.
- Pour waffle batter onto the center of the lower waffle plate, ensuring not to overfill. Close and lock the lid.
- Cook for approximately 4-7 minutes, or until waffles are golden brown and crispy.

Image: The appliance opened, displaying the square waffle plates.
Grilling (180° Flat Grill Mode)
- Install the grill plates.
- Preheat the appliance until the green light illuminates.
- For 180° flat grill mode, gently push the upper handle back until the top plate lies flat, creating a larger grilling surface.
- Place food (e.g., meat, vegetables, panini) onto the grill plates.
- Cook according to your recipe or until desired doneness is achieved.

Image: The appliance opened, showing the ribbed grill plates. This mode can be used for panini or opened flat for a larger grilling surface.

Image: The Black+Decker appliance shown with various prepared foods, including sandwiches, waffles, and grilled items, demonstrating its multi-functionality.
Maintenance and Cleaning
Proper maintenance ensures the longevity and performance of your appliance.
- Always Unplug: Before cleaning, always unplug the appliance from the power outlet and allow it to cool completely.
- Removing Plates: Once cool, press the plate release buttons (if applicable, usually located near the hinges) and carefully remove the plates.
- Cleaning Plates: The non-stick plates are dishwasher safe for easy cleaning. Alternatively, they can be washed by hand with warm, soapy water and a non-abrasive sponge. For stubborn residue, soak the plates in warm water for a few minutes before cleaning. Rinse thoroughly and dry completely before re-installing or storing.
- Cleaning Exterior: Wipe the exterior of the appliance with a damp cloth. Do not use abrasive cleaners or scouring pads, as they may damage the finish.
- Never Immerse: Never immerse the main unit, cord, or plug in water or any other liquid.
- Storage: Store the appliance in a clean, dry place. The compact design with cord storage allows for vertical storage to save space. Ensure the locking clip is engaged for secure storage.
Troubleshooting
If you encounter issues with your appliance, refer to the following common problems and solutions:
| Problem | Possible Cause | Solution |
|---|---|---|
| Appliance does not turn on. | Not plugged in; power outlet malfunction; appliance fault. | Ensure the power cord is securely plugged into a working outlet. Check the circuit breaker. If the issue persists, contact customer support. |
| Food sticks to plates. | Plates not greased; excessive sugar in batter/filling; damaged non-stick coating. | Lightly grease plates before each use. Reduce sugar content if possible. If coating is damaged, plates may need replacement. |
| Green indicator light does not illuminate. | Appliance not fully preheated; sensor malfunction. | Allow more time for preheating (3-5 minutes). If it never illuminates, contact customer support. |
| Uneven cooking. | Uneven food placement; appliance not fully preheated; lid not properly closed. | Ensure food is evenly distributed on the plates. Allow full preheating. Ensure the lid is closed and locked. |
| Smoke or unusual odor during first use. | Protective oils burning off. | This is normal for first use. Ensure good ventilation. If smoke persists after initial uses, unplug and contact support. |
Specifications
| Brand | Black+Decker |
| Model Number | TS4130-B5 |
| Color | Black |
| Power / Wattage | 1400 Watts |
| Voltage | 240 Volts |
| Material | Plastic |
| Special Features | Non-stick coating, Removable surface |
| Item Weight | 4 Kilograms |
| Product Dimensions | 34D x 42W x 20H cm |
| Included Components | Instruction Manual |
| Style | Sandwich + Grill + Waffle |

Image: The appliance with its dimensions (depth 34cm, width 42cm, height 20cm) clearly indicated.
Warranty and Support
Your Black+Decker 2-in-1 Sandwich and Waffle Maker comes with a manufacturer's warranty to ensure your peace of mind.
- Warranty Period: This appliance comes with a two-year manufacturer's warranty. Please refer to the warranty card included in your packaging for specific terms and conditions.
- Proof of Purchase: Retain your purchase receipt as proof of purchase for warranty claims.
- Customer Support: For technical assistance, warranty claims, or general inquiries, please contact Black+Decker customer service. Contact details can typically be found on the manufacturer's official website or on the warranty card.
Note: No official product videos are available for this model from the seller.


