1. Introduction
This manual provides essential information for the assembly, operation, maintenance, and troubleshooting of your TOBBI 24V Go Kart (Model 93-55). Please read all instructions carefully before use to ensure safe and proper functioning of the product.

Image: Two children enjoying their TOBBI 24V Go Karts on a track.
2. Safety Information
Your safety and the safety of others are paramount. Always adhere to the following safety guidelines:
- Age Range: Suitable for children aged 4 to 16 years.
- Weight Capacity: Do not exceed the maximum weight capacity of 132 LBS (60 kg).
- Protective Gear: Always wear the provided protective suit, including a helmet with adjustable headgear, knee pads, elbow pads, and gloves. Ensure all gear is properly fitted and secured.
- Safety Harness: Always use the 5-point adjustable safety harness. Ensure it is securely fastened before operation.
- Supervision: Adult supervision is required at all times during operation.
- Operating Environment: Use the go-kart on flat, dry surfaces away from traffic, pools, or other hazards. Avoid steep inclines (maximum 15° slope).
- Braking: Familiarize yourself with the electronic braking system.
- ASTM Certified: This product complies with all safety regulations (ASTM-certified).

Image: Child wearing full protective gear in the go-kart.

Image: Safety features and structural details of the go-kart.
3. Setup and Assembly
Follow these steps to assemble your TOBBI 24V Go Kart. Refer to the assembly video for visual guidance.
Video: Detailed assembly instructions for the TOBBI 24V Go Kart.
- Install Rear Axle: Insert the rear axle into the motor hole and pass it through the opposite side of the body, ensuring both sides are even.
- Install Rear Wheels: Install the rear wheels onto the rear axle. Slide the M12 gasket into the rear axle. Tighten the M10 nut with a wrench. Cover the small wheel hub and press it firmly. Repeat for the other rear wheel.
- Install Steering Bracket: Install the front wheel iron from bottom to top on the front steering bracket. Insert the long M10*96 screw through the hole of the steering bracket. Screw the M10 nuts on both sides to fix it.
- Install Front Wheels: Install an M12 gasket and slide it onto the front axle. Install the front wheel. Install another M12 gasket and slide it into the front wheel. Tighten the M10 nut with a wrench. Cover the small wheel hub and press it firmly. Repeat for the other front wheel.
- Install Steering Connecting: Install the steering adapter connecting rod and fasten the M5 nut with a short 5*30MM screw and a gasket.
- Install Front Fender: Install the front fender onto the steering connector. Snap the front part into the reserved position of the body to secure it tightly.
- Install Steering Rod: Pass the steering axle through the steering hole and align it through the corresponding rod. Fix it on the front steering shaft with an M10 Gasket and cotter pin.
- Install Steering Wheel Connecting Rod: Connect the terminal at the bottom of Part No. 2 to the terminal on the chassis. Install the steering wheel connecting rod and fasten the M5 nut with a short 5*20MM screw. Connect the terminal at the top of Part No. 2 to the terminal on the steering wheel (put in the hexagon nut first, then insert the bolt).
- Install Seat: Install the seat on the body and fix it with 4 M4*14 screws.
- Fixed Base: Use a screwdriver to tighten 2 M4*14 screws at the pre-drilled screw holes on both sides of the armrest to fix the base.
- Connect Power Supply: Use a screwdriver to remove the rear cover. Connect the two connection terminals. Cover the rear cover tightly.

Image: Key components and features of the go-kart.
4. Operating Instructions
Once assembled and safety checks are complete, you can begin operating your go-kart.
- Power On/Off: Use the one-button start switch located on the control panel.
- Speed Modes: The go-kart features two speed modes: Low Speed (up to 5 MPH for a longer driving experience) and High Speed (up to 8 MPH for faster and more exciting rides). Select the desired speed using the switches on the control panel.
- Direction Control: Use the Forward/Stop/Backward switch to control the direction of movement.
- Acceleration: Press the foot pedal to accelerate.
- Braking: Release the foot pedal to engage the electronic braking system.
- Drifting: The go-kart is designed for various drifting effects, including 360° spins and S-drifting, thanks to its quiet EVA tires. Practice in an open, safe area.
- Music and Horn: The go-kart includes a built-in music player and horn for an authentic driving experience. Use the controls on the steering wheel and control panel to operate these features.
Video: Demonstration of the TOBBI 24V Electric Drifting Go Kart in action.
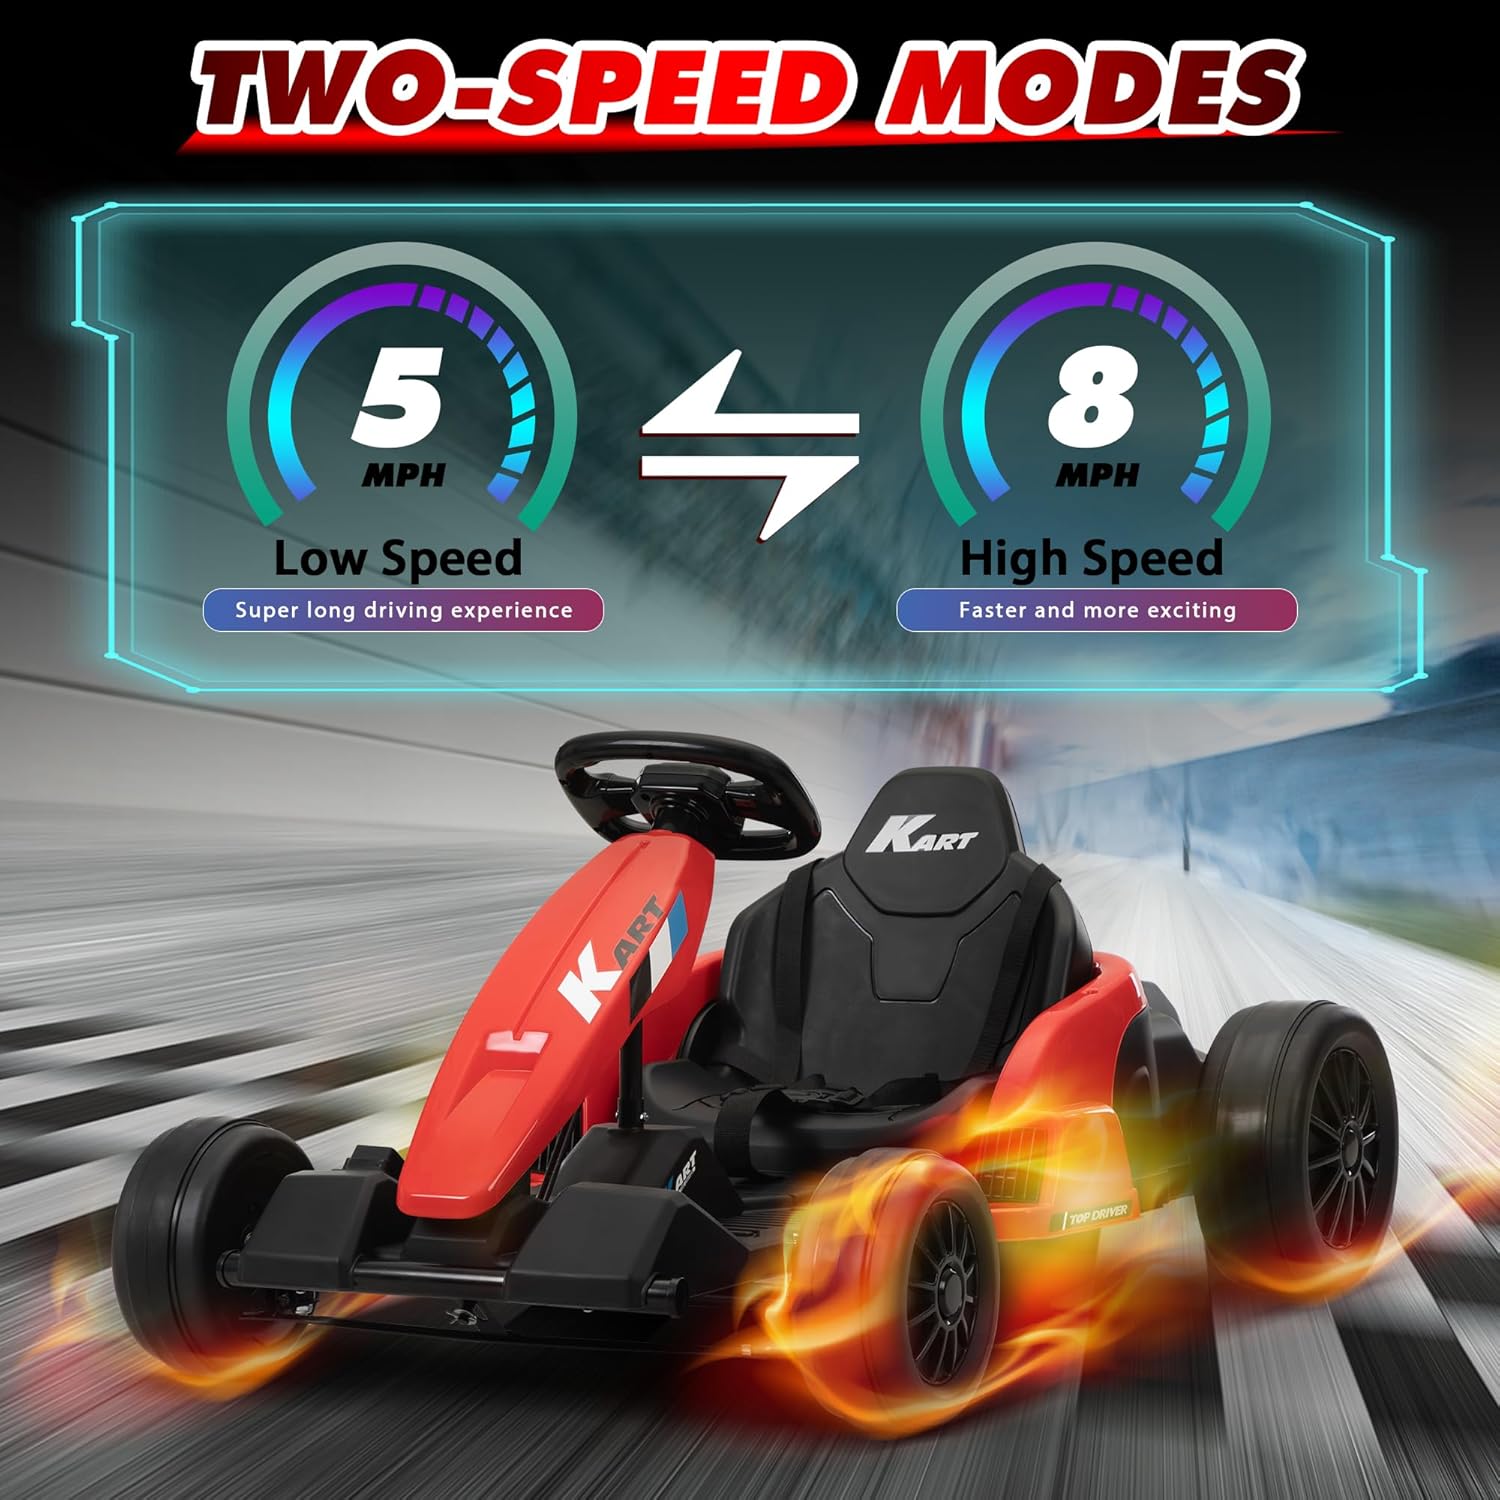
Image: Two-speed modes for the go-kart.
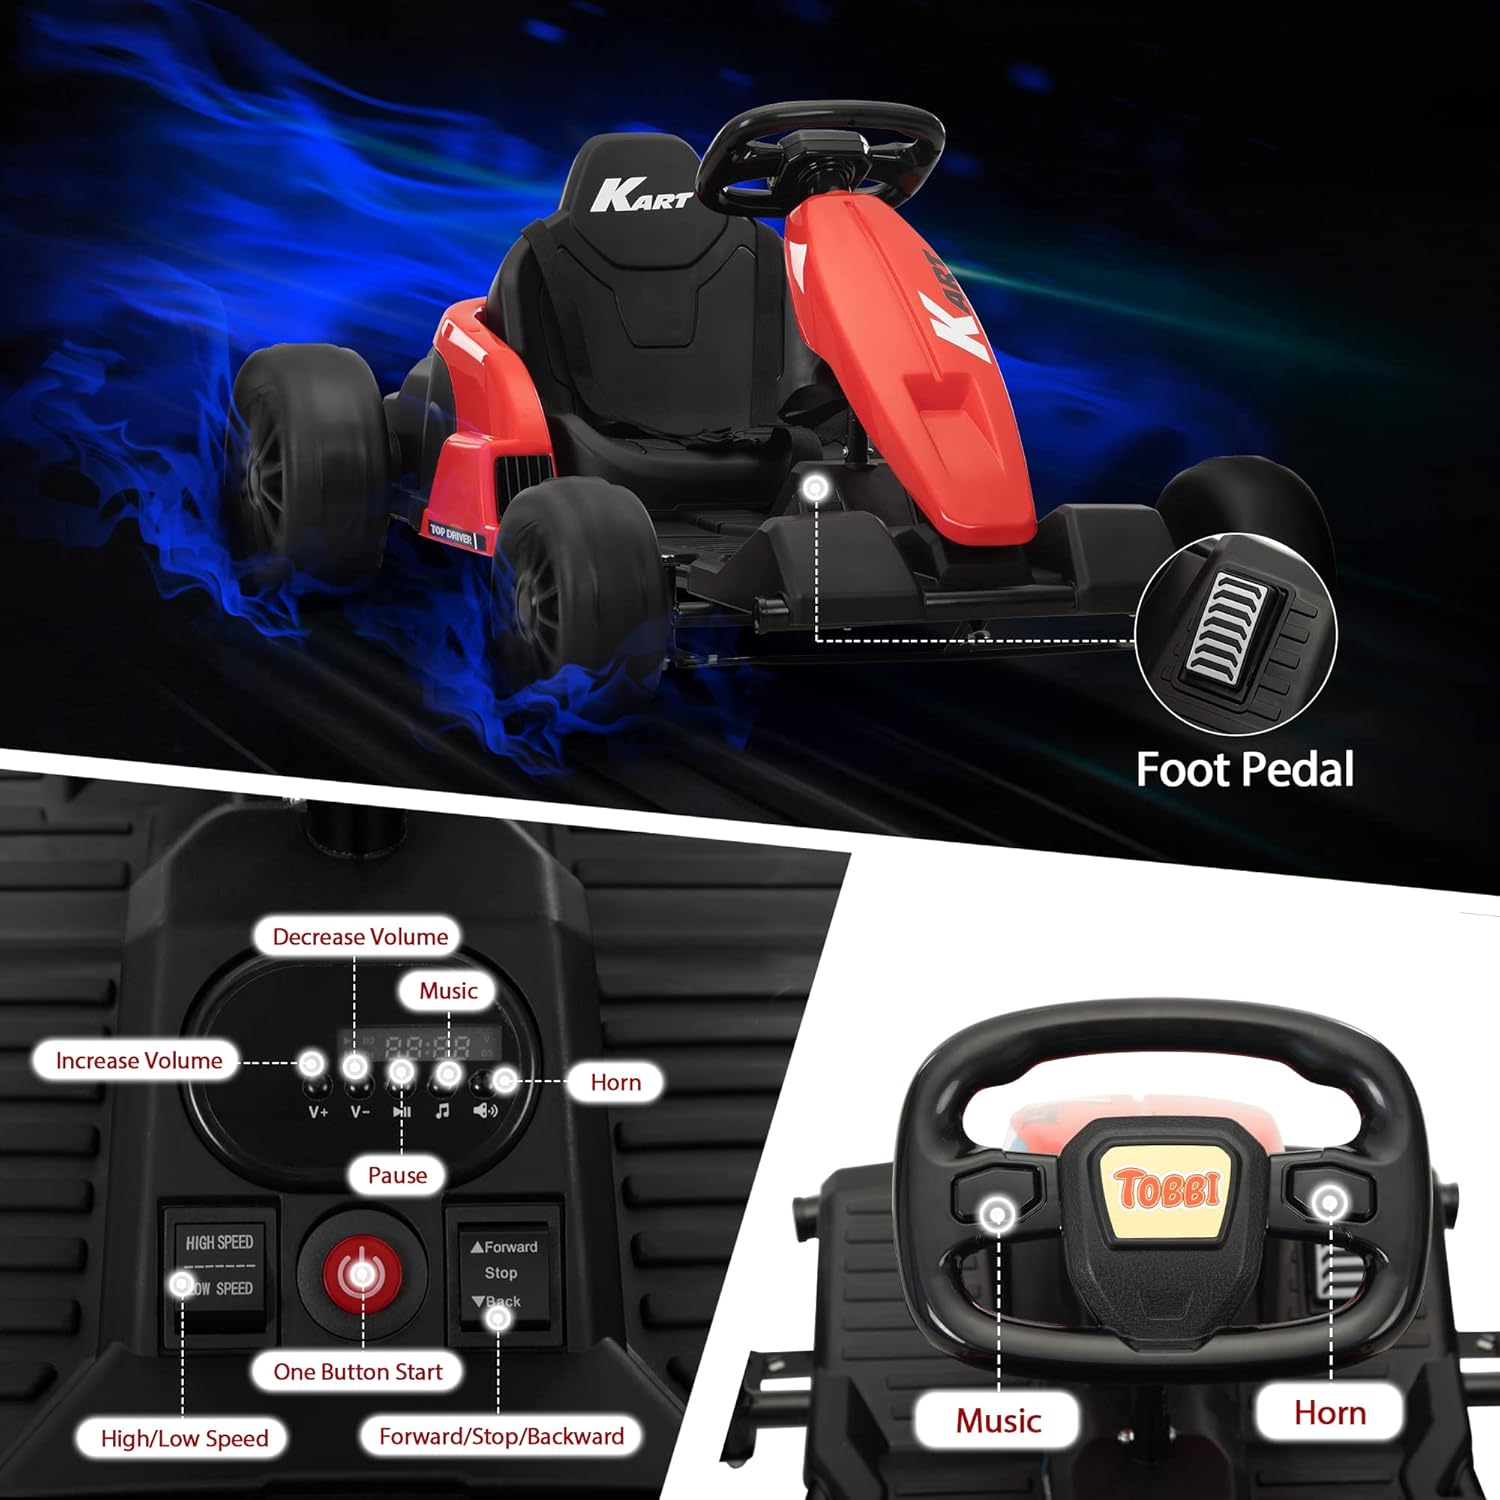
Image: Go-kart control panel and foot pedal.
5. Maintenance
Regular maintenance ensures the longevity and safe operation of your go-kart.
- Cleaning: Wipe down the go-kart with a damp cloth after each use. Avoid using harsh chemicals or abrasive cleaners.
- Battery Care:
- Charge the 24V 7AH battery fully before first use and after each use.
- Do not overcharge the battery.
- If storing the go-kart for an extended period, charge the battery every 30 days to maintain its health.
- Ensure the battery connections are secure.
- Tire Inspection: Regularly inspect the EVA tires for wear and tear. Replace worn tires to maintain optimal performance and drifting capability.
- General Inspection: Periodically check all screws, nuts, and connections to ensure they are tight and secure. Inspect the frame for any damage.
6. Troubleshooting
If you encounter issues with your TOBBI 24V Go Kart, refer to the following common problems and solutions:
- Go-Kart Not Turning On:
- Check if the battery is fully charged.
- Ensure all power connections, especially the main battery terminals, are securely connected.
- Verify the one-button start switch is functioning correctly.
- Go-Kart Not Moving or Moving Slowly:
- Confirm the battery is fully charged.
- Check the speed mode selection (ensure it's not stuck in a lower speed or neutral).
- Inspect the motor connections and ensure they are secure.
- Ensure the foot pedal is fully depressed.
- Unusual Noises or Vibrations:
- Stop operation immediately.
- Inspect wheels, axles, and steering components for any loose parts or obstructions.
- Check for any visible damage to the motor or drivetrain.
- Battery Not Holding Charge:
- Ensure the charger is properly connected and the outlet is working.
- Verify the charger itself is not damaged.
- If the battery is old or frequently discharged completely, it may need replacement.
If these troubleshooting steps do not resolve the issue, please contact TOBBI customer support.
7. Specifications
| Feature | Detail |
|---|---|
| Brand | TOBBI |
| Model Number | 93-55 |
| Item Weight | 50 Pounds |
| Item Dimensions (L x W x H) | 45.28" x 30.31" x 20.47" |
| Material Type | Polypropylene |
| Battery | 24V 7AH |
| Motors | Dual 35W motors |
| Top Speed | 8 MPH |
| Max Weight Capacity | 132 LBS |
| Age Range | 4-16 Years |
| Assembly Required | Yes |
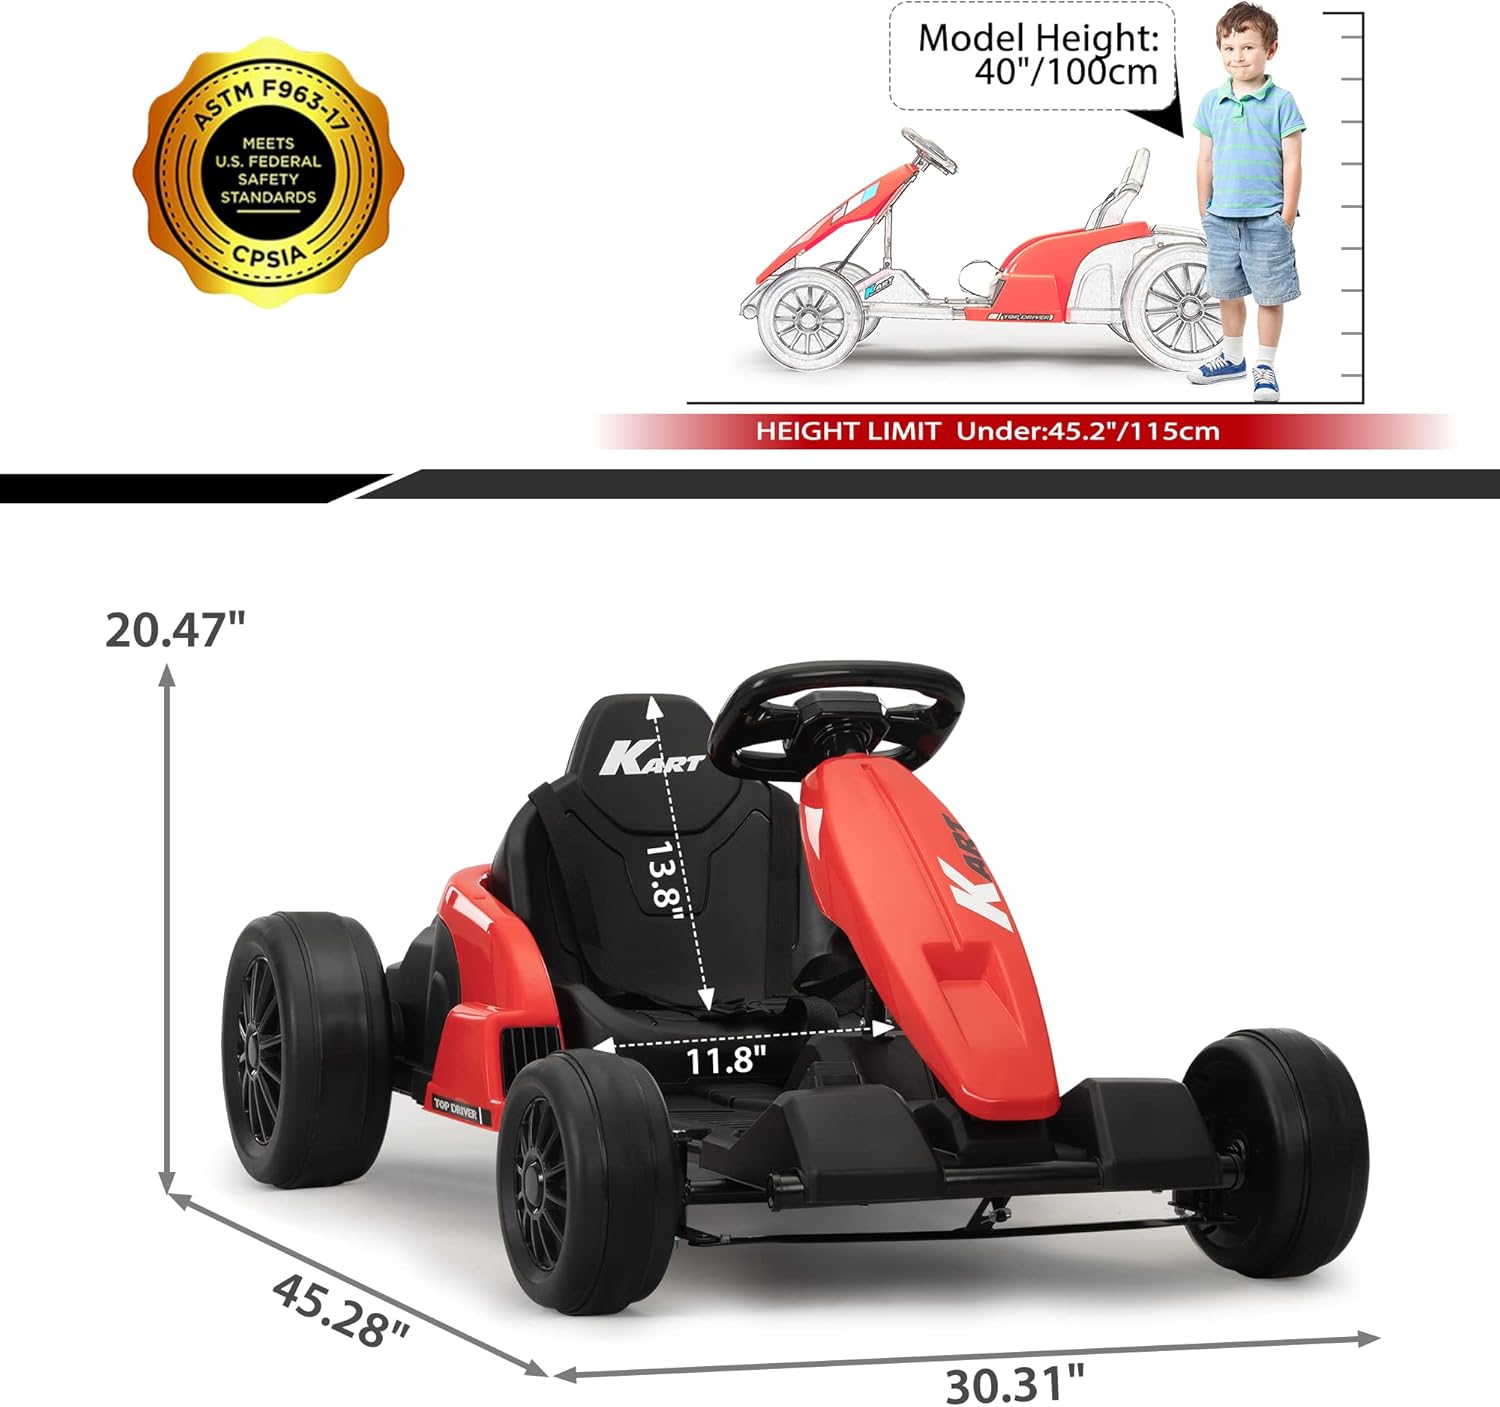
Image: Go-kart dimensions.
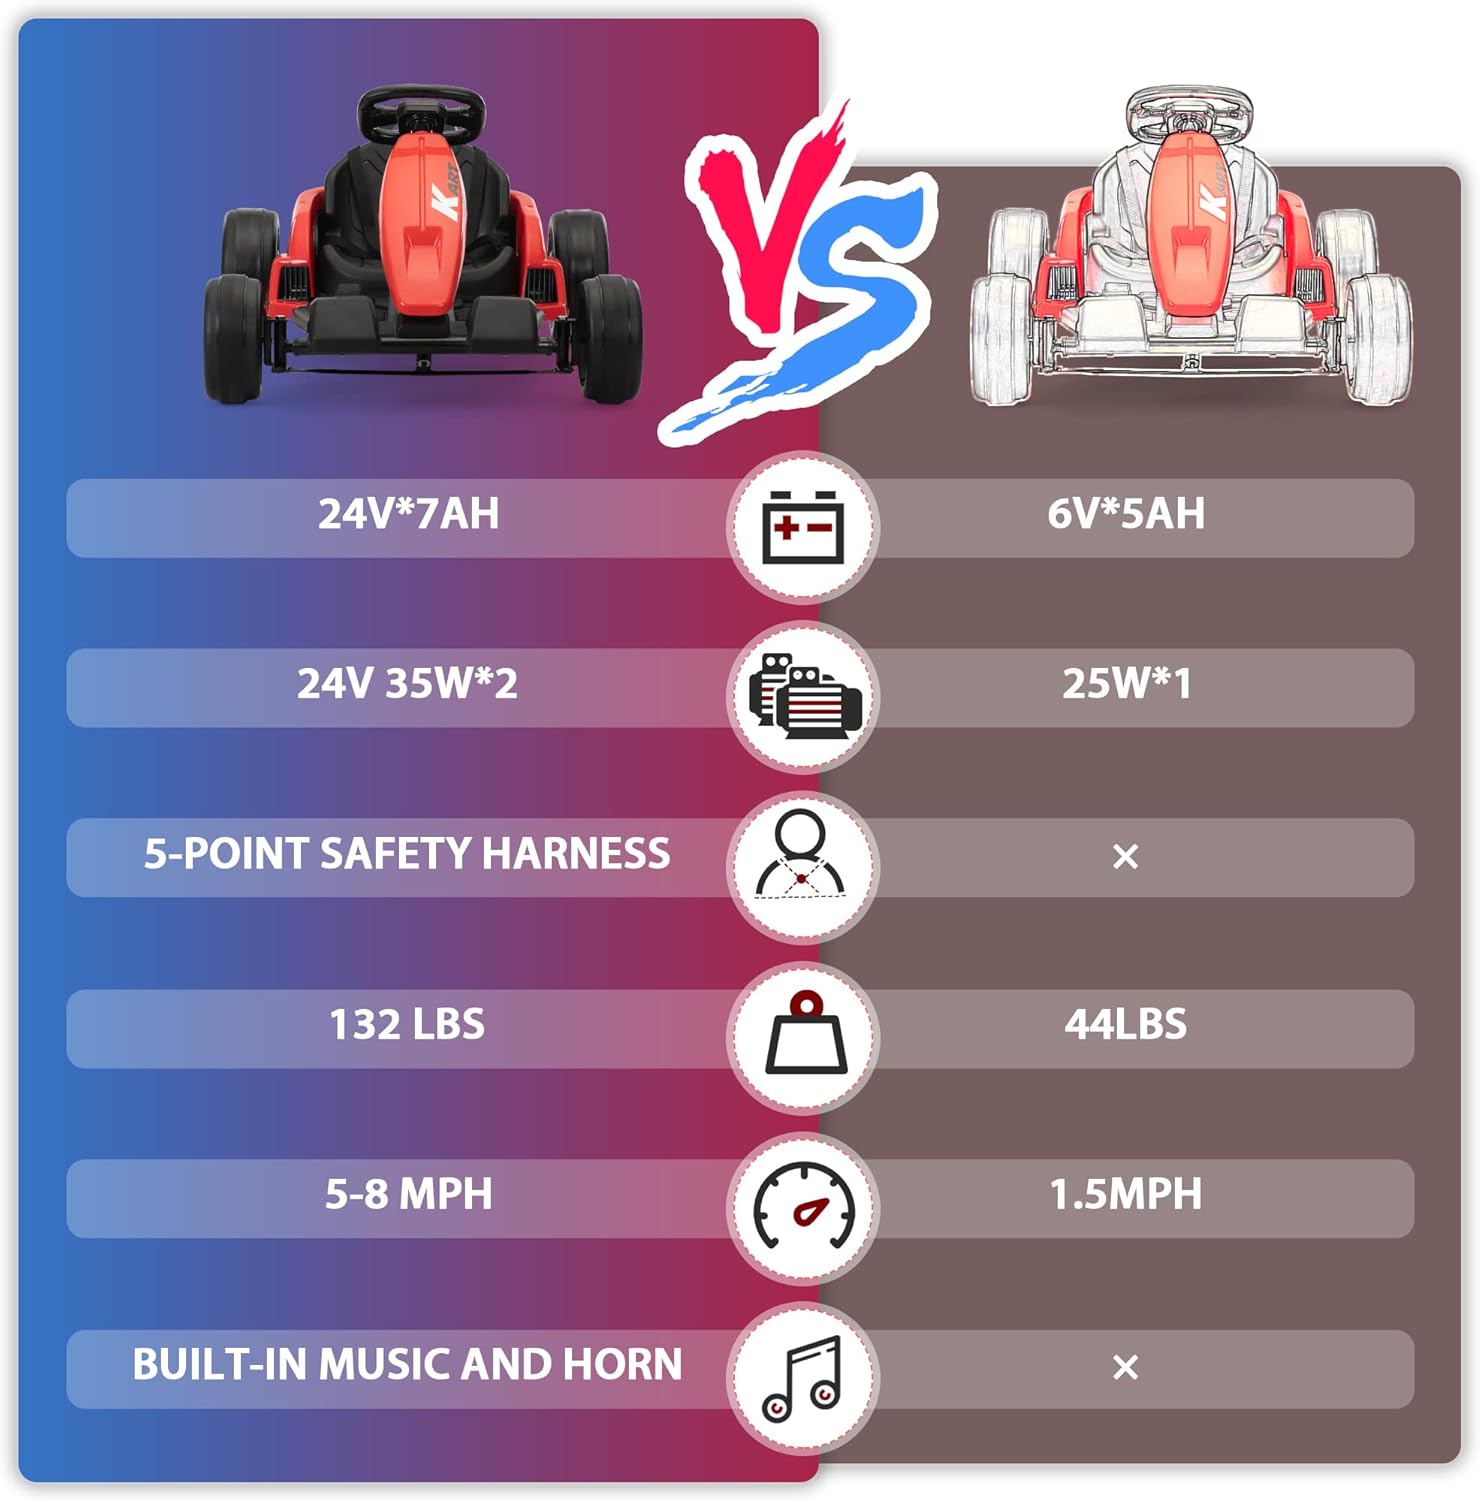
Image: Comparison of go-kart specifications.
8. Warranty and Support
For any questions, concerns, or support needs regarding your TOBBI 24V Go Kart, please refer to the contact information provided with your purchase or visit the official TOBBI website. Please retain your proof of purchase for warranty claims.


