1. Introduction
Thank you for choosing the warmiplanet 42-inch Ceiling Fan with Lights and Remote Control. This modern ceiling fan is designed to provide efficient air circulation and adjustable lighting for your indoor spaces. It features a silent DC motor, six fan speeds, a dimmable LED light with three color temperature options, and convenient remote control operation. This manual provides essential information for safe installation, proper operation, and effective maintenance of your new ceiling fan.

Image 1.1: The warmiplanet 42-inch white ceiling fan with its accompanying remote control.
2. Safety Information
Please read all safety instructions carefully before installation and operation to prevent personal injury or property damage. Retain this manual for future reference.
- Electrical Safety: Always disconnect power at the main circuit breaker before attempting any installation, maintenance, or repair. Ensure all wiring connections comply with local electrical codes. If you are unsure about wiring, consult a qualified electrician.
- Mounting: The ceiling fan must be mounted to a ceiling joist or a securely anchored outlet box capable of supporting the fan's weight (approximately 10 pounds).
- Blade Installation: The fan blades must be properly installed for the DC motor to function correctly. Do not operate the fan without the blades securely attached.
- Clearance: Ensure there is adequate clearance between the fan blades and any obstacles, including walls and furniture.
- Environmental Conditions: This fan is designed for indoor use and covered outdoor areas. Avoid direct exposure to rain or excessive moisture.
- Light Source: The integrated LED light is replaceable. Refer to the maintenance section for instructions on replacing the LED module.
3. Package Contents
Verify that all components are present before beginning installation. If any parts are missing or damaged, contact customer service.
- Ceiling Fan Motor Housing
- Fan Blades (3)
- LED Light Kit
- Remote Control
- Mounting Bracket
- Downrod and Canopy
- Hardware Pack (screws, wire nuts, washers)
- Instruction Manual
4. Specifications
| Feature | Specification |
|---|---|
| Brand | warmiplanet |
| Model Name | WICF12-1 |
| Size | 42 inches |
| Number of Blades | 3 |
| Material | Metal (housing), Plastic (blades) |
| Color | White |
| Motor Type | Silent DC Motor |
| Fan Speeds | 6 Levels |
| Air Flow Capacity | 3583 Cubic Feet Per Minute |
| Light Source Type | Integrated Dimmable LED |
| Light Wattage | 24W |
| Color Temperature | 3000K (Warm), 4000K (Natural), 6000K (Cool White) |
| Dimming Range | 10% - 100% |
| Control Method | Remote Control |
| Timer Settings | 1H, 3H, 6H |
| Reversible Function | Yes (Summer/Winter Mode) |
| Power Source | Corded Electric |
| Voltage | 120 Volts |
| Item Weight | 10 Pounds |
| Product Dimensions | 42 x 42 x 11.9 inches |
| Mounting Type | Downrod Mount (Semi Flush Mount) |
| Assembly Required | Yes |
5. Installation
Professional installation is recommended. Ensure power is disconnected at the circuit breaker before proceeding.
5.1 Pre-Installation Considerations
- Room Size: This 42-inch fan is suitable for rooms approximately 10ft x 10ft to 12ft x 12ft.
- Installation Height: For optimal performance and safety, the fan should be installed with blades at least 7 feet from the floor. Recommended ceiling height for installation is between 10ft and 15ft.
- Ceiling Type: The fan supports both flat ceilings and sloped ceilings with an angle of up to 15 degrees.

Image 5.1: Overall dimensions of the 42-inch ceiling fan, illustrating mounting options for flat and sloped ceilings, and recommended room size.
5.2 General Installation Steps (Consult full diagram in package for details)
- Turn Off Power: Locate the circuit breaker for the fan's intended location and turn off the power.
- Mounting Bracket Installation: Secure the mounting bracket to the ceiling outlet box or a structural support. Ensure it is firmly attached and can support the fan's weight.
- Downrod Assembly: Attach the downrod to the fan motor housing, feeding the electrical wires through the downrod.
- Hang Fan: Carefully lift the fan assembly and hang it from the mounting bracket.
- Electrical Connections: Connect the fan's electrical wires to the household wiring according to the wiring diagram provided in your package. Ensure all connections are secure with wire nuts. Pay attention to ground wire connections.
- Control Module Placement: Insert the control module into the mounting bracket. Careful alignment may be required to ensure the canopy fits properly.
- Canopy Installation: Secure the canopy to the mounting bracket, covering the wiring and control module.
- Blade Attachment: Attach the fan blades to the motor housing using the provided screws. Ensure they are tightened securely.
- Light Kit Installation: Connect the LED light kit wires and attach the light kit to the bottom of the fan motor housing.
- Restore Power: Once all components are securely installed and connections are checked, restore power at the circuit breaker.
6. Operation
Your warmiplanet ceiling fan is operated using the included remote control. Ensure batteries are installed correctly in the remote.
6.1 Remote Control Functions

Image 6.1: Layout of the multi-function remote control.
- Fan Speed Buttons (1-6): Press buttons 1 through 6 to select the desired fan speed. '1' is the lowest speed, and '6' is the highest.
- Fan Off Button (STOP): Press this button to turn off the fan.
- Light ON/OFF & Color Changeable Button: Press once to turn the light on/off. Press repeatedly to cycle through the three color temperatures (3000K Warm Light, 4000K Natural Light, 6000K Cool White Light). The light has a memory function and will recall the last setting.
- Fan Reverse Button: Press this button to change the direction of the fan blades (clockwise or counter-clockwise).
- Light Dimmer Buttons (+/-): Use the '+' button to increase light brightness and the '-' button to decrease it. The light is dimmable from 10% to 100%.
- Timer Setting Buttons (1H, 3H, 6H): Press these buttons to set the fan to automatically turn off after 1, 3, or 6 hours.
6.2 Fan Speed Settings

Image 6.2: Fan speed levels and their corresponding airflow intensity.
- Level 1-2: Provides a comfortable, gentle breeze.
- Level 3-4: Generates a natural, moderate airflow.
- Level 5-6: Delivers a strong, cooling wind.
6.3 Light Color Temperature and Dimming
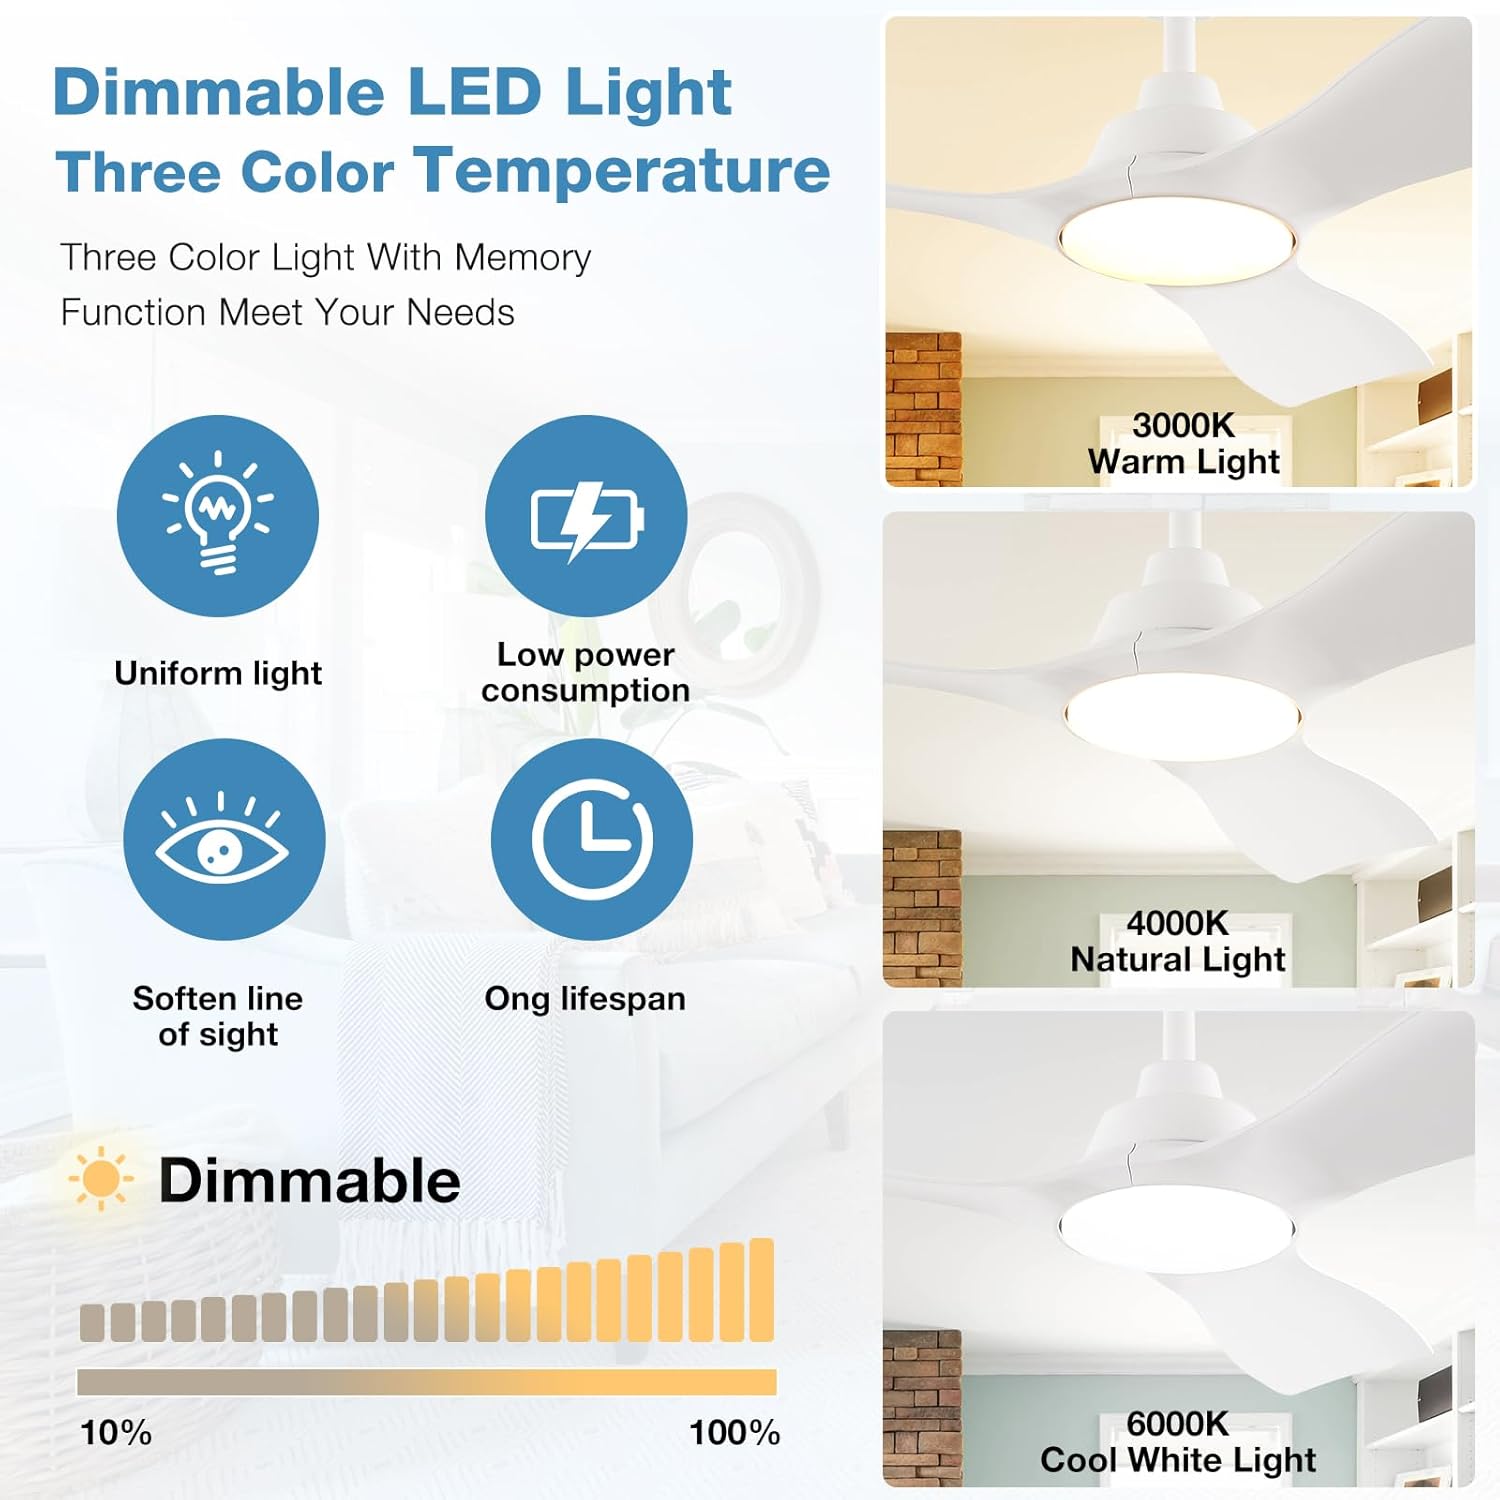
Image 6.3: Dimmable LED light with three color temperature options.
The integrated LED light offers versatility to match your environment and mood:
- 3000K Warm Light: Ideal for creating a cozy and inviting atmosphere.
- 4000K Natural Light: A balanced light suitable for general tasks and everyday living.
- 6000K Cool White Light: Bright and crisp, perfect for focused activities or a modern aesthetic.
Adjust the brightness from 10% to 100% using the dimmer buttons on the remote control.
6.4 Reversible Fan Function (Summer/Winter Mode)

Image 6.4: Reversible motor function for seasonal comfort.
The reversible DC motor allows you to optimize air circulation for different seasons:
- Summer Season (Clockwise Downdraft): The fan blades rotate clockwise, pushing cool air downwards to create a refreshing breeze.
- Winter Season (Counter-Clockwise Updraft): The fan blades rotate counter-clockwise, drawing air up towards the ceiling to circulate warm air throughout the room, improving heating efficiency.
7. Maintenance
Regular maintenance helps ensure the longevity and optimal performance of your ceiling fan. Always turn off power at the circuit breaker before performing any maintenance.
- Cleaning: Use a soft, damp cloth to clean the fan blades and motor housing. Do not use abrasive cleaners or solvents, as they may damage the finish.
- Blade Inspection: Periodically check that all blade screws are tight. Loose blades can cause wobbling and noise.
- LED Light Replacement: The LED light module is designed to be replaceable. If replacement is necessary, contact customer support for guidance or a replacement part. Ensure power is off before attempting to replace the light module.
- Remote Control: Replace batteries in the remote control as needed. Ensure correct battery type and polarity.
8. Troubleshooting
If you encounter issues with your ceiling fan, refer to the following common problems and solutions:
| Problem | Possible Cause | Solution |
|---|---|---|
| Fan does not start | No power supply Loose wiring connections Remote control battery dead Fan blades not installed | Check circuit breaker and wall switch Verify all wiring connections are secure (power off first) Replace remote control batteries Ensure fan blades are securely attached |
| Light does not work | No power supply Loose wiring connections LED module issue Remote control battery dead | Check circuit breaker and wall switch Verify light kit wiring connections (power off first) Contact customer support for LED module replacement Replace remote control batteries |
| Fan wobbles | Loose blade screws Uneven blade balance Loose mounting bracket | Tighten all blade screws Use a blade balancing kit (not included) if necessary Ensure mounting bracket is securely fastened to the ceiling |
| Remote control not responding | Dead batteries Obstruction between remote and receiver Remote not paired (if applicable) | Replace batteries Ensure clear line of sight Refer to specific pairing instructions in your package if the remote requires pairing |
| Fan makes unusual noise | Loose screws Motor housing rubbing Blade imbalance | Check and tighten all screws on the fan and mounting bracket Ensure no wires are rubbing against the motor housing Check for blade imbalance |
9. Warranty and Support
warmiplanet is committed to providing high-quality products and excellent customer service.
9.1 Product Guarantee
- Motor Warranty: The DC motor is covered by a 10-year warranty. If the motor fails within this period, it will be replaced free of charge.
- Whole Fan Warranty: The entire fan, excluding the motor, is covered by a 2-year warranty.

Image 9.1: Warranty information and compensation policy.
9.2 Customer Support
For any questions regarding installation, operation, maintenance, or warranty claims, please contact our professional customer service team. We aim to respond to all inquiries within 24 hours.

Image 9.2: warmiplanet's professional customer service team.