Introduction
This manual provides detailed instructions for the setup, operation, and maintenance of your CYSSJF Restaurant Paging System. Please read this manual thoroughly before using the product to ensure proper functionality and longevity.
Product Overview
The CYSSJF Restaurant Paging System is a wireless calling system designed to improve customer service and operational efficiency in various settings such as restaurants, food courts, coffee shops, and clinics. It consists of a keypad transmitter and multiple coaster pagers.

Image: The CYSSJF Restaurant Paging System, showing the keypad transmitter/charging base and multiple coaster pagers. The pagers are illuminated red, indicating they are charging.
Key Features:
- Large Capacity: The keypad transmitter supports up to 999 pagers.
- Long Transmission Distance: Up to 150-200ft indoors, and approximately 500ft in barrier-free environments (based on 433.92MHz frequency).
- Multiple Alert Modes: 8 call modes including vibration, sound, and light, or combinations thereof.
- Easy to Use: Pagers are pre-configured and ready for use.
- Scalable: Supports multiple transmitters with the same ID to call the same guest pager, and one keyboard can call many pagers simultaneously.
Setup
- Unpack Components: Carefully remove all components from the packaging. Ensure you have the keypad transmitter/charging base, 20 coaster pagers, and the power adapter.
- Connect Power: Plug the DC5V power adapter into the keypad transmitter/charging base and then into a standard electrical outlet.
- Charge Pagers: Place all coaster pagers into the charging slots on the keypad transmitter. The red light on the pagers will indicate charging. Ensure all pagers are fully charged before first use.
- Initial Configuration (Pre-set): The pagers are typically pre-set with registration numbers 1 to 20. No initial setup is usually required for basic operation.
Image: Coaster pagers placed in the charging base, with red indicator lights showing they are receiving power.
Operating Instructions
Basic Operation Flow:
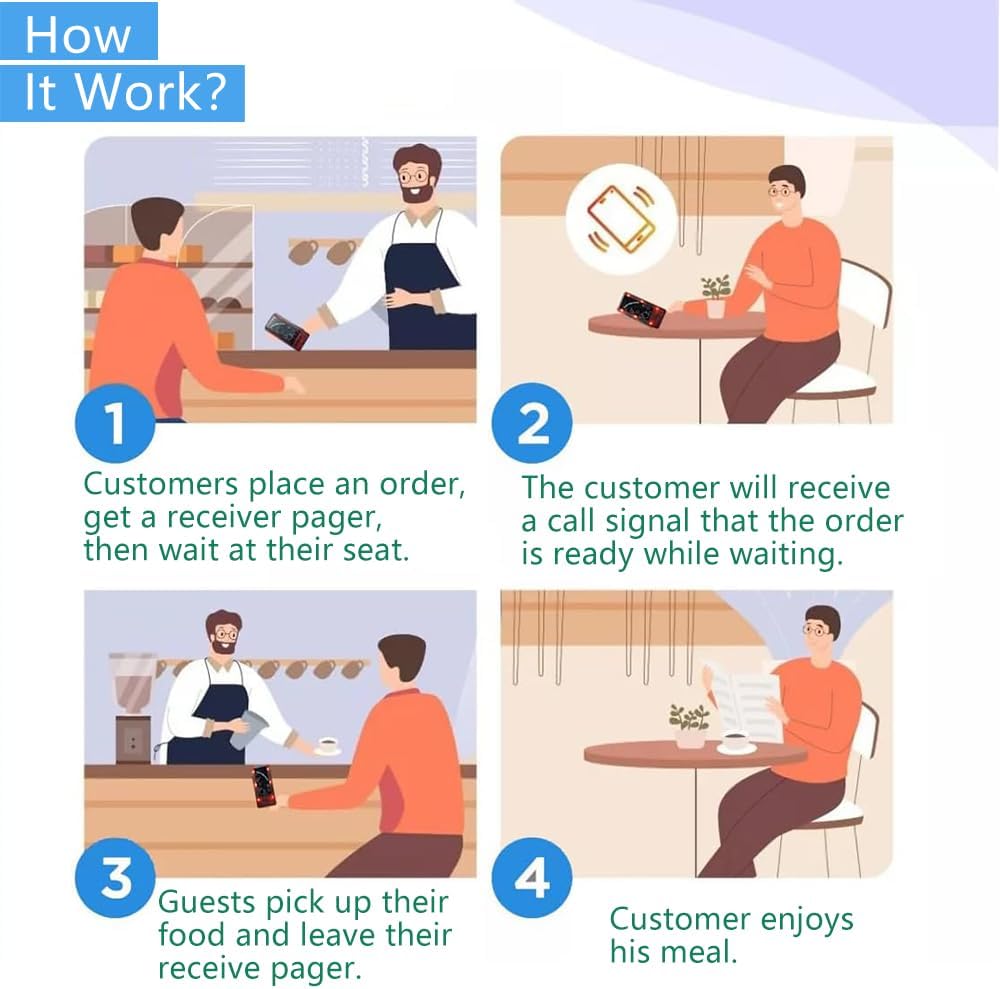
Image: A four-panel diagram illustrating the customer paging process. 1. Customer places an order and receives a pager. 2. Customer waits and receives a call signal when the order is ready. 3. Customer picks up food and returns the pager. 4. Customer enjoys their meal.
1. Registering Pager Numbers (If needed):
The pagers are typically pre-registered. If you need to register new pagers or change numbers:
- Press the FUN key on the keypad transmitter.
- Enter the desired 3-digit number (000-999) for the pager.
- Place the pager on the charging base. The pager will register the new number.
Video: This video demonstrates how to register a pager number. Press the FUN key on the keypad, enter the desired number, and then place the pager on the charging base to complete registration.
2. Calling a Pager:
- Ensure the pager is powered on and within range.
- On the keypad transmitter, enter the 3-digit number of the pager you wish to call.
- Press the CALL key. The pager will activate with its set alert mode (vibration, sound, or flash).
- The keypad has a "+1" function to quickly call the next sequential number.
Video: This video illustrates how to call a pager. Enter the pager's number on the keypad and press the CALL button. The pager will then activate with its programmed alert.
3. Stopping a Pager Call:
There are three methods to stop a pager call:
- Return to Base: Place the activated pager back onto any charging slot on the keypad transmitter. The call will automatically stop.
- Manual Stop from Keypad: On the keypad, enter the pager number and then press the F2 key.
- Manual Stop from Pager: Press any key on the pager itself to stop the alert.
Video: This video demonstrates three ways to stop a pager call: by returning the pager to the charging base, by entering the pager number and pressing F2 on the keypad, or by pressing any button on the pager itself.
4. Turning Pagers On/Off:
To turn a pager on or off, long-press the FUN button on the pager itself.
Video: This video shows how to power a pager on or off by performing a long press on the FUN button located on the pager.
5. Quick Shutdown Function:
To quickly shut down all pagers after a day's work, press "111+Call" and then "999+Call" sequentially on the keypad transmitter. All pagers will power off.
6. Changing Alert Modes:
The system offers 8 call modes, including various combinations of flash, vibration, and beep, plus a silent (sourdine) mode.

Image: A visual representation of the 8 available alert modes for the pagers. These modes combine flashing lights, vibration, and beeping sounds, with one mode being silent (sourdine).
Refer to the specific instructions provided with your product for details on how to switch between these modes, as this may vary.
Maintenance
- Cleaning: Use a soft, dry cloth to clean the keypad transmitter and pagers. Avoid using abrasive cleaners or solvents.
- Charging: Always return pagers to the charging base when not in use to ensure they are ready for the next service period.
- Battery Care: The pagers contain built-in 3.7V polymer lithium batteries. Avoid extreme temperatures and prolonged exposure to direct sunlight.
- Storage: Store the system in a cool, dry place when not in use for extended periods.
Troubleshooting
| Problem | Possible Cause | Solution |
|---|---|---|
| Pager not responding to call. |
|
|
| Pager not charging. |
|
|
| Reduced transmission range. |
|
|

Image: An illustration demonstrating the effective transmission range of the paging system. It shows a range of 500ft in open, unobstructed areas and a reduced range of 150-200ft indoors due to walls and other barriers.
Specifications
| Feature | Detail |
|---|---|
| Brand | CYSSJF |
| Model Number | 1 |
| Keypad Transmitter Size | 28.5 x 15.3 x 3.6 cm |
| Keypad Transmitter Output | DC5V |
| Pager Receiver Shell Material | High-quality Polycarbonate |
| Pager Receiver Power | Built-in 3.7V Polymer Lithium Battery |
| Pager Receiver Size | 10.5 x 5 x 1.7 cm |
| Number of Pagers | 20 (expandable up to 999) |
| Transmission Frequency | 433.92 MHz |
| Indoor Transmission Range | Up to 150-200 ft |
| Open Air Transmission Range | Up to 500 ft |
| Call Modes | 8 (Sound, Vibration, Flash, or combinations) |
| Battery Indicator | "LLL" word for low battery |
Warranty and Support
For warranty information and technical support, please refer to the contact details provided by your retailer or visit the official CYSSJF website. Keep your purchase receipt for warranty claims.
Manufacturer: Quanzhou Shuojiang Electronic Commerce Co., Ltd.