Phlizon PH-A40-P
Phlizon Timer Control Dimmable 165W LED Aquarium Light User Manual
Model: PH-A40-P | Brand: Phlizon
1. Introduction
The Phlizon Timer Control Dimmable 165W LED Aquarium Light is designed to provide optimal lighting conditions for various aquatic environments, including coral reefs and fish tanks. It features a built-in timer for simulating natural day-night cycles, three distinct lighting modes, a temperature monitor, and dimmable brightness control. This manual provides detailed instructions for the setup, operation, and maintenance of your aquarium light.
2. Package Contents
Please verify that all items are present in your package:
- 1 x Phlizon Aquarium Light
- 1 x Power Cord
- 1 x Wireless Remote Control
- 1 x Temperature Monitor Probe
- 1 x Adjustable Rope
- 1 x Hanger Kits
- 1 x User Instruction Manual

Figure 1: Overview of included package contents.
3. Product Specifications
| Feature | Specification |
|---|---|
| Model Number | PH-A40-P |
| Dimensions (L x W x H) | 16" x 8" x 2.4" (400mm x 210mm x 70mm) |
| Item Weight | 5.7 lbs (2.6 kg) |
| Light Source Type | LED |
| Light Source Wattage | 165 Watts |
| Voltage | 12 Volts (DC) |
| Power Source | Corded Electric |
| Material | Iron |
| Color | Black |
| Lifespan | >50,000 hours |

Figure 2: Light Specifications overview.
4. Setup Instructions
4.1. Initial Installation
- Unpack all components and ensure they are intact.
- Assemble the hanger kits and adjustable rope to suspend the light securely above your aquarium. Ensure the light is positioned at an appropriate height for your tank size and coral/fish species.
- Connect the power cord to the light's power inlet and then plug it into a suitable power outlet.
- Turn on the main power switch located on the side of the light unit.

Figure 3: Phlizon Aquarium Light unit and remote.
4.2. Remote Control Pairing
To ensure the remote control functions correctly, it needs to be paired with the light unit. This process only needs to be done once.
- Ensure the light unit is powered on.
- Locate the small hole next to the control panel on the light unit.
- Insert a thin needle or a similar pointed object into this hole.
- While the needle is inserted, press any button on the remote control. The light unit's display should respond, indicating successful pairing.
Video 1: Demonstrates how to connect the remote control to the light unit by inserting a needle into the small hole and pressing a remote button.
5. Operating Modes
The Phlizon aquarium light offers three distinct lighting modes to cater to different aquatic needs. You can switch between these modes using the "Mode" button on the control panel or the remote control.
5.1. L001 Mode (Red + Green + White Lights)
This mode activates a combination of red, green, and white LEDs, providing a full spectrum light suitable for general growth and vibrant coloration. This mode is ideal for daytime viewing and promoting plant photosynthesis.
5.2. L002 Mode (Blue Light)
This mode primarily uses blue LEDs, which are essential for the growth of corals (LPS/SPS) and marine fish. It simulates moonlight conditions and enhances the natural fluorescence of corals.
5.3. L003 Mode (All Lights On)
This mode combines all available LEDs (red, green, white, and blue) for maximum brightness and a comprehensive spectrum. It is suitable for periods requiring intense light, such as peak growth phases for demanding corals.
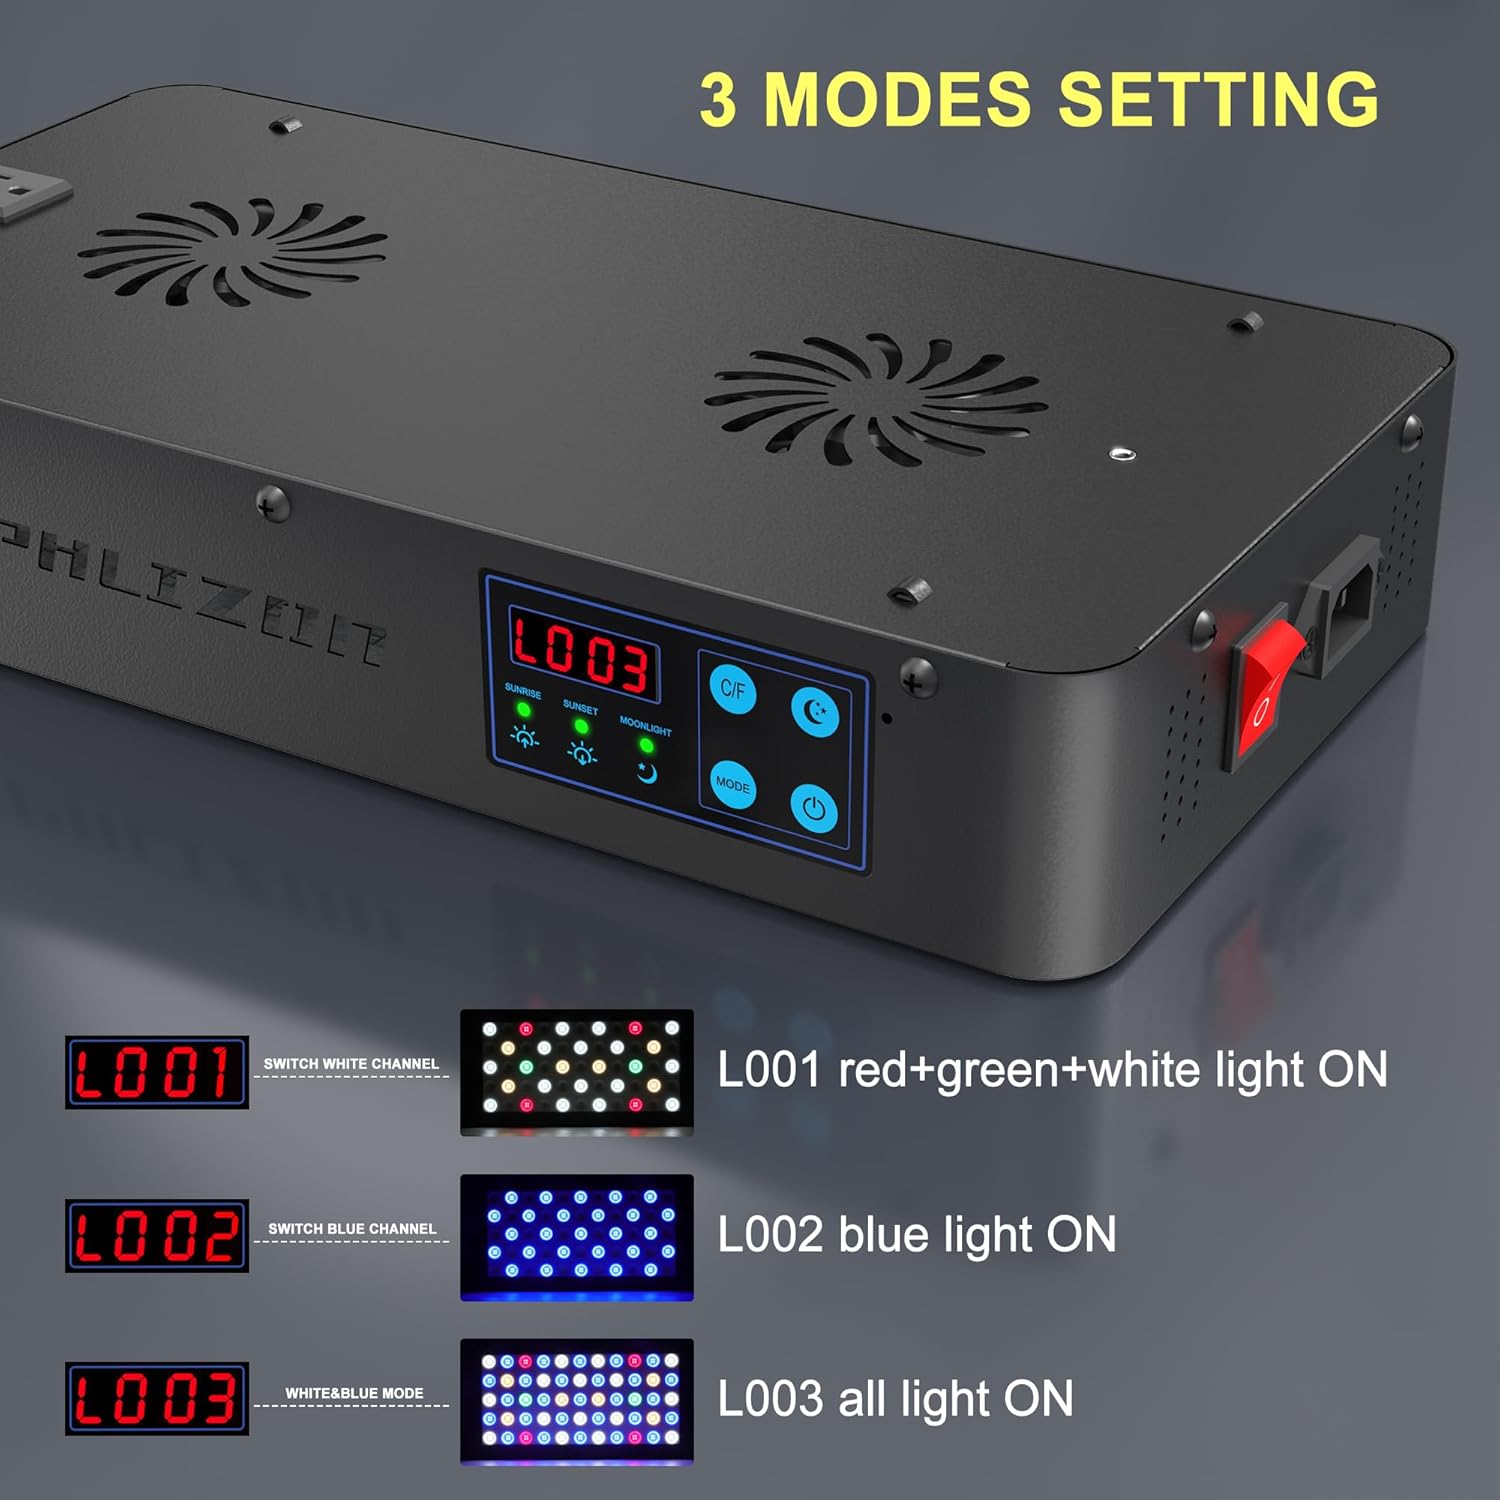
Figure 4: Visual representation of the three lighting modes.
Video 2: Demonstrates switching between the three lighting modes (L001, L002, L003) and their appearance.
6. Timing Function Setup
The built-in timer allows you to set specific times for sunrise, sunset, and moonlight modes, creating a natural light cycle for your aquarium.
6.1. Setting Local Time
Press the Dimming Button (light bulb icon) on the remote. Then use the Left/Right arrows to adjust hours and Up/Down arrows to adjust minutes. Confirm by pressing the Dimming Button again.
6.2. Setting Sunrise Time
Press the Time Setting button (clock icon) on the remote. The display will show "SUNRISE". Use the arrow buttons to set your desired sunrise time (e.g., 07:00). Press the Time Setting button again to confirm.
6.3. Setting Sunset Time
After setting sunrise, press the Time Setting button again. The display will show "SUNSET". Use the arrow buttons to set your desired sunset time (e.g., 19:00). Press the Time Setting button again to confirm.
6.4. Setting Moonlight Mode Time
Press the Time Setting button one more time. The display will show "MOONLIGHT". Use the arrow buttons to set the time for moonlight mode (e.g., 20:00). Press the Time Setting button again to confirm and exit timing setup.
Once set, the light will automatically transition between modes at the programmed times. For example, if sunrise is 07:00, sunset is 19:00, and moonlight is 20:00, the light will be on from 07:00-19:00, and then enter moonlight mode at 20:00.
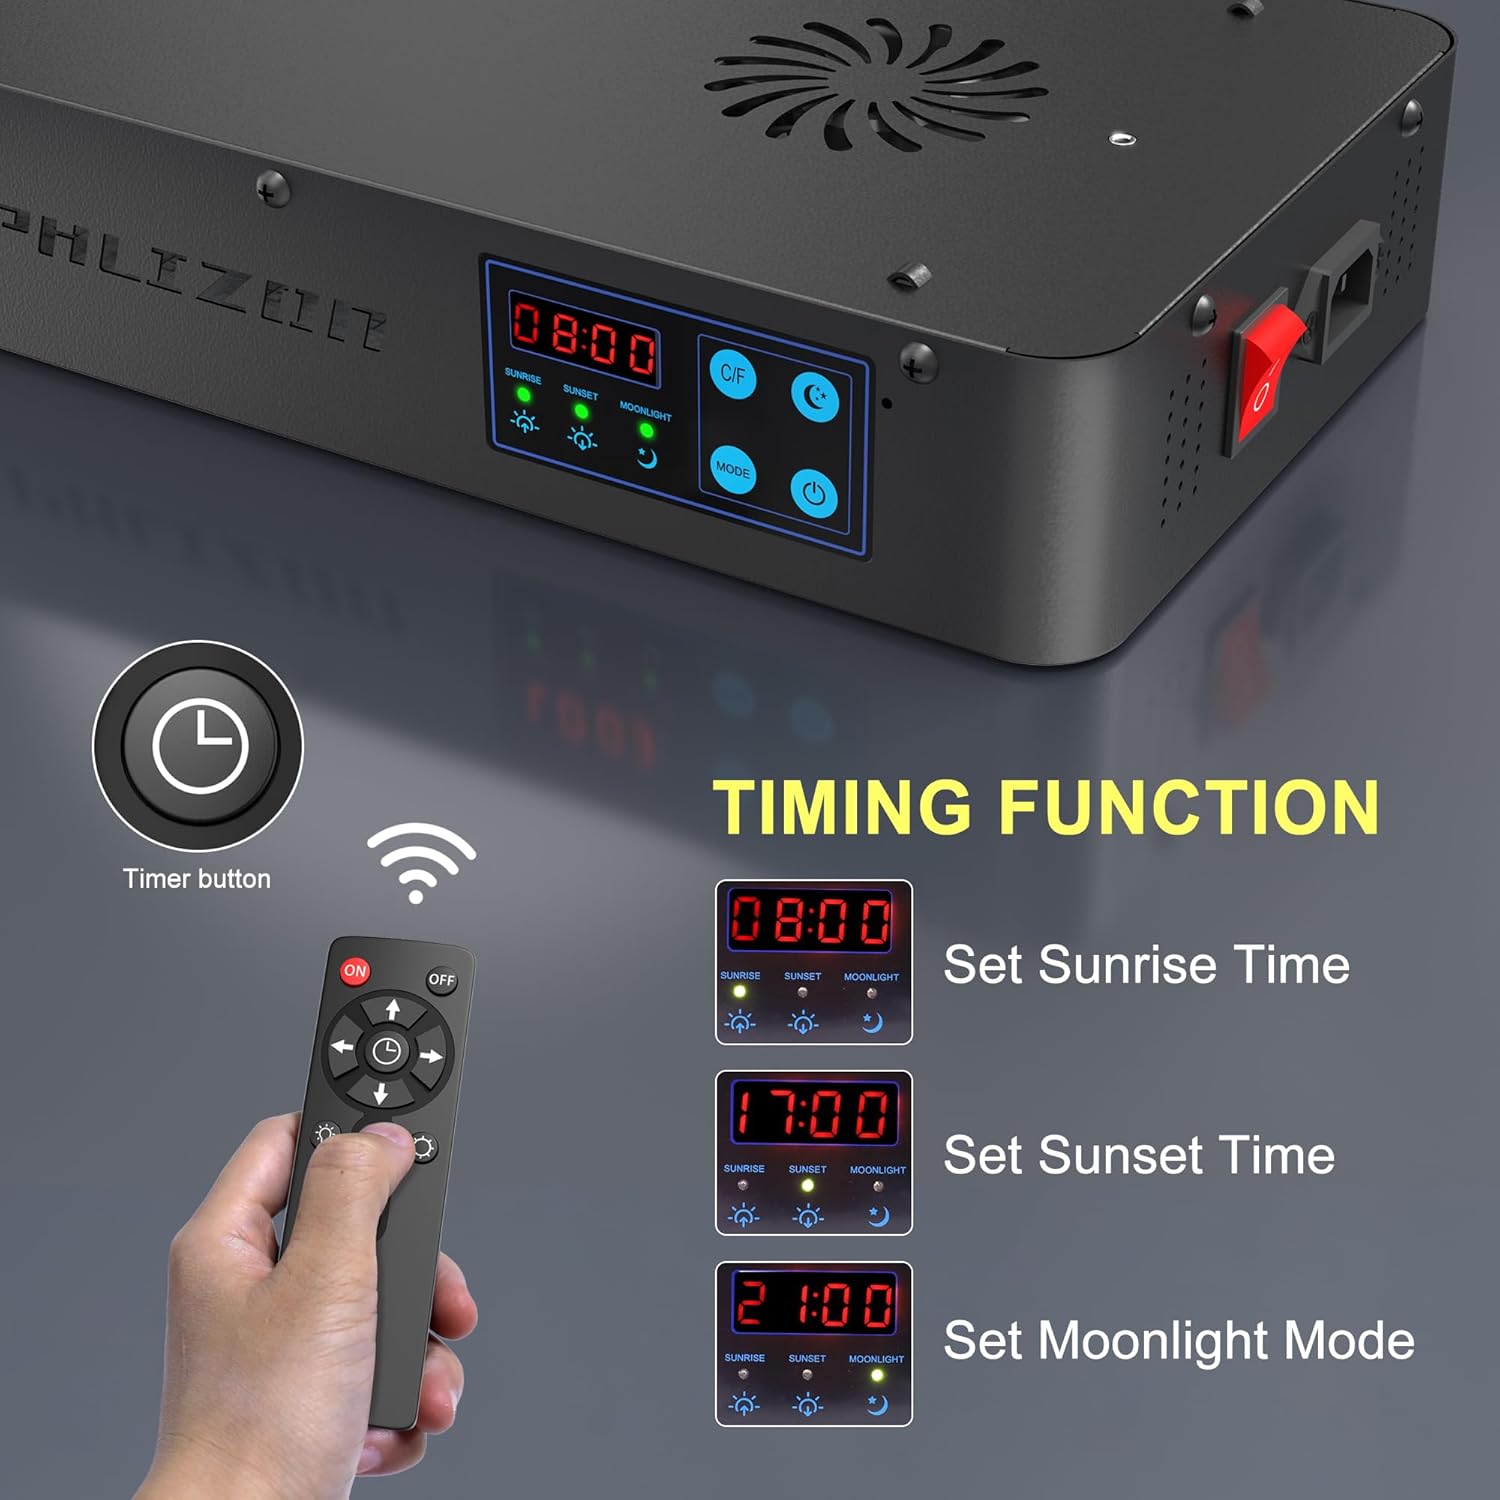
Figure 5: Setting the timing function for automated light cycles.
7. Dimming Function
The light offers 0-100% dimmable brightness control, allowing you to customize the intensity to suit your aquarium's specific needs and the preferences of your aquatic inhabitants.
- Press the Dimming Button (light bulb icon) on the remote control.
- Use the Up and Down arrow keys to increase or decrease the brightness level. The display will show the current brightness percentage.

Figure 6: Adjusting light intensity using the dimming function.
8. Temperature Monitor
The light unit includes a temperature monitor feature to help you maintain optimal water conditions for your fish and plants.
- Insert the provided temperature probe into the designated temperature probe hole on the light unit.
- Place the other end of the temperature probe into your aquarium water.
- The display on the light unit will show the current water temperature.
- Press the C/F Button on the control panel or remote to switch between Celsius and Fahrenheit display units.

Figure 7: Using the temperature monitor to display water temperature.
9. Maintenance
Regular maintenance ensures the longevity and optimal performance of your Phlizon aquarium light.
- Cleaning: Periodically wipe the light's surface and LEDs with a soft, dry cloth to remove dust and water spots. Ensure the light is unplugged before cleaning. Do not use abrasive cleaners or immerse the unit in water.
- Ventilation: Ensure the ventilation holes on the light unit are not obstructed to prevent overheating.
- Cable Inspection: Regularly check the power cord for any signs of damage. If damaged, discontinue use and contact customer support.
- Storage: If storing the light for an extended period, unplug it, clean it thoroughly, and store it in a cool, dry place away from direct sunlight.
10. Troubleshooting
If you encounter issues with your Phlizon aquarium light, refer to the following common problems and solutions:
| Problem | Possible Cause | Solution |
|---|---|---|
| Light does not turn on. | No power, main switch off, faulty power cord. | Check power outlet, ensure main switch is ON, inspect power cord for damage. |
| Remote control not responding. | Not paired, dead batteries, remote obstruction. | Re-pair the remote (Section 4.2), replace remote batteries, ensure no obstructions between remote and light. |
| Timer function not working correctly. | Incorrect time setting, remote not paired. | Verify local time and timing settings (Section 6), ensure remote is paired. |
| Temperature display is inaccurate or not showing. | Probe not connected, probe faulty, probe not in water. | Ensure temperature probe is securely connected and submerged in water. |
11. Warranty and Support
Phlizon provides a 2-year warranty for this product. If you encounter any issues or require assistance, please contact Phlizon customer support. Our dedicated R&D team and professional LED light manufacturing expertise ensure high-quality products and responsive support.
For further assistance, please visit the Phlizon Store on Amazon.
Ask a question about this manual
Ask about setup, troubleshooting, compatibility, parts, safety, or missing instructions. Manuals+ will review the question and use this page’s manual context to help answer it.