Introduction
This manual provides essential information for the installation, operation, and maintenance of the Generic Precision T1500 Workstation Motherboard. Please read this manual thoroughly before proceeding with installation to ensure proper function and safety. This motherboard is designed for use in Dell Precision T1500 workstation systems.
Product Overview
The motherboard serves as the central communication backbone for your computer system, connecting all components. Familiarize yourself with its layout and connectors.
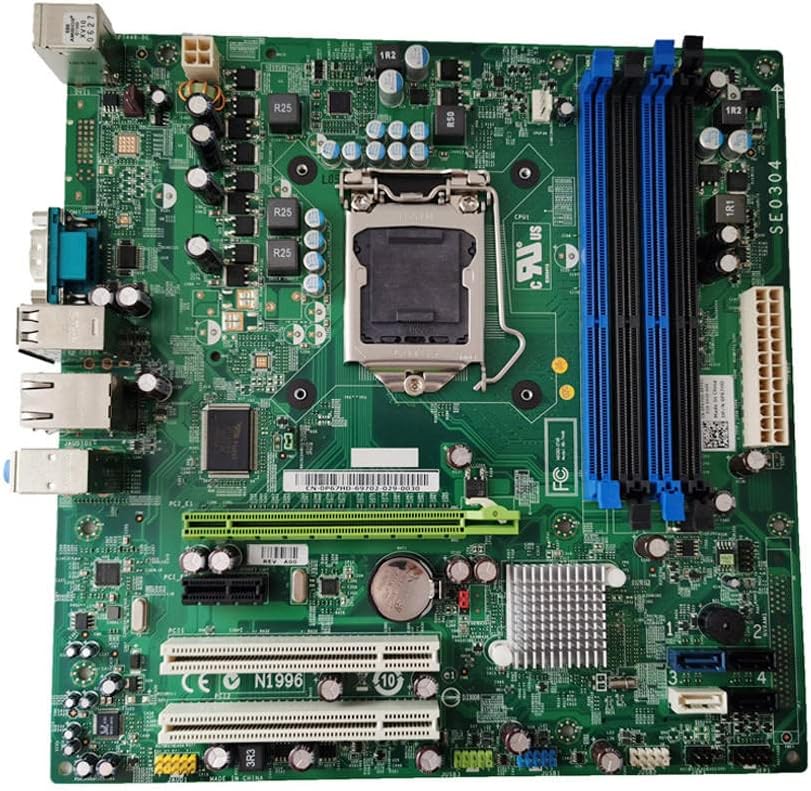
This image displays the overall layout of the motherboard, including the CPU socket, memory (RAM) slots, and various expansion slots.

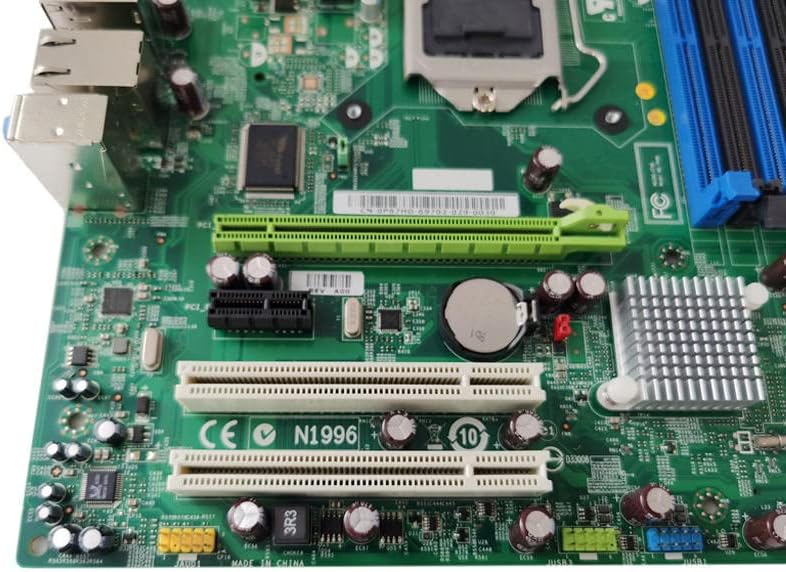
This close-up highlights the expansion slots (PCIe and PCI) for adding graphics cards, network cards, and other peripherals, as well as the CMOS battery.
This image shows the rear input/output (I/O) panel, featuring USB ports, an Ethernet port, audio jacks, and a VGA video output.

This view details the memory (RAM) slots, identifiable by their blue and black colors, and the primary 24-pin ATX power connector.

This image provides a detailed look at the CPU socket, where the central processing unit is installed, along with adjacent power delivery components.
Installation Guide
Safety Precautions
- Always disconnect power from the system before installing or removing components.
- Wear an anti-static wrist strap to prevent electrostatic discharge (ESD) damage to components.
- Handle the motherboard by its edges, avoiding contact with components and connectors.
Component Installation
- CPU Installation: Carefully open the CPU socket lever. Align the CPU with the socket, ensuring the triangular markers match. Gently place the CPU into the socket without force. Close the lever to secure the CPU.
- CPU Cooler Installation: Apply thermal paste to the CPU (if not pre-applied on the cooler). Mount the CPU cooler according to its specific instructions, ensuring it is securely fastened and making good contact with the CPU. Connect the CPU fan cable to the designated header on the motherboard.
- RAM Installation: Open the clips on the memory slots. Align the RAM module with the slot, ensuring the notch on the module matches the key in the slot. Press down firmly on both ends of the module until the clips snap into place.
- Motherboard Mounting: Install standoffs in the computer case that align with the motherboard's mounting holes. Carefully place the motherboard onto the standoffs, aligning the I/O shield with the case opening. Secure the motherboard with screws.
- Power Supply Connection: Connect the main 24-pin ATX power connector and the 4-pin or 8-pin CPU power connector from the power supply to the motherboard.
- Storage Device Connection: Connect SATA data cables from storage drives (HDD/SSD) to the SATA ports on the motherboard. Connect SATA power cables from the power supply to the drives.
- Front Panel Connections: Connect the front panel headers (power button, reset button, USB ports, audio jacks, LED indicators) from the computer case to the corresponding pins on the motherboard. Refer to your case manual for specific pin assignments.
- Expansion Card Installation: Insert graphics cards or other expansion cards into the appropriate PCIe or PCI slots. Secure them with the case's retention mechanism.
Operating
After all components are securely installed and connected, you can power on the system.
First Boot
- Connect a monitor, keyboard, and mouse to the appropriate ports.
- Power on the system. The system should display the BIOS/UEFI splash screen.
- Press the designated key (usually DEL, F2, F10, or F12) to enter the BIOS/UEFI setup utility.
BIOS/UEFI Configuration
In the BIOS/UEFI, you may need to:
- Set the correct date and time.
- Configure boot order to prioritize your operating system drive.
- Enable or disable specific features as required by your system components.
- Save changes and exit. The system will restart.
Operating System Installation
Proceed with the installation of your preferred operating system (e.g., Windows, Linux) from a bootable USB drive or DVD after configuring the BIOS/UEFI.
Maintenance
Cleaning
Regularly clean dust from the motherboard and components using compressed air. Ensure the system is powered off and unplugged before cleaning. Hold fans to prevent over-spinning during cleaning.
Handling
When handling the motherboard, always use anti-static precautions. Avoid touching sensitive components directly to prevent damage.
BIOS/UEFI Updates
Periodically check the system manufacturer's website (Dell for Precision T1500) for BIOS/UEFI updates. Updates can improve stability, compatibility, and performance. Follow the update instructions carefully to avoid system damage.
Troubleshooting
No Power
- Check Power Connections: Ensure the 24-pin ATX and 4/8-pin CPU power cables are securely connected to the motherboard and power supply.
- Power Supply Test: Verify the power supply is functioning correctly.
- Front Panel Connections: Double-check that the power button cable is correctly connected to the motherboard's front panel header.
No Display
- Monitor Connection: Ensure the monitor is connected to the correct video output (either integrated graphics or a dedicated graphics card) and is powered on.
- RAM Reseat: Remove and re-insert RAM modules to ensure they are properly seated. Try booting with one RAM stick if multiple are installed.
- Graphics Card: If using a dedicated graphics card, ensure it is fully seated in its PCIe slot and any required power cables are connected.
System Instability/Crashes
- Overheating: Check CPU and case fan operation. Ensure heatsinks are clean and properly mounted. Monitor temperatures using system software.
- RAM Issues: Run memory diagnostic tools to check for faulty RAM.
- Driver Issues: Ensure all necessary drivers (chipset, graphics, etc.) are installed and up to date.
Beep Codes
If the system emits a series of beeps on startup, these are often diagnostic codes indicating a specific hardware issue. Consult the motherboard's specific documentation (if available) or online resources for the meaning of these codes, often related to the BIOS manufacturer (e.g., AMI, Award, Phoenix).
Technical Specifications
| Feature | Detail |
|---|---|
| Model | P67HD CN-0P67HD MS-7448 |
| Brand | Generic |
| Compatible Workstation | Dell Precision T1500 |
| CPU Socket | LGA 1156 |
| Memory Type | DDR3 SDRAM |
| Max Memory Capacity | Supports DDR3 memory. Maximum supported capacity depends on CPU and RAM module configuration (typically up to 16GB or 32GB for T1500). |
| Expansion Slots | 1x PCI Express x16, 2x PCI Express x1, 3x PCI (based on visual inspection) |
| Storage Interfaces | SATA ports |
| Rear I/O Ports | USB ports, Ethernet (RJ-45), Audio jacks, VGA, PS/2 ports |
Important Safety Information
- Always ensure proper grounding to prevent electrical shock.
- Do not operate the motherboard in environments with excessive moisture or extreme temperatures.
- Keep out of reach of children.
- Refer to professional technicians for complex repairs or if you are unsure about any installation steps.
Warranty and Technical Support
Specific warranty information for this 'Generic' brand product is not provided in the product details. For technical support, troubleshooting assistance, or warranty inquiries, please contact your retailer or the system integrator who supplied this component. It is also recommended to consult Dell's official documentation for the Precision T1500 workstation for system-specific information.