Introduction
This manual provides detailed instructions for the operation and maintenance of your Gelielim Retro Radio Bluetooth Speaker (Model RZ-8178BS) and the Gelielim CD/Cassette Player Combo. Please read this manual thoroughly before using the devices to ensure proper function and longevity.
Gelielim Retro Radio (Model RZ-8178BS)

Figure 1: Gelielim Retro Radio highlighting key features.
This image illustrates the various functionalities of the Gelielim Retro Radio, including AM/FM/SW radio reception, Bluetooth connectivity, an integrated flashlight, solar charging capability, and playback options via USB and TF card.
1. Components and Controls
Familiarize yourself with the main components and controls of the retro radio:
- Front Panel: Speaker grille, tuning dial, volume control knob, tuning knob, mode selection switch (AM/FM/SW/Bluetooth/USB/TF).
- Top Panel: Integrated solar charging panel, carrying handle.
- Side Panel: Flashlight.
- Rear Panel: Telescopic antenna, DC 5V charging port, USB port, TF card slot.

Figure 2: Detailed view of the retro radio's controls and speaker design.
This image provides a closer look at the radio's tuning dial, volume control, and the speaker's ported design, which contributes to sound quality.
2. Powering the Device
The retro radio is equipped with an internal rechargeable battery and offers multiple charging methods:
- Solar Charging: Place the radio with the solar panel facing direct sunlight. The charging indicator will illuminate.
- DC 5V Charging: Connect a standard DC 5V USB power adapter (not included) to the DC 5V input port on the rear of the radio. The charging indicator will show charging status.

Figure 3: Dual charging methods for the retro radio.
This image illustrates how to charge the retro radio using its integrated solar panel or via the DC 5V input port.
3. Radio Operation (AM/FM/SW)
- Extend the telescopic antenna for optimal reception.
- Set the mode selection switch to AM, FM, or SW.
- Rotate the tuning knob to select your desired radio station.
- Adjust the volume knob to your preferred listening level.

Figure 4: Retro radio with extended antenna for enhanced AM/FM/SW reception.
This image demonstrates the use of the telescopic antenna to improve radio signal strength for AM, FM, and Shortwave bands.
4. Bluetooth Speaker Operation
- Set the mode selection switch to Bluetooth. The radio will enter pairing mode, indicated by an audible prompt.
- On your mobile device, enable Bluetooth and search for available devices.
- Select "Gelielim RZ-8178BS" (or similar name) from the list to pair.
- Once paired, you can play audio from your device through the radio.
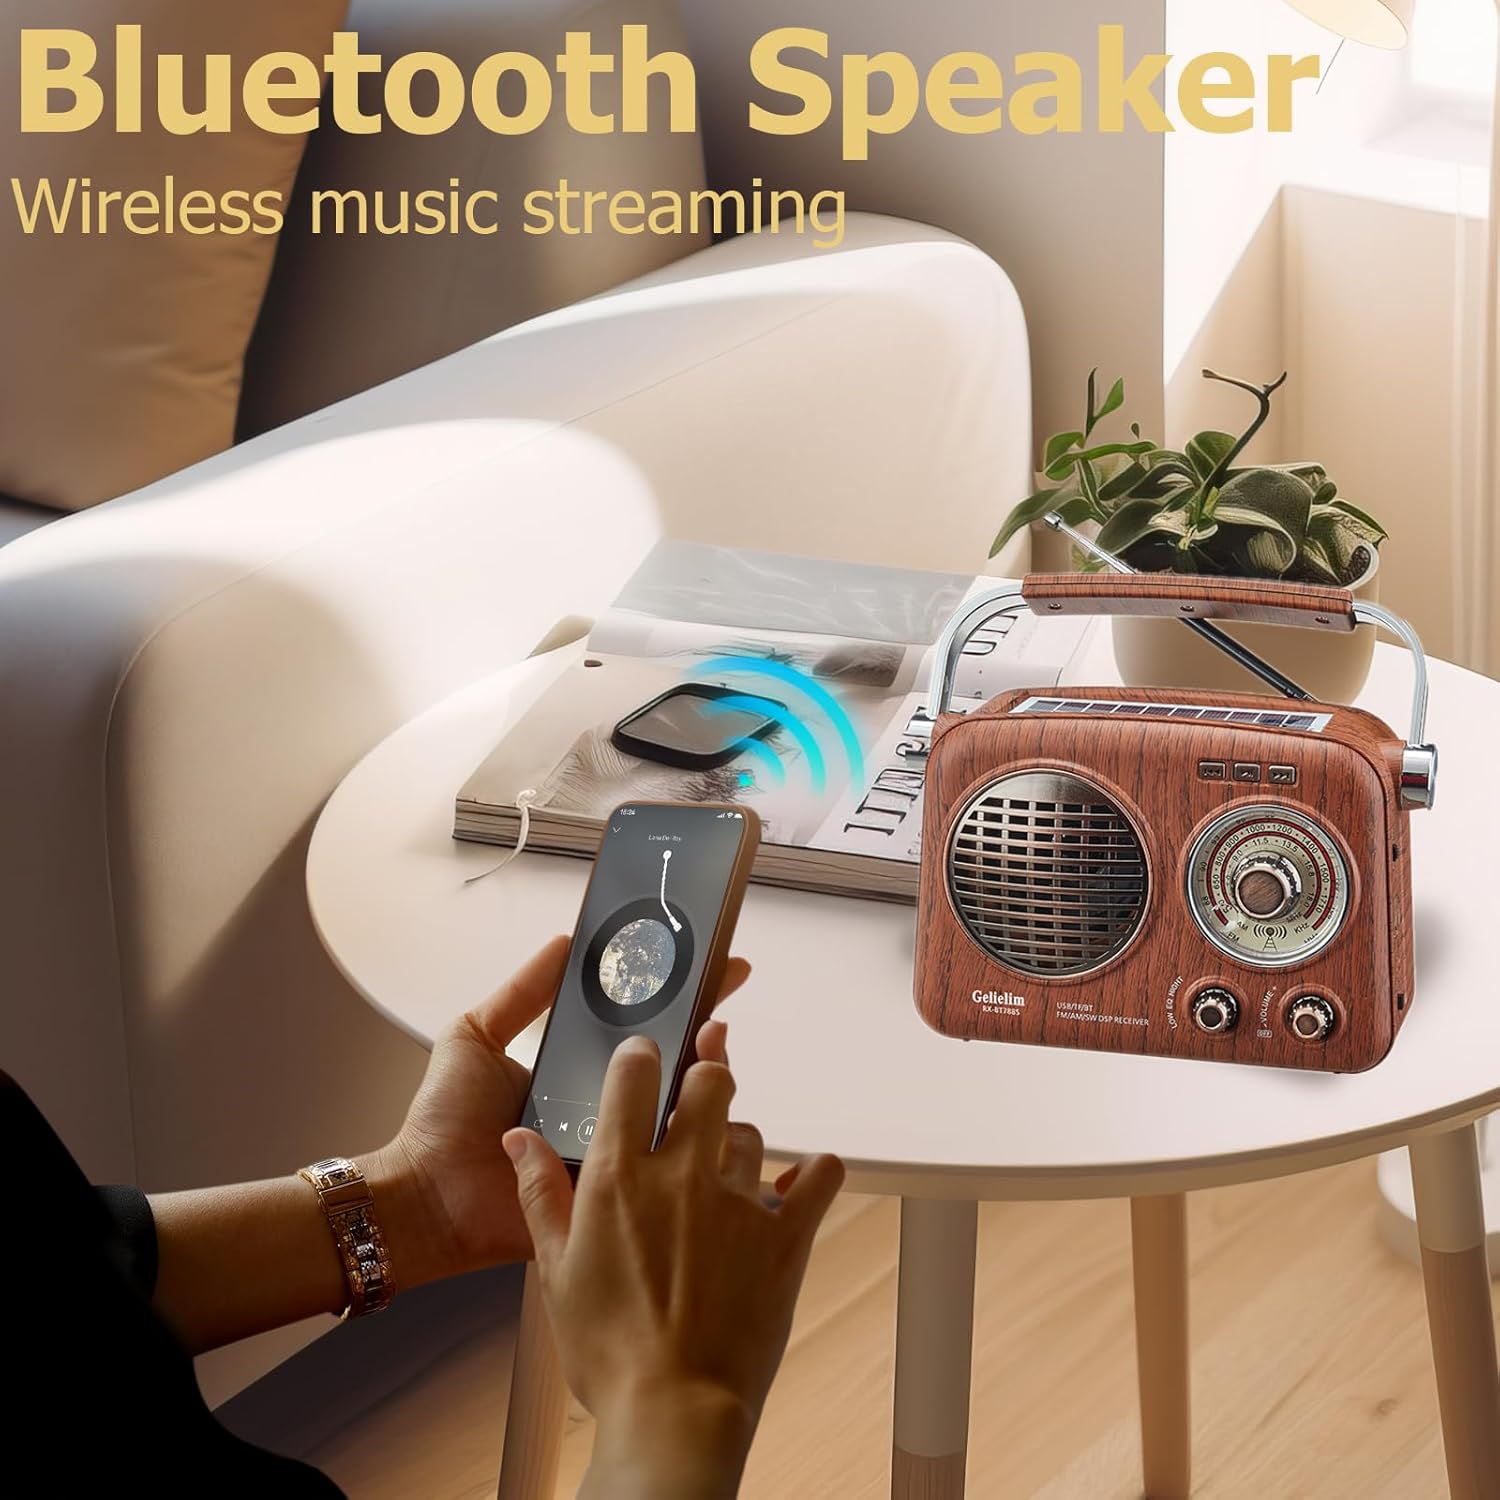
Figure 5: Retro radio connected via Bluetooth to a smartphone.
This image shows the retro radio wirelessly streaming music from a smartphone, demonstrating its Bluetooth speaker capability.
5. USB/TF Card Playback
- Insert a USB flash drive into the USB port or a TF (Micro SD) card into the TF card slot.
- Set the mode selection switch to USB or TF. The radio will automatically begin playing compatible audio files (e.g., MP3).
- Use the playback controls (if available, typically integrated with tuning/volume knobs for track skipping) to navigate tracks.
6. Flashlight Function
To activate the integrated flashlight, locate the flashlight switch on the side of the radio and slide it to the ON position. Slide it back to OFF to turn off the flashlight.
Gelielim CD/Cassette Boombox
1. Components and Controls
Familiarize yourself with the main components and controls of the CD/Cassette Boombox:
- Front Panel: CD compartment, LCD display, function buttons (Play/Pause, Stop, Skip, Program), volume control, radio tuner dial, mode selector (CD/Cassette/Radio).
- Side Panel: Cassette deck with playback/record controls.
- Rear Panel: AC power input, telescopic antenna.

Figure 6: Gelielim CD Player Boombox in use.
This image shows the CD player boombox with its CD compartment open, indicating CD playback functionality.
2. Powering the Device
The CD/Cassette Boombox can be powered by AC power or batteries:
- AC Power: Connect the AC power cord to the AC input on the rear of the unit and plug it into a standard wall outlet.
- Battery Power: (If applicable) Insert the required number of C-size batteries (not included) into the battery compartment, typically located on the bottom or rear of the unit, observing correct polarity.
3. CD Player Operation
- Open the CD compartment door.
- Place a CD onto the spindle with the label side facing up. Close the CD compartment door.
- Set the mode selector to CD.
- Press the PLAY/PAUSE button to start playback. Press again to pause.
- Use the SKIP buttons to navigate between tracks.
- Press the STOP button to end playback.
4. Cassette Player Operation
- Open the cassette deck door.
- Insert a cassette tape with the open edge facing upwards. Close the cassette deck door.
- Set the mode selector to TAPE.
- Press the PLAY button to start playback.
- Use the FAST FORWARD (FF) and REWIND (REW) buttons to quickly move through the tape.
- Press the STOP/EJECT button to stop playback and open the cassette door.
- Recording: To record from the radio or an external source (if applicable), ensure the mode is set to the desired input, insert a recordable cassette, and press the RECORD button (usually red) along with the PLAY button simultaneously.

Figure 7: Gelielim Cassette Player Boombox in operation.
This image highlights the cassette player functionality, including support for tape playback and recording.
5. AM/FM Radio Operation
- Extend the telescopic antenna for optimal FM reception. For AM, rotate the unit for best reception.
- Set the mode selector to RADIO.
- Select the desired band (AM or FM) using the band switch.
- Rotate the tuning dial to select your desired radio station.
- Adjust the volume control to your preferred listening level.

Figure 8: Gelielim AM/FM Radio Boombox with extended antenna.
This image shows the boombox operating as an AM/FM radio, emphasizing its reception capabilities.
Maintenance
Proper care ensures the longevity of your devices:
- Cleaning: Use a soft, dry cloth to clean the exterior surfaces. Do not use abrasive cleaners or solvents. For CD/cassette mechanisms, use specialized cleaning kits if necessary.
- Battery Care (Retro Radio): For optimal battery life, avoid fully discharging the battery frequently. Charge regularly, especially if storing for extended periods.
- Storage: Store devices in a cool, dry place away from direct sunlight and extreme temperatures.
Troubleshooting
If you encounter issues, refer to the following common problems and solutions:
| Problem | Possible Cause | Solution |
|---|---|---|
| No power (Retro Radio) | Battery discharged, charging cable not connected. | Charge the battery via solar panel or DC 5V. Ensure charging cable is securely connected. |
| No power (Boombox) | AC cord disconnected, dead batteries. | Check AC power connection. Replace batteries if using battery power. |
| Poor radio reception | Antenna not extended, weak signal, interference. | Fully extend the telescopic antenna. Reposition the device. For AM, rotate the unit. |
| Bluetooth pairing failure | Device not in pairing mode, too far from source. | Ensure radio is in Bluetooth mode. Move devices closer. Restart Bluetooth on both devices. |
| CD/Cassette playback issues | Dirty disc/tape, incorrect insertion, damaged media. | Clean disc/tape. Ensure media is inserted correctly. Try a different disc/tape. |
Specifications
- Brand: Gelielim
- Model (Overall): B0C39ZQ138
- Connectivity Technology: Bluetooth, USB
- Speaker Type: Stereo
- Power Source (Retro Radio): Battery Powered, Solar Powered
- Power Source (Boombox): AC Powered, (Optional Battery Powered)
- Speaker Output: 4W (Retro Radio)
- Date First Available: May 24, 2024
Warranty and Support
For warranty information, please refer to the documentation provided with your purchase. For technical support or customer service inquiries, please contact Gelielim customer support through your retailer or the official Gelielim website.