1. Important Safety Information
Please read and understand all instructions before installing and using this pet gate. Failure to follow these instructions could result in injury or damage.
- This gate is designed for use with pets and can also function as a barrier for children.
- Always ensure the gate is securely installed and all pressure mounts are tightened before use.
- Do not use this gate at the top of stairs without additional safety measures or if not explicitly designed for such use. This model is primarily for doorways and hallways.
- Regularly check all parts for wear, damage, or loose components. Discontinue use if any part is damaged.
- Never leave pets or children unattended near the gate.
- The narrow 1.37-inch gap between bars is designed to prevent small pets and children from squeezing through.
- The gate features a double-locking mechanism for enhanced security. Always ensure both locks are engaged when closing the gate.
- Important Installation Note: Do not cut the zip ties holding the gate frame together until the gate is fully installed and secured in its opening. These ties maintain the gate's structural integrity during installation.
2. Package Contents
Verify that all components are present before beginning installation:
- Main Gate Frame with Door
- 4 x Adjustable Pressure Bolts (Screw Rods)
- 4 x Wall Protectors (optional for use)
- Reinforcement Slot (bottom bar cover)
- Instruction Manual

3. Installation Instructions
This gate is designed for pressure-mounted installation, requiring no drilling. A two-person installation is recommended for larger gates.
3.1. Before Installation
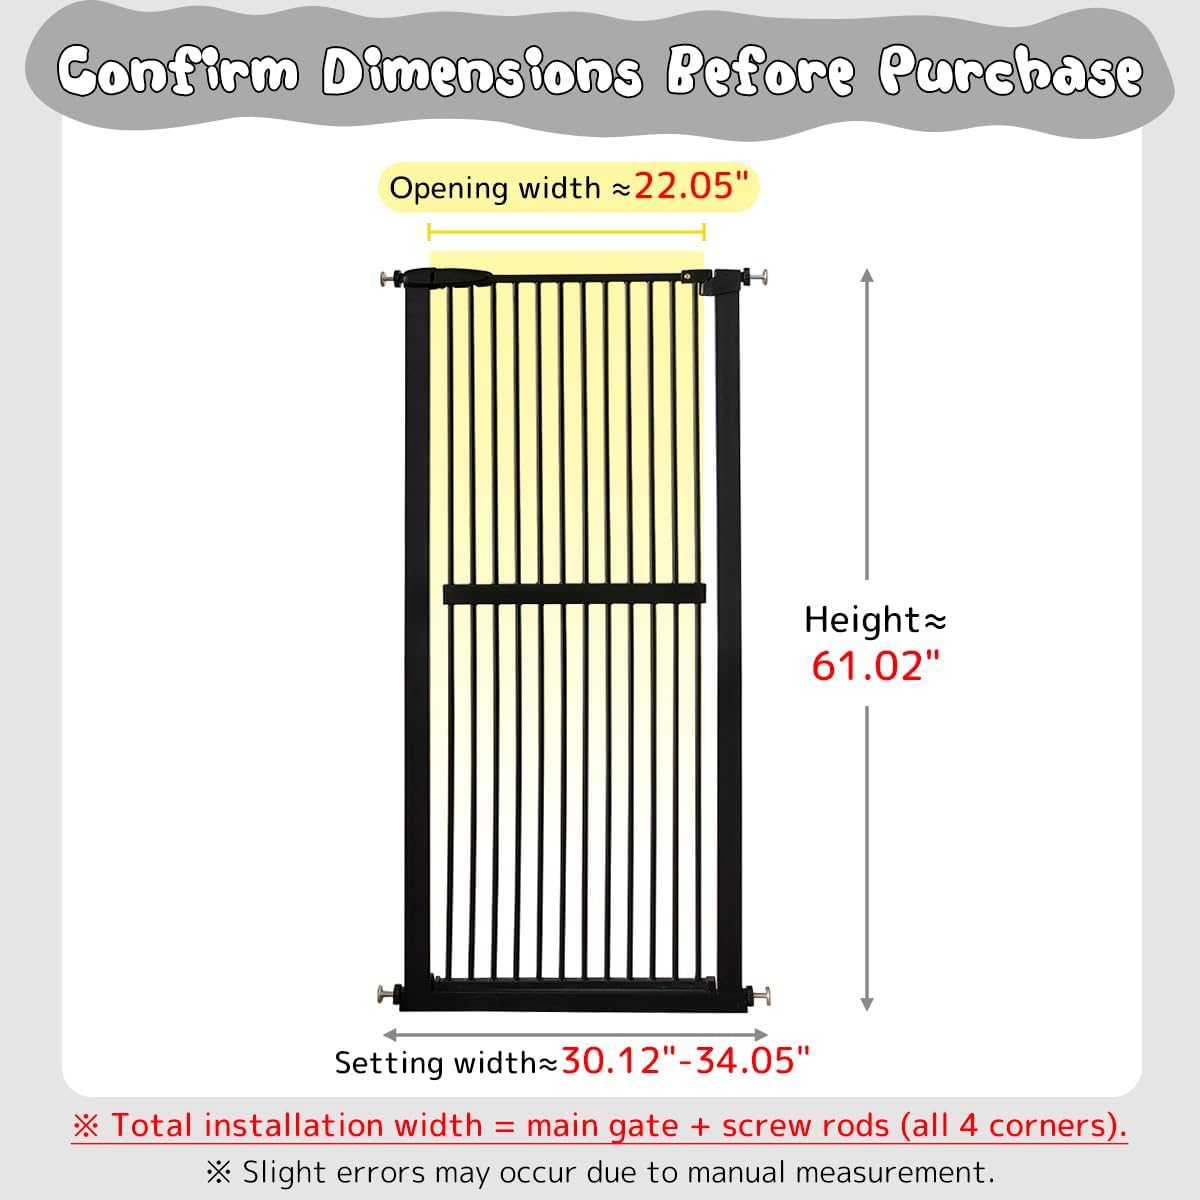
- Measure your opening width carefully. This gate is designed for openings between 30.12 inches and 34.05 inches (76.5-86 cm).
- Ensure the installation surface is clean, dry, and structurally sound.
- Keep the zip ties on the gate until instructed to remove them. This is crucial for proper installation.
3.2. Step-by-Step Installation
- Insert Pressure Bolts: Insert one adjustable pressure bolt into each of the four corners of the main gate frame.
- Position the Gate: Place the gate in the desired opening (doorway, hallway). Ensure the bottom bar is flush with the floor.
- Apply Wall Protectors (Optional): If using, place the wall protectors against the wall where the pressure bolts will make contact.
- Tighten Bolts: Rotate the rings on the pressure bolts (do not rotate the bolts themselves) to extend them. Tighten them evenly until the gate is firmly secured between the door frames or walls. The gate should feel stable and not move when pushed.
- Verify Stability: Gently push and pull the gate to ensure it is securely mounted and does not shift.
- Remove Zip Ties: Once the gate is fully installed and stable, carefully cut and remove the zip ties. The latch may appear open before removing the zip ties; this is normal and not a defect. The resistance from the pressure mounting will cause the lock to close firmly after installation.


3.3. Reinforcement Slot
The included reinforcement slot can be placed over the bottom bar of the gate to reduce the risk of tripping. Position it securely over the bar once the gate is installed.

4. Operating Instructions
4.1. Opening and Closing the Gate
This gate features a double-locking mechanism for secure closure and an auto-close function.
- To Open:
- Slide the knob on the top lock.
- Lift the gate handle slightly to disengage the second lock.
- Pull or push the gate open.
- To Close: Simply push the gate shut. The auto-close mechanism will engage if the gate is opened less than 90 degrees. Ensure both locks click into place for full security.
- Keep Open Feature: If the gate is opened to a 90-degree angle or wider, it will remain open, allowing for continuous passage.


5. Maintenance
To ensure the longevity and proper function of your Lumizone pet gate, follow these simple maintenance guidelines:
- Cleaning: Wipe the gate regularly with a damp cloth and mild soap. Avoid abrasive cleaners or harsh chemicals, as these can damage the finish.
- Inspection: Periodically inspect all components, especially the pressure bolts and locking mechanisms, for any signs of wear, damage, or loosening.
- Tightening: Re-tighten the pressure bolts as needed to maintain a secure fit.
6. Troubleshooting
If you encounter issues with your pet gate, refer to the following common solutions:
- Gate Does Not Close Properly:
- Ensure the gate is installed with sufficient pressure. Re-tighten the pressure bolts evenly.
- Verify that the zip ties were removed only after full installation. If removed prematurely, the gate's alignment might be affected.
- Check for any obstructions preventing the gate from swinging freely or the locks from engaging.
- Gate Feels Unstable:
- Re-tighten all four pressure bolts evenly until the gate is firm.
- Ensure wall protectors are used if the wall surface is uneven or delicate.
- Latching Mechanism is Stiff:
- Ensure the gate is not over-tightened, which can cause friction in the latch. Slightly loosen the pressure bolts if necessary.
- A small amount of food-grade lubricant can be applied to moving parts if stiffness persists.
- Gap at Latch Before Installation: This is normal. The gate is designed to have a slight gap at the latch before installation. The pressure from mounting will pull the frame together, allowing the latch to close securely.
7. Specifications
| Feature | Specification |
|---|---|
| Model Number | BM02 |
| Height | 61.02 inches (155 cm) |
| Adjustable Width Range | 30.12 - 34.05 inches (76.5 - 86 cm) |
| Bar Gap | 1.37 inches (3.5 cm) |
| Mounting Type | Pressure Mounted |
| Color | Black |
| Item Weight | 28.3 pounds (12.86 kg) |

8. Warranty and Support
Lumizone is committed to customer satisfaction. If you encounter any issues with your product, such as missing parts, damage, or fitment problems, please contact us directly for assistance.
Our support team will provide a free solution, which may include sending replacement parts or offering further guidance.
Contact Email: lumizone2303@gmail.com
Your satisfaction is our top priority.
9. Video Resources
No official product videos from the seller were available in the provided data to embed in this manual. For visual installation guides or product demonstrations, please refer to the product page or manufacturer's website.