1. Introduction
This manual provides essential information for the safe and efficient operation, installation, and maintenance of your Hothope Nugget Ice Maker Countertop Model IM-S2-A. Please read all instructions carefully before using the appliance and retain this manual for future reference. Proper use and maintenance will ensure optimal performance and extend the lifespan of your ice maker.
Safety Precautions
- Ensure the ice maker is placed on a stable, level surface.
- Do not block ventilation openings on the appliance.
- Connect to a grounded power outlet.
- Do not immerse the appliance, cord, or plug in water or other liquids.
- Keep children away from the ice maker during operation.
- Unplug the appliance before cleaning or performing any maintenance.
2. Product Overview
The Hothope Nugget Ice Maker Countertop Model IM-S2-A is designed to produce chewable pellet ice efficiently. It features a robust stainless steel construction and offers flexible water input options.

Figure 2.1: Hothope Nugget Ice Maker Countertop Model IM-S2-A. This image displays the ice maker with a 5-gallon water bottle on top, an open ice basket filled with nugget ice, and a water filter connected to a tap on the right side.
Key Features
- High Ice Production: Produces up to 80 pounds of nugget ice per 24 hours.
- Large Storage Capacity: Equipped with a 20-pound ice basket.
- Dual Water Inlet: Supports direct tap water connection and bottled water supply.
- Self-Cleaning Function: One-click automatic cleaning for convenience.
- Durable Construction: Features reinforced stainless steel and food-grade internal components.
- Energy Efficient & Quiet: 220W compressor operates at approximately 45dB.

Figure 2.2: Efficient Nugget Ice Making. This diagram highlights the ice maker's capabilities, including 80 lbs ice production in 24 hours, 20 lbs storage capacity, nugget ice type, and a 220W powerful compressor.
3. Components
The Hothope Nugget Ice Maker Countertop Model IM-S2-A includes the following components:
- Ice machine unit
- Water filter
- Water inlet hoses
- Drain pipe
- Ice scoop
4. Setup
Proper setup is crucial for the performance and longevity of your ice maker. Follow these steps carefully.
4.1 Placement
Place the ice maker on a firm, level surface away from direct sunlight and heat sources. Ensure adequate ventilation around the unit, leaving at least 5 inches of space from walls or other appliances.
4.2 Water Connection
Your ice maker supports two methods for water supply:
- Direct Tap Water Supply: Connect the provided water inlet hose to a potable water tap. Ensure the external water filter is installed in-line to remove impurities.
- Bottled Water Supply: Place a standard 5-gallon water bottle onto the designated water barrel seat on top of the unit.

Figure 4.1: Dual Water Inlet Methods. This image illustrates how to connect the ice maker to either a direct tap water supply with an inline filter or use a 5-gallon bottled water supply.
4.3 Drain Pipe Connection
Connect the drain pipe to the designated outlet on the back of the ice maker. Ensure the drain pipe is routed to a suitable drainage point to prevent water accumulation, as melted ice will drain from the unit.
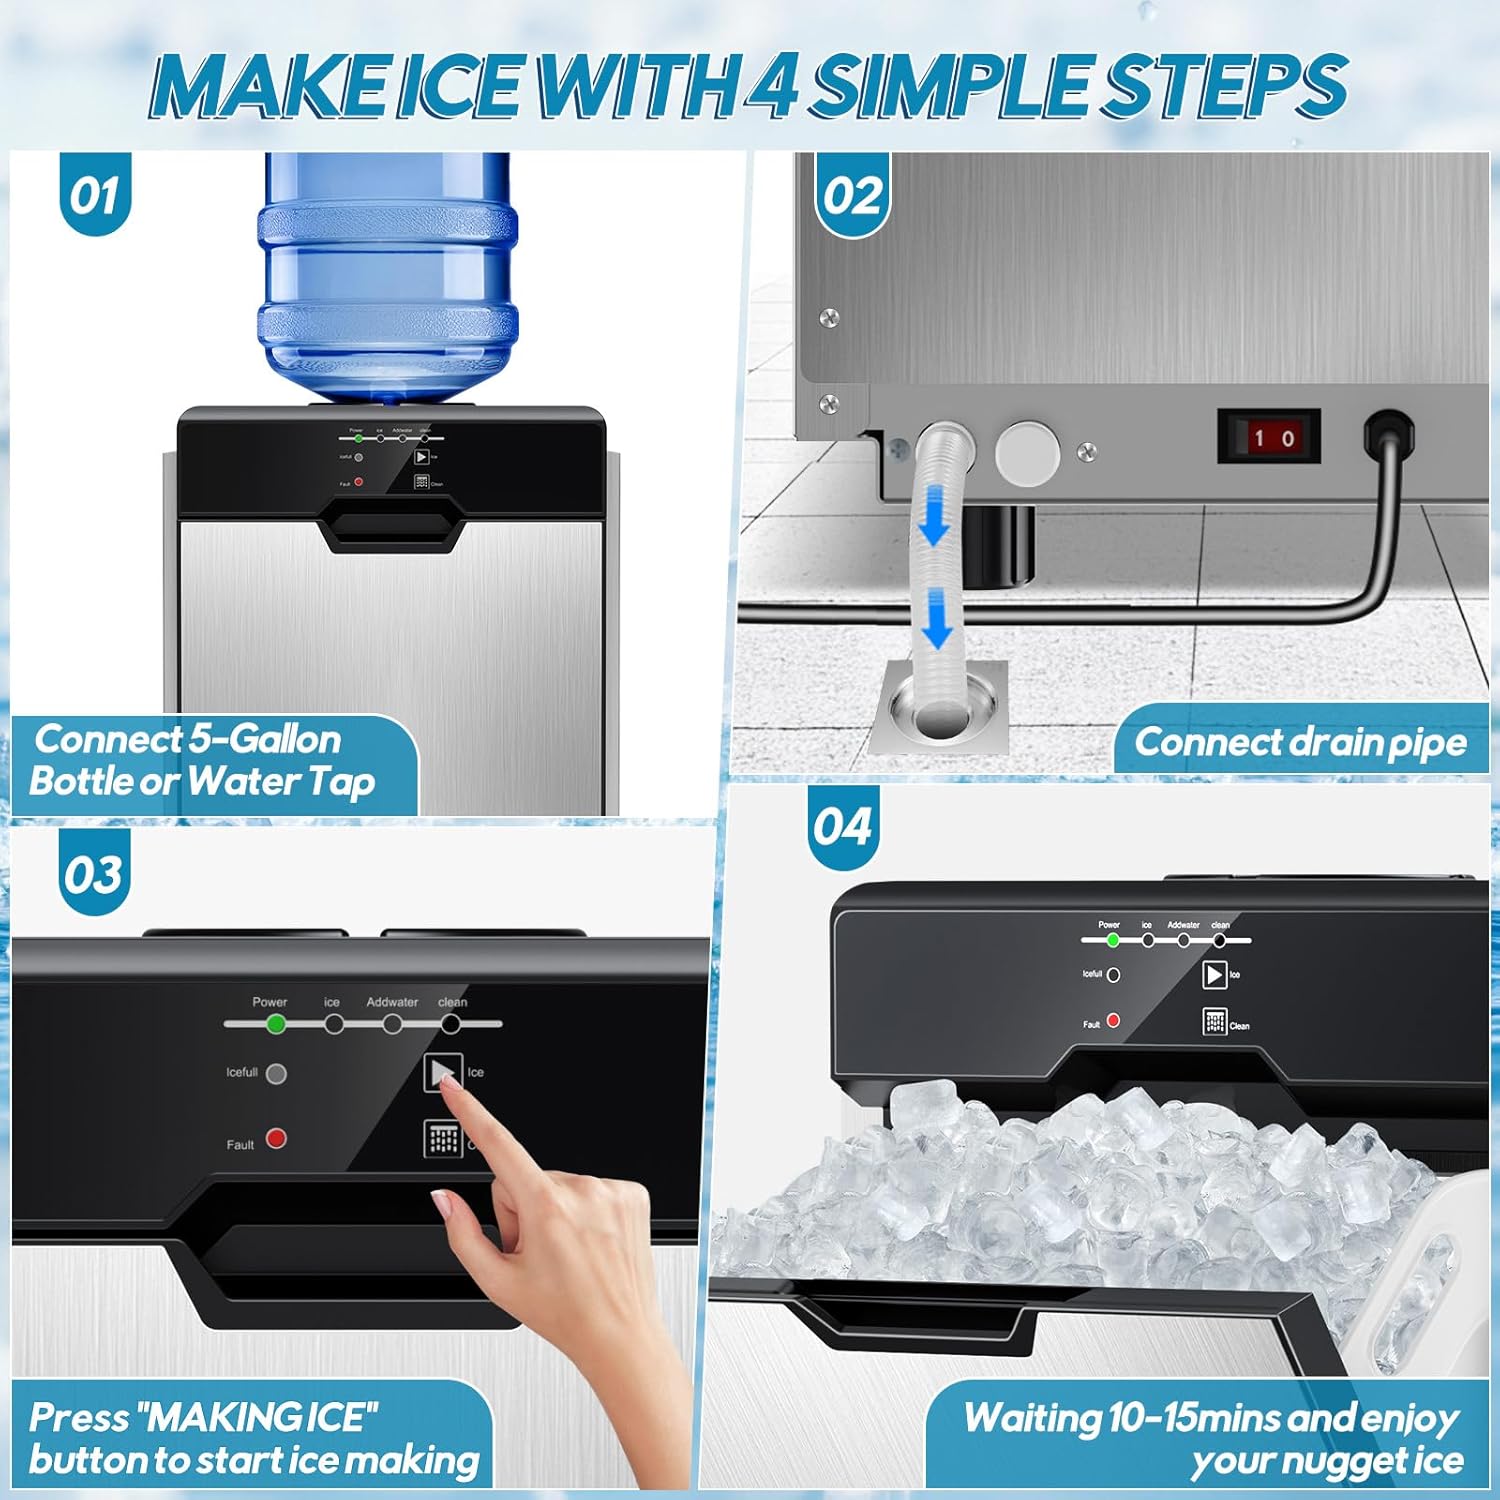
Figure 4.2: Ice Making Steps. This visual guide shows connecting a water source, connecting the drain pipe, pressing the 'MAKING ICE' button, and waiting for ice production.
5. Operating Instructions
Follow these steps to operate your Hothope Nugget Ice Maker.
5.1 Control Panel Overview
The intuitive LED control panel simplifies operation and provides status updates.

Figure 5.1: Simple Operation Panel. This image details the control panel with indicators for Power, Ice, Add Water, Clean, Ice Full, and Fault, along with buttons for Ice and Clean functions.
5.2 Starting Ice Production
- Ensure the ice maker is properly connected to a water source and power.
- Press the 'Power' button to turn on the unit. The 'Power' indicator light will illuminate.
- Press the 'Ice' button (often labeled 'MAKING ICE' or similar) to begin ice production.
- The unit will start producing ice within 10-15 minutes.
5.3 Indicator Lights
- Power: Indicates the unit is on.
- Ice: Indicates ice production is active.
- Add Water: Illuminates when the water level is low and requires refilling or checking the water supply.
- Ice Full: Illuminates when the ice basket is full, and ice production will pause automatically.
- Fault: Indicates an operational error. Refer to the troubleshooting section.
- Clean: Indicates the self-cleaning cycle is active.
6. Maintenance
Regular maintenance ensures the hygiene and efficiency of your ice maker.
6.1 Self-Cleaning Function
The ice maker features a one-click auto-clean function. To activate, ensure the unit is empty of ice and water, then press the 'Clean' button on the control panel. The unit will perform an internal cleaning cycle. After the cycle, drain any remaining water.
6.2 Water Filter Replacement
If using the direct tap water supply, regularly check and replace the external water filter to maintain ice quality and prevent mineral buildup. The frequency depends on water hardness and usage, typically every 3-6 months.
6.3 General Cleaning
- Wipe the exterior of the unit with a soft, damp cloth.
- Clean the ice basket and scoop with mild soap and water. Rinse thoroughly.
- For internal cleaning beyond the self-clean function, consult the manufacturer's support.
7. Troubleshooting
If you encounter issues with your ice maker, refer to the following common problems and solutions.
| Problem | Possible Cause | Solution |
|---|---|---|
| Ice maker not producing ice | No water supply; 'Add Water' indicator on. | Check water bottle or tap connection. Ensure water valve is open. |
| Ice production is slow or ice is small | Ambient temperature too high; poor ventilation. | Ensure proper ventilation around the unit. Operate in a cooler environment. |
| Ice melts quickly in the basket | The ice maker's basket is not a freezer. | This is normal. Transfer ice to a freezer for long-term storage. Ensure the drain pipe is connected. |
| 'Ice Full' indicator is on, but basket is not full | Ice cubes are clumped, triggering sensor. | Break up ice clumps or remove some ice from the basket. |
| 'Fault' indicator is on | Internal error. | Unplug the unit for 10 minutes, then plug it back in. If the issue persists, contact customer support. |
For issues not listed above, please contact Hothope customer support.
8. Specifications
Detailed technical specifications for the Hothope Nugget Ice Maker Countertop Model IM-S2-A.
| Specification | Value |
|---|---|
| Model Name | IM-S2-A |
| Product Dimensions (D x W x H) | 18.9" x 15.55" x 22.05" (480mm x 395mm x 560mm) |
| Net Weight | 40 Pounds (18.14 kg) |
| Ice Making Capacity | 80 LBS/DAY |
| Ice Storage Capacity | 20 Pounds |
| Ice Type | Chewing Ice (Nugget Ice) |
| Voltage | 110V 60Hz |
| Power | 220 Watts |
| Refrigerant | R290 |
| Cooling Type | Air-Cooled |
| Material | Stainless Steel + PP + ABS |
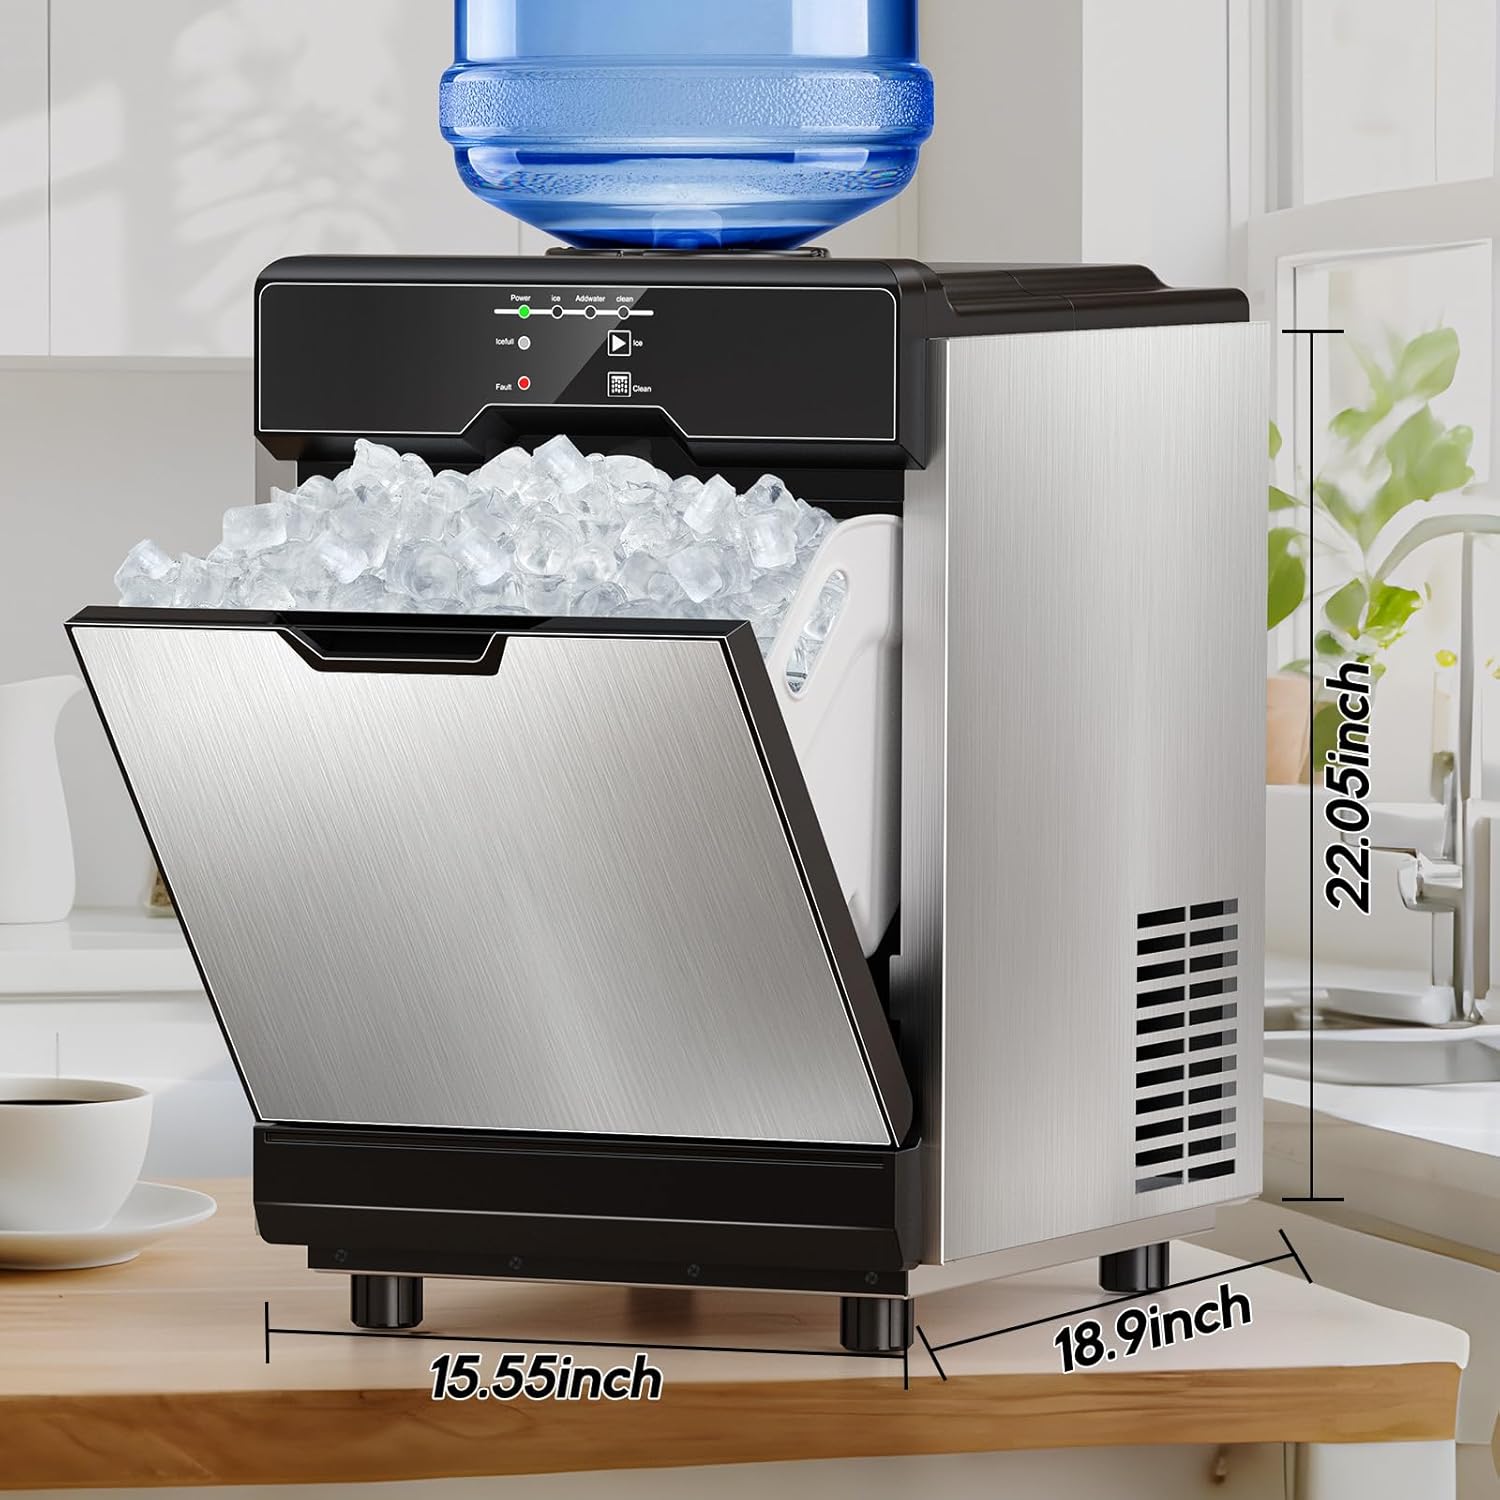
Figure 8.1: Product Dimensions. This image shows the ice maker with its depth (18.9 inches), width (15.55 inches), and height (22.05 inches) clearly labeled.
9. Warranty and Support
For warranty information, technical support, or service inquiries, please contact Hothope customer service. Refer to your purchase documentation for specific warranty terms and contact details.
You can visit the Hothope Store for additional product information and support: Hothope Store