1. Product Overview
The Plozoe Mini USB Dash Cam Hardwire Kit is an advanced power solution designed to provide continuous power to your dash camera, radar detector, or GPS navigator, enabling parking surveillance and protecting your vehicle's battery. This kit features innovative microwave radar sensing technology and robust power management.

Image: Overview of the Plozoe Mini USB Dash Cam Hardwire Kit, showing the main control box, wiring harness, and various fuse adapters.
Key Features:
- Advanced Microwave Radar Sensing: Automatically detects moving objects within 26 feet, triggering video recording to save battery and storage space.
- Dual Working Modes: Supports 24-hour parking mode and ACC parking mode for flexible surveillance options.
- Stable 5V/3A Output: Provides consistent power, preventing overload and overheating common with lower amperage hardwire kits.
- Low Voltage Protection: Features two cutoff voltage settings (11.8V or 11.6V) to prevent vehicle battery drain.
- Wide Compatibility: Compatible with most dash cams, rearview mirror dash cams, GPS navigators, and radar detectors with a Mini USB interface.
- Enhanced Safety: Includes multiple security protections such as over-current, short-circuit, reverse connection, and overheat protection.
2. Setup and Installation
Proper installation is crucial for the optimal performance and safety of your Dash Cam Hardwire Kit. Please follow these steps carefully.
Installation Steps:
- Open the Vehicle Fuse Box: Locate your vehicle's fuse box, typically found under the dashboard, in the engine bay, or in the trunk. Consult your vehicle's owner's manual for the exact location.
- Connect the Yellow Cable (Constant Power): The yellow cable of the hardwire kit should be connected to a fuse that provides constant power (always on, even when the ignition is off). This is essential for the 24-hour parking monitoring feature.
- Connect the Red Cable (ACC Power): Connect the red cable to an ACC (Accessory) fuse slot. This fuse provides power only when the vehicle's ignition is on.
- Connect the Black Cable (Ground): Securely connect the black cable to any unpainted metal bolt or screw on the vehicle's chassis. This provides the necessary ground connection.
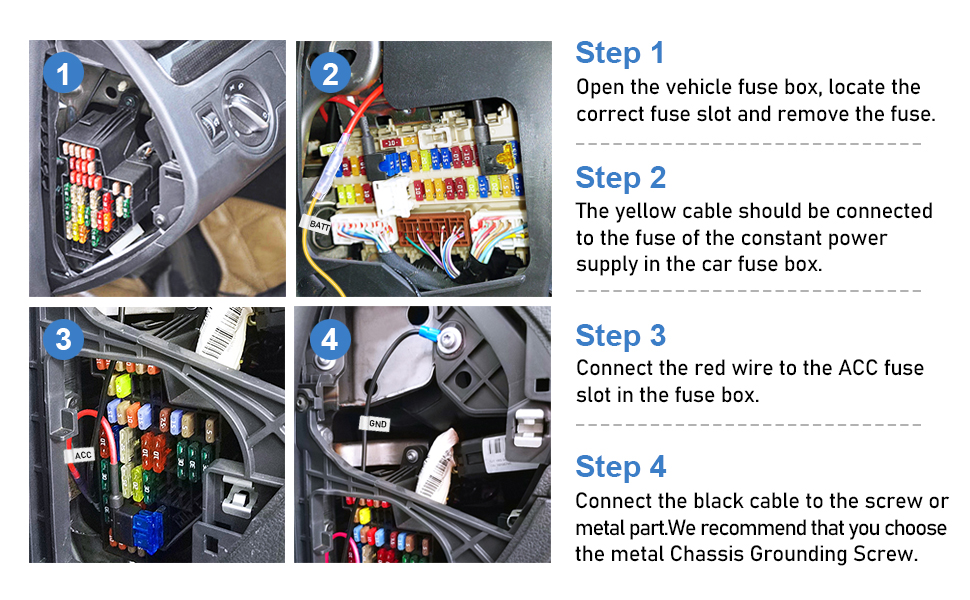
Image: Visual guide illustrating the four steps for connecting the hardwire kit to the vehicle's fuse box and ground.

Image: A detailed diagram illustrating the wire connections from the hardwire kit to the dash cam, including input and output voltages and cable lengths.
Optimal Installation Location:
For optimal radar sensing performance, install the hardwire kit control box in a location that allows for clear detection of movement around the vehicle. The ideal placement is typically near the dash cam itself, often mounted on the windshield or dashboard.

Image: Illustration showing the recommended mounting position for the hardwire kit control box on the windshield, near the dash cam, for optimal radar sensing.
Video Installation Guide:
For a visual step-by-step installation guide, please refer to the official product video below:
Video: Official guide demonstrating the installation process and features of the Radar Microwave Induction Dash Cam Hardwiring Kit.
3. Operating Instructions
The hardwire kit offers two primary operating modes and adjustable settings for optimal performance.
Working Modes:
- 24-Hour Parking Mode: When the vehicle is turned off, the microwave induction control power box provides continuous power to the dash cam, enabling 24-hour surveillance. This mode is activated by setting the cutoff voltage switch to either 11.8V or 11.6V.
- ACC Parking Mode: In this mode, the hardwire kit only powers the dash cam when the vehicle's ignition is on. This mode is activated by setting the cutoff voltage switch to 'ACC'.

Image: Visual explanation of the two working modes: 24-hour parking mode for continuous surveillance and ACC monitoring mode for ignition-on operation.
Low Voltage Protection Settings:
The hardwire kit features a low voltage protection mechanism to prevent your car battery from draining completely. You can select from two cutoff voltage settings:
- 11.8V: The kit will cut off power to the dash cam when the vehicle battery voltage drops to 11.8V.
- 11.6V: The kit will cut off power to the dash cam when the vehicle battery voltage drops to 11.6V.
This ensures sufficient power remains to start your vehicle.

Image: A close-up view of the control box, highlighting the switch for selecting the desired cutoff voltage (11.8V, 11.6V, or ACC).
Radar Sensitivity Adjustment:
The microwave radar sensing technology can be adjusted for sensitivity to suit different environments and preferences. This allows you to fine-tune the detection range for triggering recording.

Image: A close-up view of the control box, highlighting the switch for adjusting radar sensitivity (High, Medium, Low).

Image: Depiction of the 24-hour surveillance feature, showing a car parked with the hardwire kit providing power and illustrating the low voltage cutoff to protect the car battery.

Image: Graphic illustrating the 360-degree all-round protection provided by the radar microwave sensing, showing detection zones around a vehicle.
4. Maintenance
The Plozoe Dash Cam Hardwire Kit requires minimal maintenance. To ensure longevity and proper function:
- Regular Checks: Periodically inspect the wiring connections to ensure they remain secure and free from corrosion.
- Cleanliness: Keep the hardwire control box clean and free from dust or debris. Use a soft, dry cloth for cleaning.
- Avoid Extreme Conditions: While designed for automotive use, avoid exposing the unit to excessive moisture or extreme temperatures beyond typical vehicle interior conditions.
5. Troubleshooting
If you encounter issues with your hardwire kit, please refer to the following common problems and solutions:
| Problem | Possible Cause | Solution |
|---|---|---|
| Dash cam does not power on in parking mode. | Incorrect wiring (constant power not connected), low vehicle battery, incorrect mode selection. | Verify yellow wire is connected to a constant power fuse. Check vehicle battery voltage. Ensure cutoff voltage switch is set to 11.8V or 11.6V. |
| Dash cam only works when ignition is on. | Cutoff voltage switch set to 'ACC' mode. | Change the cutoff voltage switch to 11.8V or 11.6V for 24-hour parking mode. |
| Radar sensing is not triggering recording. | Incorrect sensitivity setting, obstruction, improper installation location. | Adjust radar sensitivity (H, M, L). Ensure the control box has a clear line of sight. Refer to optimal installation location. |
| Vehicle battery drains quickly. | Low voltage protection not enabled or set too low for battery health. | Ensure low voltage protection is enabled and set to an appropriate cutoff (e.g., 11.8V). Consider vehicle battery health. |
If the problem persists after attempting these solutions, please contact customer support for further assistance.
6. Specifications
- Model: Mini USB
- Input Voltage: 12V-24V DC
- Output Voltage: 5V DC
- Output Current: 3A
- Cable Length: 11.5 ft (approx. 3.5 meters)
- Low Voltage Cutoff: 11.6V / 11.8V (selectable)
- Radar Sensing Range: Up to 26 ft (approx. 8 meters)
- Item Weight: 7.9 ounces
- Package Dimensions: 5.63 x 3.9 x 1.85 inches
- Compatibility: Dash cams, rearview mirror dash cams, GPS navigators, radar detectors with Mini USB interface.

Image: Illustrates the advantage of the 3A current output of the hardwire kit compared to lower amperage chargers, highlighting stable power delivery.

Image: Shows the universal compatibility of the Mini USB hardwire kit with various devices such as dash cams, radar detectors, mirror dashcams, and GPS navigation units.
7. Warranty and Support
Plozoe is committed to providing high-quality products and customer satisfaction. For any questions, technical assistance, or professional help regarding your Dash Cam Hardwire Kit, please do not hesitate to contact our customer support team.
If you are unsure about the compatibility or installation of the hardwire kit for your specific dash cam model, our support team is available to provide guidance.