1. Introduction
Thank you for choosing the Locksworth 1.2 Cubic Feet Fireproof Safe Box. This safe is designed to provide secure storage for your valuable documents, jewelry, cash, and other important items, offering protection against fire and theft. Please read this manual carefully before operating your safe to ensure proper use and to maximize its features.

Image 1.1: The Locksworth 1.2 Cubic Feet Fireproof Safe Box, showcasing its fire-resistant capabilities.
2. Safety Information
- Always keep the emergency keys in a secure location away from the safe. Do not store them inside the safe.
- Ensure the safe is installed on a stable, level surface or securely mounted to a wall or floor to prevent tipping.
- Do not expose the safe to extreme temperatures or humidity, except during a fire event for which it is designed.
- Keep children away from the safe and do not allow them to play with the keypad or keys.
- Replace batteries promptly when the low battery indicator appears to avoid being locked out.
3. Package Contents
Verify that all items are present in the package:
- 1 x Locksworth 1.2 Cubic Feet Fireproof Safe Box
- 2 x Emergency Keys
- 2 Sets x Expansion Bolts (for mounting)
- 1 x Instruction Manual
- 4 x Floor Protectors
- AA Batteries (not included, 4 required)
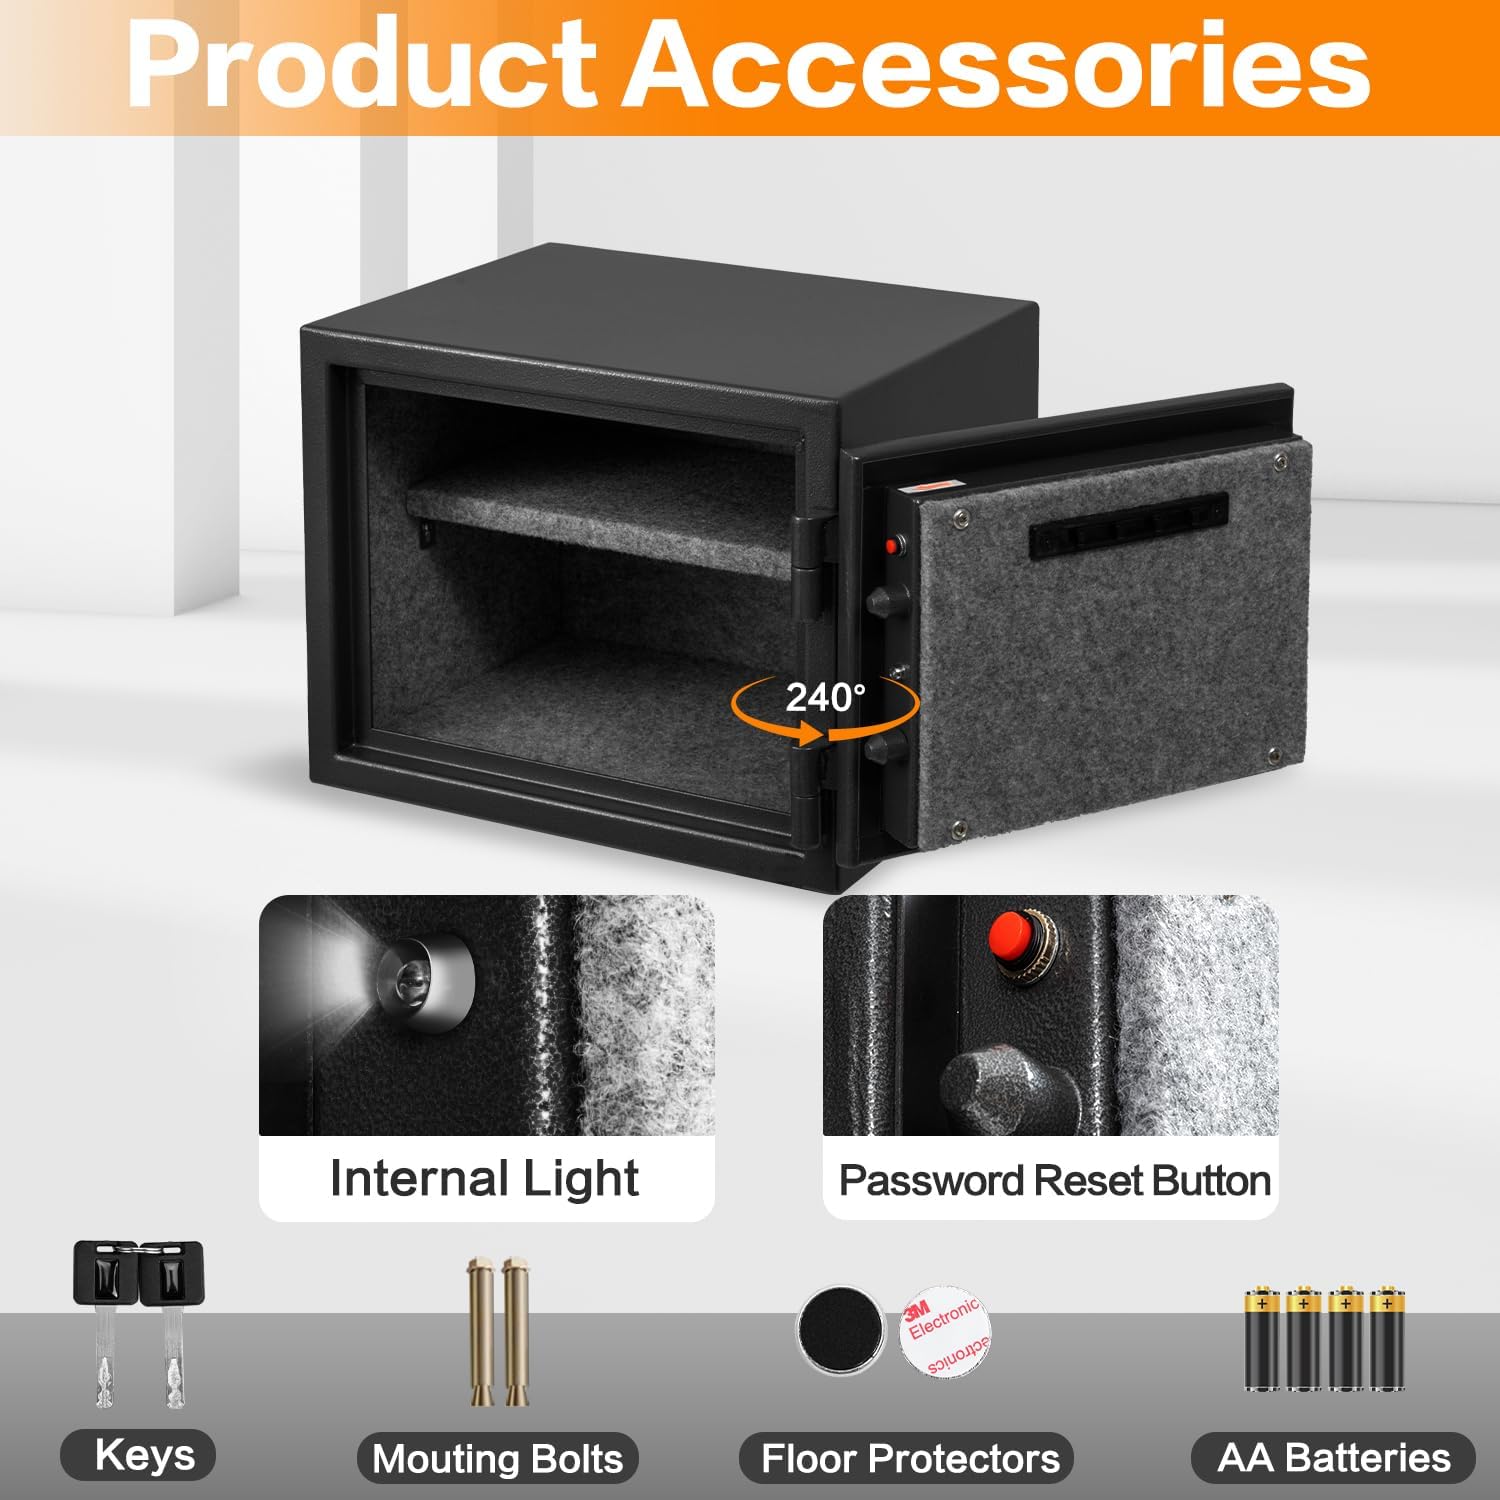
Image 3.1: Included accessories for the Locksworth safe, including keys, mounting bolts, and floor protectors. AA batteries are required for operation.
4. Product Overview
The Locksworth safe features a robust design with a digital keypad for secure access, an internal light for visibility, and a removable shelf for organized storage. Its construction includes fireproof plaster and an alloy steel latch for enhanced protection.

Image 4.1: Key features of the safe's construction, including fireproof plaster, heat-activated door seal, and alloy steel lock bolts.
5. Setup
5.1. Battery Installation
- Locate the battery compartment on the inside of the safe door.
- Insert 4 AA alkaline batteries, ensuring correct polarity (+/-).
- Close the battery compartment cover.
5.2. Initial Opening (Using Emergency Key)
- Remove the plastic cover from the keypad panel.
- Insert one of the emergency keys into the keyhole.
- Turn the key counter-clockwise.
- While holding the key turned, rotate the knob clockwise to open the safe door.
5.3. Setting/Changing Passcode
The original password is 12345678. It is highly recommended to change this immediately after initial setup.
- With the safe door open, locate the red reset button on the inside of the door.
- Press the reset button. The keypad will beep, and the indicator light will flash.
- Enter your new 3-8 digit passcode on the keypad.
- Press the '#' key to confirm. The safe will beep, indicating the new passcode is set.
- Test the new passcode with the door open before closing it.

Image 5.1: Details on the password reset button, internal light, and two methods for opening the safe.
5.4. Mounting Instructions
The safe can be mounted to a wall, floor, or shelf using the pre-drilled holes and included expansion bolts.
- Choose a suitable location for mounting.
- Mark the drilling points through the pre-drilled holes at the back or bottom of the safe.
- Drill holes at the marked points using an appropriate drill bit.
- Align the safe with the drilled holes and insert the expansion bolts.
- Tighten the bolts securely to fix the safe in place.
6. Operating Instructions
6.1. Opening with Passcode
- Enter your 3-8 digit passcode on the digital keypad.
- Press the '#' key to confirm.
- If the passcode is correct, the indicator light will turn green. Within 5 seconds, rotate the knob clockwise to open the door.
6.2. Opening with Emergency Key
Follow the steps in Section 5.2 if you forget your passcode or if the batteries are dead.
6.3. Alarm System Functionality
The safe is equipped with an alarm system. If an incorrect passcode is entered 5 consecutive times, an audible alarm will sound for 20 seconds. After the alarm, the safe will enter a 3-minute lockout period, during which no entries can be made.

Image 6.1: The safe's alarm system activated, indicated by a flashing red light.
6.4. Internal Light
The safe features an internal light that automatically illuminates when the door is opened, improving visibility of contents in low-light conditions.
7. Maintenance
7.1. Battery Replacement
When the low battery indicator appears on the keypad, replace all 4 AA batteries promptly. Use only alkaline batteries. Refer to Section 5.1 for battery installation steps.
7.2. Cleaning
Clean the exterior of the safe with a soft, damp cloth. Avoid using abrasive cleaners or solvents that could damage the finish or keypad.
7.3. General Care
Regularly check the door hinges and locking bolts for any obstructions or signs of wear. Ensure the safe is kept dry to prevent corrosion.
8. Troubleshooting
- Keypad Not Responding: Check battery levels and replace if necessary. Ensure batteries are inserted with correct polarity.
- Forgotten Passcode: Use the emergency key to open the safe. Once open, reset the passcode using the red reset button (refer to Section 5.3).
- Door Will Not Open After Correct Passcode: Ensure you rotate the knob clockwise within 5 seconds after the green light appears. If batteries are low, the mechanism might not engage fully; replace batteries.
- Alarm Sounds Frequently: Ensure no one is attempting to open the safe with incorrect passcodes. If the alarm sounds without interaction, check for loose battery connections or contact customer support.
9. Specifications
| Brand | Locksworth |
| Model Number | AZ4305 |
| Exterior Dimensions (D x W x H) | 11.8" x 15" x 11.8" |
| Interior Dimensions (D x W x H) | 10.04" x 13.19" x 10.24" |
| Capacity | 1.2 Cubic Feet |
| Door Thickness | 2.7 inches |
| Lock Type | Electronic Combination Lock, Key |
| Material | Alloy Steel |
| Fire Resistance | 30 minutes at 1400℉ |
| Alarm System | Audible (after 5 incorrect entries) |
| Mounting Type | Under Counter Mount, Wall Mount, Floor Mount |
| Item Weight | 44.5 pounds |
| Batteries Required | 4 x AA Alkaline (not included) |
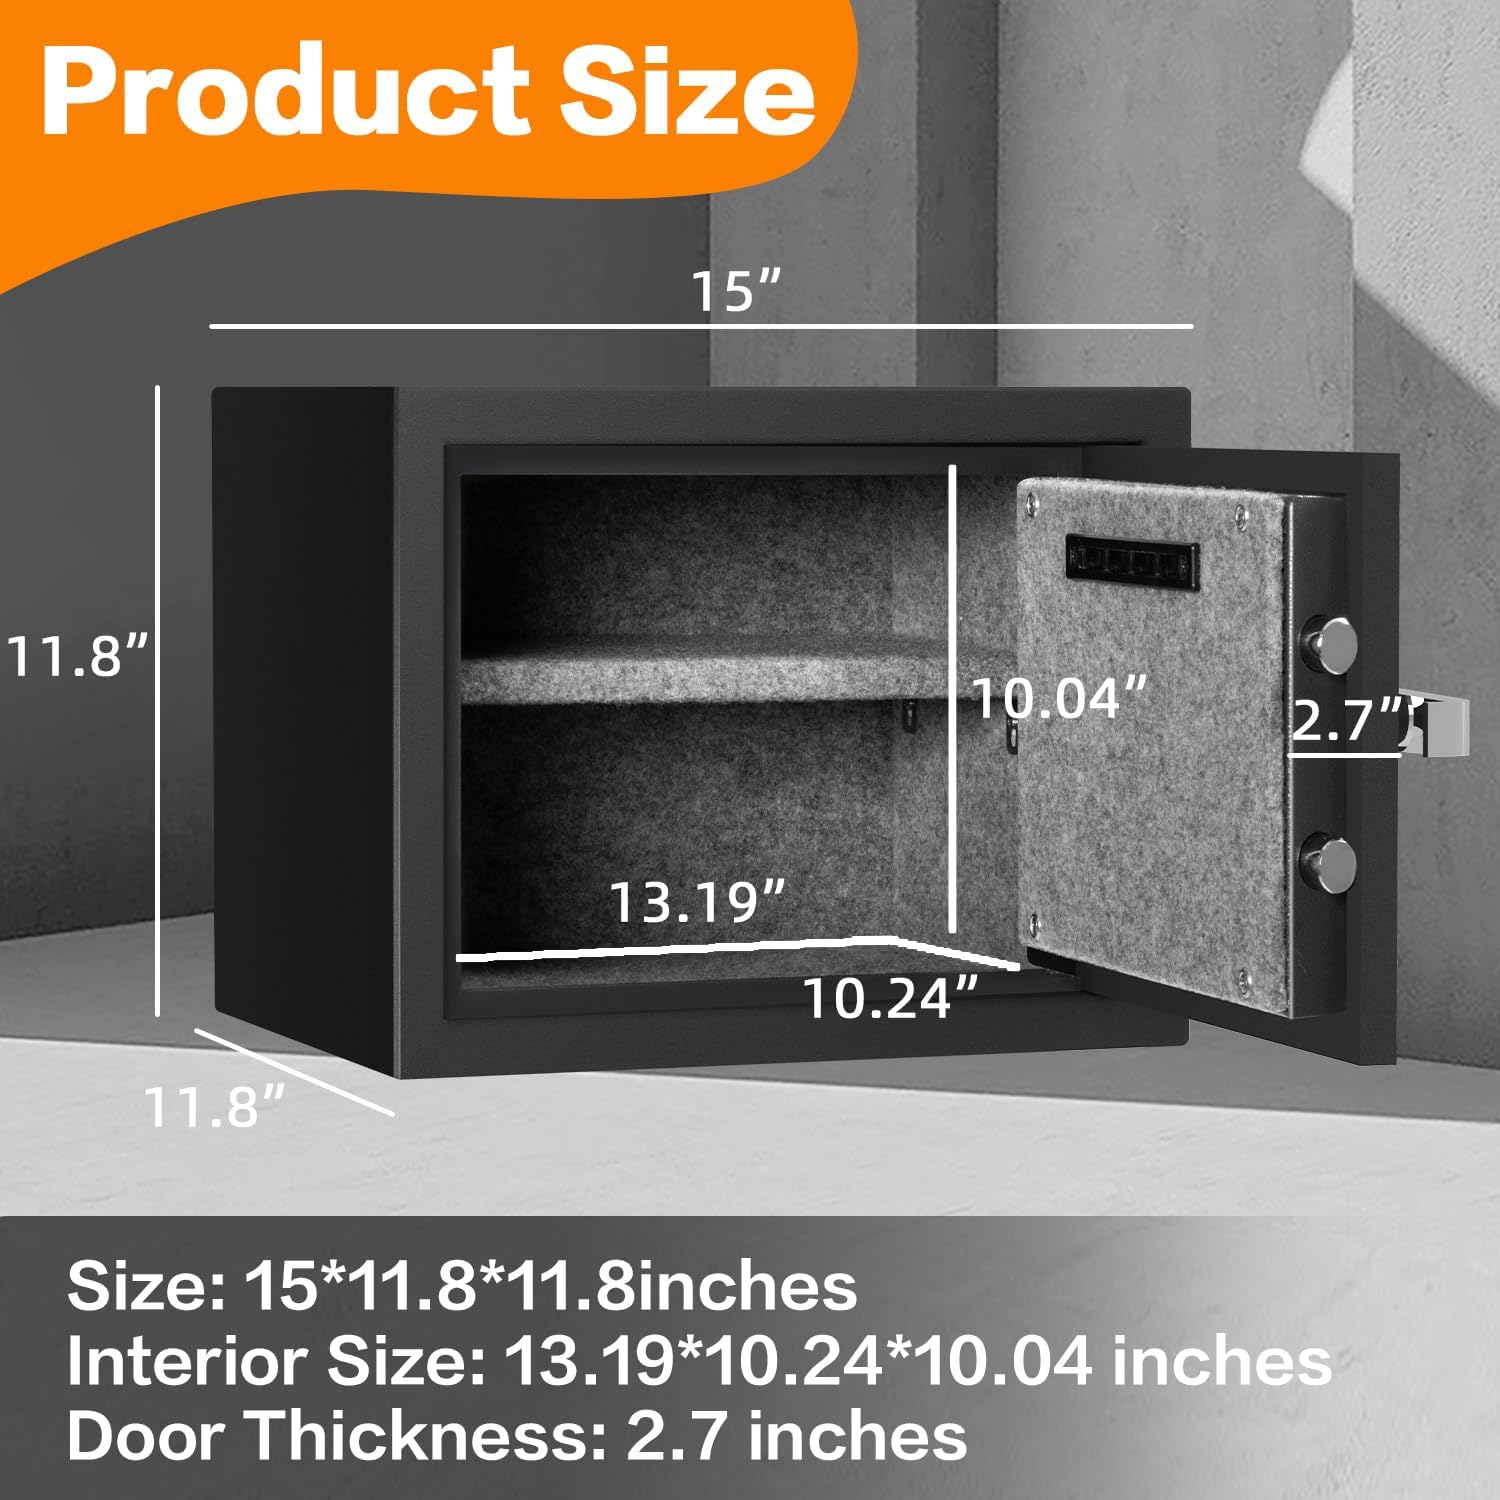
Image 9.1: Detailed dimensions of the Locksworth 1.2 Cubic Feet Fireproof Safe Box.

Image 9.2: The safe's fire resistance rating: 30 minutes at 1400℉.

Image 9.3: Illustration of the safe's double fireproof construction, featuring 18mm fireproof gypsum board and a fireproof sealing strip.
10. Warranty and Support
Locksworth products are manufactured with quality and durability in mind. For warranty information, technical support, or any questions regarding your safe, please refer to the contact information provided on the Locksworth official website or your purchase documentation. Please have your model number (AZ4305) and purchase date available when contacting support.

