1. Introduction
This manual provides instructions for the operation and maintenance of your new Generic replacement infrared remote control for Quietside AC Air Conditioners. Please read this manual thoroughly before using the remote control to ensure proper function and to extend the life of the product. This remote is designed to be compatible with various Quietside AC models as listed above.
2. Safety Information
- Do not mix old and new batteries.
- Do not mix alkaline, standard (carbon-zinc), or rechargeable (nickel-cadmium) batteries.
- Always remove exhausted batteries promptly.
- If the remote control will not be used for an extended period, remove the batteries to prevent leakage.
- Keep batteries out of reach of children.
- Do not expose the remote control to direct sunlight, heat, or moisture.
3. Package Contents
Your package should contain:
- 1 x Generic Replacement Remote Control
Note: Batteries (2 x AAA) and a user manual are not included with this product.
4. Setup: Battery Installation
The remote control requires two AAA batteries (not included) for operation. Follow these steps to install them:
- Locate the battery compartment cover on the back of the remote control.
- Slide the cover downwards or press the latch and lift to open the compartment.
- Insert two new AAA batteries, ensuring the positive (+) and negative (-) terminals match the diagrams inside the compartment.
- Replace the battery compartment cover by sliding it back into place until it clicks securely.

Figure 4.1: Rear view of the remote control with the battery compartment open, ready for battery insertion.

Figure 4.2: Another view of the remote control's battery compartment, illustrating the correct orientation for battery placement.
Once batteries are installed, the remote control is ready for use. No programming is typically required for this replacement remote.
5. Operating Instructions
Point the remote control directly at the infrared receiver on your Quietside AC unit. Ensure there are no obstructions between the remote and the AC unit.
5.1 Basic Functions
- Power ON/OFF: Press the OFF/ON button to turn the AC unit on or off.
- Adjusting Temperature: Use the + (Up) and - (Down) buttons to increase or decrease the desired temperature.
- Changing Mode: Press the MODE button to cycle through available operating modes (e.g., Cool, Heat, Fan, Dry, Auto).
5.2 Changing Temperature Unit (Celsius/Fahrenheit)
To switch the temperature display between Celsius (°C) and Fahrenheit (°F):
- Simultaneously press and hold the MODE button and the - (Temperature Down) button.
- The display will toggle between Celsius and Fahrenheit. The default display is typically in Celsius.
6. Button Functions Overview
Refer to the image below for the layout of the remote control buttons and their general functions.
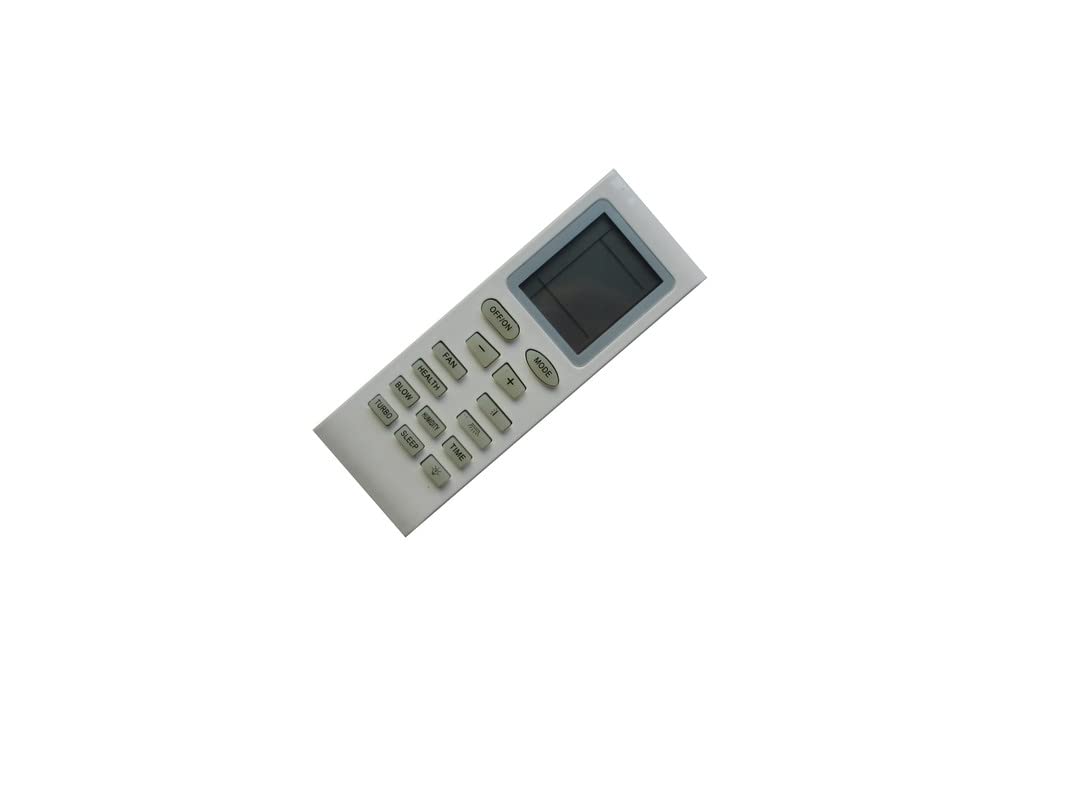
Figure 6.1: Front view of the remote control, highlighting the display and various function buttons.
| Button | Function |
|---|---|
| OFF/ON | Turns the AC unit on or off. |
| MODE | Cycles through operating modes (e.g., Cool, Heat, Fan, Dry, Auto). |
| + / - | Adjusts temperature settings up or down. |
| FAN | Adjusts fan speed settings. |
| HEALTH | Activates or deactivates health-related functions (if supported by AC unit). |
| BLOW | Controls the fan blow function, often used to dry internal components. |
| HUMIDITY | Activates or adjusts dehumidification settings. |
| TIME | Sets timer functions (e.g., auto on/off). |
| TURBO | Activates maximum cooling/heating for rapid temperature change. |
| SLEEP | Adjusts settings for comfortable sleep (e.g., gradual temperature changes). |
Note: Not all functions may be supported by every Quietside AC model. Some buttons may have no effect depending on your specific unit.
7. Troubleshooting
| Problem | Possible Cause / Solution |
|---|---|
| Remote control not responding. |
|
| AC unit does not respond to certain buttons. |
|
| Display is dim or blank. |
|
8. Specifications
- Brand: Generic
- Compatible Devices: Quietside AC Air Conditioners (Models: YB1FAF, QSVI-18A, QSVI-24A, QS09-VJ220, QSFMI-18A, QSVI-09A, QSVI-12A, 5304502215, QS12-VJ220, QS18-VJ220, QS24-VJ220, QSFMI-09A, QSFMI-12A)
- Connectivity Technology: Infrared (IR)
- Power Source: 2 x AAA Batteries (not included)
- Max Number of Supported Devices: 1 (controls one AC unit at a time)
- Special Feature: Temperature unit toggle (Celsius/Fahrenheit) by holding MODE and Temp Down buttons.
9. Maintenance
- Cleaning: Wipe the remote control with a soft, dry cloth. Do not use liquid cleaners or abrasive materials.
- Battery Replacement: Replace batteries when the remote's display becomes dim or the remote becomes unresponsive. Always replace both batteries at the same time.
- Storage: If not using the remote for an extended period, remove the batteries to prevent corrosion and store it in a cool, dry place.
10. Warranty and Support
As this is a generic replacement product, specific warranty details may vary. Please refer to the seller's return policy or contact the seller directly for any support or warranty inquiries regarding this remote control.


