SRJTEK Pixel 6 Pro
SRJTEK OLED Screen Replacement for Google Pixel 6 Pro
Model: GLUOG, G8VOU, GF5KQ
1. Product Overview
This SRJTEK OLED screen replacement is designed for the Google Pixel 6 Pro (Models GLUOG, G8VOU, GF5KQ). It is a high-quality LCD display touch screen digitizer assembly replacement with a pre-installed frame.
Key Features:
- High Quality OLED Material: Ensures vibrant colors, high resolution (1440 x 3120 pixels), wide color gamut, and smooth touch response.
- Complete Repair Kit: Each package includes the screen replacement and a set of professional opening tools for convenient installation.
- Pre-installed Frame: Simplifies the installation process.
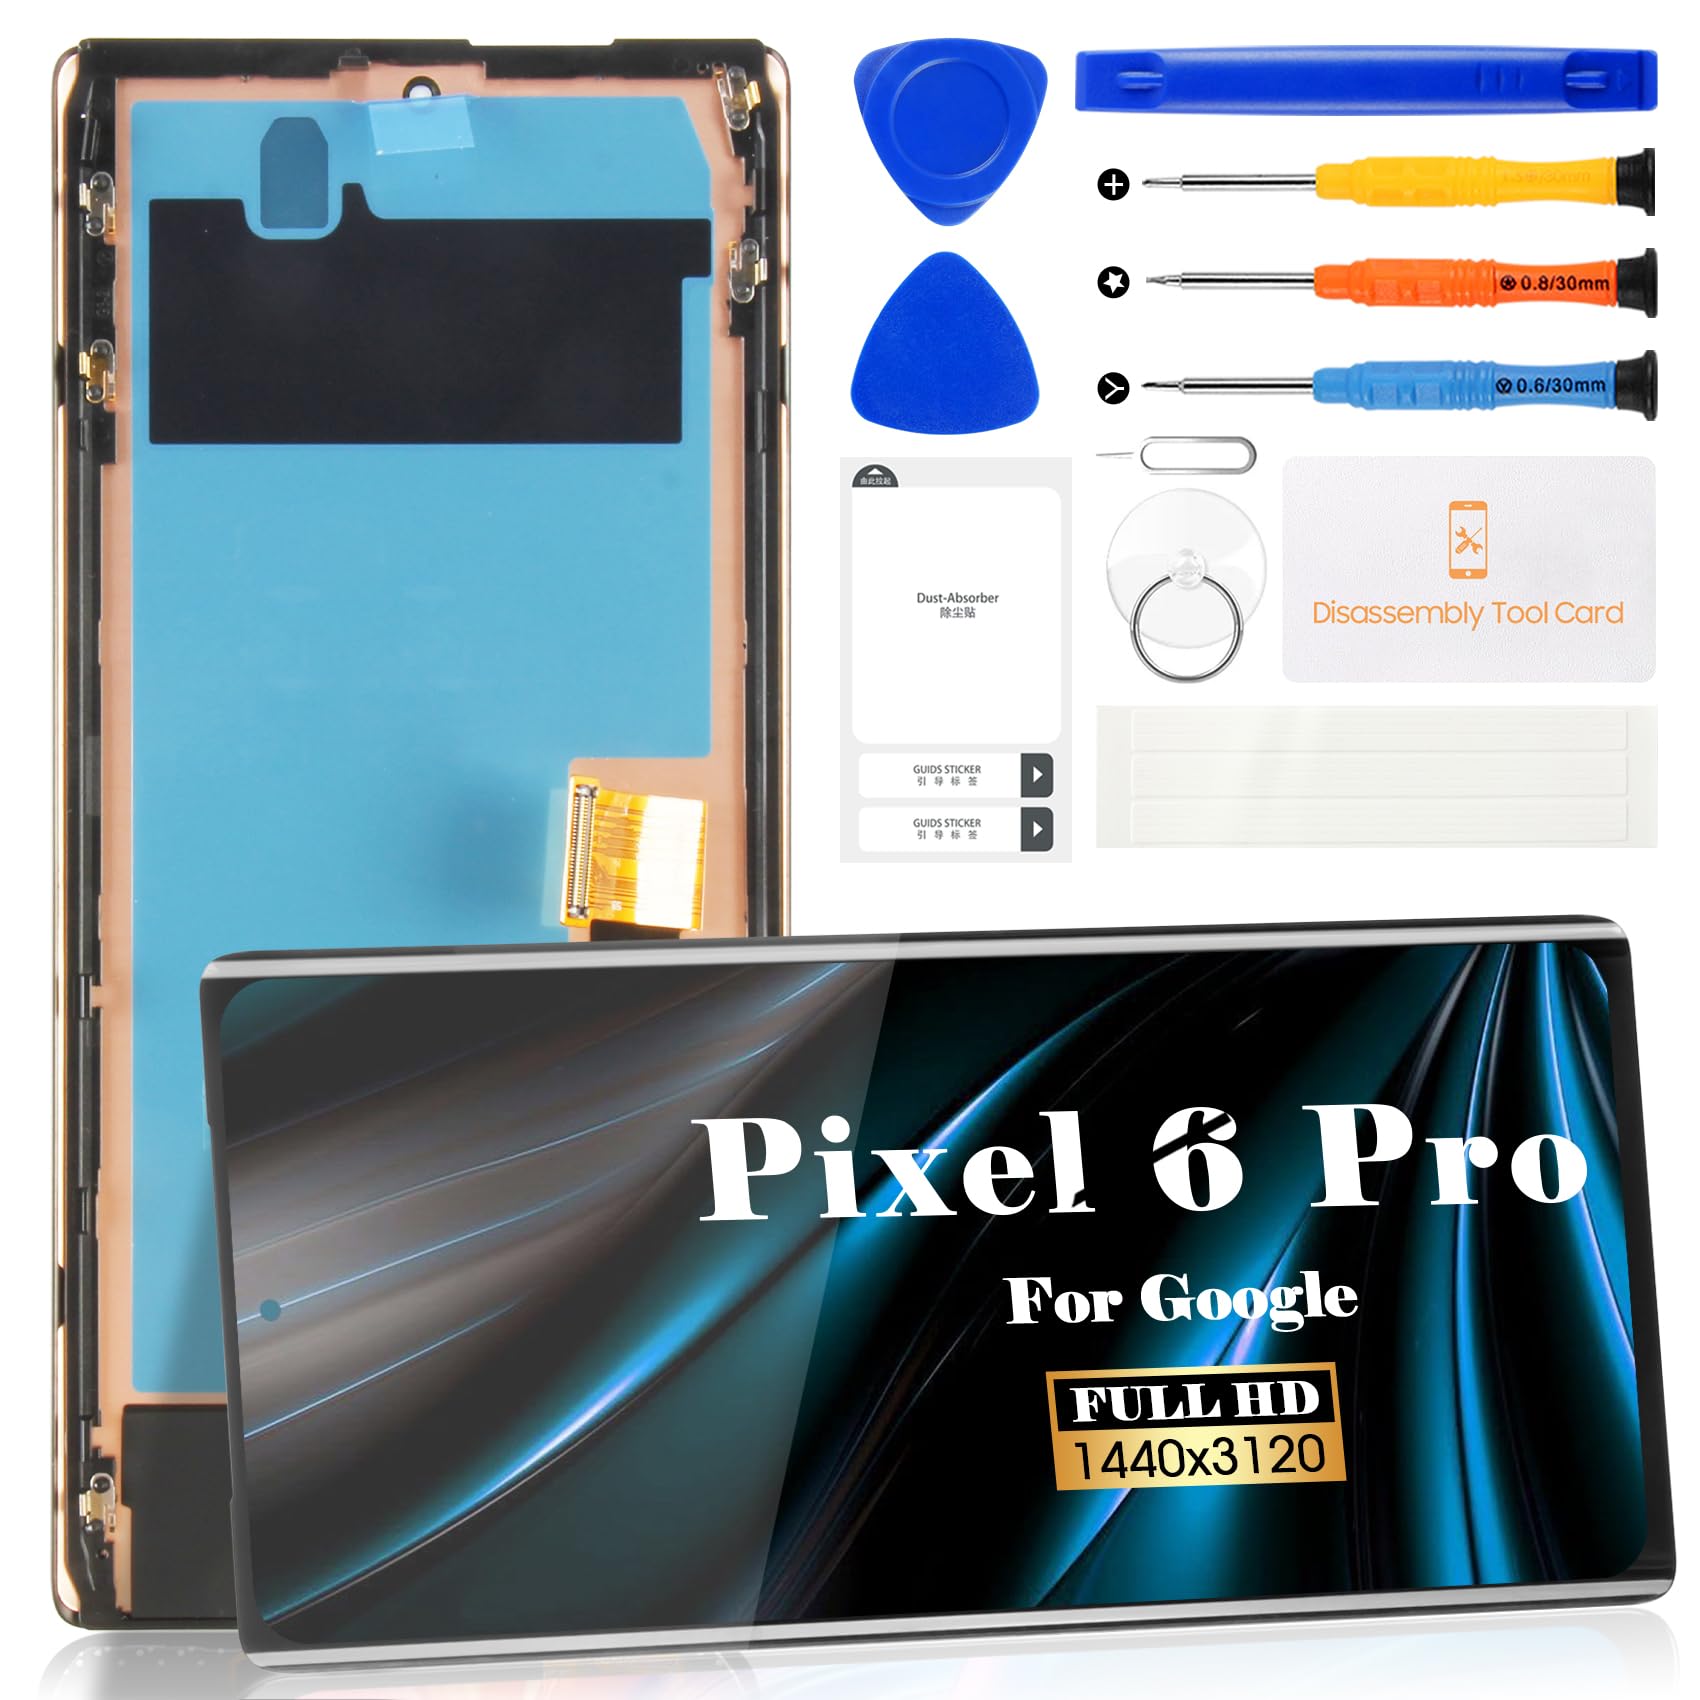
Figure 1: Product overview of the Google Pixel 6 Pro screen replacement, highlighting key display specifications.
2. Setup and Installation
Replacing a smartphone screen requires precision and care. Non-professional installation is not recommended. If you are not experienced in repairing electronic equipment, please seek assistance from a repair shop or refer to detailed video guides.
2.1 Pre-Installation Checklist
- Ensure the product is in good condition upon arrival.
- Test the screen functionality before proceeding with full installation. Do not remove protective films or labels during testing.
- Watch out for static issues.
- The screen is glass and very fragile. Handle with extreme care.
- Do not bend the flex cables during installation and testing.
- The screen does not include power buttons, volume buttons, or other small components. These must be carefully removed from your old screen and re-installed onto the new assembly.
2.2 Fingerprint Sensor Information
This OLED screen replacement includes fingerprint function. However, it does not come with a pre-installed fingerprint sensor. The original fingerprint sensor (fingerprint cable) must be removed from your old screen and installed onto the new screen. Alignment and calibration are required during this process. Before removing the original sensor, you must log into the official Google website for fingerprint calibration to ensure the fingerprint cable can be used on the new screen.

Figure 2: Illustration of the fingerprint sensor removal and the importance of calibration.
2.3 Installation Steps Overview
A set of basic installation tools is provided to assist with the screen replacement. For detailed visual instructions, please refer to the embedded videos below and search for relevant installation videos on platforms like YouTube.

Figure 3: The complete tool kit provided for screen replacement, including screwdrivers, pry tools, and adhesive tape.
2.4 Visual Installation Guides
Video 1: Detailed installation guide for the Google Pixel 6 Pro screen replacement. This video demonstrates the step-by-step process of removing the old screen, transferring components, and installing the new display.
Video 2: A concise video demonstrating the screen replacement process for the Google Pixel 6 Pro.
Video 3: A short preview video showcasing the Google Pixel 6 Pro screen replacement.
Video 4: A brief overview of the OLED screen replacement for Google Pixel 6 Pro.
Video 5: A short vertical video demonstrating the OLED display touch screen replacement for Pixel 6 Pro 5G.
Video 6: A short video demonstrating the Google Pixel 6 Pro screen replacement process.
3. Operating and Testing
After installation, it is crucial to test the new screen thoroughly to ensure proper functionality.
3.1 Initial Screen Test
Before fully adhering the screen, connect the flex cables and power on the device to check for display issues, pixel distortion, incorrect colors, or unresponsive touch. If your phone has a black screen during this test, simultaneously press and hold the power key and volume key. If the phone vibrates, it may indicate that the main flex cable is not properly installed. Reinstall the product carefully.
3.2 Fingerprint Calibration
As mentioned, the fingerprint sensor requires calibration after installation. This typically involves using Google's official Pixel Update and Software Repair tool. Ensure your phone is connected to a computer via USB and follow the on-screen instructions to install the fingerprint calibration software.
Video 7: Guide on how to test the screen and solve common problems during installation, including issues with the fingerprint sensor.
Video 8: Instructions on how to add fingerprint data after screen replacement.
4. Troubleshooting
If you encounter issues after installation, consider the following:
- Black Screen: If the phone has a black screen, ensure all flex cables are securely connected. Try a hard reset by holding the power and volume keys simultaneously.
- Unresponsive Touch/Display Issues: Recheck all connections. Ensure no excessive force was applied to screen corners during installation, as this can cause damage.
- Fingerprint Not Working: Verify the original fingerprint sensor was correctly transferred and calibrated using the official Google tool.
5. Specifications
| Feature | Detail |
|---|---|
| Metarial | OLED |
| Model Compatibility | GLUOG, G8VOU, GF5KQ |
| Size | 6.7 inches |
| Resolution | 1440 x 3120 pixels |
| Package Dimensions | 7.6 x 4.06 x 1.22 inches |
| Item Weight | 3.84 ounces |
| Manufacturer | SRJTEK |
6. Warranty and Support
All our products undergo strict Quality Control (QC) testing before shipment to ensure no scratches, dead zones, dot pixels, or lines on the screen. If you require further assistance or encounter any issues, please contact us. We aim to respond within 24 hours.
For additional support and resources, you may visit the SRJTEK Store on Amazon.