Introduction
The ADIUM YouPro YP-880 N3 is a wired shutter release timer remote control designed for select Canon DSLR cameras. This device provides advanced control over your camera's shutter, enabling various shooting modes including single shot, continuous shooting (low/high speed), Bulb, delay, and timing functions. It features an LCD display for clear parameter settings and is ideal for time-lapse photography, long exposures, and self-portraits.
Package Contents
Please check the package contents upon unboxing to ensure all items are present:
- YouPro YP-880 N3 Timer Remote Control
- Connecting Cable (N3 type)
- Instruction Manual
- Protective Case

Image: The YouPro YP-880 N3 remote control, its connecting cable, and the included instruction manual.
Product Overview
Familiarize yourself with the components and controls of the YP-880 N3 remote control.

Image: Front and back view of the YouPro YP-880 N3 remote control, showing the LCD and buttons on the front, and product information on the back.
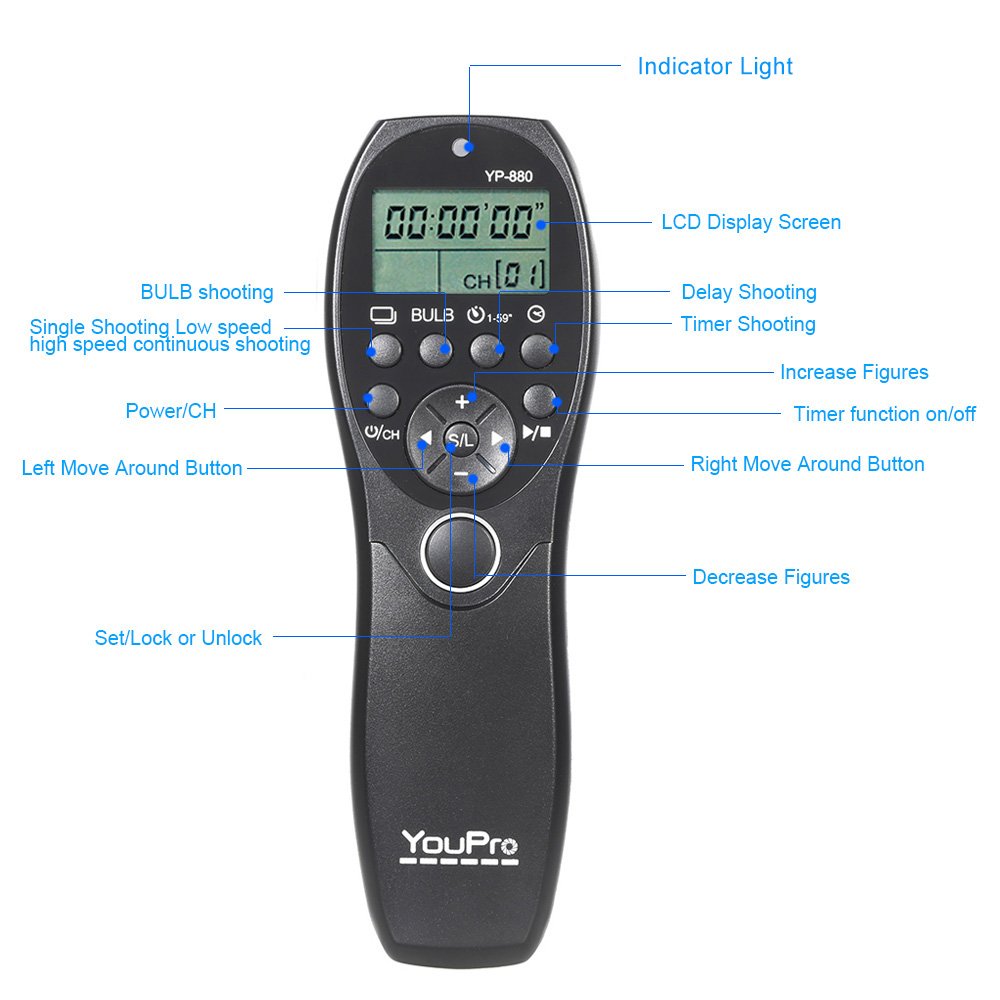
Image: A detailed diagram labeling the indicator light, LCD display screen, Power/CH button, Left/Right Move Around buttons, Increase/Decrease Figures buttons, Set/Lock or Unlock button, and the main shutter release button. It also indicates areas for Bulb shooting, Delay Shooting, Timer Shooting, and Single/Low Speed/High Speed Continuous Shooting.
Key Components:
- LCD Display: Shows current settings, shooting modes, and timer information.
- Indicator Light: Provides visual feedback on operation.
- Power/CH Button: Powers the device on/off and changes channels.
- S/L Button (Set/Lock or Unlock): Used to confirm settings or lock the device.
- +/- Buttons: Adjust numerical values for settings.
- Left/Right Move Around Buttons: Navigate through menu options.
- Shutter Release Button: Functions as a two-stage shutter button (half-press for focus, full-press for shutter).
Setup
1. Battery Installation
The YP-880 N3 requires two AAA batteries (not included).
- Locate the battery compartment cover on the back of the remote control.
- Slide the cover downwards to open the compartment.
- Insert two AAA batteries, ensuring correct polarity (+/-).
- Close the battery compartment cover securely.

Image: The YouPro YP-880 N3 remote control with its battery compartment open, showing the slots for two AAA batteries.
2. Connecting to Camera
Connect the remote control to your compatible Canon DSLR camera using the provided N3 type cable.
- Locate the remote control terminal on your camera (refer to your camera's manual for exact location).
- Plug one end of the connecting cable into the remote control terminal on your camera.
- Plug the other end of the connecting cable into the port on the YouPro YP-880 N3 remote control.

Image: The YouPro YP-880 N3 remote control connected via its cable to a DSLR camera mounted on a tripod, demonstrating its use as a wired remote.
Operating Modes
The YP-880 N3 supports multiple shooting modes to suit various photographic needs. Use the navigation buttons to select and configure these modes on the LCD display.

Image: The YouPro YP-880 N3 remote control with its LCD screen showing different shooting modes and settings. The image also highlights the low power consumption of the LCD screen.
1. Single Shooting
Press the shutter button fully to take a single photograph. The camera will capture one image per press.

Image: The YouPro YP-880 N3 remote control displaying 'CS' for Single Shooting mode on its LCD, alongside an example photo of a baby.
2. Low Speed Continuous Shooting (CL)
Hold down the shutter button to continuously capture images at a lower frame rate, as determined by your camera settings.
Image: The YouPro YP-880 N3 remote control displaying 'CL' for Low Speed Shooting Mode on its LCD, with an example of continuous shots of a baby.
3. High Speed Continuous Shooting (CH)
Hold down the shutter button to continuously capture images at a higher frame rate, as determined by your camera settings.
Image: The YouPro YP-880 N3 remote control displaying 'CH' for High Speed Shooting on its LCD, with an example of continuous shots of a baby.
4. Bulb Shooting
This mode allows you to control the exposure time manually. Press the shutter button once to open the shutter, and press it again to close the shutter. This is ideal for very long exposures.
Image: The YouPro YP-880 N3 remote control displaying 'BULB' on its LCD, with an example of a long exposure photograph of fireworks, illustrating the control over exposure time.
5. Delay Shooting
Set a delay time before the shutter is released. This is useful for self-portraits or to avoid camera shake from pressing the shutter button directly.

Image: The YouPro YP-880 N3 remote control displaying delay settings on its LCD, with an example of puppies, illustrating the use of delay shooting.
6. Timing Shooting
Program a sequence of shots with specific delay, exposure, and interval times. This mode is ideal for time-lapse photography.
Image: The YouPro YP-880 N3 remote control displaying timing shooting settings on its LCD, showing how to set delay, exposure, interval, and number of shots for time-lapse photography.
Setting Parameters
To set parameters for delay, exposure, interval, and number of shots:
- Press the Power/CH button to cycle through the different shooting modes until you reach the desired mode (e.g., Delay or Timing).
- Use the Left/Right Move Around Buttons to select the parameter you wish to adjust (e.g., delay time, exposure time, interval time, number of shots).
- Use the +/- Buttons to increase or decrease the value of the selected parameter.
- Press the S/L Button to confirm the setting and move to the next parameter or exit the setting menu.
Parameter Ranges:
- Delay Time: 1 to 59 seconds.
- Exposure Time: Configurable based on mode (e.g., Bulb).
- Interval Time: 1 second to 99 hours, 59 minutes, 59 seconds (in 1-second increments).
- Number of Shots: 1 to 99, or unlimited.
Troubleshooting
If you encounter issues with your YouPro YP-880 N3, refer to the following common problems and solutions:
- Remote control does not power on:
- Ensure batteries are correctly installed with proper polarity.
- Replace old batteries with new AAA batteries. - Camera does not respond to remote:
- Check if the connecting cable is securely plugged into both the remote and the camera's remote terminal.
- Verify that your camera is set to the correct remote control mode (refer to your camera's manual).
- Ensure the remote control is powered on. - LCD display is dim or blank:
- Batteries may be low; replace them.
- Check for extreme temperatures that might affect LCD performance. - Settings are not saving:
- Ensure you press the S/L Button to confirm settings after making adjustments.
Specifications
| Feature | Specification |
|---|---|
| Model Number | CH27PGPK8YJ |
| Compatible Devices | Canon DSLR Cameras (N3 type connector) |
| Controller Type | Button Control |
| Max Supported Devices | 1 |
| Power Source | 2 x AAA Batteries (not included) |
| Product Dimensions | 15 x 5 x 10 cm |
| Delay Time Range | 1 - 59 seconds |
| Interval Time Range | 1 second - 99 hours, 59 minutes, 59 seconds |
| Number of Shots | 1 - 99 or Unlimited |
Maintenance
To ensure the longevity and proper functioning of your remote control, follow these maintenance guidelines:
- Keep the device dry. Do not expose it to water or high humidity.
- Clean the exterior with a soft, dry cloth. Avoid using harsh chemicals or abrasive cleaners.
- Store the remote control in a cool, dry place when not in use.
- Remove batteries if the device will not be used for an extended period to prevent leakage.
- Protect the connecting cable from kinks or damage.
Warranty and Support
For information regarding warranty coverage and technical support, please refer to the documentation provided at the time of purchase or contact your retailer. Keep your proof of purchase for warranty claims.