1. Introduction
Thank you for choosing the OTADUG 1080p WiFi Hidden Camera with Wireless Charger. This device combines a discreet surveillance camera with a functional wireless charging pad, offering both security monitoring and convenient phone charging. This manual provides comprehensive instructions to help you set up, operate, and maintain your device effectively.
2. Package Contents
- OTADUG Hidden Camera Wireless Charger Unit
- USB Charging Cable
- User Manual
- Reset Pin (if applicable)
3. Product Overview
The OTADUG hidden camera is ingeniously designed to resemble a standard wireless phone charger, making it inconspicuous for surveillance purposes. It features a high-definition camera, infrared night vision, motion detection capabilities, and a fully functional wireless charging pad.
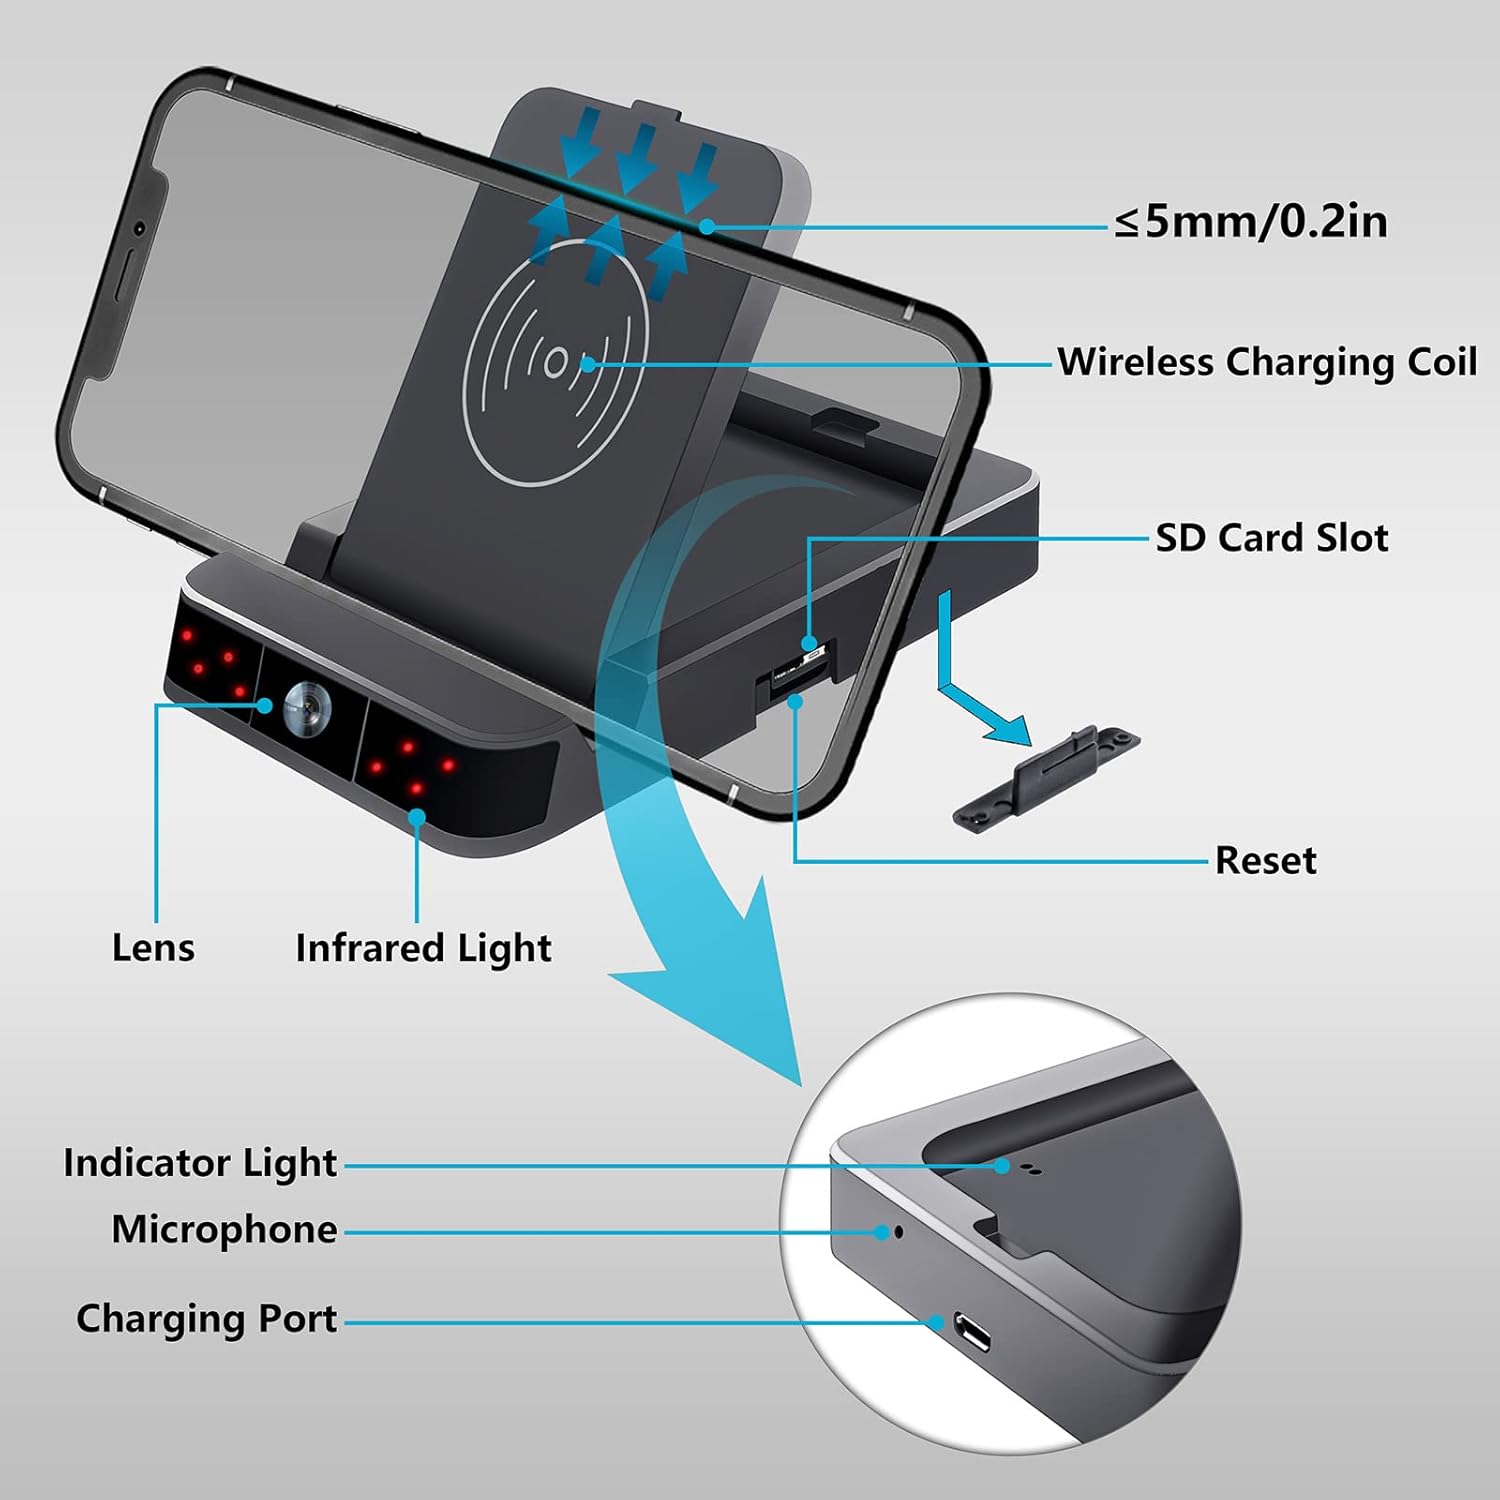
Key components include the camera lens, infrared lights, an SD card slot for local video storage, a reset button, indicator lights for status, a microphone for audio recording, and a charging port for power input.
4. Key Features
- Discreet Design: Appears as a regular wireless phone charger, blending into any environment.
- 1080p HD Video: Captures clear, high-definition video footage.
- Motion Detection: Automatically detects movement and sends instant alerts to your smartphone.
- Night Vision: Equipped with 8 infrared lights for clear recording in low-light conditions up to 1-2 meters.
- Wireless Charging: Provides functional wireless charging for compatible smartphones.
- Secure Connection: Features strong security protocols and password protection to prevent unauthorized access.
- Multiple Recording Modes: Supports live streaming via WiFi and local recording to an SD card (not included).
5. Setup
5.1 Initial Setup
- Power On: Connect the device to a power source using the provided USB cable and a suitable power adapter (not included). The device will power on automatically.
- Insert SD Card: For local recording, insert a Micro SD card (up to 128GB, Class 10 or higher, not included) into the designated slot. Ensure it is inserted correctly until it clicks into place.
5.2 WiFi Connection
To enable remote viewing and alerts, connect the camera to your home or office WiFi network.
- Download App: Scan the QR code in the manual (or search your app store) to download the dedicated companion application for your smartphone.
- Register/Login: Open the app and create an account or log in if you already have one.
- Add Device: Follow the in-app instructions to add your camera. This typically involves selecting 'Add Device', powering on the camera, and connecting your phone to the camera's temporary WiFi hotspot before connecting the camera to your home WiFi network.
- Configure Settings: Once connected, you can configure various settings such as video resolution, motion detection sensitivity, recording schedules, and alert preferences within the app.
6. Operating Instructions
6.1 Live View and Recording
- Live Streaming: Open the companion app on your smartphone to view live video feed from the camera anytime, anywhere, provided the camera is connected to WiFi.
- SD Card Recording: If an SD card is inserted, the camera will automatically record footage based on your configured settings (e.g., continuous recording, motion-activated recording). Recorded files can be accessed and downloaded via the app or by removing the SD card and viewing it on a computer.
6.2 Motion Detection Alerts
The camera is equipped with motion detection to notify you of any activity.

When motion is detected, the camera will capture an image or video clip and send an instant alert notification to your smartphone through the app. You can adjust the sensitivity of motion detection in the app settings to minimize false alarms.
6.3 Night Vision
The integrated infrared night vision allows for clear monitoring in low-light or complete darkness.
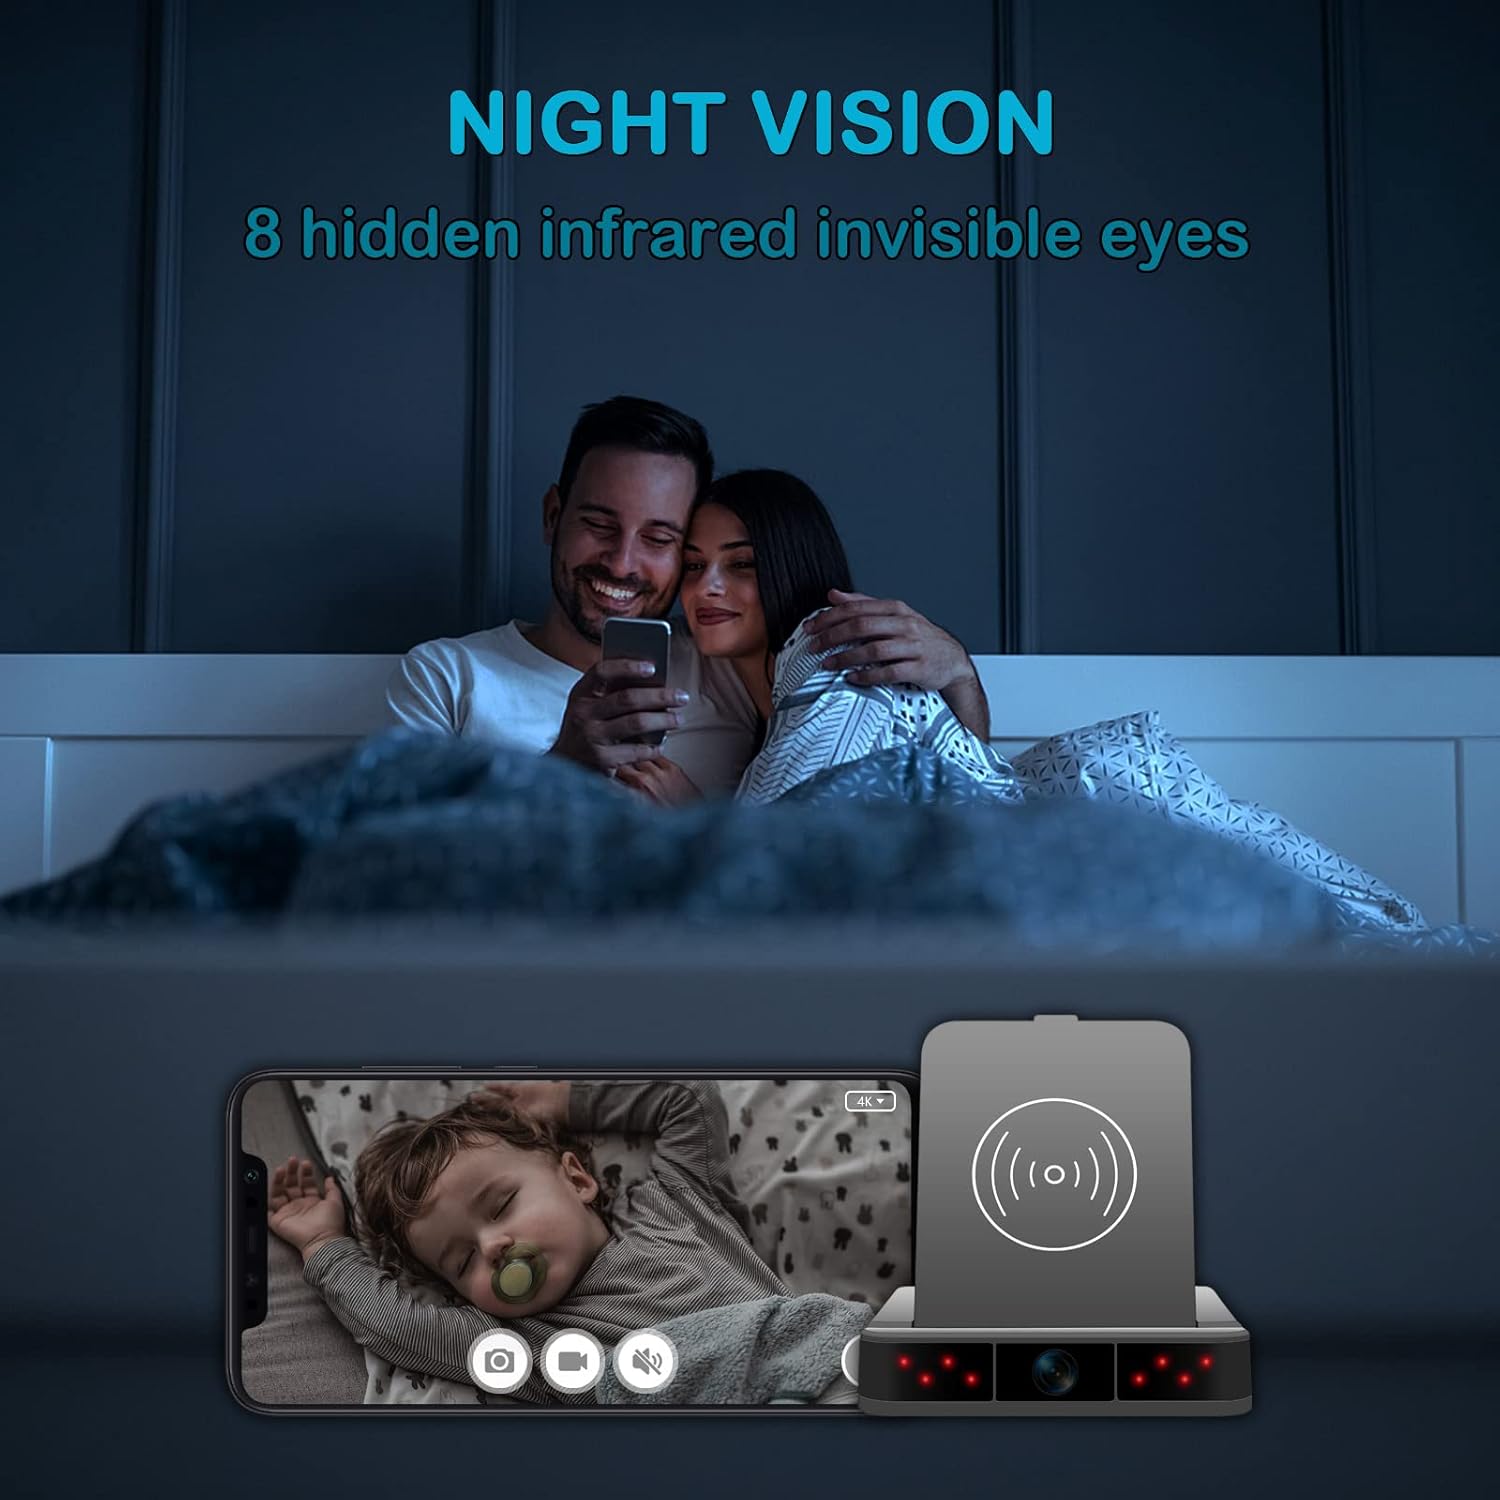
The camera automatically switches to night vision mode when ambient light levels are low, utilizing its 8 invisible infrared lights to illuminate the area without emitting visible light.
6.4 Wireless Charging Function
The top surface of the device functions as a wireless charging pad for compatible smartphones.

Simply place your Qi-compatible smartphone on the charging pad. Ensure the phone is centered on the charging coil for optimal charging efficiency. The device must be powered on for the wireless charging function to work.
7. Maintenance
- Cleaning: Use a soft, dry cloth to clean the device. Avoid using liquid cleaners or aerosols that could damage the electronics.
- Storage: Store the device in a cool, dry place away from direct sunlight and extreme temperatures when not in use.
- SD Card Management: Regularly back up important footage from the SD card. Format the SD card periodically (via the app or computer) to maintain optimal performance and prevent data corruption.
- Firmware Updates: Check the companion app regularly for any available firmware updates to ensure your device has the latest features and security enhancements.
8. Troubleshooting
If you encounter issues with your OTADUG hidden camera, refer to the following table for common problems and solutions.
| Problem | Possible Cause | Solution |
|---|---|---|
| Device not powering on | No power connection or faulty cable/adapter. | Ensure the USB cable is securely connected to both the device and a working power source. Try a different cable or adapter. |
| Cannot connect to WiFi | Incorrect WiFi password, weak signal, or camera too far from router. | Verify WiFi password. Move the camera closer to the router. Ensure your router is 2.4GHz compatible (5GHz is not supported by most hidden cameras). Reset the camera and try connecting again. |
| No video recording to SD card | SD card not inserted, full, corrupted, or incompatible. | Ensure SD card is inserted correctly. Format the SD card via the app or computer. Try a different, compatible SD card (Class 10, up to 128GB). |
| Wireless charging not working | Phone not Qi-compatible, misaligned, or device not powered. | Ensure your phone supports Qi wireless charging. Realign the phone on the charging pad. Confirm the camera device is powered on. |
| Motion detection alerts not received | App notifications disabled, motion detection off, or sensitivity too low. | Check app notification settings on your phone. Enable motion detection in the app and adjust sensitivity. Ensure the camera has a stable internet connection. |
9. Specifications
| Feature | Detail |
|---|---|
| Brand | OTADUG |
| Model | B0C2VDTFTV |
| Video Resolution | 1080p (1920 x 1080 pixels) |
| Viewing Angle | 90 Degrees |
| Connectivity | Wi-Fi (2.4GHz) |
| Night Vision | 8 Infrared LEDs, 1-2 meter range |
| Motion Detection | Supported, with smartphone alerts |
| Storage | Micro SD Card (up to 128GB, Class 10 recommended) |
| Power Input | 5 Volts |
| Power Consumption | 5 Watt-hours |
| Battery | 1 A Lithium-polymer (included) |
| Material | Metal |
| Dimensions | 15 x 11.9 x 5.3 cm |
| Weight | 280 grams |
10. Warranty and Support
OTADUG products are designed for reliability and performance. For warranty information, technical support, or any questions regarding your device, please refer to the contact information provided with your purchase or visit the official OTADUG website. Please retain your proof of purchase for warranty claims.