NIORSUN LH-TB15
NIORSUN Fence Solar Lights Outdoor User Manual
Model: LH-TB15 | Brand: NIORSUN
Introduction
Thank you for choosing NIORSUN Fence Solar Lights. These lights are designed to provide an elegant and functional lighting solution for your outdoor spaces, including fences, decks, stairs, patios, and walls. Featuring multiple lighting modes and colors, they enhance the aesthetics and safety of your environment while being energy-efficient and easy to install.

Image: NIORSUN Fence Solar Lights installed on a white fence, providing illumination.
Safety Information
- Ensure the solar panel receives direct sunlight for optimal charging.
- Do not submerge the lights in water. While IP65 waterproof, they are not designed for underwater use.
- Keep out of reach of children.
- Handle with care during installation to avoid damage to the product or injury.
- Dispose of batteries responsibly according to local regulations.
Package Contents
Each package of NIORSUN Fence Solar Lights includes the following items:
- Solar fence lights (quantity as per pack size, e.g., 10 lights for a 10-pack)
- Mounting screws
- User Manual
Product Overview
The NIORSUN Fence Solar Light features a compact design with an integrated solar panel, LED lights, and a mode button for easy operation. Understanding its components will assist in proper installation and use.

Image: Detailed view of the solar light showing its dimensions (4.6in L x 2.8in H x 2.4in W), the solar panel, and the location of the mode button and battery compartment on the underside.
Key Components:
- Solar Panel: Located on the top surface, responsible for charging the internal battery during daylight hours.
- LED Lights: Positioned on the underside, providing illumination.
- Mode Button: A small button on the underside used to cycle through different lighting modes and colors.
- Battery Compartment: Houses the rechargeable battery, accessible for replacement.
Setup & Installation
1. Initial Preparation
Before installation, ensure the switch on the back of each solar light is in the 'ON' position. Place the lights in direct sunlight for 4-6 hours to allow the battery to fully charge for the first time. This initial charge is crucial for optimal performance.
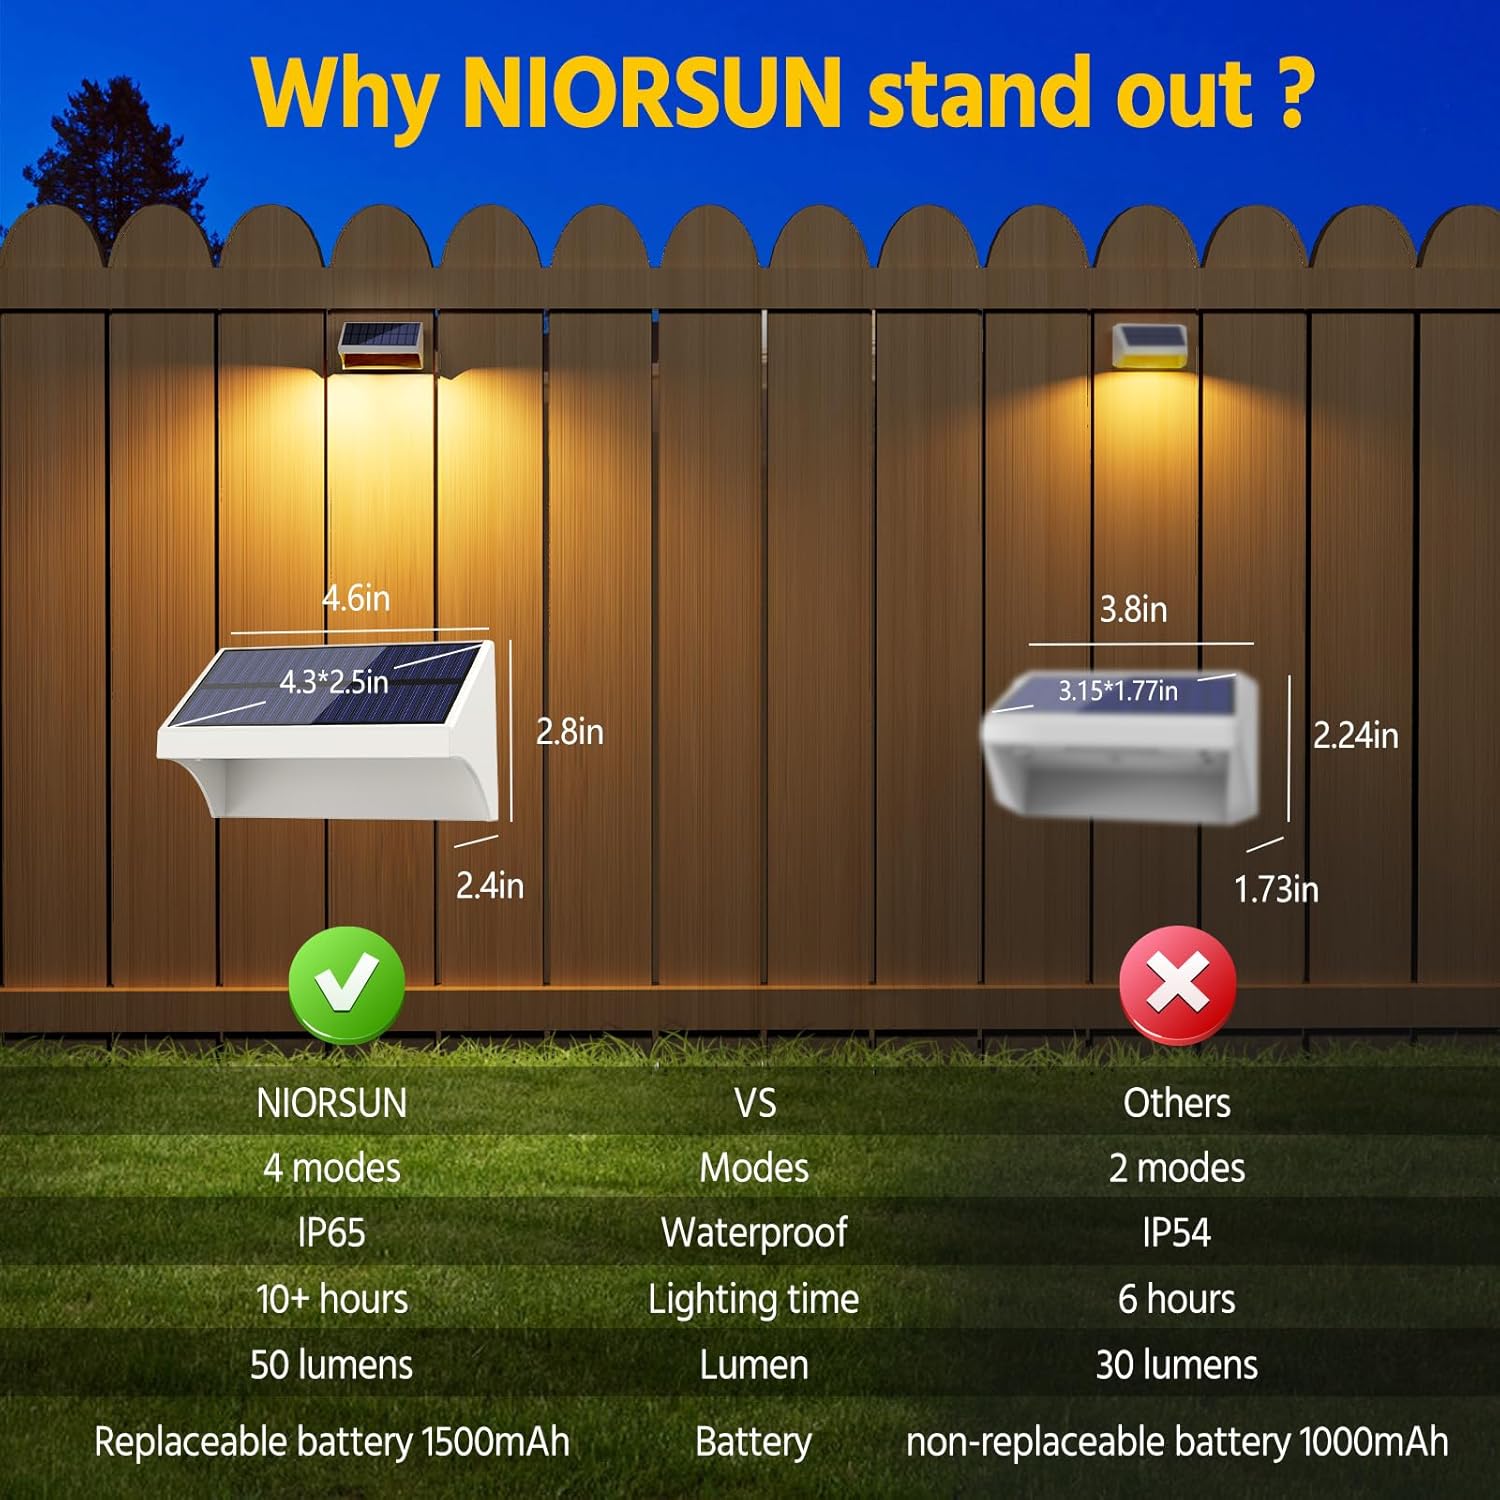
Image: Illustration demonstrating optimal solar charging by placing lights in a southwest direction for maximum sunlight exposure, compared to a less ideal northeast direction.
2. Choosing Installation Location
Select a location that receives ample direct sunlight throughout the day. Avoid areas shaded by trees, buildings, or other obstructions, as this will reduce charging efficiency and lighting duration. The lights are suitable for fences, deck railings, stairs, patios, and walls.

Image: Various applications of the solar lights, including illuminating stairs, providing RGB lighting on a fence, and warm white light on wooden fences.
3. Mounting the Lights
The lights come with mounting hardware (screws) for easy attachment. Follow these steps:
- Identify the desired mounting spot.
- Use the provided screws to secure the light to the surface. For wood surfaces, a screwdriver is sufficient. For harder surfaces like concrete or brick, you may need to drill pilot holes and use wall anchors (not included).
- Ensure the light is securely fastened to prevent it from falling.

Image: Visual instructions for installation, showing drilling a screw, attaching the mounting bracket, and sliding the light onto the bracket.
Operating Instructions
Automatic Operation
The NIORSUN Fence Solar Lights are equipped with an automatic sensor. Once fully charged and the switch is in the 'ON' position, the lights will automatically turn on at dusk and turn off at dawn.
Changing Lighting Modes
The lights offer 4 distinct lighting modes and 8 solid color options. To cycle through the modes, locate the 'MODE' button on the underside of the light (refer to Product Overview section for location). Press the button repeatedly to switch between the following modes:
- Warm White Mode: Provides a cozy and inviting ambiance.
- RGB Solid Color Glow Mode: Cycles through 8 distinct solid colors (Green, Red, Blue, Purple, etc.). Press the button to select and fix a desired color.
- RGB Fade Mode: Colors smoothly transition from one to another.
- Cool White Mode: Offers a pure white light for better visibility and security.
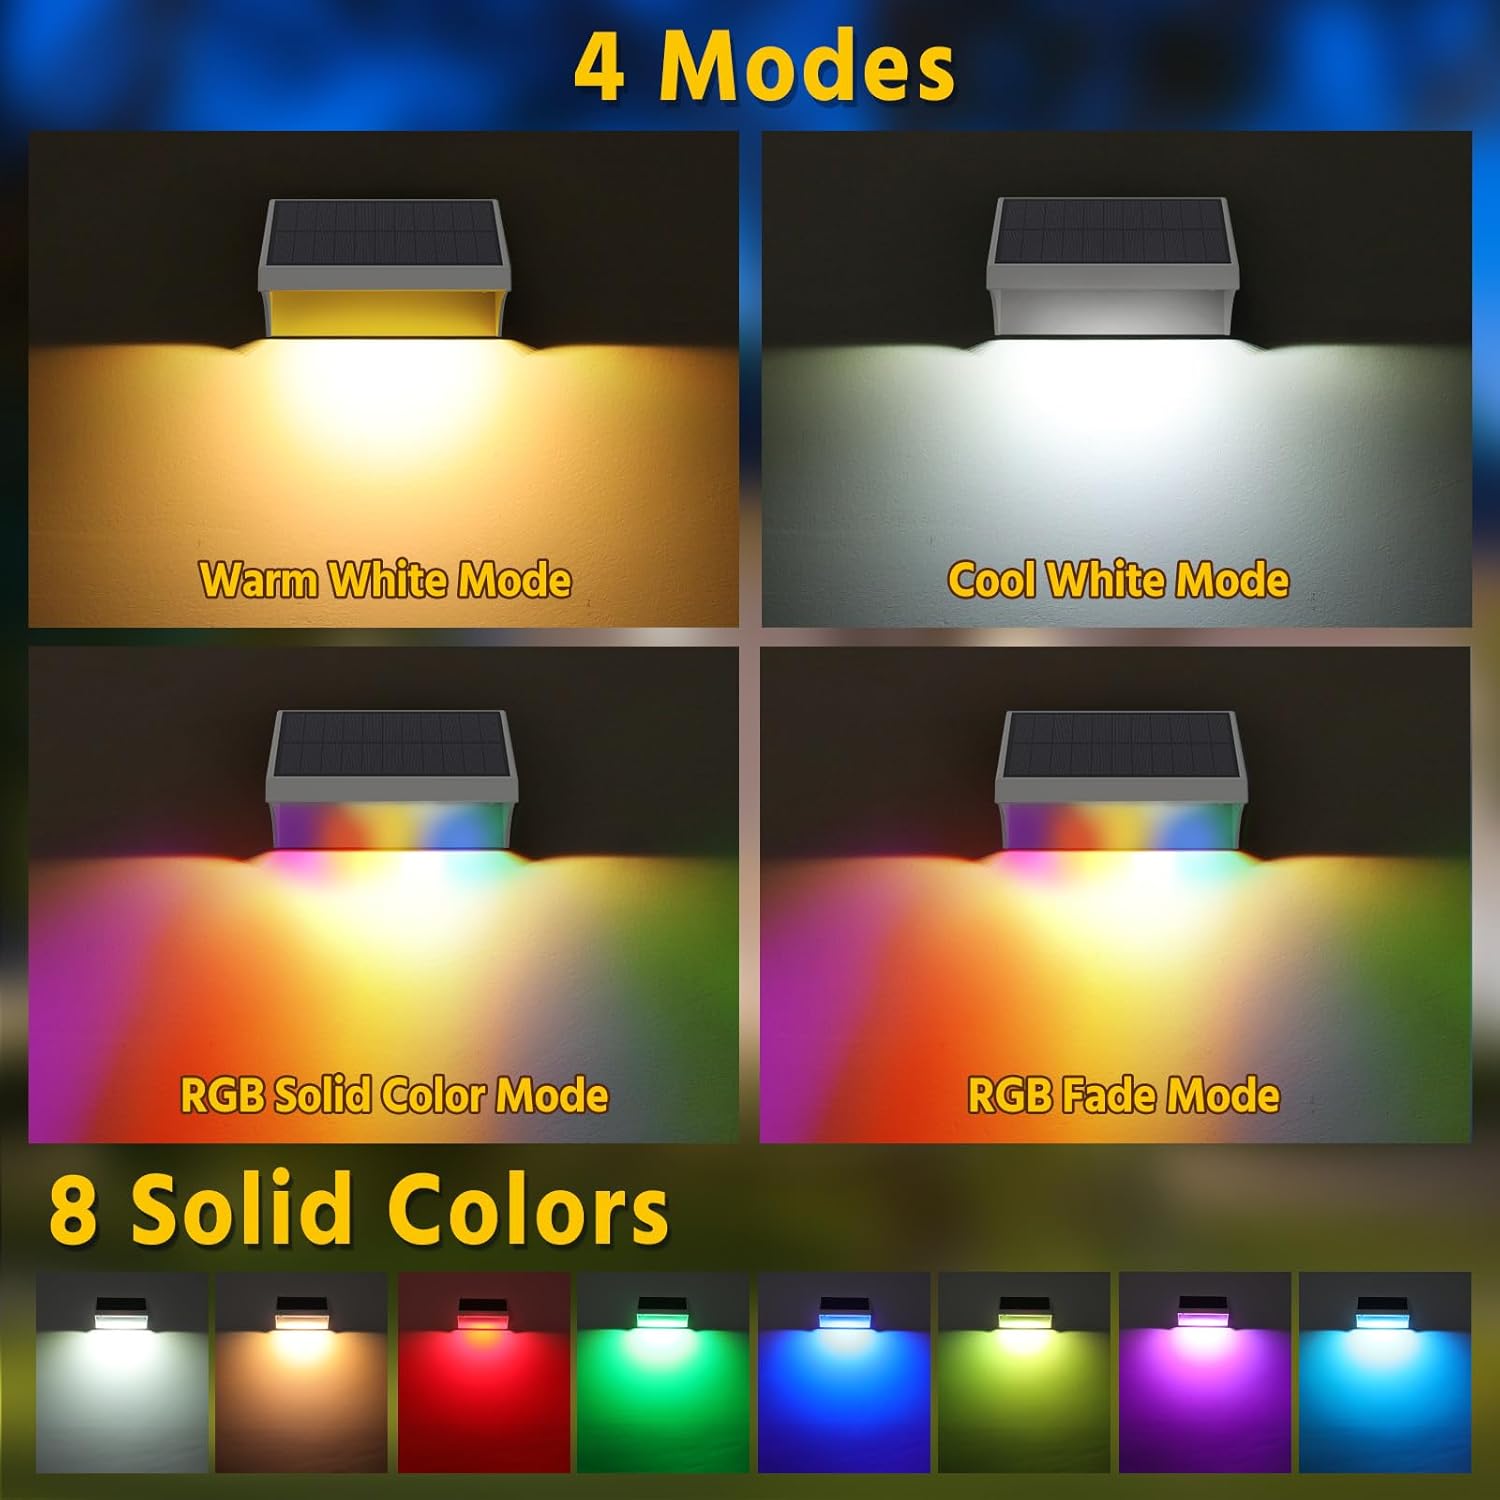
Image: Display of the four available lighting modes and eight distinct solid color options for the solar lights.
Memory Function
The lights feature a memory function. Once you select a desired lighting mode, the light will remember this setting and automatically turn on in that mode each night until you manually change it again.
Maintenance
Cleaning the Solar Panel
To ensure optimal charging efficiency, regularly clean the solar panel surface. Dust, dirt, and debris can accumulate and reduce the panel's ability to absorb sunlight. Use a soft, damp cloth to gently wipe the panel. Avoid abrasive cleaners or harsh chemicals.
Battery Replacement
The NIORSUN Fence Solar Lights use a replaceable and rechargeable 1500mAh battery. If you notice a significant decrease in lighting duration after prolonged use, the battery may need replacement. To replace the battery:
- Carefully remove the light from its mounting location.
- Locate the battery compartment on the underside of the light.
- Open the compartment and remove the old battery.
- Insert a new 1500mAh rechargeable battery, ensuring correct polarity.
- Close the battery compartment securely and remount the light.

Image: Instructions for replacing the rechargeable battery, showing the battery compartment and a battery being inserted.
All-Weather Durability
These lights are designed with IP65 waterproof rating, making them resistant to rain and snow. They are also heat-resistant and frost-resistant, ensuring reliable performance in various weather conditions.
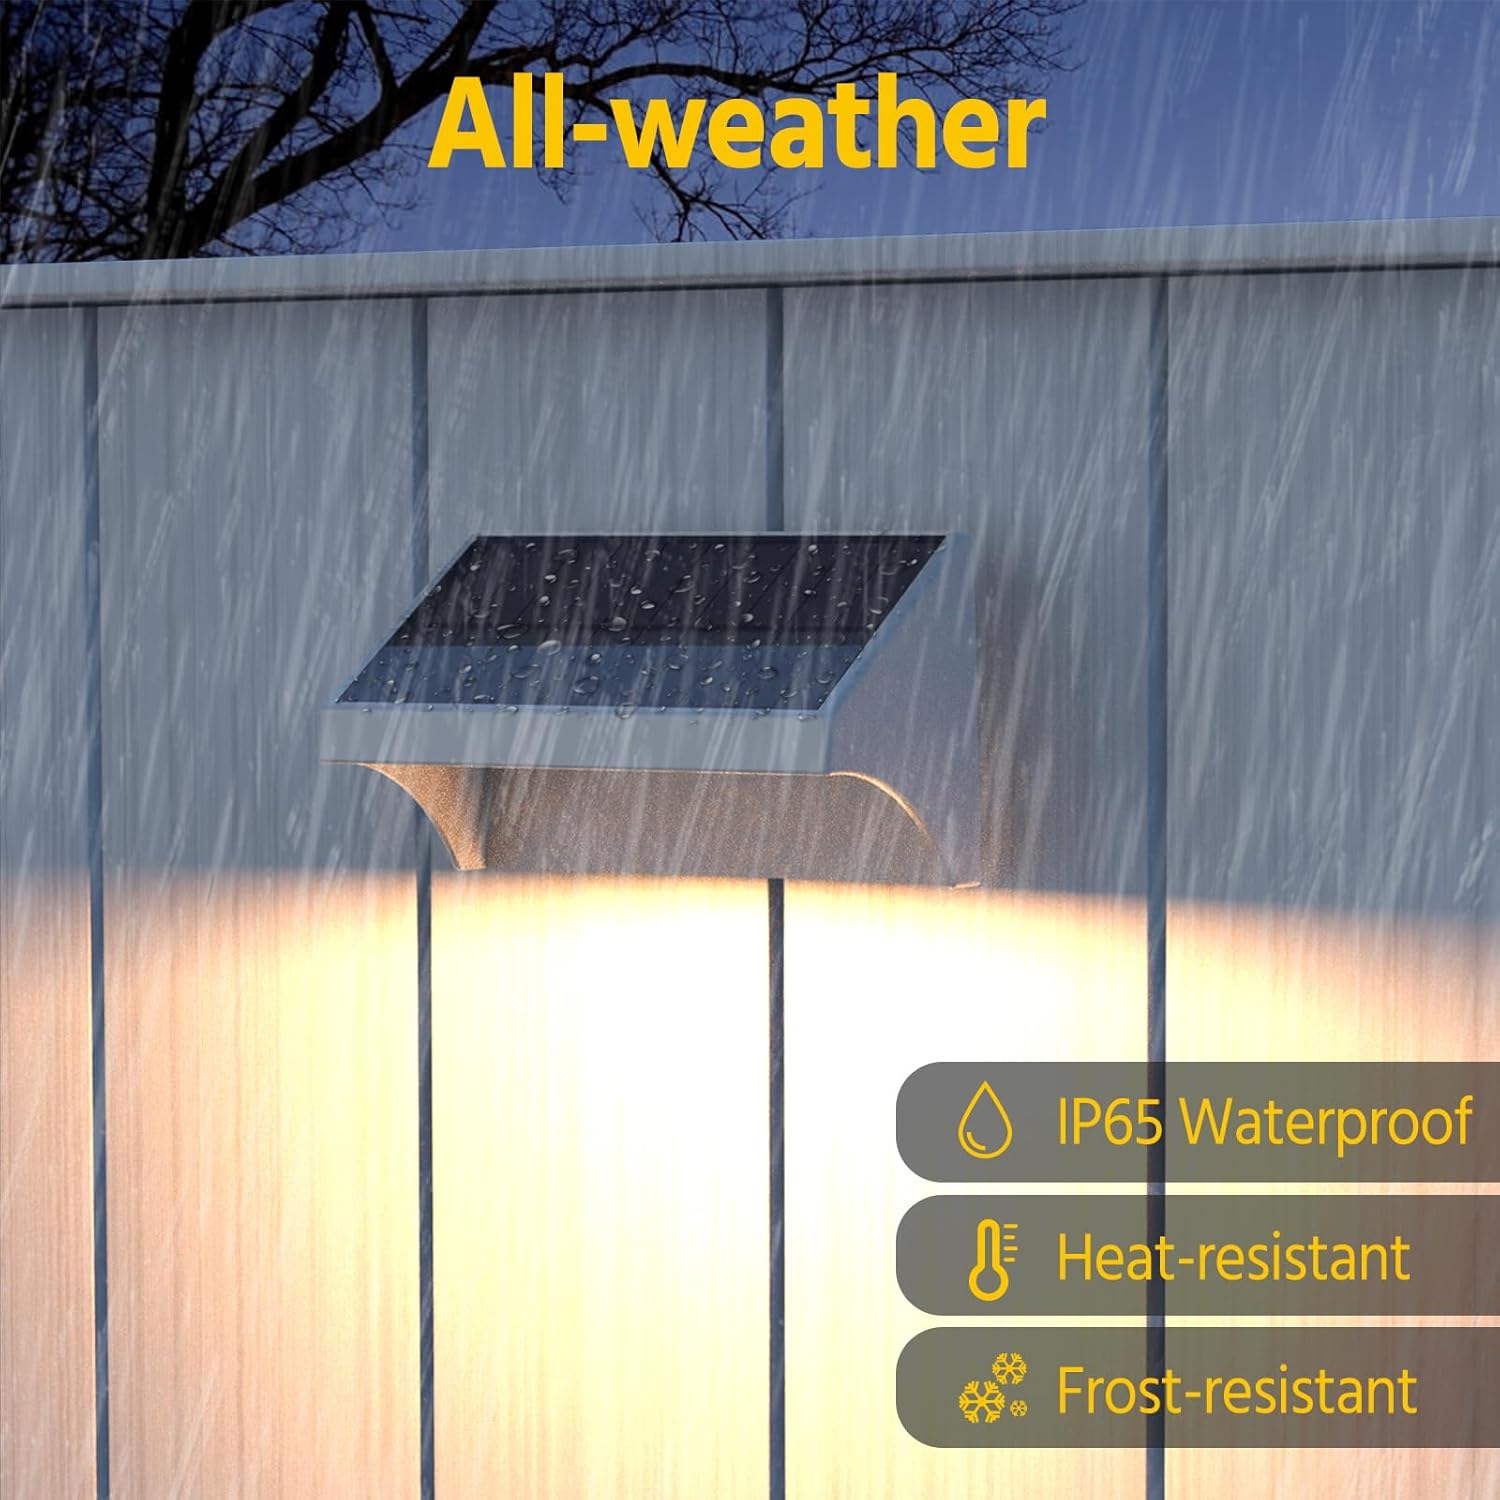
Image: A solar light on a fence during rain, illustrating its IP65 waterproof, heat-resistant, and frost-resistant capabilities.
Troubleshooting
| Problem | Possible Cause | Solution |
|---|---|---|
| Light does not turn on at night. |
|
|
| Light duration is short. |
|
|
| Light flickers or is dim. |
|
|
Specifications
| Feature | Detail |
|---|---|
| Brand | NIORSUN |
| Model Number | LH-TB15 |
| Color | RGBWW-White |
| Material | Plastic (Acrylonitrile Butadiene Styrene) |
| Product Dimensions | 4.6"L x 2.6"W x 2.2"H |
| Power Source | Solar Powered |
| Battery Capacity | 1500mAh (Rechargeable, Replaceable) |
| Charging Time | 4-6 hours (direct sunlight) |
| Lighting Time | More than 10 hours (fully charged) |
| Brightness | 50 Lumen |
| Water Resistance Level | IP65 Waterproof |
| Light Modes | Warm White, Cool White, RGB Solid Color, RGB Fade |
| Control Method | Push Button |
| Installation Type | Wall Mount |
| UPC | 736091741187 |
Warranty and Support
NIORSUN products come with a limited warranty. For specific warranty details, claims, or technical support, please refer to the warranty information included in your product packaging or contact NIORSUN customer service directly.
For further assistance, please visit the official NIORSUN store or contact their customer support channels.
NIORSUN Store: https://www.amazon.com/stores/NIORSUN/page/BC12DEFC-E81B-4447-80F0-45048661088B
Ask a question about this manual
Ask about setup, troubleshooting, compatibility, parts, safety, or missing instructions. Manuals+ will review the question and use this page’s manual context to help answer it.