
1. Introduction
This manual provides detailed instructions for the installation, operation, and maintenance of your HYPER GO 1430K1 1/14 Scale RC Car Shell Body with Light Assembly. This product is designed as a replacement or upgrade part for HYPER GO H14MK and 14301 RC vehicles. Please read this manual thoroughly before use to ensure proper function and longevity of the product.

Figure 1.1: The HYPER GO 1430K1 1/14 Scale RC Car Shell Body with integrated light assembly.
2. Package Contents
Verify that all items listed below are present in your package:
- 1x HYPER GO 1430K1 RC Car Shell Body
- 1x Integrated Light Assembly (pre-installed in shell body)
3. Setup and Installation
3.1 Required Tools
The following tools are recommended for installation (not included):
- Small Phillips head screwdriver
- Pliers (optional, for body clips)
3.2 Installing the Shell Body
- Carefully remove the existing shell body from your HYPER GO H14MK or 14301 RC vehicle. This typically involves detaching body clips or screws. Store these components safely for potential future use.
- Position the new HYPER GO 1430K1 shell body onto the chassis. Ensure it aligns correctly with the mounting posts on the vehicle.
- Secure the new shell body using the original body clips or screws. Ensure it is firmly attached to prevent detachment during operation.
3.3 Connecting the Light Assembly
The light assembly is integrated into the shell body and requires connection to the vehicle's electronics.
- Locate the light assembly connector on the new shell body.
- Connect the light assembly cable to the corresponding port on your RC vehicle's electronic speed controller (ESC) or receiver, as per your vehicle's specific wiring diagram. Refer to your RC vehicle's main manual for exact connection points.
- Ensure the connection is secure to prevent intermittent light function during use.
Figure 3.1: The HYPER GO 1430K1 shell body with its integrated light assembly, ready for installation.
4. Operation
4.1 Light Functionality
Once installed and connected, the integrated light assembly will typically activate when the RC vehicle is powered on. The lights are designed to enhance visibility and realism during operation, especially in low-light conditions.
4.2 General Use
The shell body serves as a protective cover for the internal components of your RC vehicle. While durable, avoid excessive impacts or collisions that could damage the shell or the sensitive electronics underneath. Operate your RC vehicle responsibly and within its intended environment.

Figure 4.1: An RC car in an outdoor environment, demonstrating typical operating conditions.
5. Maintenance
5.1 Cleaning the Shell Body
To clean the shell body, use a soft, damp cloth to wipe away dirt and debris. For stubborn grime, a mild soap solution can be used. Avoid harsh chemicals, solvents, or abrasive materials, as these can damage the paint and finish of the shell.
5.2 Inspecting the Light Assembly
Periodically check the light assembly for any loose wires, damaged LEDs, or signs of wear. Ensure all electrical connections remain secure to maintain proper functionality.
5.3 Storage
When not in use, store the shell body in a cool, dry place away from direct sunlight. Prolonged exposure to extreme temperatures or UV light can lead to material degradation or fading of the paintwork.
6. Troubleshooting
6.1 Lights Not Working
- Check Connection: Ensure the light assembly cable is securely connected to the RC vehicle's power source (e.g., ESC or receiver). A loose connection is a common cause of intermittent or non-functional lights.
- Vehicle Power: Verify that the RC vehicle itself is powered on and the battery has sufficient charge. The lights draw power from the vehicle's main battery.
- Damage: Inspect the light assembly for visible damage to wires, connectors, or individual LEDs. If damage is apparent, replacement of the shell body or light assembly may be necessary.
6.2 Shell Body Loose
- Body Clips/Screws: Ensure all body clips or screws used to secure the shell body are properly installed and fully engaged.
- Mounting Posts: Check if the mounting posts on the RC vehicle's chassis are intact and not damaged or worn. Damaged posts may prevent the shell from seating securely.
7. Specifications
| Feature | Detail |
|---|---|
| Model Number | 1430K1 |
| Compatibility | HYPER GO H14MK, HYPER GO 14301 |
| Scale | 1/14 Scale |
| Product Dimensions | 12.52 x 6.1 x 4.37 inches |
| Item Weight | 5.4 ounces |
| Manufacturer | HYPER GO |
| Recommended Age | 14 years and up |

Figure 7.1: Example of a compatible 3S 2000 mAh Lipo battery.
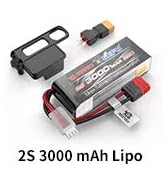
Figure 7.2: Example of a compatible 2S 3000 mAh Lipo battery.
8. Warranty and Support
For warranty information, technical support, or inquiries regarding replacement parts, please contact HYPER GO customer service. Refer to the official HYPER GO website or your original RC vehicle manual for specific contact details.
You can also visit the official HYPER GO store on Amazon for additional products and support: