1. Safety Instructions
Read all instructions carefully before using the treadmill. Keep this manual for future reference.
- Placement: Place the treadmill on a flat, stable surface. Ensure adequate clear space around the unit (at least 2 meters behind and 0.6 meters on each side).
- Power Supply: Connect the treadmill to a grounded electrical outlet. Do not use extension cords or adapters.
- User Weight Limit: Do not exceed the maximum weight capacity of 265 lbs (120 kg).
- Attire: Wear appropriate athletic footwear and clothing. Avoid loose clothing that could get caught in moving parts.
- Children and Pets: Keep children and pets away from the treadmill during operation.
- Emergency Stop: The treadmill is equipped with a safety lock design. In case of an emergency, pull the safety lock to immediately stop the treadmill. Always attach the safety clip to your clothing during use.
- Maintenance: Regularly inspect the treadmill for wear and tear. Do not operate if damaged. Refer to the maintenance section for lubrication and belt adjustment.
- Medical Conditions: Consult a physician before starting any exercise program, especially if you have pre-existing medical conditions.
- Unattended Operation: Never leave the treadmill running unattended.
2. Package Contents
Carefully unpack the box and ensure all items are present:
- AIRHOT TT300 Treadmill Unit
- Remote Control (with batteries included)
- Lubricant
- User Manual
- Safety Key
3. Setup
The AIRHOT TT300 treadmill requires no assembly and can be used directly after unpacking.
3.1 Unfolding for Running Mode
- Place the treadmill on a flat, stable surface.
- Unlock the safety buckles on both sides of the treadmill.
- Carefully raise the armrest/handlebar until it clicks into place. Ensure it is securely locked.
- Connect the power cord to a grounded outlet.
- Attach the safety key clip to your clothing and insert the safety key into its designated slot on the console.

Image: The AIRHOT TT300 treadmill shown in its upright running configuration with the handlebar raised.
3.2 Folding for Walking Pad Mode or Storage
- Ensure the treadmill is powered off and the safety key is removed.
- Unlock the safety buckles on both sides of the armrest/handlebar.
- Gently lower the armrest/handlebar until it lies flat against the treadmill deck.
- The treadmill can now be used as a walking pad or stored.
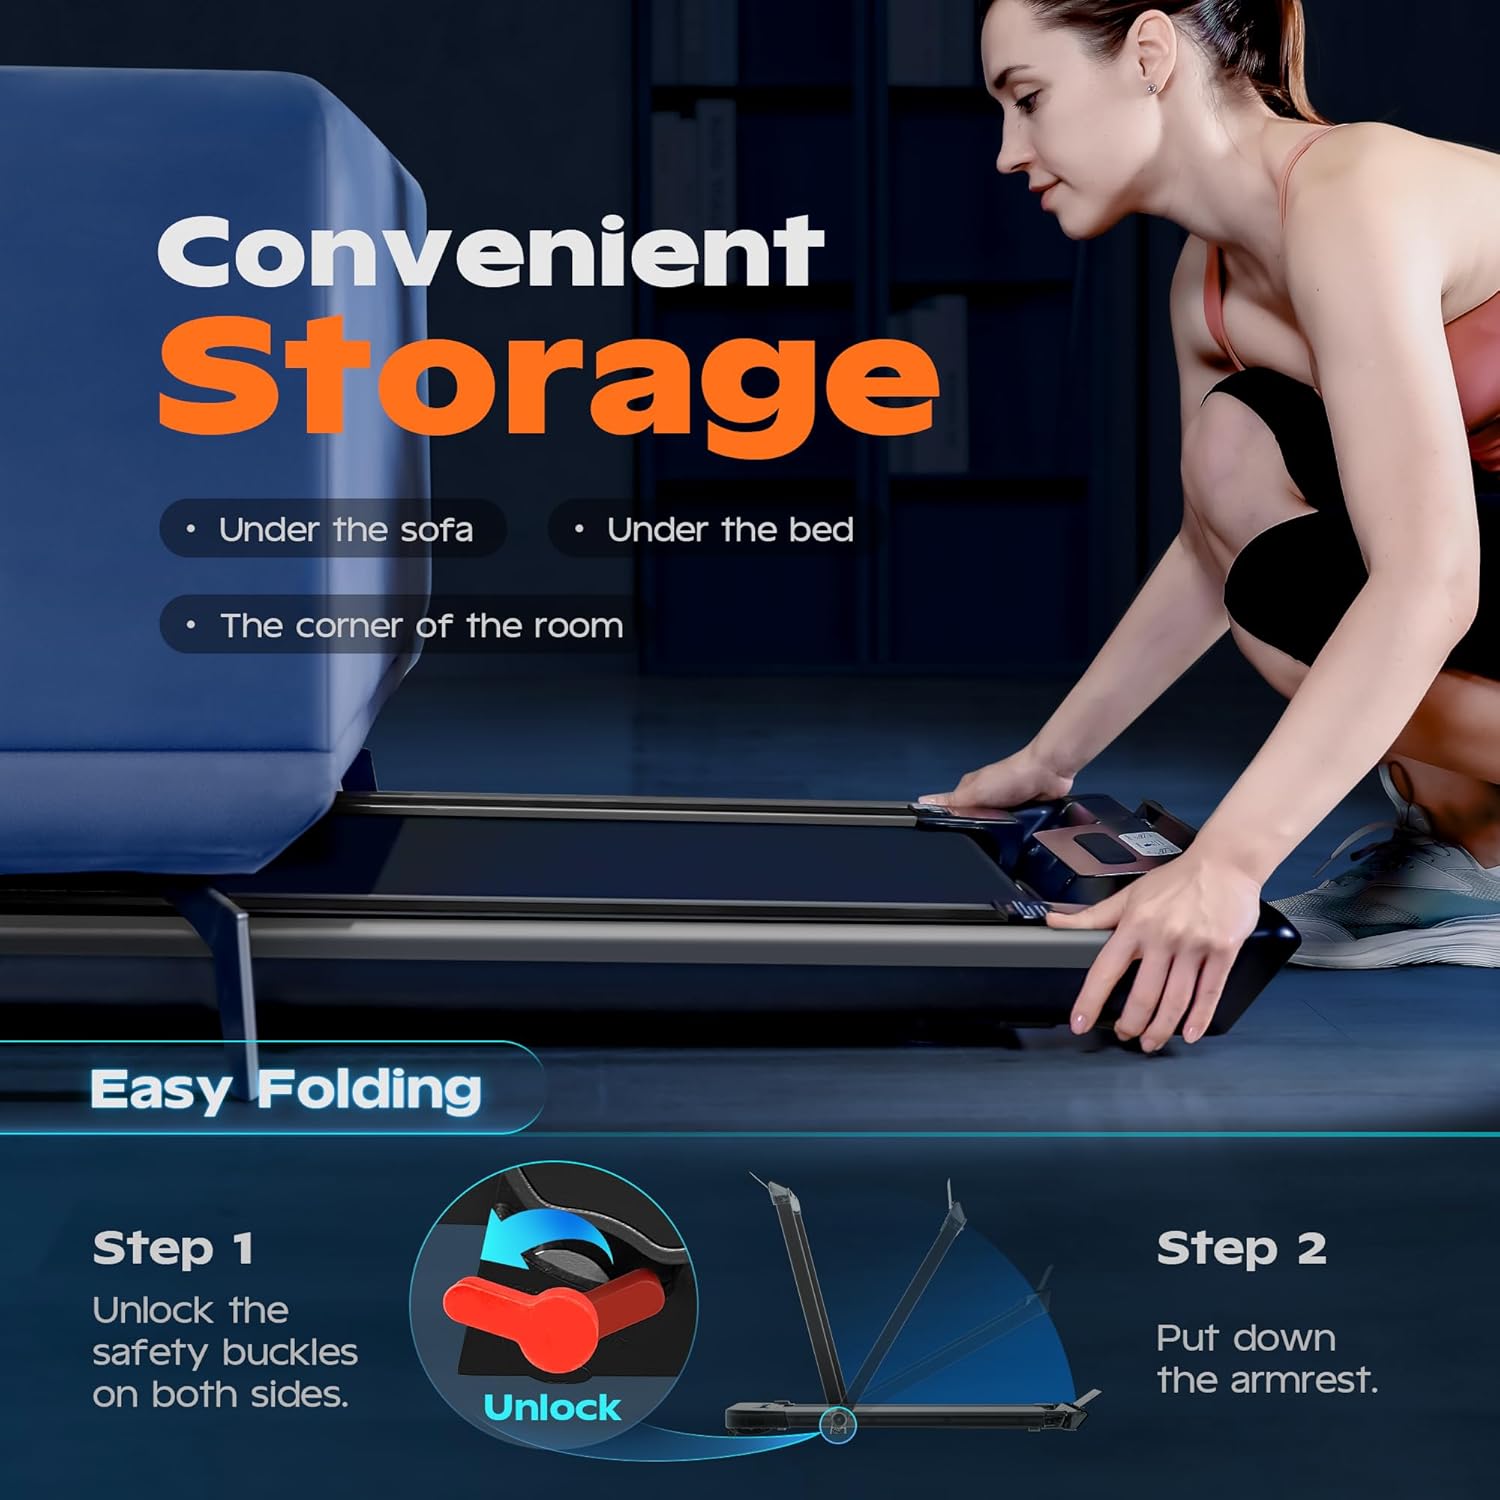
Image: Illustration of the two-step folding process for the AIRHOT TT300 treadmill, showing how to unlock safety buckles and lower the armrest for compact storage.
3.3 Moving and Storage
The treadmill features full silicone-wrapped mobility wheels for easy movement without damaging floors. Once folded, it can be placed under a bed or sofa to save space.

Image: The AIRHOT TT300 treadmill shown compactly stored under a sofa, highlighting its space-saving design.
4. Operating Instructions
4.1 Modes of Operation
The AIRHOT TT300 offers three distinct modes:
- Running Mode: With the armrests raised, speeds range from 0.6 to 7.6 MPH.
- Walking Mode: With the armrests lowered, speeds range from 0.6 to 3.8 MPH.
- Working Mode (Under Desk): With the armrests lowered, speeds range from 0.6 to 2.0 MPH, ideal for use with a standing desk.

Image: Visual representation of the three operational modes: Running (handlebar up, higher speed), Walking (handlebar down, moderate speed), and Working (handlebar down, low speed, often with a desk).
4.2 Controls
The treadmill can be controlled via the knob on the handlebar (when raised) or the remote control.
4.2.1 Knob and Remote Control
The knob on the handlebar (in running mode) and the compact remote control (in all modes) allow for easy speed adjustment and start/stop functions.
- Knob (Running Mode): Press to start/stop. Rotate right to accelerate, left to decelerate.
- Remote Control (All Modes): Use power, start/stop, and speed +/- buttons to manage your workout.

Image: A visual guide illustrating two methods for adjusting treadmill speed: the integrated knob control on the handlebar and the separate remote control.
4.3 Display Information
The LED screen displays real-time workout data:
- Speed
- Distance
- Time
- Calories Burned

Image: The LED display of the AIRHOT TT300 treadmill, showing various workout metrics such as speed, calories, distance, and time.
4.4 Incline Feature (if applicable)
Some models may feature an adjustable incline. The provided video demonstrates a model with 4% or 9% incline options to boost calorie burn. Refer to your specific model's features for details.
Video: An official seller video demonstrating the incline feature of a homeTro walking pad treadmill, showing 4% and 9% incline options to enhance calorie expenditure during workouts.
5. Maintenance
Regular maintenance ensures the longevity and optimal performance of your treadmill.
5.1 Cleaning
- Wipe down the treadmill after each use with a damp cloth to remove sweat and dust.
- Do not use abrasive cleaners or solvents.
- Keep the area around the treadmill clean and free of debris.
5.2 Lubrication
The running belt requires periodic lubrication to reduce friction and extend its lifespan. Use the provided lubricant.
- Turn off and unplug the treadmill.
- Loosen the rear roller bolts slightly to lift the belt.
- Apply a small amount of lubricant evenly under the center of the running belt.
- Tighten the rear roller bolts.
- Run the treadmill at a low speed (e.g., 1-2 MPH) for a few minutes to distribute the lubricant.
- Frequency: Lubricate every 3-6 months, or after approximately 100 hours of use, depending on usage.
5.3 Belt Adjustment
If the running belt shifts to one side or slips, it may need adjustment.
- Belt Shifting: If the belt moves to the left, turn the left adjustment bolt clockwise a quarter turn. If it moves to the right, turn the right adjustment bolt clockwise a quarter turn. Run the treadmill for a few minutes and re-check. Repeat if necessary.
- Belt Slipping: If the belt slips during use, turn both left and right adjustment bolts clockwise a quarter turn simultaneously. Run the treadmill and test. Repeat if necessary.
6. Troubleshooting
This section addresses common issues you might encounter.
| Problem | Possible Cause | Solution |
|---|---|---|
| Treadmill does not start. | Power cord not plugged in; Safety key not inserted; Power switch off. | Ensure power cord is securely plugged in; Insert safety key; Turn on power switch. |
| Running belt stops or slows down during use. | Belt too loose; Insufficient lubrication; Motor overload. | Adjust belt tension (see 5.3); Lubricate belt (see 5.2); Reduce user weight or speed. |
| Running belt shifts to one side. | Belt misalignment. | Adjust belt alignment (see 5.3). |
| Unusual noise from the treadmill. | Loose parts; Lack of lubrication; Foreign object. | Check for and tighten any loose bolts; Lubricate belt; Inspect for and remove any foreign objects. If noise persists, contact support. |
| Remote control not working. | Dead batteries; Remote out of range; Interference. | Replace remote control batteries; Ensure remote is within operating range; Remove any obstructions. |
7. Specifications
| Feature | Detail |
|---|---|
| Model Number | TT300 |
| Product Dimensions (Unfolded) | 123.95 x 67.06 x 105.23 cm (48.8"D x 26.4"W x 41.34"H) |
| Packed Size (Folded) | 53.2" x 26.4" x 4.9" |
| Item Weight | 27.34 kg (60.28 lbs) |
| Maximum Weight Capacity | 265 lbs |
| Motor Horsepower | 2.5 HP |
| Speed Range (Running Mode) | 0.6 - 7.6 MPH |
| Speed Range (Walking/Working Mode) | 0.6 - 3.8 MPH (Walking), 0.6 - 2.0 MPH (Working) |
| Running Belt Dimensions | 38.8" x 17" |
| Display Type | LED (3 Inches) |
| Special Features | Foldable, Shock Absorbent, Wheeled, 5-layer non-slip running belt |
| Power Source | Corded Electric |
| Included Components | Lubricant, Remote Control (with batteries) |
7.1 Running Belt Dimensions

Image: Diagram illustrating the dimensions of the treadmill's running belt, showing a width of 17 inches (43 cm) and a length of 38.8 inches (98 cm).
7.2 Running Belt Construction

Image: Cross-section view detailing the 5-layer construction of the treadmill's diamond pattern non-slip running belt, designed for durability and shock absorption.
8. Warranty and Support
For warranty information and customer support, please refer to the documentation included with your purchase or contact AIRHOT customer service directly. Keep your purchase receipt as proof of purchase.
Contact Information: Please visit the official AIRHOT website or refer to your product packaging for the most up-to-date customer support contact details.