Introduction
The ToolkitRC M6D Dual AC/DC Battery Charger Workstation is a versatile and powerful charging solution designed for various battery chemistries. It offers dual independent outputs, allowing simultaneous charging from both AC and DC power sources. This manual provides essential information for safe and efficient operation of your M6D charger.
Key Features
- Built-in AC/DC power supply for flexible power input.
- Dual charge outputs for charging two batteries simultaneously.
- USB 65W fast charge capability for external devices.
- Vibrant 3.5" IPS color screen for clear information display.
- Intuitive metal dial wheel for easy menu navigation and settings adjustment.
- Supports multiple battery types: Lipo, LiHV, LiFe, LiIon (1-6S), NiMh (1-16S), Pb (1-10S).
Setup
1. Unboxing and Initial Inspection
Carefully remove all components from the packaging. Verify that all items listed in the package contents are present and undamaged. The package includes the M6D Dual AC/DC Battery Charger Workstation, a screen protector, and power cords.

Figure 1: ToolkitRC M6D charger and included accessories.
2. Power Connection
The M6D charger can be powered by either AC (Alternating Current) or DC (Direct Current) sources.
- AC Power: Connect the provided AC power cord to the AC input port on the back of the charger and then to a standard wall outlet (100-240V).
- DC Power: Connect a DC power source (7.0-28.0V, MAX 30A) to the DC input port on the back of the charger. Ensure correct polarity.
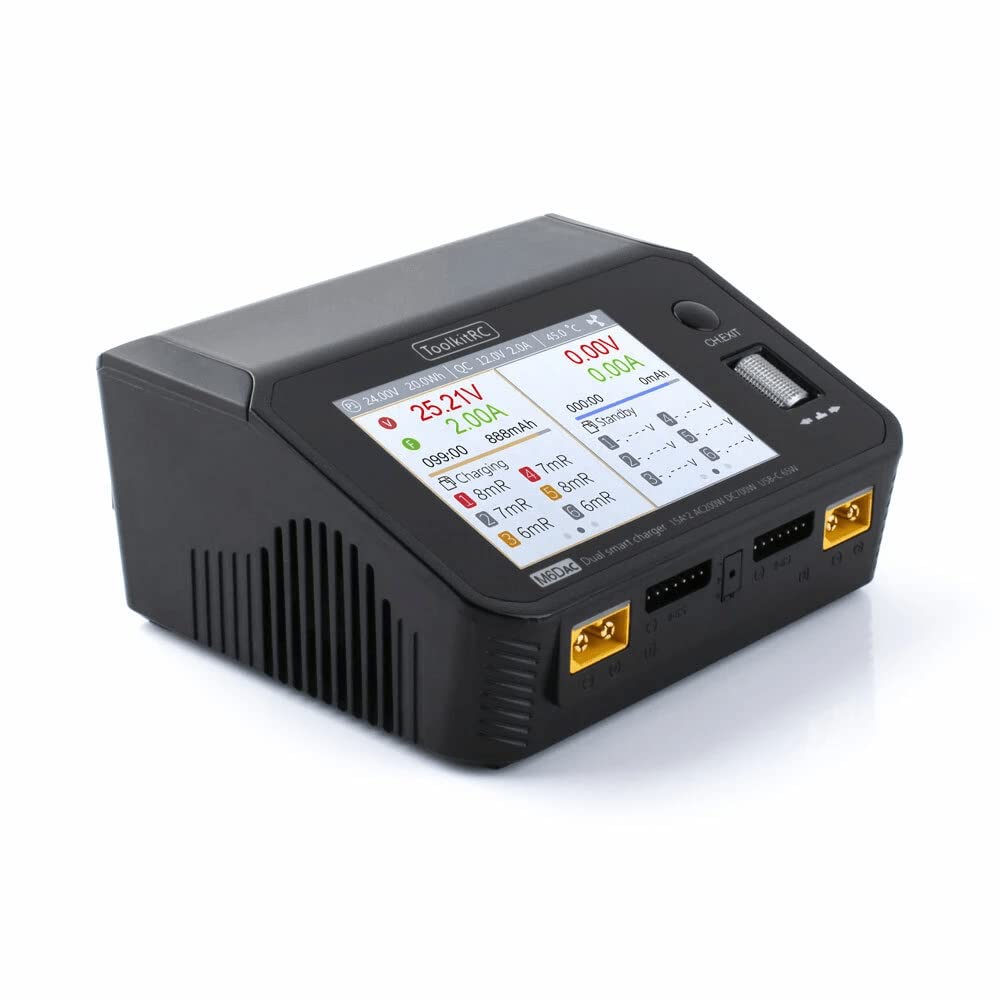
Figure 2: Rear and side view of the M6D charger with power input ports.
3. Battery Connection
Connect your battery to one of the two charge outputs (CHA or CHB) on the front of the charger. Always connect both the main power lead (e.g., XT60) and the balance lead to the corresponding ports on the charger. The balance lead is crucial for monitoring individual cell voltages and ensuring safe, balanced charging.

Figure 3: Front view of the M6D charger with dual output ports.
Operating Instructions
1. Navigation and Display
The M6D features a 3.5" IPS color screen and a metal dial wheel for intuitive navigation. Rotate the dial to scroll through menus and options, and press the dial to confirm selections.
2. Selecting Battery Type and Task
After connecting your battery, the charger will typically prompt you to select the battery type (Lipo, LiHV, LiFe, LiIon, NiMh, Pb) and the desired task (Charge, Balance, Discharge, Storage, etc.).
- Charge: Standard charging mode. For LiPo batteries, this typically includes balancing.
- Balance: Charges and balances individual cells to ensure they have equal voltage, prolonging battery life.
- Discharge: Discharges the battery to a specified voltage.
- Storage: Charges or discharges the battery to a safe storage voltage (e.g., 3.8V per cell for LiPo) to prevent degradation over time.
- Fast Charge: Charges the battery at a higher rate, potentially without full balancing. Use with caution.
The charger supports 1-6S for Lipo/LiHV/LiFe/LiIon, 1-16S for NiMh, and 1-10S for Pb batteries. Always ensure the selected battery type and cell count match your connected battery to prevent damage.
3. Setting Charge Parameters
Adjust parameters such as charge current (Amps) and target voltage as needed. For LiPo batteries, a common safe charging rate is 1C (e.g., 5000mAh battery charged at 5A). Refer to your battery's specifications for recommended charge rates.
4. USB-C Fast Charging
The M6D includes two USB-C ports with MAX 65W output (3.25A @ 20.0V) supporting PD, QC, AFC, FCP, SCP, PE, SFCP, and VOC protocols. These ports can be used to fast charge compatible smartphones, tablets, or other accessories.
Product Videos
G-Tech Charger Series Overview
Video 1: An animated overview of the G-Tech charger series, highlighting features like battery information, state of health, and compatibility with general batteries.
6200mAh Battery Installation Test
Video 2: Demonstrates the installation and compatibility of a 6200mAh battery with a remote control unit, showcasing the battery's physical fit and connection.
Maintenance
- Cleaning: Regularly wipe the charger's exterior with a soft, dry cloth. Avoid using solvents or abrasive cleaners.
- Storage: Store the charger in a cool, dry place away from direct sunlight and extreme temperatures.
- Cable Inspection: Periodically inspect all cables and connectors for signs of wear or damage. Replace any damaged cables immediately.
- Firmware Updates: Check the ToolkitRC official website for any available firmware updates to ensure optimal performance and compatibility.
Troubleshooting
- Charger Not Powering On:
- Ensure the AC power cord is securely connected to both the charger and the wall outlet, or that the DC power source is correctly connected and providing sufficient voltage.
- Check the power source for functionality.
- Battery Not Charging:
- Verify that both the main power lead (e.g., XT60) and the balance lead are correctly and securely connected to the charger.
- Confirm that the selected battery type and cell count in the charger settings match the connected battery.
- Check for any error messages on the screen and refer to the charger's internal error code explanations if available.
- Unusual Heat or Smell:
- Immediately disconnect the battery and power source.
- Do not attempt to continue charging. Contact customer support.
Specifications
| Input Voltage | DC 7.0-28.0V @MAX 30A, AC 100-240V @ MAX 2.5A |
| Battery Type Support | Lipo, LiHV, LiFe, LiIon (1-6S); NiMh (1-16S); Pb (1-10S) |
| Balance Current | 1000mA @2-6S |
| Balance Accuracy | <0.005V |
| Charger Power | 0.1-15A @350W *2 (Asynchronous mode); 0.1-25A @700W (Synchronous mode) |
| Discharge Power | 350W @MAX 15A *2 (Recycle mode); 15W@3A *2 (Normal mode) |
| USB-C Power | MAX 65W 3.25A @20.0V (PD, QC, AFC, FCP, SCP, PE, SFCP, VOC) |
| Battery Voltage | 1.0V-5.0V@1-6S |
| Internal Resistance | 1-100mR@1-6S |
| Dimensions | 127x106x57mm (5.0 x 4.17 x 2.24 inches) |
| Weight | 520g (1.15 lbs) |
| LCD | IPS 3.5inch LCD 480x320 Pixel |
Warranty and Support
For detailed warranty information, technical support, or service inquiries, please refer to the official ToolkitRC website or contact your authorized dealer. Keep your purchase receipt as proof of purchase for warranty claims.


