
Important Safety Instructions
Read all instructions carefully before using the appliance. Failure to follow these instructions may result in electric shock, fire, or serious injury.
- Always ensure the appliance is placed on a stable, level, and heat-resistant surface.
- Do not immerse the electrical head (control panel and heating elements) in water or any other liquid. This is crucial for preventing electric shock.
- Use only the recommended oil type and fill to the specified maximum level to prevent overflow and splashing.
- Always use the provided frying baskets with long plastic handles to avoid scalding from hot oil.
- Utilize the lid covers to protect against splashing boiled oil during operation.
- The fryer is equipped with sensitive temperature probes for overheat protection. Do not bypass or tamper with these safety features.
- Ensure proper ventilation when operating the fryer.
- Unplug the appliance from the power outlet when not in use and before cleaning.
- Keep children and pets away from the appliance during operation.

Image: Detail showing the 1.7kW+1.7kW dual heating elements with temperature probes for overheat protection, and the removable, washable oil tanks. A warning emphasizes keeping the electrical head away from water.
Product Components
The COSTWAY Commercial Deep Fryer includes the following parts:
- Main Fryer Unit (with control panels and heating elements)
- 2 x Oil Tanks (5.8QT max. capacity each)
- 2 x Frying Baskets with Anti-scald Plastic Handles
- 2 x Well-matched Lid Covers
- 2 x Oil Residue Plates
- Insulated Non-slip Foot Pads (pre-attached)
- Convenient Handles (on the main unit)
- Hanging Hooks (for baskets)

Image: An exploded view illustrating the individual components of the deep fryer, such as the oil tanks, frying baskets, lid covers, and other accessories, highlighting their placement and function.
Setup Instructions
- Unpack: Carefully remove all components from the packaging. Retain packaging for future storage or transport.
- Placement: Place the main fryer unit on a stable, level, and heat-resistant countertop or surface. Ensure there is adequate clearance around the unit for ventilation.
- Install Oil Tanks: Insert the two stainless steel oil tanks into their respective compartments within the main unit.
- Insert Heating Elements: Ensure the heating elements are properly seated above the oil tanks. The control panel assembly should fit securely.
- Add Oil: Pour cooking oil into each tank, ensuring the oil level is between the minimum and maximum fill lines indicated inside the tank. Do not overfill.
- Connect Power: Plug the two separate power cords into grounded electrical outlets. Ensure the outlets meet the voltage and power requirements (110V/60Hz, 1.7kW+1.7kW).

Image: Illustration of the 1700W+1700W powerful heating elements and the dual safe plugs, emphasizing the electrical connections.
Operating Instructions
- Power On: Turn the temperature selection dial for each tank to the desired temperature. The "POWER LIGHT" (green) will illuminate.
- Preheat Oil: The "HEAT LIGHT" (red) will illuminate, indicating that the heating elements are active. Allow the oil to preheat until the "HEAT LIGHT" turns off, signifying the set temperature has been reached. This process is quick due to the 1.7kW heating elements.
- Prepare Food: Place food items into the frying baskets. Do not overload the baskets, as this can lower oil temperature and result in soggy food.
- Frying: Carefully lower the baskets into the hot oil. Use the anti-scald plastic handles.
- Monitor Temperature: The "HEAT LIGHT" will cycle on and off to maintain the set temperature.
- Remove Food: Once food is cooked to desired crispness, carefully lift the baskets and hang them on the built-in hooks to drain excess oil.
- Power Off: Turn the temperature selection dials to the "OFF" position and unplug the unit when frying is complete.
Recommended Frying Temperatures:

Image: The control panel displaying the temperature selection dial and a guide for optimal frying temperatures for different food types, ranging from 140°F to 375°F.
- French Fries: 325°F - 350°F (163°C - 177°C)
- Chicken Pieces: 350°F (177°C)
- Fish Fillets: 350°F (177°C)
- Shrimp: 350°F (177°C)
- Onion Rings: 350°F (177°C)
- Doughnuts/Banana Fritters: 375°F (190°C)
Note: These are general guidelines. Adjust temperature and cooking time based on food quantity and desired doneness. The dual control panels allow for frying different foods simultaneously at their optimal temperatures.
Maintenance and Cleaning
Regular cleaning ensures the longevity and safe operation of your deep fryer.
- Cool Down: Always allow the oil and the fryer to cool completely before attempting any cleaning. This can take several hours.
- Drain Oil: Carefully drain the cooled oil from the tanks. Dispose of used oil responsibly.
- Remove Components: Detach the heating element assembly (electrical head) from the main unit. Remove the oil tanks, frying baskets, and oil residue plates.
- Clean Tanks and Baskets: The heavy-duty stainless steel oil tanks, frying baskets, and oil residue plates are washable. Clean them with warm, soapy water and a non-abrasive sponge. Rinse thoroughly and dry completely.
- Clean Main Unit: Wipe the exterior of the main fryer unit with a damp cloth. Do not use abrasive cleaners or immerse the main unit or electrical head in water.
- Reassemble: Once all parts are clean and dry, reassemble the fryer. Ensure the heating elements are correctly positioned before reinserting the oil tanks.
Important: Never clean the electrical head (control panel and heating elements) with water. Wipe it with a dry or slightly damp cloth only after ensuring it is unplugged and cool.
Troubleshooting
If you encounter issues with your deep fryer, refer to the following common problems and solutions:
| Problem | Possible Cause | Solution |
|---|---|---|
| Fryer does not turn on. |
|
|
| Oil not heating up. |
|
|
| Excessive oil splashing. |
|
|
| Food is soggy. |
|
|
If the problem persists after trying these solutions, please contact customer support.
Specifications
| Feature | Detail |
|---|---|
| Model Number | GO-19233-EPCY |
| Power | 5000W (2 x 1.7kW heating elements) |
| Voltage | 110V/60Hz |
| Oil Tank Capacity | 2 x 5.8QT (max.) |
| Temperature Range | 140°F - 375°F (60°C - 190°C) |
| Material | Stainless Steel |
| Product Dimensions | 42.5 x 59.5 x 29.5 inches (Overall) |
| Item Weight | 18 pounds |
| Included Components | 1 x Electric Deep Fryer, 1 x Instruction, 2 x Anti-splash Lids, 2 x Frying Basket, 2 x Oil Tank |
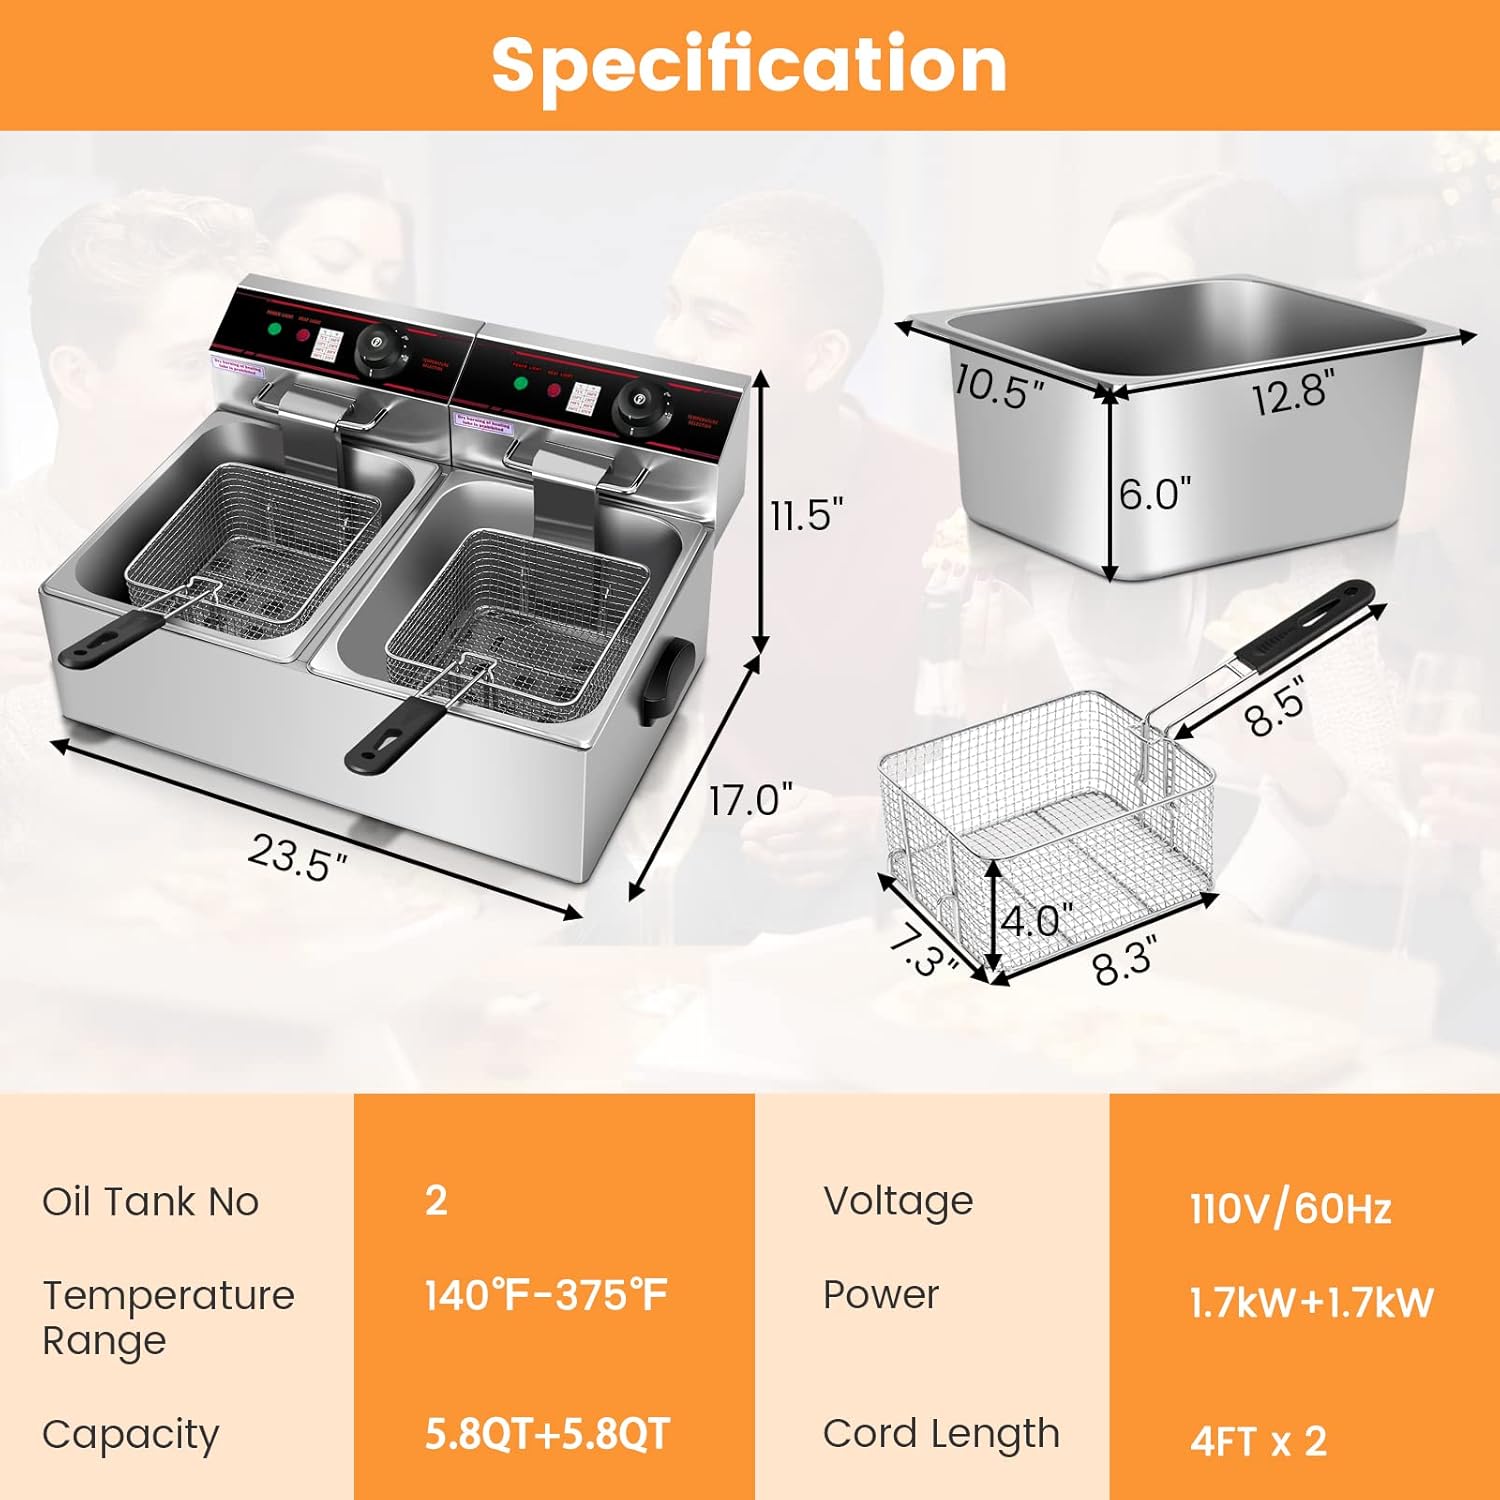
Image: A visual representation of the deep fryer's dimensions and the individual measurements of the oil tanks and frying baskets.


