STAHLWERK AC/DC WIG 200 Puls Pro
STAHLWERK AC/DC WIG 200 Puls Pro Digital Welding Machine Instruction Manual
Model: AC/DC WIG 200 Puls Pro
1. Introduction
This instruction manual provides essential information for the safe and efficient operation, setup, and maintenance of your STAHLWERK AC/DC WIG 200 Puls Pro Digital Welding Machine. Please read this manual thoroughly before operating the device to ensure proper use and to prevent injury or damage.
2. Safety Instructions
WARNING: Welding can be dangerous. Always follow safety precautions to prevent serious injury or death.
- Always wear appropriate personal protective equipment (PPE), including a welding helmet with proper shade, flame-resistant clothing, welding gloves, and safety shoes.
- Ensure adequate ventilation to avoid inhaling welding fumes, which can be hazardous to your health.
- Protect bystanders from arc rays and hot metal. Use welding screens or barriers.
- Never touch live electrical parts. Ensure the machine is properly grounded.
- Keep a fire extinguisher nearby. Welding sparks can cause fires.
- Disconnect power before performing any maintenance or service.
- Do not operate the machine in damp or wet conditions.
3. Product Overview
The STAHLWERK AC/DC WIG 200 Puls Pro is a versatile digital welding machine designed for precise welding of various metals. It features advanced IGBT technology, a robust housing, and multiple welding functions.

Figure 3.1: STAHLWERK AC/DC WIG 200 Puls Pro welding machine with complete accessory set, including TIG torch, welding helmet, ground clamp, electrode holder, gas pressure regulator, various welding consumables, and a foot pedal.
Key Features:
- AC/DC WIG Function: For precise welding of nearly all metals, including steel, stainless steel, aluminum, and copper-silicon alloys.
- Pulse Function: Dosed heat input facilitates the welding of thin sheets, minimizing distortion.
- Spot Function: Enables tacking and spot welding with minimal material distortion.
- ARC/MMA Function: Integrated function for electrode welding without shielding gas.
- Job Memory: Digital memory for saving individual welding settings and presets.
- IGBT Technology: Advanced Insulated Gate Bipolar Transistor technology for increased efficiency and reduced power consumption.
- ST-Guard Housing: Extremely robust housing provides reliable protection against external influences.
- Smart Cooling & Overheat Protection: Efficient high-performance cooling ensures maximum duty cycle.
- Dust and Splash-Proof: Designed for first-class welding results even under adverse conditions.
- Compact Design: Reduced weight ensures effortless transport.
- Hotstart Automatic: Automatic voltage increase for excellent ignition results in MMA mode.
- Stable Arc: Constant power output ensures uniform weld seams in MMA mode.
- Anti-Stick Function: Prevents the electrode from sticking during MMA welding.

Figure 3.2: Illustration of key features including AC/DC TIG, Pulse, Spot, remote control, job memory, and aluminum suitability.

Figure 3.3: Details on the robust ST-Guard housing, smart cooling, dust/splash protection, and compact design.

Figure 3.4: Explanation of ARC/MMA welding features including Hotstart, stable arc, and Anti-Stick function.

Figure 3.5: Graphic highlighting the integrated IGBT technology for increased efficiency and reduced power consumption.
4. Setup
4.1 Unpacking and Inspection
- Carefully remove the welding machine and all accessories from the packaging.
- Inspect all components for any signs of damage during transit. Contact your dealer immediately if any damage is found.
- Ensure all listed accessories are present.
4.2 Electrical Connection
- Connect the machine to a suitable power supply as specified in the technical specifications. Ensure the power outlet is properly grounded.
- Use an appropriate circuit breaker for the machine's current draw.
4.3 Gas Connection (for WIG welding)
- Connect the gas hose from the welding machine to your shielding gas cylinder (e.g., Argon).
- Attach the gas pressure regulator to the cylinder and set the appropriate gas flow rate (typically 6-12 liters/minute for WIG).
- Ensure all gas connections are tight to prevent leaks.
4.4 Torch and Ground Clamp Connection
- Connect the TIG torch to the designated connector on the front panel.
- Connect the ground clamp cable to the appropriate terminal and securely attach the clamp to the workpiece or welding table, ensuring good electrical contact.
- For MMA welding, connect the electrode holder to the positive (+) terminal and the ground clamp to the negative (-) terminal for most electrodes, or vice-versa depending on electrode type.

Figure 4.1: Easily accessible connection ports on the rear of the welding machine for convenient setup.
5. Operating Instructions
The STAHLWERK AC/DC WIG 200 Puls Pro features a clear and intuitive digital control panel for setting welding parameters.
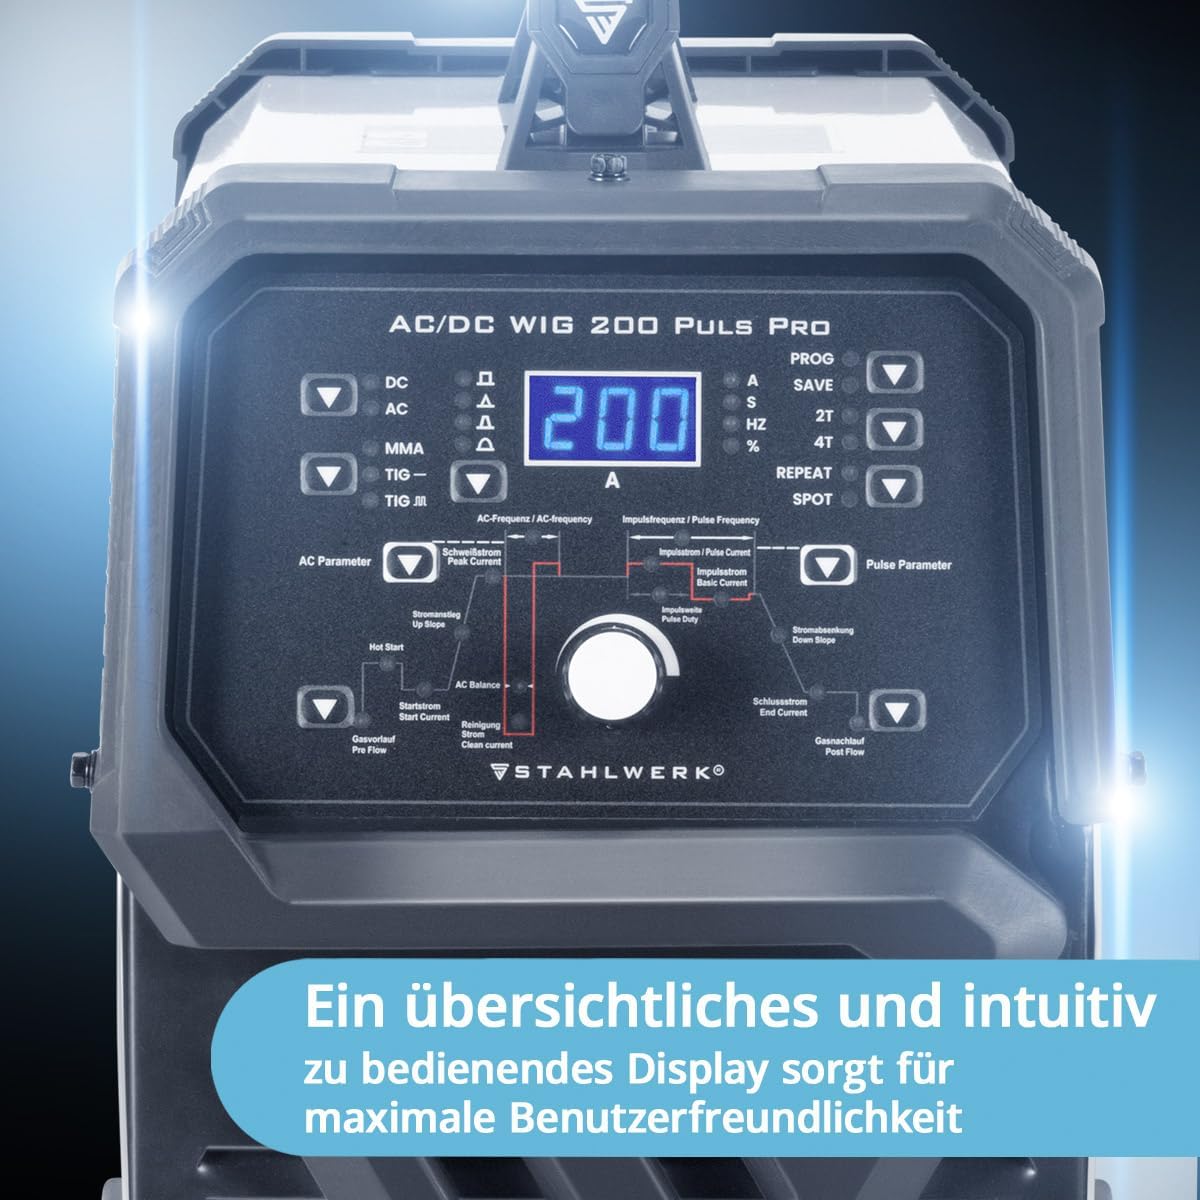
Figure 5.1: Digital control panel with various settings for AC and Pulse parameters, mode selection, and job memory functions.
5.1 Control Panel Overview
The control panel allows you to select welding modes and adjust parameters:
- Mode Selection: Buttons for DC, AC, MMA, TIG, TIG-R (TIG with remote).
- Digital Display: Shows current welding amperage and other selected parameters.
- Parameter Adjustment Knobs: Used to fine-tune settings such as AC frequency, AC balance, pulse current, pulse frequency, hot start, and crater fill.
- Job Memory (PROG/SAVE): Allows saving and recalling up to 10 custom welding programs.
- 2T/4T Function: Select between 2-stroke and 4-stroke torch operation.
- SPOT Function: Activates the spot welding mode.
5.2 WIG Welding (TIG)
WIG welding offers high precision and clean welds. The machine supports both DC WIG (for steel, stainless steel, copper) and AC WIG (for aluminum and its alloys).
- DC WIG: Select 'DC' mode. Adjust welding current, gas pre-flow, and post-flow.
- AC WIG: Select 'AC' mode. Adjust welding current, AC frequency, AC balance (for cleaning action), gas pre-flow, and post-flow.
- Pulse WIG: Activate 'PULS' function. Adjust pulse current, base current, pulse frequency, and pulse width for controlled heat input, especially on thin materials.
- Spot WIG: Activate 'SPOT' function for precise tack welding.

Figure 5.2: High-frequency pulsing provides better penetration and increased control during welding.
5.3 ARC/MMA Welding
For electrode welding, select the 'MMA' mode. The machine's Hotstart, Stable Arc, and Anti-Stick functions assist in achieving optimal results.
- Connect the electrode holder and ground clamp as described in Section 4.4.
- Select 'MMA' mode.
- Adjust the welding current according to the electrode type and material thickness.
- The Hotstart function automatically increases voltage for easier arc ignition.
- The Anti-Stick function prevents the electrode from sticking to the workpiece.

Figure 5.3: A welder demonstrating MMA (Manual Metal Arc) welding.
6. Maintenance
Regular maintenance ensures the longevity and optimal performance of your welding machine.
- Cleaning: Regularly clean the machine's exterior with a dry, soft cloth. Use compressed air to blow out dust from the cooling vents. Ensure the machine is disconnected from power before cleaning.
- Check Connections: Periodically inspect all electrical and gas connections for tightness and signs of wear or damage. Replace any damaged cables or hoses immediately.
- Torch Maintenance: Clean the TIG torch regularly. Replace worn-out consumables such as ceramic nozzles, collets, and tungsten electrodes.
- Ground Clamp: Ensure the ground clamp is clean and makes good electrical contact with the workpiece.
- Storage: Store the welding machine in a dry, dust-free environment when not in use.

Figure 6.1: View of the cooling fan, emphasizing the importance of keeping vents clear for proper machine function.
7. Troubleshooting
This section addresses common issues you might encounter. For problems not listed here, please contact STAHLWERK customer support.
| Problem | Possible Cause | Solution |
|---|---|---|
| No power to the machine | Power cable disconnected, circuit breaker tripped, faulty power outlet. | Check power cable connection, reset circuit breaker, test power outlet. |
| No arc ignition (WIG) | Tungsten electrode not sharp, gas flow incorrect, poor ground connection, wrong parameters. | Sharpen tungsten, check gas flow and connections, ensure good ground, verify welding parameters. |
| No arc ignition (MMA) | Electrode damp, poor ground connection, incorrect current setting. | Use dry electrodes, ensure good ground, adjust current. |
| Poor weld quality | Incorrect parameters, contaminated workpiece, improper technique, insufficient gas shielding. | Adjust parameters, clean workpiece, refine welding technique, check gas flow and torch setup. |
| Overheat warning light | Exceeded duty cycle, blocked cooling vents, high ambient temperature. | Allow machine to cool down, clear cooling vents, operate in a cooler environment. |
8. Technical Specifications
| Specification | Value |
|---|---|
| Brand | STAHLWERK |
| Model Number | 1035 |
| Product Dimensions (L x W x H) | 50 x 35 x 50 cm |
| Weight | 17.5 Kilograms |
| ASIN | B0C27Q799S |
| Welding Current (WIG) | Up to 200 A |
| Welding Current (MMA) | Up to 200 A |
| Mains Voltage | 230 V AC |
| Technology | IGBT |

Figure 8.1: Physical dimensions of the welding machine: 450 mm (length), 245 mm (width), and 430 mm (height).
9. Warranty and Support
Your STAHLWERK AC/DC WIG 200 Puls Pro Digital Welding Machine comes with a 7-year manufacturer's warranty. This warranty covers extensive services and support.
For technical assistance, spare parts, or warranty claims, please contact STAHLWERK customer support directly. Ensure you have your model number (1035) and ASIN (B0C27Q799S) available when contacting support.

Figure 9.1: Comparison highlighting STAHLWERK's 7-year warranty, comprehensive service, in-house workshop, and own production.