PHILIPS Azur 7000
Philips Azur 7000 Series Steam Iron (Model DST7061/30) User Manual
Your guide to efficient and safe ironing.
Introduction
Thank you for choosing the Philips Azur 7000 Series Steam Iron. This manual provides essential information for the safe and effective use, maintenance, and troubleshooting of your iron. Please read it thoroughly before first use and keep it for future reference.

Figure 1: Philips Azur 7000 Series Steam Iron (Model DST7061/30). This image displays the iron's sleek design and dark violet finish from a front-side perspective, highlighting its handle and soleplate.
1. Setup
1.1 Unpacking
- Carefully remove the iron and all accessories from the packaging.
- Remove any stickers or protective film from the soleplate.
- Retain the packaging for storage or in case of return.
1.2 Filling the Water Tank
- Ensure the iron is unplugged from the power outlet.
- Set the steam control to the 'dry ironing' position (no steam).
- Open the water filling inlet cover, usually located at the front of the handle.
- Fill the water tank with tap water up to the 'MAX' indicator. For areas with hard water, consider using a mixture of 50% tap water and 50% distilled water to prolong the iron's life. Do not use perfumed water, water from tumble dryers, or chemically descaled water.
- Close the water filling inlet cover securely.

Figure 2: Top view of the iron, illustrating the water tank and control layout. This perspective helps identify the water filling inlet and steam control dial.
2. Operating Instructions
2.1 First Use
- When using the iron for the first time, it may produce a slight odor or some flakes. This is normal and will disappear after a short time.
- To ensure the soleplate is clean, iron an old piece of fabric for a few minutes.
2.2 Ironing with Steam
- Plug the iron into a grounded wall socket.
- The temperature indicator light will illuminate, indicating the iron is heating up.
- Once the light goes out, the iron has reached the selected temperature.
- Adjust the steam control to the desired steam level. For optimal results, use higher steam settings for cotton and linen, and lower settings for synthetics.
- Begin ironing. The iron's advanced technology automatically adjusts steam output for various fabrics, providing optimal results without manual temperature settings for most garments.

Figure 3: Iron in active use, demonstrating steam output. This image shows the iron gliding over fabric, with visible steam, illustrating its primary function.
2.3 Steam Boost Function
- For stubborn creases, press the steam boost button (usually located under the handle). This provides an extra burst of steam.
- Wait a few seconds between bursts to allow the iron to reheat and produce maximum steam.
2.4 Vertical Steaming
- The iron can be used for vertical steaming to remove creases from hanging garments, curtains, or delicate fabrics.
- Hold the iron vertically a few centimeters away from the fabric and press the steam boost button.
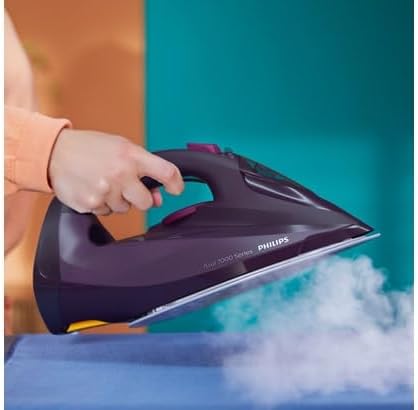
Figure 4: Soleplate detail with steam. This close-up highlights the design of the soleplate and the distribution of steam through its vents, crucial for effective ironing.
2.5 Dry Ironing
- To iron without steam, ensure the water tank is empty or set the steam control to the 'dry ironing' position.
- Select the appropriate temperature for your fabric.
2.6 Safety Precautions
- Always place the iron on its heel or on the iron rest with the soleplate facing upwards when not in use.
- Never leave a hot iron unattended.
- Keep the iron out of reach of children.
- Do not touch the hot soleplate.
- Unplug the iron after each use and before cleaning.
3. Maintenance
3.1 Cleaning the Soleplate
- Allow the iron to cool down completely.
- Wipe the soleplate with a damp cloth and a non-abrasive cleaner if necessary.
- Do not use abrasive scouring pads or harsh chemicals, as these can damage the soleplate.
3.2 Calc-Clean Function (Self-Clean)
- Regularly use the Calc-Clean function to remove scale buildup and maintain optimal steam performance. Refer to the specific instructions for your model, usually found near the steam control.
- Typically, this involves filling the water tank, heating the iron, unplugging it, and then holding it over a sink while activating the Calc-Clean button to flush out scale and impurities with hot steam and water.
3.3 Storage
- After use, unplug the iron and allow it to cool down completely.
- Empty any remaining water from the tank.
- Store the iron vertically on its heel in a safe, dry place.

Figure 5: Iron stored vertically. This image demonstrates the correct and safe way to store the iron when not in use, preventing soleplate damage and ensuring stability.
4. Troubleshooting
| Problem | Possible Cause | Solution |
|---|---|---|
| Iron does not heat up. | Not plugged in; power outlet fault; iron malfunction. | Check power connection; try another outlet; contact customer support if problem persists. |
| No steam or insufficient steam. | Water tank empty; steam control set to 'dry'; iron not hot enough; scale buildup. | Fill water tank; adjust steam control; wait for indicator light to go out; perform Calc-Clean. |
| Water leaks from soleplate. | Temperature too low for steam; water tank overfilled; Calc-Clean valve not closed properly. | Ensure iron is hot enough for steam; do not overfill; ensure Calc-Clean valve is closed. |
| Brown stains on fabric. | Scale buildup; impurities in water; soleplate dirty. | Perform Calc-Clean; use appropriate water (tap/distilled mix); clean soleplate. |
5. Specifications
- Model: Philips Azur 7000 Series (DST7061/30)
- Power: 3000 Watts
- Soleplate Material: Stainless Steel
- Weight: 1.56 Kilograms
- Color: Dark Violet
- Special Features: High Voltage Heating, Optimal Steam Distribution
- Recommended Use: Garment Ironing
6. Warranty and Support
This Philips product comes with a standard manufacturer's warranty. For detailed warranty terms and conditions, please refer to the warranty card included in your product packaging or visit the official Philips website. For technical support, spare parts, or service, please contact Philips Customer Support in your region. You can find contact information on the Philips website or in the documentation provided with your product.
Online Support: www.philips.com/support
Ask a question about this manual
Ask about setup, troubleshooting, compatibility, parts, safety, or missing instructions. Manuals+ will review the question and use this page’s manual context to help answer it.