1. Introduction
This instruction manual provides detailed guidance for using your Super PDR Paintless Dent Repair Kit. This kit is designed for effective removal of dents, door dings, and hail damage from vehicle bodies without damaging the original paint finish. Please read this manual thoroughly before use to ensure proper operation and safety.
2. Safety Information
- Always wear appropriate personal protective equipment, such as gloves and eye protection, during operation.
- Ensure the work area is well-ventilated.
- Handle the hot glue gun and heat gun with care to prevent burns. Keep away from flammable materials.
- Do not use this kit on vehicles that have undergone sheet metal painting, as it may cause damage.
- Use high-concentration alcohol for glue removal in a well-ventilated area. Avoid contact with skin and eyes.
- Keep tools out of reach of children.
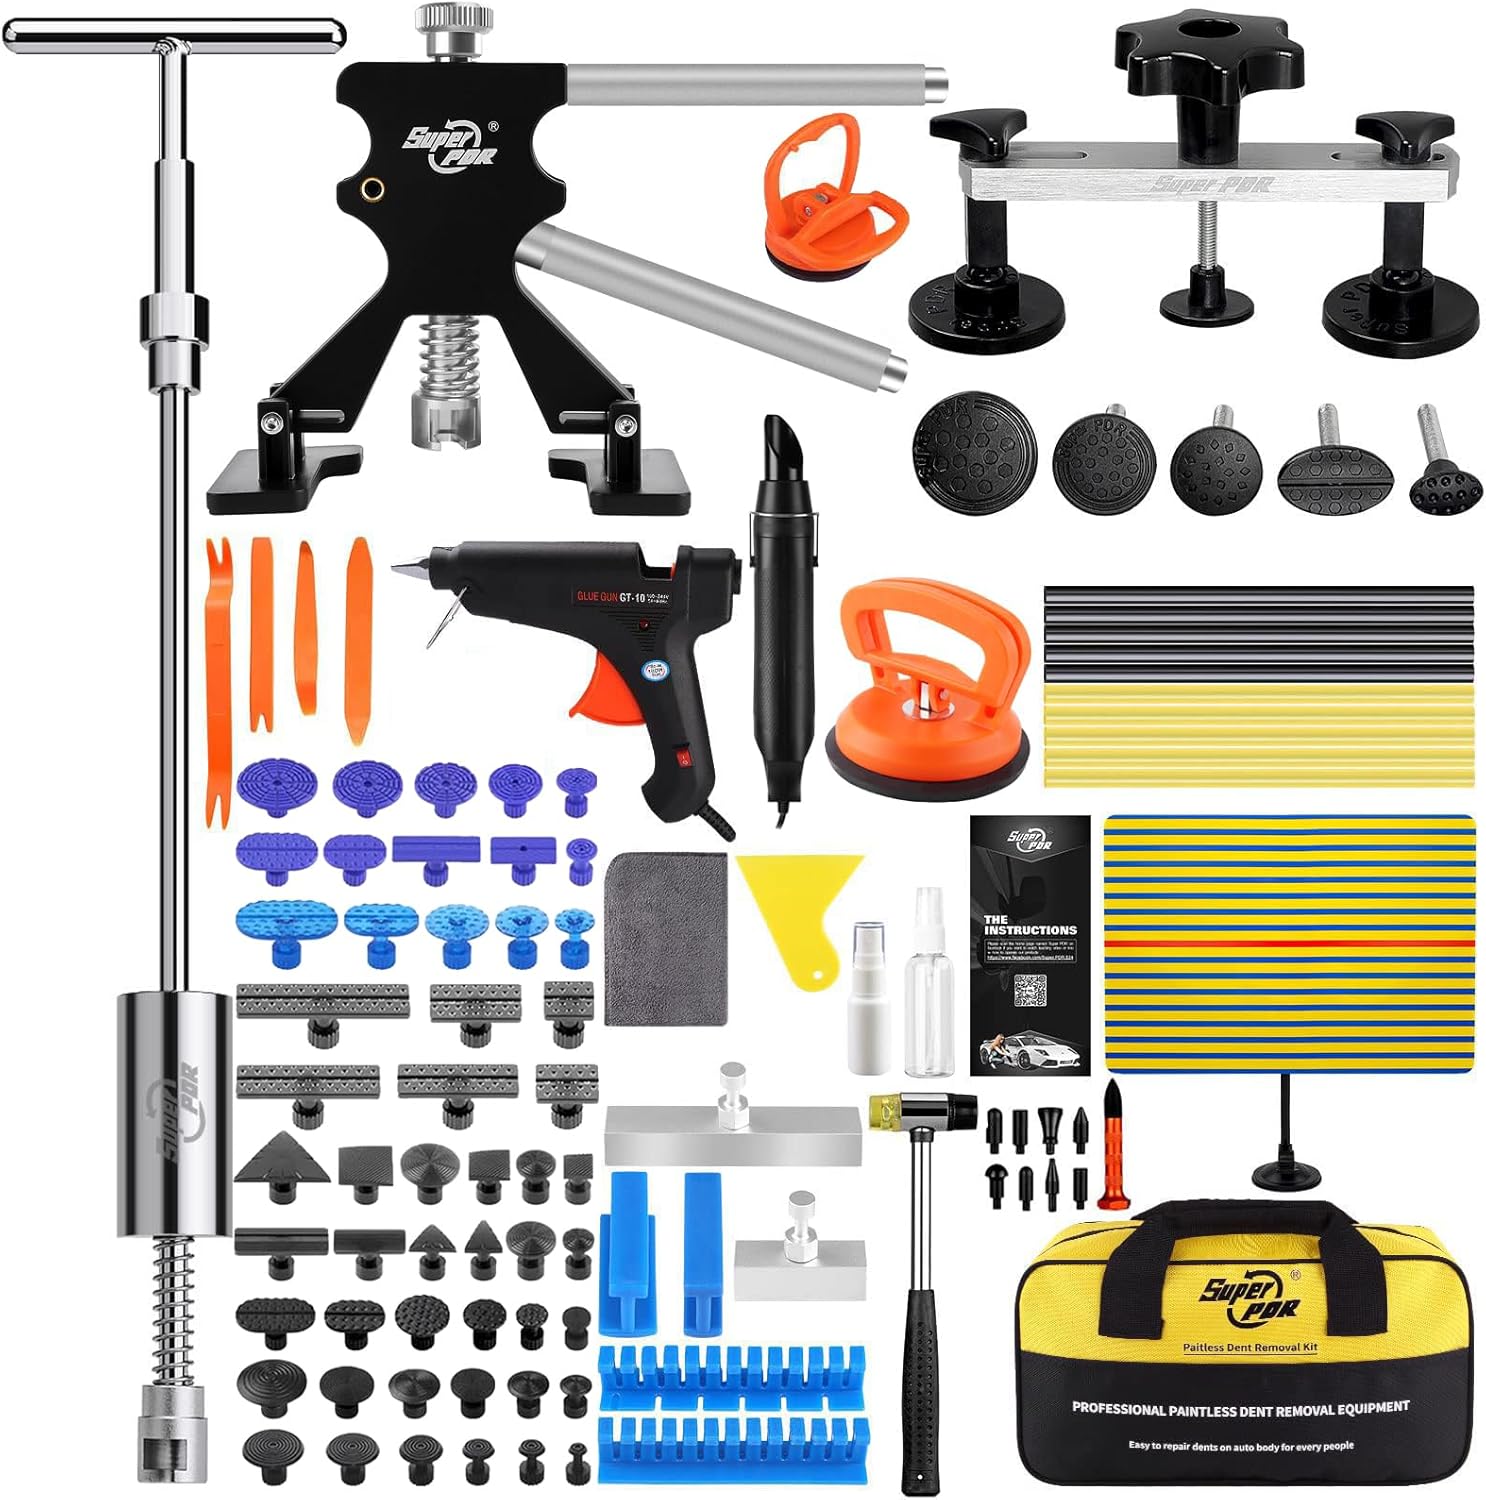
3. What's in the Box
Your Super PDR Paintless Dent Repair Kit includes the following components:
- Bridge Dent Puller
- Slide Hammer T-Bar
- Adjustable Dent Lifter
- 100W Hot Melt Glue Gun
- Heat Gun (for preheating and glue removal)
- Yellow PDR Line Board
- Various Puller Tabs (55 pieces, different shapes and sizes)
- Glue Sticks (yellow and black for different temperatures)
- Knockdown Pens/Tools
- Plastic Scrapers/Spatulas
- Spray Bottle (for alcohol, alcohol not included)
- Cleaning Cloth
- Gloves
- Storage Bag
4. Setup
4.1 Surface Preparation
Before starting any dent repair, ensure the vehicle's surface around the dent is clean and dry. Use a cleaning cloth and a suitable cleaning agent (alcohol not included) to remove any dirt, wax, or grease. A clean surface is crucial for proper glue adhesion.
4.2 Identifying the Dent
Use the PDR Line Board to accurately locate and assess the dent. The lines on the board will distort over the dent, making it easier to identify the exact boundaries and depth. Mark the dent's perimeter with a marker if necessary.

4.3 Glue Gun Preparation
Insert a glue stick into the 100W hot melt glue gun. Plug in the glue gun and allow it to heat up for 3-5 minutes until the glue is fully melted and flows smoothly. For optimal performance, especially in cold weather, ensure the glue gun is adequately warmed.

4.4 Preheating the Dent Area (Optional, Recommended in Cold Weather)
In cold weather, use the provided heat gun to gently warm the dented area of the car. This improves glue adhesion and prevents paint cracking during the pulling process. Maintain a safe distance and keep the surface temperature between 122°F–158°F (50°C–70°C) to avoid paint damage.

4.5 Video: Paintless Dent Removal Tools Operating Instructions
Video 1: A comprehensive guide to the operating instructions for paintless dent removal tools.
5. Operating Instructions
5.1 General Dent Repair Process
- Apply Glue to Tab: Select a puller tab slightly smaller than the dent. Apply a generous amount of hot glue to the center of the tab.
- Attach Tab to Dent: Quickly and firmly press the glue-covered tab onto the center of the dent. Hold it in place for a few seconds until the glue sets.
- Allow Glue to Cool: Let the glue cool for 5-8 minutes. The cooling time may vary based on ambient temperature and glue type. The glue should be firm but still slightly flexible.
- Attach Puller Tool: Connect the appropriate dent puller tool (Dent Lifter, Bridge Puller, or Slide Hammer T-Bar) to the puller tab.
- Pull the Dent: Operate the puller tool according to its specific instructions (detailed below) to gently and gradually pull the dent outwards. Avoid excessive force.
- Remove Glue: Once the dent is reduced, spray high-concentration alcohol around the base of the tab. Wait 2-3 minutes for the alcohol to dissolve the glue, then gently pry off the tab with a plastic spatula.
- Clean Residual Glue: Use a plastic scraper and alcohol to remove any remaining glue residue from the car's surface.
- Check and Repeat: Inspect the repaired area. If the dent is not fully removed, repeat the process with a different size tab or tool as needed.
5.2 Using the Adjustable Dent Lifter
The adjustable dent lifter is ideal for small to medium-sized dents. Attach the puller tab to the dent, then position the dent lifter over the tab. Adjust the height of the lifter and slowly turn the knob to lift the dent. Press the handle halfway and loosen it repeatedly until the dent disappears.

5.3 Using the Bridge Puller
The bridge puller is suitable for shallow dents. After attaching the puller tab, place the bridge puller over it, ensuring its feet are firmly on the car's surface. Turn the knob to apply upward pressure, gradually pulling the dent out. The unique arched bridge design adjusts space and features a swivel button for better fit on dents.

5.4 Using the Slide Hammer T-Bar
For larger or deeper dents, the 2-in-1 Slide Hammer T-Bar provides powerful pulling action. Attach the puller tab to the dent. Connect the slide hammer to the tab. Pull the slide hammer back with different strengths until the dent is removed. This tool is versatile for both small and large dents.

5.5 Knockdown Tips Tools
After pulling, if there are any high spots or raised areas around the repaired dent, use the knockdown pens/tools to gently tap them down until the surface is smooth and even with the surrounding area.

5.6 Video: Golden Dent Puller Dent Removal Tools Operation
Video 2: Demonstrates the operation of the Golden Dent Puller and other dent removal tools.
5.7 Video: Super PDR Car Dent Repair Kit in Action
Video 3: Shows the Super PDR Car Dent Repair Kit being used for various dent repairs.
6. Maintenance
- After each use, clean all tools thoroughly, especially glue residue from puller tabs and tools, using alcohol and a plastic scraper.
- Store all components in the provided storage bag in a cool, dry place to prevent damage and loss.
- Regularly inspect tools for wear and tear. Replace damaged components as needed.
7. Troubleshooting
7.1 Glue Not Adhering Properly
- Cold Adhesion: Due to cold weather, hot melt glue may be prone to cold adhesion, resulting in poor bonding. It is recommended to use a heat gun to warm the dent area of the car before applying the glue.
- Surface Contamination: Ensure the surface to be bonded is free of moisture, dust, or other contaminants. Clean the area thoroughly with alcohol before applying glue.
- Insufficient Heating: Ensure the glue gun is fully heated and the glue stick is completely melted before application.
- Incorrect Glue Type: Use yellow glue for room temperature environments and black glue in colder weather. Both types are compatible with the included glue gun.
7.2 Dent Not Fully Removed
- Repeat Process: For stubborn or complex dents, it may be necessary to repeat the pulling process multiple times.
- Try Different Tabs: Experiment with different sizes and shapes of puller tabs to find the most effective one for the specific dent.
- Adjust Tool Pressure: Apply gradual and controlled pressure with the dent puller. For high spots, use knockdown tools.
7.3 Difficulty Removing Residual Glue
- Use Alcohol: Spray high-concentration alcohol on the residual glue and wait for 2-3 minutes. The alcohol helps to dissolve the glue, making it easier to remove.
- Use Heat Gun: The heat gun can also be used to soften glue for easier removal.
- Scrape Gently: Use a plastic spatula or scraper to gently remove the softened glue. Avoid using metal tools that could scratch the paint.

8. Specifications
| Feature | Specification |
|---|---|
| Manufacturer | Super PDR |
| Brand | Super PDR |
| Model Number | DRK-0205 |
| Item Weight | 8.53 pounds |
| Package Dimensions | 13.15 x 10.43 x 5.71 inches |
| Glue Gun Power | 100W |
| Dent Lifter Adjustment Range | 1.2" to 5.3" |
9. Warranty & Support
For any questions, concerns, or support needs regarding your Super PDR Paintless Dent Repair Kit, please contact our customer service. We offer 24-hour online customer service to assist you with product inquiries, troubleshooting, and general support.
Please refer to your purchase documentation for specific warranty details. Keep your proof of purchase for any warranty claims.