Knutat B0C1WVD9HD
Knutat 24V Cordless String Trimmer User Manual
Model: B0C1WVD9HD
Introduction
Welcome to your new Knutat 24V Cordless String Trimmer. This manual provides essential information for safe operation, assembly, maintenance, and troubleshooting. Please read it thoroughly before first use to ensure optimal performance and safety.

This image displays the complete Knutat 24V Cordless String Trimmer kit, including the main unit, two batteries, a charger, and various blade types (metal, plastic, and saw blades).
Important Safety Instructions
Always follow basic safety precautions when using electrical appliances to reduce the risk of fire, electric shock, and personal injury.
- Wear Eye Protection: Always wear safety glasses or goggles when operating the trimmer.
- Keep Clear: Ensure bystanders, children, and pets are at a safe distance from the operating area.
- Remove Battery: Always remove the battery pack before cleaning, performing maintenance, or when the tool is not in use.
- Inspect Before Use: Check for damaged parts, loose screws, or any other condition that may affect operation.
- Proper Grip: Maintain a firm grip on the trimmer with both hands during operation.
- Avoid Obstacles: Be aware of hidden obstacles such as rocks, roots, or metal objects that could damage the blade or cause kickback.
- Use Correct Blades: Only use blades recommended for the specific task and material.

This image serves as a visual reminder to ensure the switch is turned off and the battery is removed before installing any blades to prevent injury.
Package Contents
Verify that all items are present and in good condition upon unpacking:
- Knutat 24V Cordless String Trimmer Unit
- 2 x 24V Lithium-Ion Batteries
- 1 x Battery Charger
- 3 x Saw Blades
- 4 x Plastic Blades
- 2 x Metal Blades
- Auxiliary Handle
- Safety Guard
- Wrench
- Pair of Gloves

This image highlights the comprehensive set of accessories included with the Knutat string trimmer, such as multiple blade types, safety glasses, and gloves, emphasizing its versatility.
Setup and Assembly
Follow these steps for initial assembly. Ensure the battery is removed before beginning any assembly or maintenance tasks to prevent accidental startup.
1. Attaching the Safety Guard
Align the baffle into the slot on the trimmer head and tighten the screws securely. This guard protects against debris during operation.
2. Installing Blades
The trimmer supports three types of blades: saw blades, plastic blades, and metal blades. Choose the appropriate blade for your task.
This image illustrates the six key steps for installing the saw blade, starting from preparing parts to tightening the screws, with a crucial safety reminder to turn off the switch and remove the battery.

This image shows the four different cutting attachments: straw rope, plastic blades, a saw blade, and metal blades, demonstrating their appearance and how they are used for various trimming tasks.
- Saw Blades: Ideal for cutting thicker brush and small branches. Securely fasten the saw blade using the provided hardware and wrench.
- Plastic Blades: Best for light grass trimming and edging. Snap the plastic blades into their designated slots.
- Metal Blades: Suitable for tougher weeds and denser grass. Attach the metal blades firmly to the trimmer head.
3. Attaching the Auxiliary Handle
Slide the auxiliary handle onto the main shaft and adjust its position for comfortable and balanced operation. Tighten the handle securely.
4. Charging the Battery
Insert the 24V Lithium-Ion battery into the charger. The indicator light on the charger will show the charging status. A full charge typically takes 40-60 minutes for the 4000mAh battery, providing 20-30 minutes of usage time. Ensure batteries are fully charged before first use for optimal performance.
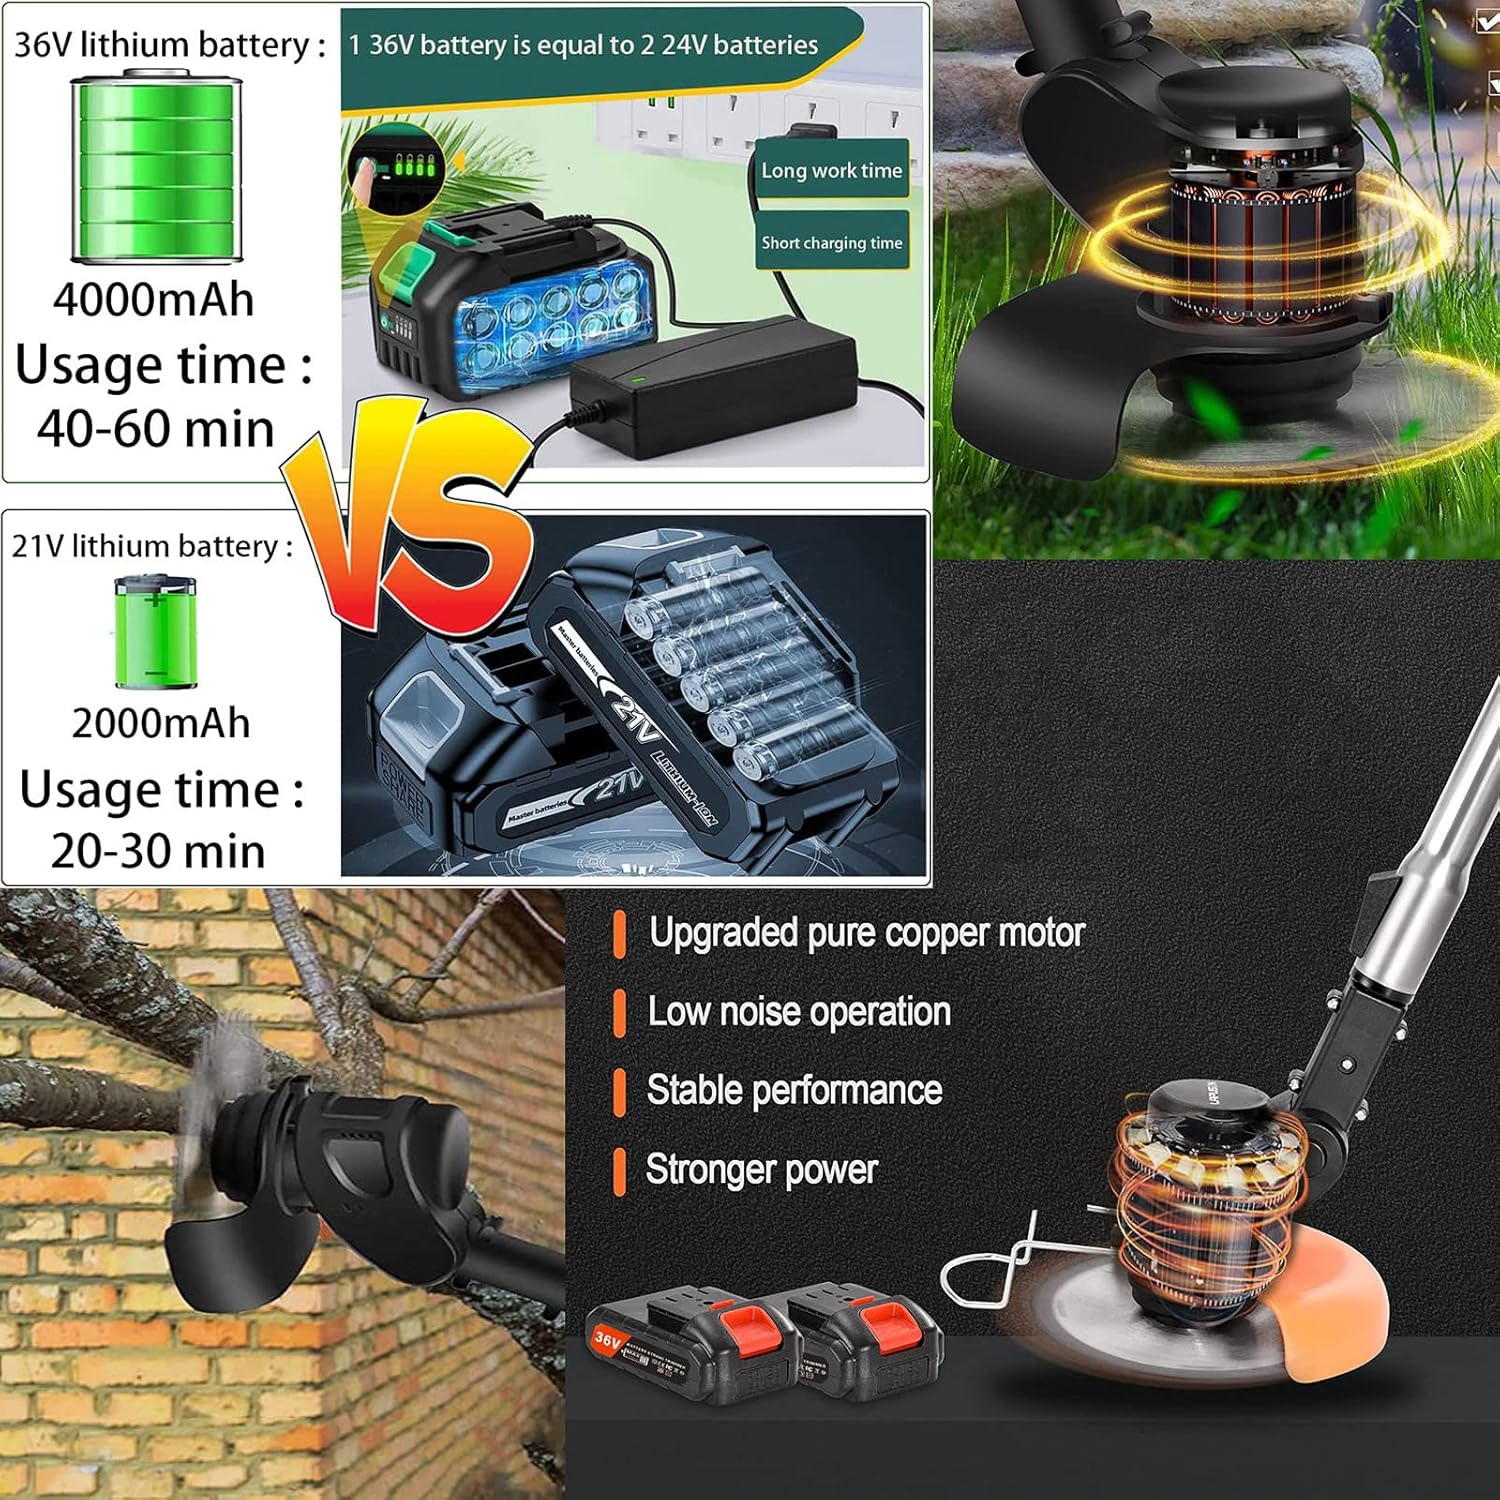
This image compares 36V and 21V lithium batteries, showing their usage times, and highlights the upgraded pure copper motor for low noise, stable performance, and stronger power.
Operating Instructions
Basic Operation
Once assembled and the battery is charged, insert the battery into the trimmer. To start, press the Safety Switch and then the ON/OFF Switch. Release the ON/OFF Switch to stop the trimmer.

This diagram labels the main components of the string trimmer, including the Safety Switch, ON/OFF Switch, Lithium Battery, Auxiliary Handle, Length Adjustment Button, Head Adjustment Button, Grass Baffle, and Anti-collision Steel Wire, along with its telescopic length adjustment.
Adjusting Length and Angle
- Length Adjustment: Press the Length Adjustment Button and extend or retract the shaft to your desired working length. The trimmer can extend from 35.4 inches to 47.2 inches.
- Head Angle Adjustment: Use the Head Adjustment Button to change the angle of the trimmer head. This allows for versatile trimming, including edging and reaching difficult areas, with a 90-degree adjustable angle.

This image showcases the comfortable and convenient grip, the safety switch for accidental touch prevention, the freely adjustable pole length, and the 90-degree adjustable head angle for versatile use.
Using Different Blades
- Plastic Blades: Ideal for light grass and soft weeds.
- Metal Blades: Use for tougher grass and thicker weeds.
- Saw Blades: Designed for cutting small branches and dense brush.
Maintenance
Regular maintenance ensures the longevity and efficiency of your trimmer.
- Cleaning Blades and Guard: After each use, remove the battery and clean any grass, dirt, or debris from the blades and safety guard. Use a damp cloth.
- Addressing Grass Buildup: If grass or debris gets stuck around the blade mechanism and stops the blade, you may need to disassemble the blade attachment (remove the retaining nut and blade) to thoroughly clean the area underneath. Reassemble carefully, ensuring all parts are secure.
- Battery Care: Store batteries in a cool, dry place away from direct sunlight. Do not store fully discharged batteries for extended periods. Charge them regularly, even if not in use, to maintain battery health.
- Check for Wear and Tear: Periodically inspect the trimmer for any signs of wear, damage, or loose components. Replace worn or damaged blades immediately.
Troubleshooting
Refer to the table below for common issues and their solutions.
| Problem | Possible Cause | Solution |
|---|---|---|
| Trimmer not starting | Battery not charged or incorrectly inserted | Ensure battery is fully charged and properly inserted until it clicks into place. |
| Blade not cutting effectively | Wrong blade type for material; dull or damaged blade; excessive grass buildup | Select appropriate blade for the task; replace dull/damaged blade; clean grass buildup from around the blade mechanism (see Maintenance). |
| Short battery life | Battery not fully charged; battery nearing end of life | Fully charge battery before use; consider replacing the battery if it no longer holds a charge. |
| Excessive vibration during operation | Loose or unbalanced blade; damaged shaft | Check that the blade is securely attached and not bent; inspect the shaft for damage. |
Specifications
| Feature | Detail |
|---|---|
| Brand | Knutat |
| Power Source | Battery Powered |
| Item Weight | 2.6 Pounds |
| Cutting Width | 4 Inches |
| Product Dimensions | 35"L x 7"W (Before Telescoping) / 47.2"L (After Telescoping) |
| Speed | 18000 RPM |
| Assembly Required | Yes |
| Number of Batteries | 2 Lithium Ion batteries (included) |
| Cordless | Yes |
| Recommended Uses | General gardening tasks, trimming grass, weeds, and overgrown plants, hard-to-reach areas, detailed trimming work |
Warranty and Support
For warranty information and customer support, please refer to the contact details provided with your purchase or visit the official Knutat website. For extended coverage and peace of mind, optional 2-Year and 3-Year Protection Plans are available for purchase.
no relevant documents
Ask a question about this manual
Ask about setup, troubleshooting, compatibility, parts, safety, or missing instructions. Manuals+ will review the question and use this page’s manual context to help answer it.