1. Introduction
This user manual provides essential information for the safe and efficient operation of your HYCHIKA 3.6V Cordless Electric Rechargeable Screwdriver Drill Set. Please read this manual thoroughly before first use and keep it for future reference.
The HYCHIKA 3.6V Cordless Electric Screwdriver is designed for various screwing and light drilling tasks around the home. It features a maximum torque of 6 N-m, a 6.35 mm quick-change chuck, and a versatile design that allows for both pistol and straight grip configurations.
2. Safety Instructions
Always observe basic safety precautions when using electrical tools to reduce the risk of fire, electric shock, and personal injury.
- Work Area Safety: Keep your work area clean and well-lit. Cluttered or dark areas invite accidents. Do not operate power tools in explosive atmospheres, such as in the presence of flammable liquids, gases, or dust.
- Electrical Safety: Avoid body contact with earthed or grounded surfaces such as pipes, radiators, ranges, and refrigerators. Do not expose power tools to rain or wet conditions.
- Personal Safety: Always wear eye protection. Use safety glasses, goggles, or a face shield. Wear hearing protection when operating noisy tools. Dress properly; avoid loose clothing or jewelry.
- Tool Use and Care: Do not force the power tool. Use the correct power tool for your application. Disconnect the plug from the power source and/or remove the battery pack before making any adjustments, changing accessories, or storing power tools.
- Battery Pack Use and Care: Recharge only with the charger specified by the manufacturer. Do not use battery packs with any other power tools. When battery pack is not in use, keep it away from other metal objects.
3. Package Contents
Verify that all items listed below are included in your package. If any items are missing or damaged, please contact customer support.
- 1 x HYCHIKA 3.6V Cordless Screwdriver
- 19 x Screwdriver Bits
- 1 x Extension Bar
- 1 x Charging Adapter
- 1 x User Manual

Figure 3.1: Contents of the HYCHIKA 3.6V Cordless Screwdriver package, including the screwdriver, various bits, and charging adapter.
4. Product Features and Components
Familiarize yourself with the different parts of your cordless screwdriver.

Figure 4.1: Key components of the screwdriver, including the magnetic chuck, PUSH button, front LED light, On/Off switch, LED charger indicator, 3.5mm charger port, and forward & reverse button.
- Magnetic Chuck: 1/4 inch (6.35mm) quick-change chuck for easy bit installation and removal.
- Front LED Light: Illuminates the work area for improved visibility in dark environments.
- On/Off Switch: Activates and deactivates the screwdriver.
- Forward & Reverse Button: Controls the rotation direction for screwing and unscrewing.
- LED Charger Indicator: Provides status of battery charging.
- 3.5mm Charger Port: Connection point for the charging adapter.
- PUSH Button: Used to adjust the grip configuration from pistol to straight.
5. Setup
5.1 Charging the Battery
The screwdriver is powered by a 3.6V 2000 mAh Lithium-Ion battery. Before first use, fully charge the battery.
- Connect the charging adapter to the 3.5mm charger port on the screwdriver.
- Plug the charging adapter into a standard electrical outlet.
- The LED charger indicator will illuminate during charging. Once fully charged, the indicator may change color or turn off depending on the model.
- Unplug the charger once charging is complete.

Figure 5.1: The screwdriver connected to its charging adapter, indicating a full charge.
The screwdriver is designed to maintain full power output even when the battery is low, ensuring consistent performance until the battery is depleted.
5.2 Installing Screwdriver Bits
The screwdriver features a 1/4 inch (6.35mm) magnetic quick-change chuck for easy bit installation.
- Select the appropriate screwdriver bit for your task.
- Insert the bit into the magnetic chuck until it is securely seated. The magnetic chuck will hold the bit firmly in place.
- To remove a bit, simply pull it out of the chuck. Bits with grooves are designed for easier removal.

Figure 5.2: Visual guide for inserting a bit into the magnetic chuck and removing it.
6. Operating Instructions
6.1 Adjusting Grip Configuration
The screwdriver can be used in two grip configurations: pistol grip or straight grip, for enhanced versatility and comfort.
- To change the grip, press and hold the "PUSH" button located at the top of the screwdriver.
- While holding the button, rotate the handle ninety degrees to switch between pistol and straight configurations.
- Release the "PUSH" button once the desired configuration is achieved. The handle will lock into place.
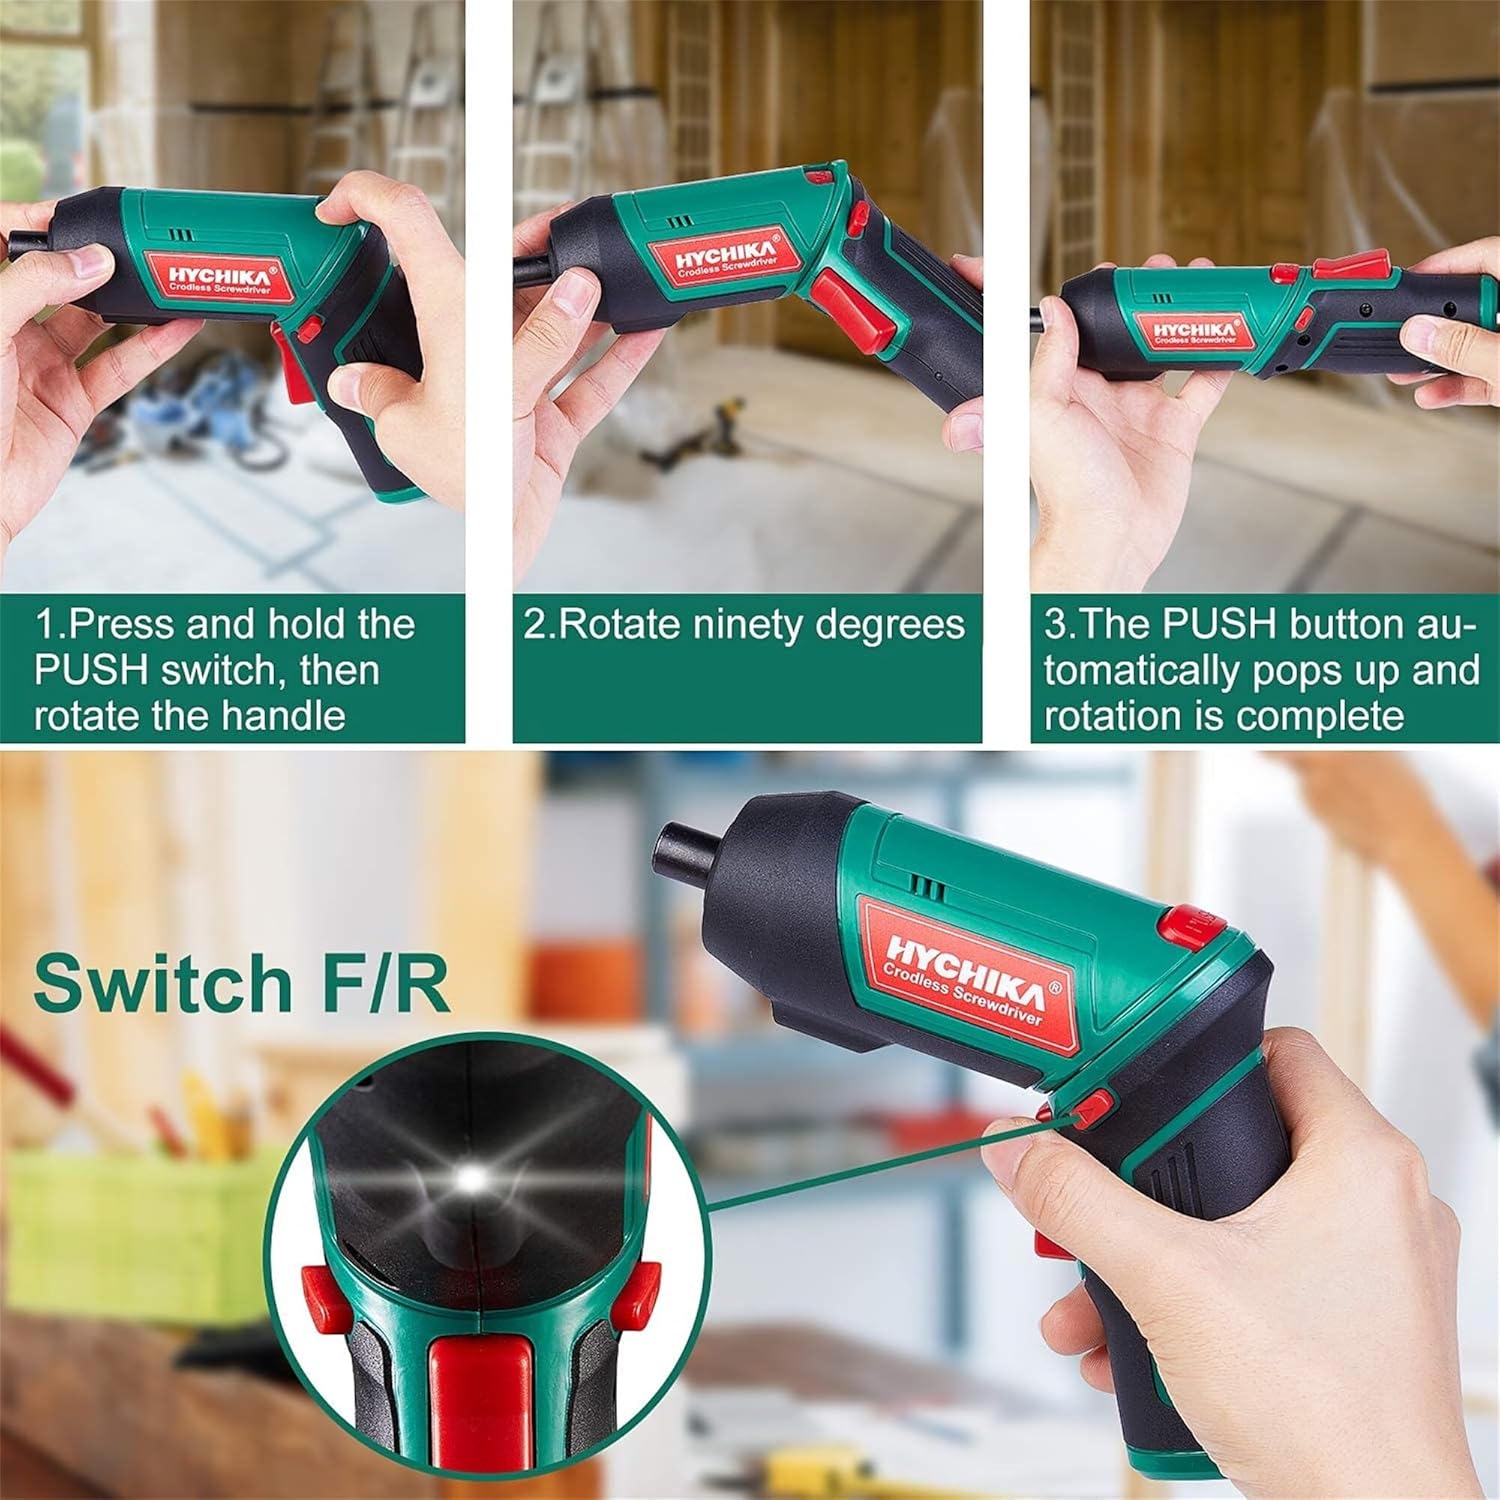
Figure 6.1: Demonstrates the process of transforming the screwdriver's grip by pressing the PUSH button and rotating the handle.
6.2 Forward and Reverse Operation
The forward/reverse button controls the direction of rotation for screwing and unscrewing.
- To drive screws (forward rotation), push the forward/reverse button to the left (when viewed from the rear of the tool).
- To remove screws (reverse rotation), push the forward/reverse button to the right.
- When the button is in the center position, the tool is locked, preventing accidental activation.
6.3 Using the LED Work Light
The built-in LED light automatically illuminates when the screwdriver is in operation, providing visibility in dimly lit areas.

Figure 6.2: The integrated LED light provides clear illumination for working in dark environments.
7. Maintenance
Regular maintenance ensures the longevity and optimal performance of your screwdriver.
- Cleaning: Keep the ventilation openings clean and free from dust. Use a soft, damp cloth to clean the tool casing. Do not use harsh chemicals or abrasive cleaners.
- Bit Care: Clean screwdriver bits after use. Store them in the provided case to prevent loss and damage.
- Battery Storage: If storing the tool for an extended period, ensure the battery is partially charged (around 50%) and store it in a cool, dry place. Recharge the battery every 3-6 months to maintain its health.
- General Inspection: Periodically check for any loose screws, damaged cords, or worn parts. Do not use the tool if any damage is observed.
8. Troubleshooting
This section addresses common issues you might encounter with your screwdriver.
| Problem | Possible Cause | Solution |
|---|---|---|
| Screwdriver does not turn on. | Battery is depleted. Forward/Reverse switch is in the center (locked) position. | Charge the battery fully. Push the forward/reverse switch to the left or right. |
| Screwdriver loses power quickly. | Battery not fully charged. Battery life degraded. | Ensure battery is fully charged before use. If battery life is significantly reduced, contact customer support for replacement options. |
| Bits are not held securely in the chuck. | Bit is not fully inserted. Chuck is dirty or damaged. | Push the bit firmly into the chuck until it clicks into place. Clean the chuck area. If damage is visible, contact customer support. |
If the problem persists after attempting these solutions, please contact customer support.
9. Specifications
| Feature | Specification |
|---|---|
| Brand | Overstock (HYCHIKA) |
| Model Number | c131a012-0da9-4306-aeab-b1d9ff5cd4b7 |
| Voltage | 3.6 Volts |
| Power Source | Battery Powered |
| Speed | 180 RPM |
| Item Torque | 6 Newton Meters (6 N-m) |
| Battery Type | Lithium Ion |
| Battery Capacity | 2000 mAh |
| Chuck Size | 1/4 inch (6.35mm) |
| Material | Plastic, Rubber |
| Color | Green |
| UPC | 616859793583 |
10. Warranty and Support
Overstock offers lifetime after-sales service for this product. For any questions, concerns, or technical assistance, please contact our customer support team.
Please have your model number (c131a012-0da9-4306-aeab-b1d9ff5cd4b7) and purchase information ready when contacting support.


