Introduction
The ZHDBD 5-in-1 Digital Heat Press Machine is a versatile tool designed for various heat transfer and sublimation applications. Its swing-away design ensures even heat distribution, which is crucial for optimal ink saturation on different substrates. This machine is suitable for customizing a wide range of items, including garments, mugs, hats, and plates.

Figure 1: The ZHDBD 5-in-1 Heat Press Machine with its various attachments.
Package Contents
Upon unpacking, please verify that all components listed below are present and in good condition:
- 15" x 15" T-shirt Press Machine (Main Unit)
- Hat Press Attachment (6" x 3" curved)
- Mug Press Attachment (3"-3.5" diameter, 11OZ)
- Plate Press Attachment #1 (12cm / 8" max diameter)
- Plate Press Attachment #2 (15.5cm / 10" max diameter)
- Operating Manual

Figure 2: Included components of the 5-in-1 Heat Press Machine.
Specifications
| Feature | Specification |
|---|---|
| Product Name | 5 in 1 38x38cm/15x15inch Heat Press |
| Voltage | 110V / 220V |
| Power | 1000W / 1200W |
| Time Range | 0-999 Seconds |
| Temperature Range | 32-410°F / 0-210℃ |
| Net Weight | 23.5 kg |
| T-shirt Press Plate Size | 38x38cm / 15" x 15" |
| Hat/Cap Press Size | 6" x 3" (curved) |
| Mug Press Size | 3"-3.5" diameter (11OZ) |
| Plate Press #1 Diameter | 12cm / 8" max diameter |
| Plate Press #2 Diameter | 15.5cm / 10" max diameter |
| Material | Aluminum |
Setup
Before operating the heat press machine, ensure it is placed on a stable, heat-resistant surface. Keep adequate clearance around the machine for ventilation and safe operation.
- Unpacking: Carefully remove all components from the packaging. Retain packaging for future storage or transport.
- Placement: Position the main heat press unit on a sturdy, level workbench or table. Ensure there is enough space for the 360-degree swing-away motion.
- Attachment Installation: To install a specific attachment (e.g., hat press, mug press, plate press), refer to the specific instructions for each attachment. Generally, this involves securing the attachment to the main unit's designated mounting points using screws or clamps provided. Ensure all connections are firm and secure before use.
- Power Connection: Plug the power cord into a grounded electrical outlet with the correct voltage (110V or 220V) as specified for your model.

Figure 3: Proper setup and operation posture.
Operating Instructions
This section details the general operation of the heat press machine and specific instructions for using its various attachments.
Digital Control Panel
The machine features a digital control panel for precise temperature and time settings.
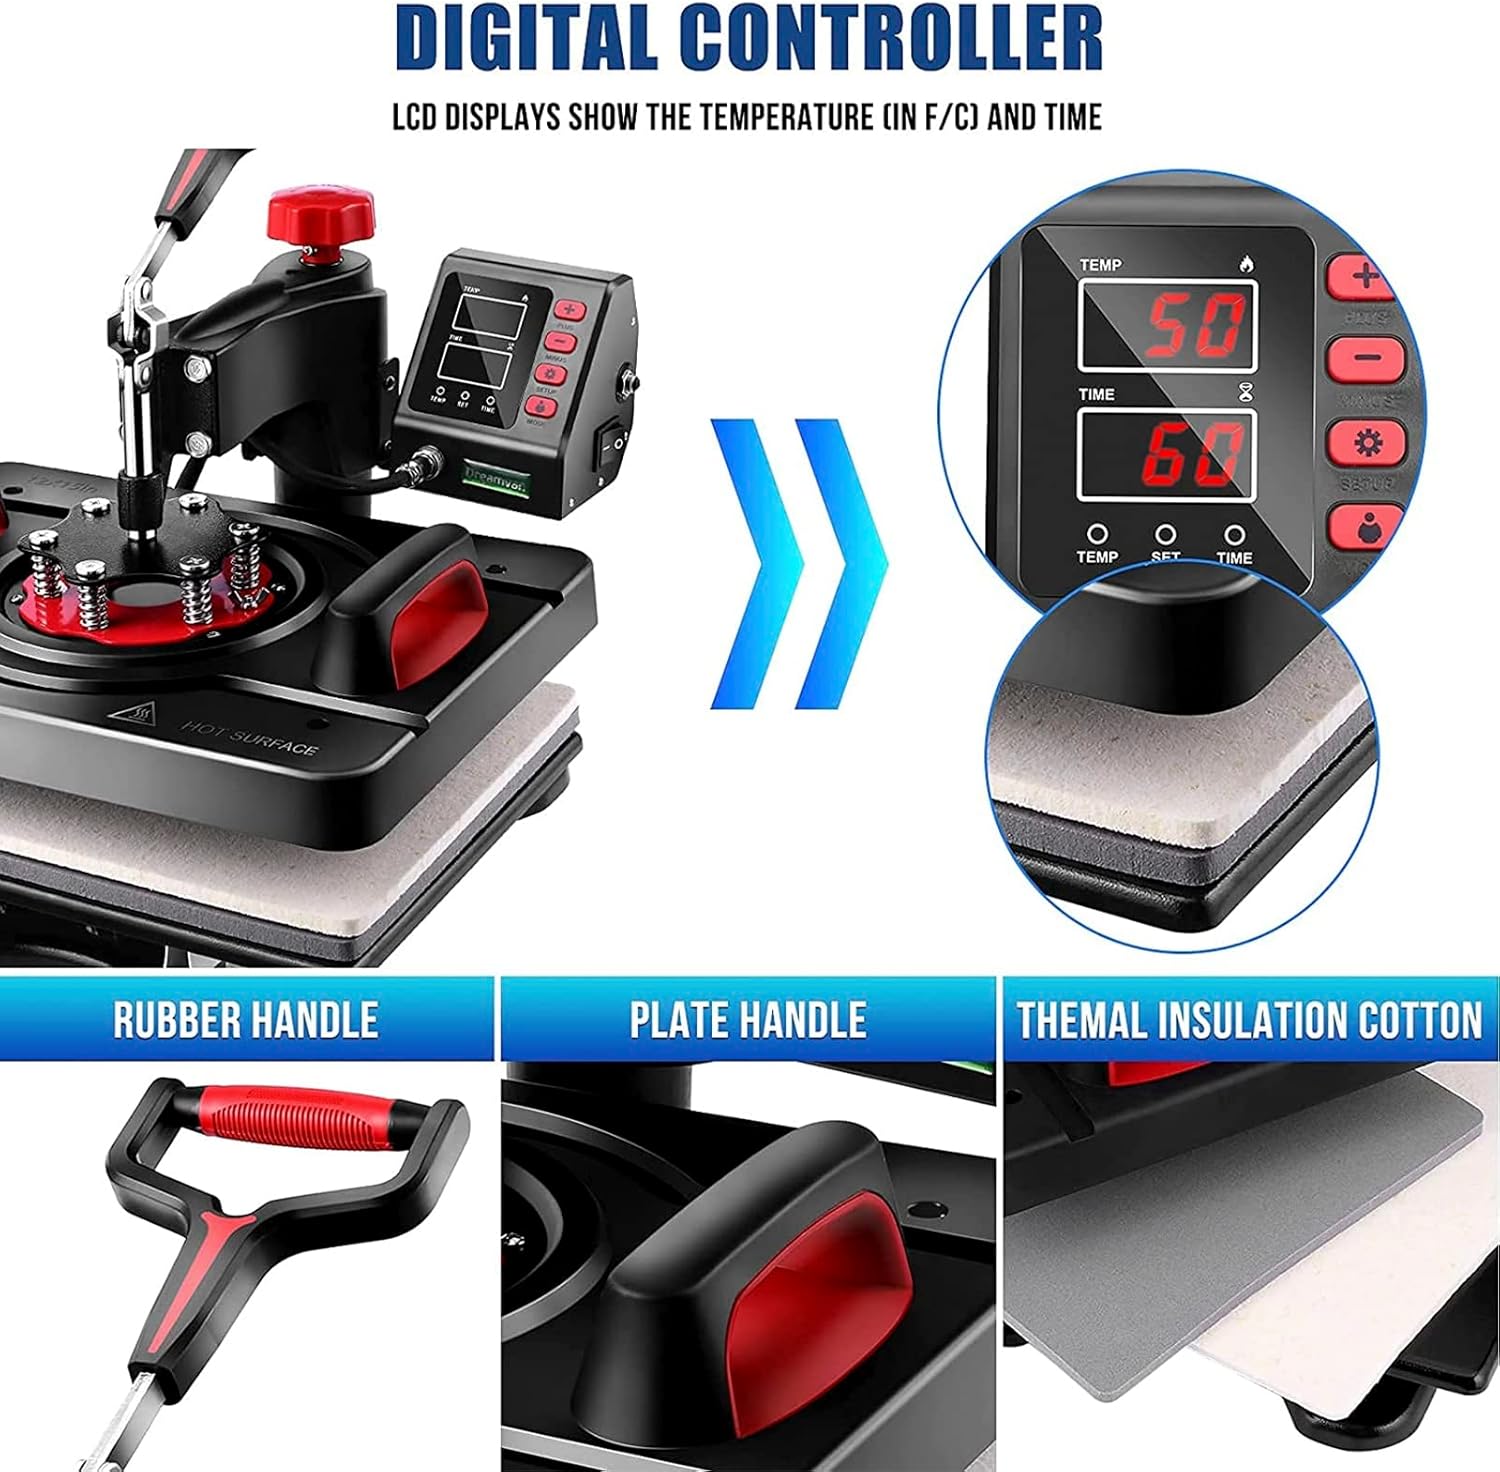
Figure 4: Digital Control Panel and key components.
- Power On: Turn on the main power switch, usually located on the side or back of the control box. The digital display will illuminate.
- Setting Temperature: Press the 'TEMP' button. Use the '+' and '-' buttons to adjust the desired temperature (e.g., 350°F or 175°C). Press 'TEMP' again to confirm.
- Setting Time: Press the 'TIME' button. Use the '+' and '-' buttons to adjust the desired pressing time (e.g., 60 seconds). Press 'TIME' again to confirm.
- Heating: The machine will begin to heat up to the set temperature. The 'TEMP' display will show the current temperature.
- Pressure Adjustment: Adjust the pressure knob (usually red, located on top) to achieve the desired pressure for your material. Turn clockwise for more pressure, counter-clockwise for less.
Using Different Attachments
The 360-degree swing-away feature allows the heating element to be safely moved aside, providing a clear workspace for placing and removing items.

Figure 5: 360-degree swing-away function.
Refer to the specific instructions for each type of item you wish to press:
- T-shirt/Flat Item Press:
- Ensure the flat platen attachment is installed.
- Pre-heat the machine to the recommended temperature for your material and transfer.
- Place the T-shirt or flat item on the lower platen, ensuring it is smooth and wrinkle-free.
- Position your transfer material (e.g., HTV, sublimation paper) onto the item.
- Swing the heating element over the item and lower the handle to apply pressure. The timer will start automatically.
- When the alarm sounds, lift the handle and swing the heating element away. Carefully remove the item.
- Hat/Cap Press:
- Install the curved hat press attachment.
- Adjust pressure for hats.
- Place the hat onto the curved platen.
- Position your transfer.
- Press as per general instructions.
- Mug Press:
- Install the mug press attachment.
- Wrap your sublimation print around the mug and secure with heat-resistant tape.
- Insert the mug into the mug press.
- Close the clamp to apply pressure.
- Press as per general instructions.
- Plate Press:
- Install the appropriate plate press attachment (8" or 10").
- Place the plate onto the lower platen.
- Position your transfer onto the plate.
- Press as per general instructions.

Figure 6: Specific heating parts for various items.

Figure 7: Examples of customizable items.
Maintenance
Proper maintenance ensures the longevity and optimal performance of your heat press machine.
- Cleaning: Regularly wipe down the heating platen with a soft, dry cloth when the machine is cool. For stubborn residue, use a non-abrasive cleaner specifically designed for Teflon-coated surfaces.
- Storage: When not in use, store the machine in a clean, dry environment, away from direct sunlight and extreme temperatures.
- Inspection: Periodically inspect the power cord for any signs of damage. Check all moving parts and connections for wear or looseness.
- Teflon Sheet: If using a separate Teflon sheet, ensure it is clean and free of wrinkles or tears. Replace if necessary to protect your heating platen and garments.
Troubleshooting
This section addresses common issues you might encounter and their potential solutions.
| Problem | Possible Cause | Solution |
|---|---|---|
| Machine does not power on | Power cord not plugged in; Power switch off; Blown fuse/circuit breaker | Ensure power cord is securely plugged in; Turn power switch on; Check and reset circuit breaker or replace fuse. |
| Temperature not reaching set point | Heating element issue; Faulty temperature sensor | Contact customer support for assistance. |
| Uneven heat distribution | Damaged heating element; Incorrect pressure setting | Ensure pressure is evenly distributed; Contact customer support if heating element is suspected. |
| Transfer not adhering properly | Incorrect temperature; Insufficient pressure; Incorrect time; Wrong material/transfer type | Verify temperature, pressure, and time settings according to transfer material instructions; Ensure material is suitable for heat pressing. |
| Alarm not sounding | Timer setting error; Faulty alarm component | Check timer settings; Contact customer support if alarm is faulty. |
Warranty and Support
For warranty information, technical support, or service inquiries, please refer to the contact details provided with your purchase documentation or visit the official ZHDBD website. Please have your model number (B0C1GM5CFK) and purchase date ready when contacting support.