1. Introduction
This manual provides comprehensive instructions for the installation, operation, and maintenance of your Philips Keyless Entry Smart Deadbolt Lock. Please read this manual thoroughly before installation and use to ensure proper function and security.

Figure 1: Philips Keyless Entry Smart Deadbolt Lock
2. Product Overview
2.1 Key Features
- Keyless Entry: Supports up to 20 access codes and 50 fingerprints for convenient entry without physical keys.
- Fingerprint Unlock: Recognizes fingerprints in approximately 0.3 seconds, unlocking the door in 1 second.
- Remote One-time PIN Code: Generate temporary PIN codes for visitors or service personnel.
- Auto-Lock Function: Configurable auto-lock delay from 30 to 180 seconds. Manual locking is also available by pressing and holding any key for 2 seconds.
- Voice Guide: Provides audio prompts in English, French, and Spanish for setup and operation.
- Enhanced Security: Features include low battery alerts, mute mode, and an away mode that triggers an alarm if unauthorized entry is attempted.
2.2 Components
The package includes the Philips Door Lock assembly, 4 AA batteries, installation instructions, and programming instructions. The deadbolt assembly and mounting hardware are also included.
3. Setup and Installation
Installation typically requires only a screwdriver and is suitable for most standard doors, accommodating both right and left-handed configurations.
3.1 Pre-Installation Checks
Before installation, verify your door's dimensions and compatibility. Ensure the door thickness is between 1-3/8" to 2" (35 to 50mm) and the backset is 2-3/8" or 2-3/4" (60 or 70mm). The cross bore diameter should be 1-1/2" or 2-1/8" (38 or 54mm).

Figure 2: Door Dimension Requirements

Figure 3: Left-Handed and Right-Handed Door Compatibility

Figure 4: Compatible Door Lock Types
3.2 Installation Steps
For a visual guide to the installation process, please refer to the official installation video below.
Video 1: Philips 13H Fingerprints Keyless Entry Door Lock Installation Guide. This video demonstrates the step-by-step process of installing the Philips Keyless Entry Door Lock, including checking dimensions, installing the latch, assembling the exterior and interior components, connecting cables, inserting batteries, and performing the lock handing process.
- Prepare the Door: Ensure the door is properly drilled according to the dimensions specified in Figure 2.
- Install the Latch: Insert the latch into the door edge, ensuring it is flush with the door. Secure it with the provided screws.
- Install Exterior Assembly: Route the cable from the exterior assembly through the door hole, ensuring the latch is fully retracted.
- Secure Mounting Plate: Attach the mounting plate to the interior side of the door, securing it with screws. Do not overtighten.
- Connect Interior Assembly: Insert the cable connector into the socket on the interior assembly.
- Attach Interior Assembly: Keep the thumb turn in a vertical position. Install the interior assembly by sliding it up and down the side buttons, then fasten it to the mounting plate using the two screws.
- Install Batteries: Insert 4 AA batteries into the battery compartment.
- Hand the Lock: Press and hold the reset button for 5 seconds to initiate the handing process, which calibrates the lock to your door's orientation.
- Close Battery Cover: Once installation is complete, close the battery cover.
4. Operating Instructions
4.1 Unlocking the Door
- Fingerprint: Place your registered fingerprint on the sensor. The lock will recognize it and unlock the door within 1 second.
- PIN Code: Enter your programmed PIN code on the keypad followed by the checkmark button.
- One-time PIN Code: Generate a temporary PIN code remotely via the Philips Home Access app. This code can be shared with guests or service providers for single-use access.
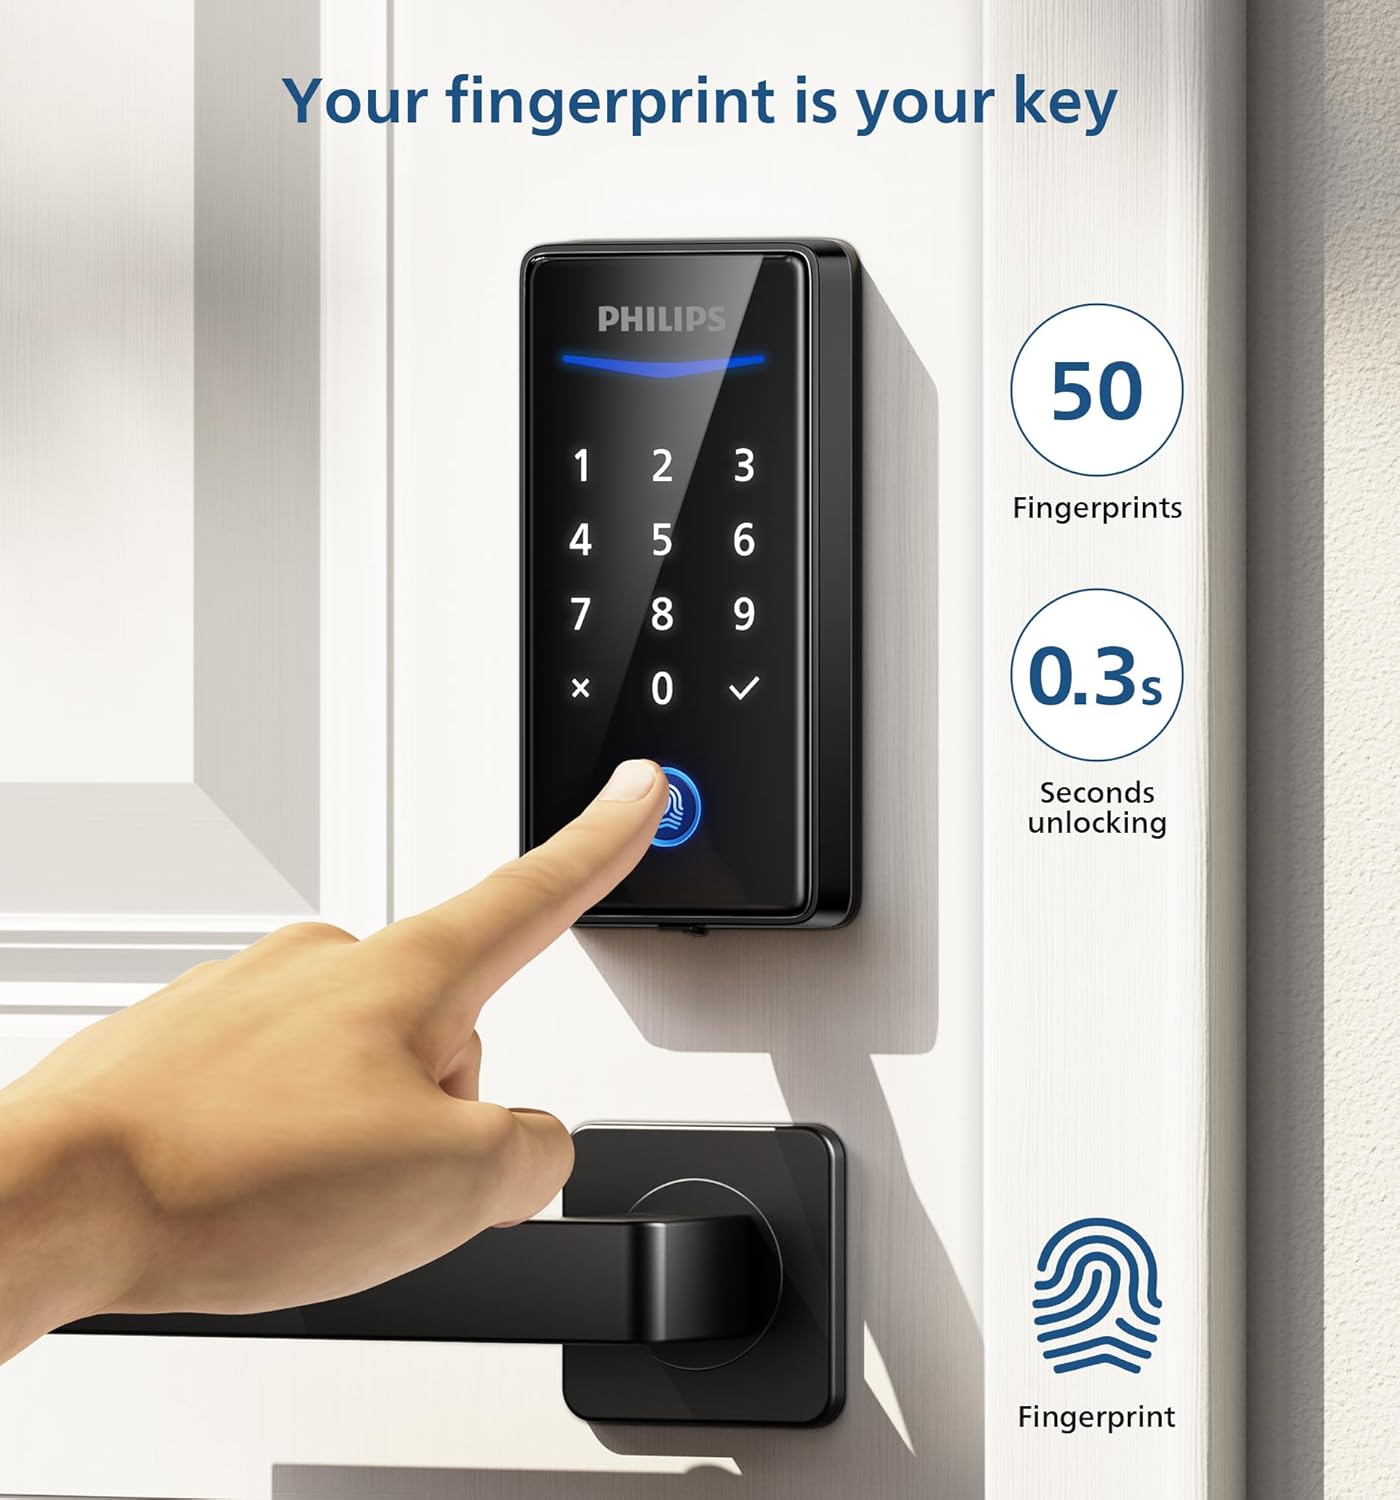
Figure 5: Fingerprint Unlocking

Figure 6: Remote One-time PIN Code Generation
4.2 Locking the Door
- Auto-Lock: The lock can be configured to automatically lock after a set period (30-180 seconds) once the door is closed.
- Manual Lock: Press and hold any key on the keypad for 2 seconds to manually lock the door.

Figure 7: Auto-Lock and One-Touch Locking
4.3 Additional Functions
- Voice Guidance: The lock provides voice prompts during setup and operation. Languages include English, French, and Spanish.
- Privacy Mode: Activating privacy mode disables all user code access from the exterior.
- Away Mode: When activated, the lock will alarm if unauthorized entry is attempted from indoors.
- Low Battery Alert: The lock provides an alert when battery levels are low.

Figure 8: Voice Guidance Feature

Figure 9: Backup Power Option for Low Battery
5. Maintenance
5.1 Battery Replacement
The lock operates on 4 AA alkaline batteries. When the low battery alert is activated, replace all four batteries promptly to ensure continuous operation. The battery life is approximately 365 days under normal usage.
6. Troubleshooting
- Lock not responding: Check battery levels and replace if necessary. Ensure the cable connection between the exterior and interior assemblies is secure.
- Locking mechanism not smooth: Verify that the deadbolt hole in the door frame is deep enough to fully accommodate the deadbolt. A shallow hole can prevent smooth operation.
- PIN code or fingerprint not recognized: Ensure you are entering the correct PIN code or placing a registered fingerprint correctly on the sensor. Re-register fingerprints if issues persist.
- Voice guide not working: Check the volume settings or ensure the voice guide feature is enabled.
7. Specifications
| Feature | Specification |
|---|---|
| Brand | PHILIPS |
| Model Number | 210X13H |
| Lock Type | Biometric, Combination Lock, Deadbolt, Keypad |
| Special Features | Fingerprint, Passcode |
| Material | Aluminum |
| Color | Matte Black |
| Item Weight | 2.08 pounds |
| Power Source | 4 AA Alkaline Batteries (Included) |
| Connectivity Protocol | None (No internet required) |
| Recommended Use | Indoor Lock, Outdoor Lock |
8. Warranty and Support
Philips offers a 2-year product warranty from the date of purchase. For customer support, please refer to the contact information provided with your product or visit the official Philips support website.


