SONNLER SN-04031
Tungsten Electrode Sharpener Grinder User Manual
Model: SN-04031 | Brand: SONNLER
1. Introduction
This user manual provides essential information for the safe and effective operation of your SONNLER Tungsten Electrode Sharpener Grinder. This portable, hand-held rotary tool is designed for sharpening tungsten electrodes used in TIG welding, offering precision grinding at various angles and sizes to enhance welding efficiency.
2. Safety Information
Warning: Always prioritize safety when operating power tools.
- Wear appropriate personal protective equipment (PPE), including a mask and other protective gear, when grinding. This is crucial unless you are operating in a fully sealed environment.
- Ensure the work area is well-ventilated to prevent inhalation of grinding dust.
- Keep hands and loose clothing away from rotating parts.
- Disconnect the tool from the power source before making any adjustments, changing accessories, or performing maintenance.
- Store the tool and accessories in a dry, secure location, out of reach of children.
3. Package Contents
Verify that all items listed below are present in your package:
- 1x Electric Grinder (Rotary Tool)
- 1x Tungsten Electrode Grinding Head
- 10x Double-Sided Diamond Grind Wheels
- 3x CNC Mandrels
- 1x Wrench
- 1x Pin Vise Hand Drill
- 1x Storage Box
- 1x User Manual (This document)

Image: Complete SONNLER Tungsten Electrode Sharpener Grinder kit, including the electric rotary tool, grinding head, diamond wheels, and mandrels.

Image: Exploded view of the SONNLER Tungsten Electrode Sharpener Grinder and its accessories, neatly arranged within its storage case.
4. Product Overview
The SONNLER Tungsten Electrode Sharpener Grinder is designed for precision sharpening of tungsten electrodes. Key features include:
- Electric Rotary Tool: Provides the power for grinding with adjustable speed settings.
- Tungsten Electrode Grinding Head: A specialized attachment with multiple holes for different electrode sizes and angles.
- Diamond Grind Wheels: Durable abrasive wheels for effective and precise material removal.
- CNC Mandrels: Used to secure the diamond grind wheels to the rotary tool.

Image: Close-up view of the electric rotary tool, highlighting the power switch, 11-speed adjustment dial, and the location for replaceable carbon brushes.

Image: Diagram illustrating the multifunctionality of the grinding head, including multi-angle and offset grinding capabilities, and a dedicated cut-off slot for electrode preparation.
5. Setup and Assembly
Follow these steps to assemble your tungsten electrode sharpener:
- Attach the Mandrel: Insert a CNC mandrel into the collet of the electric rotary tool. Use the provided wrench to tighten the collet securely, ensuring the mandrel is firmly in place.
- Mount the Diamond Wheel: Place one of the double-sided diamond grind wheels onto the mandrel.
- Install the Grinding Head: Screw the tungsten electrode grinding head onto the front of the electric rotary tool, over the diamond wheel. Ensure it is tightened securely.
- Adjust Wheel Height: The grinding head is designed with offset compensation for each hole size. However, it is important to ensure the diamond grinding wheel is at the proper height within the grinding head for optimal performance. This may require minor adjustments to the mandrel's position in the collet.

Image: Step-by-step visual guide for assembling the tungsten electrode sharpener, showing how to attach the mandrel, diamond wheel, and grinding head to the rotary tool.
6. Operating Instructions
This section details how to use your SONNLER Tungsten Electrode Sharpener Grinder for precise electrode preparation.
6.1 Selecting Electrode Size and Angle
The grinding head supports 6 common tungsten electrode sizes and offers 8 distinct grinding angles. The holes are fixed, eliminating the need for re-adjustment of the diamond wheel height when changing angles.
- Supported Electrode Sizes: 5/32", 1/8", 3/32", 5/64", 1/16", 0.040" (corresponding to 4.0mm, 3.2mm, 2.4mm, 2.0mm, 1.6mm, 1.0mm).
- Available Grinding Angles: 7.5°, 10°, 15°, 20°, 22.5°, 25°, 27.5°, 30°. These correspond to tip angles of 15°, 20°, 30°, 40°, 45°, 50°, 55°, 60° respectively.

Image: Visual representation of the grinding head, indicating the various electrode sizes and the corresponding grinding angles available for precise tungsten tip preparation.
6.2 Grinding a Tungsten Electrode
- Power On: Plug the electric grinder into a 110V AC power outlet. Turn on the tool using the power switch.
- Set Speed: Adjust the speed dial to a suitable setting. Lower speeds are generally recommended for optimal results and to prolong the life of the diamond cutting disks.
- Insert Electrode: Select the desired angle and size hole on the grinding head. Insert the tungsten electrode into the corresponding hole. The design ensures the tip centers on the grinding point.
- Grind: Gently rotate the tungsten electrode while applying light pressure against the spinning diamond wheel. Continue until the desired tip angle and sharpness are achieved. Avoid excessive pressure, which can cause overheating or uneven grinding.
- Inspect: Remove the electrode and inspect the tip for uniformity and sharpness. Repeat if necessary.
- Power Off: Once grinding is complete, turn off the electric grinder and unplug it from the power source.

Image: A user demonstrating the proper grip and use of the SONNLER Tungsten Electrode Sharpener, highlighting its ergonomic design and adjustable fixture for various electrode diameters.
6.3 Changing Grinding Angle (Reversing the Head)
The grinding head is designed to offer a wider range of angles by allowing it to be reversed. To access additional angles:
- Ensure the tool is unplugged.
- Unscrew the grinding head from the rotary tool.
- Flip the grinding head over and screw it back onto the rotary tool. This will expose a different set of angle holes.
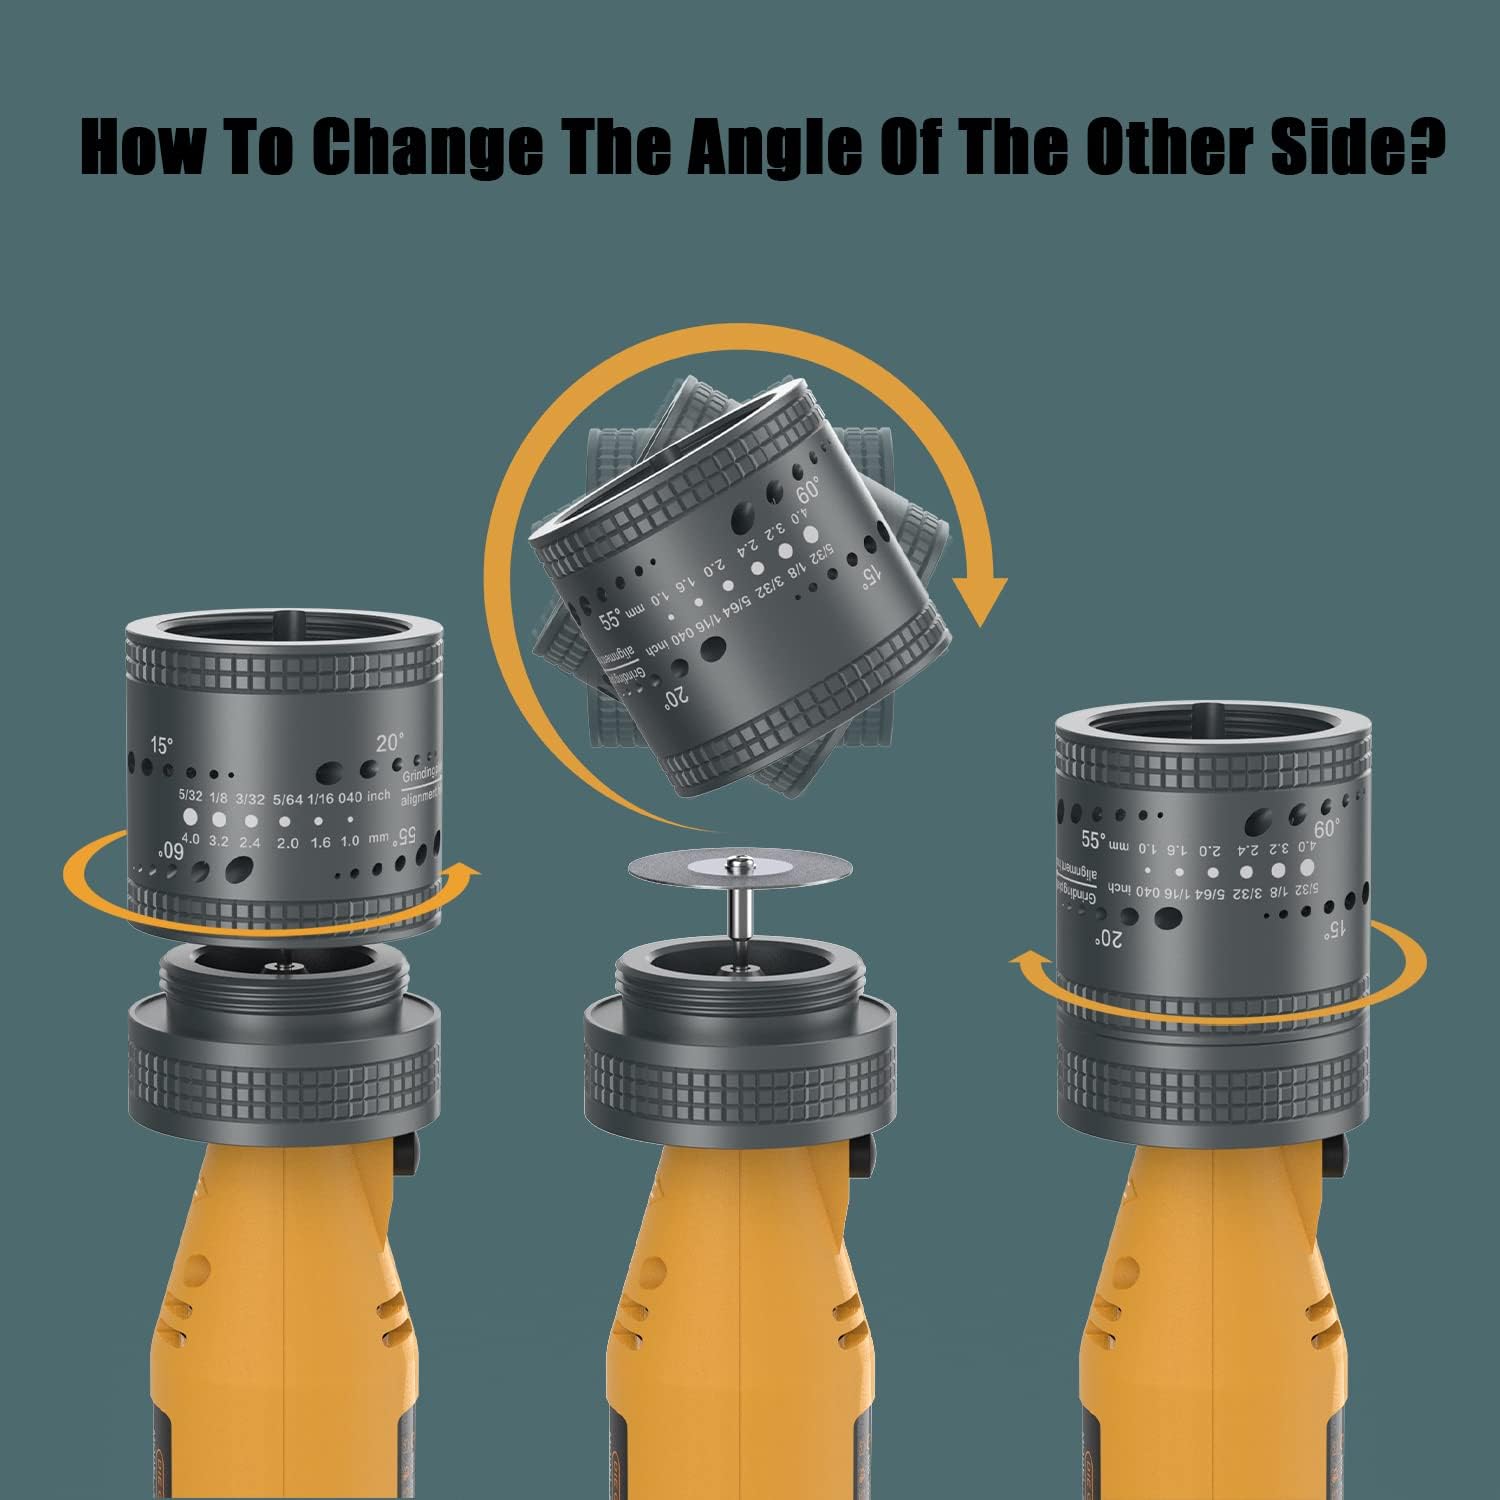
Image: Diagram illustrating how to reverse the grinding head to access additional sharpening angles, demonstrating the modular design of the sharpener.
7. Maintenance
Regular maintenance ensures the longevity and optimal performance of your sharpener.
- Cleaning: After each use, unplug the tool and use a brush or compressed air to remove grinding dust from the grinding head and rotary tool vents.
- Diamond Wheel Replacement: The diamond grind wheels are double-sided. When one side becomes worn, flip it over to use the other side. Replace the wheel when both sides are worn or if it becomes damaged.
- Carbon Brush Replacement: The electric rotary tool uses replaceable carbon brushes. If the tool experiences reduced power or intermittent operation, the carbon brushes may need replacement. Refer to the product overview image for the location of the carbon brush access points.
- Storage: Store the sharpener and all accessories in the provided storage box in a clean, dry environment.

Image: A set of double-sided diamond grind wheels, indicating the replaceable nature of this consumable component for continued sharpening performance.
8. Troubleshooting
| Problem | Possible Cause | Solution |
|---|---|---|
| Tool does not power on. | Not plugged in; power switch off; faulty outlet; worn carbon brushes. | Check power connection; ensure switch is on; test outlet; inspect and replace carbon brushes if necessary. |
| Poor grinding performance or uneven tip. | Worn diamond wheel; incorrect wheel height; insufficient rotation of electrode; excessive pressure. | Replace or flip diamond wheel; adjust wheel height; ensure consistent rotation of electrode; apply light, even pressure. |
| Excessive vibration during operation. | Mandrel or wheel not securely tightened; unbalanced wheel; tool defect. | Ensure mandrel and wheel are securely fastened; inspect wheel for damage; if problem persists, contact support. |
| Tool heats up quickly. | Continuous high-speed operation; blocked ventilation. | Reduce operating speed; ensure ventilation slots are clear; allow tool to cool down between uses. |
9. Specifications
| Feature | Detail |
|---|---|
| Brand | SONNLER |
| Model Number | SN-04031 |
| Material | Alloy Steel |
| Power Source | AC |
| Voltage | 110 Volts |
| Color | Yellow |
| Item Weight | 1.55 Kilograms (3.41 pounds) |
| Product Dimensions (Grinding Head) | 2.16"L x 2.16"W x 2.75"H |
| Supported Electrode Sizes | 5/32", 1/8", 3/32", 5/64", 1/16", 0.040" (4.0mm, 3.2mm, 2.4mm, 2.0mm, 1.6mm, 1.0mm) |
| Grinding Angles | 7.5°, 10°, 15°, 20°, 22.5°, 25°, 27.5°, 30° (Tip Angles: 15°, 20°, 30°, 40°, 45°, 50°, 55°, 60°) |
10. Warranty and Support
SONNLER is committed to providing high-quality products and customer satisfaction. While specific warranty details are not provided in this manual, if you encounter any questions or require assistance with your Tungsten Electrode Sharpener Grinder, please contact SONNLER customer support. Our team is available to provide professional help and guidance.
For support, please refer to the contact information provided with your purchase or visit the official SONNLER website.
Ask a question about this manual
Ask about setup, troubleshooting, compatibility, parts, safety, or missing instructions. Manuals+ will review the question and use this page’s manual context to help answer it.