1. Safety Information
Please read and understand all safety instructions before installing or operating the ECO-WORTHY Battery Monitor. Failure to follow these instructions may result in electric shock, fire, or serious injury.
- Always disconnect power before making any electrical connections.
- Ensure all wiring is correct and secure to prevent short circuits.
- Do not exceed the specified voltage and current ratings of the device.
- Keep the device away from water, moisture, and extreme temperatures.
- Only use the provided components and accessories.
- Consult a qualified electrician if you are unsure about any part of the installation.
2. Product Overview
The ECO-WORTHY Upgraded 200A Touchable Display Battery Monitor is designed to provide comprehensive real-time monitoring of your battery system. It features a touchable screen for easy operation and a Hall Sensor for simplified wiring without screws.
Key features include:
- Touchable Screen: Enjoy easy operation without complex buttons.
- Wide Compatibility: Suitable for 10-100V, 0-200AH battery banks, supporting Li-ion, LiFePO4, AGM, and Gel battery types.
- Clear Display: Shows battery voltage, current, power, capacity, remaining time, and percentage. Backlight ensures visibility in various lighting conditions.
- Hall Sensor: Simplifies wiring by eliminating the need for screws, just pass the cable through the sensor.
- Battery Protection: Program 14 parameters including high/low voltage, amperage, and temperature to trigger alarms for battery protection.
- Memory Function: Records and recovers data in case of power interruption.
- Two Monitor Modes: Choose between Normal and Simple display modes for tailored monitoring.

The ECO-WORTHY Battery Monitor displaying various parameters such as voltage, current, capacity, power, and temperature.

The 3.5-inch touchable screen allows for easy navigation and setting adjustments.

The monitor provides battery protection with alarm parameters for low capacity, over-voltage, over-current, under-voltage, and over-temperature.

The battery monitor is compatible with Li-ion, LiFePO4, AGM, and Gel batteries, covering a wide range of 0-100V systems.

The clear screen view ensures readability in both bright sunlight and low-light conditions.

The memory function records and recovers data even after power interruptions, ensuring continuous monitoring.

The monitor offers two display modes: Normal, showing detailed parameters, and Simple, providing essential information at a glance.

The battery monitor is suitable for various usage scenarios, including house, golf cart, and RV applications.
3. Package Contents
The package includes the following items:
- 1 x Touchable Display Battery Monitor
- 1 x Hall Sensor
- 1 x 16.4ft (5m) Communication Cable (for monitor to Hall Sensor)
- 1 x 1.64ft (0.5m) Power Cable (for Hall Sensor to battery)
- 1 x 16.4ft (5m) Power Cable (for monitor to battery)
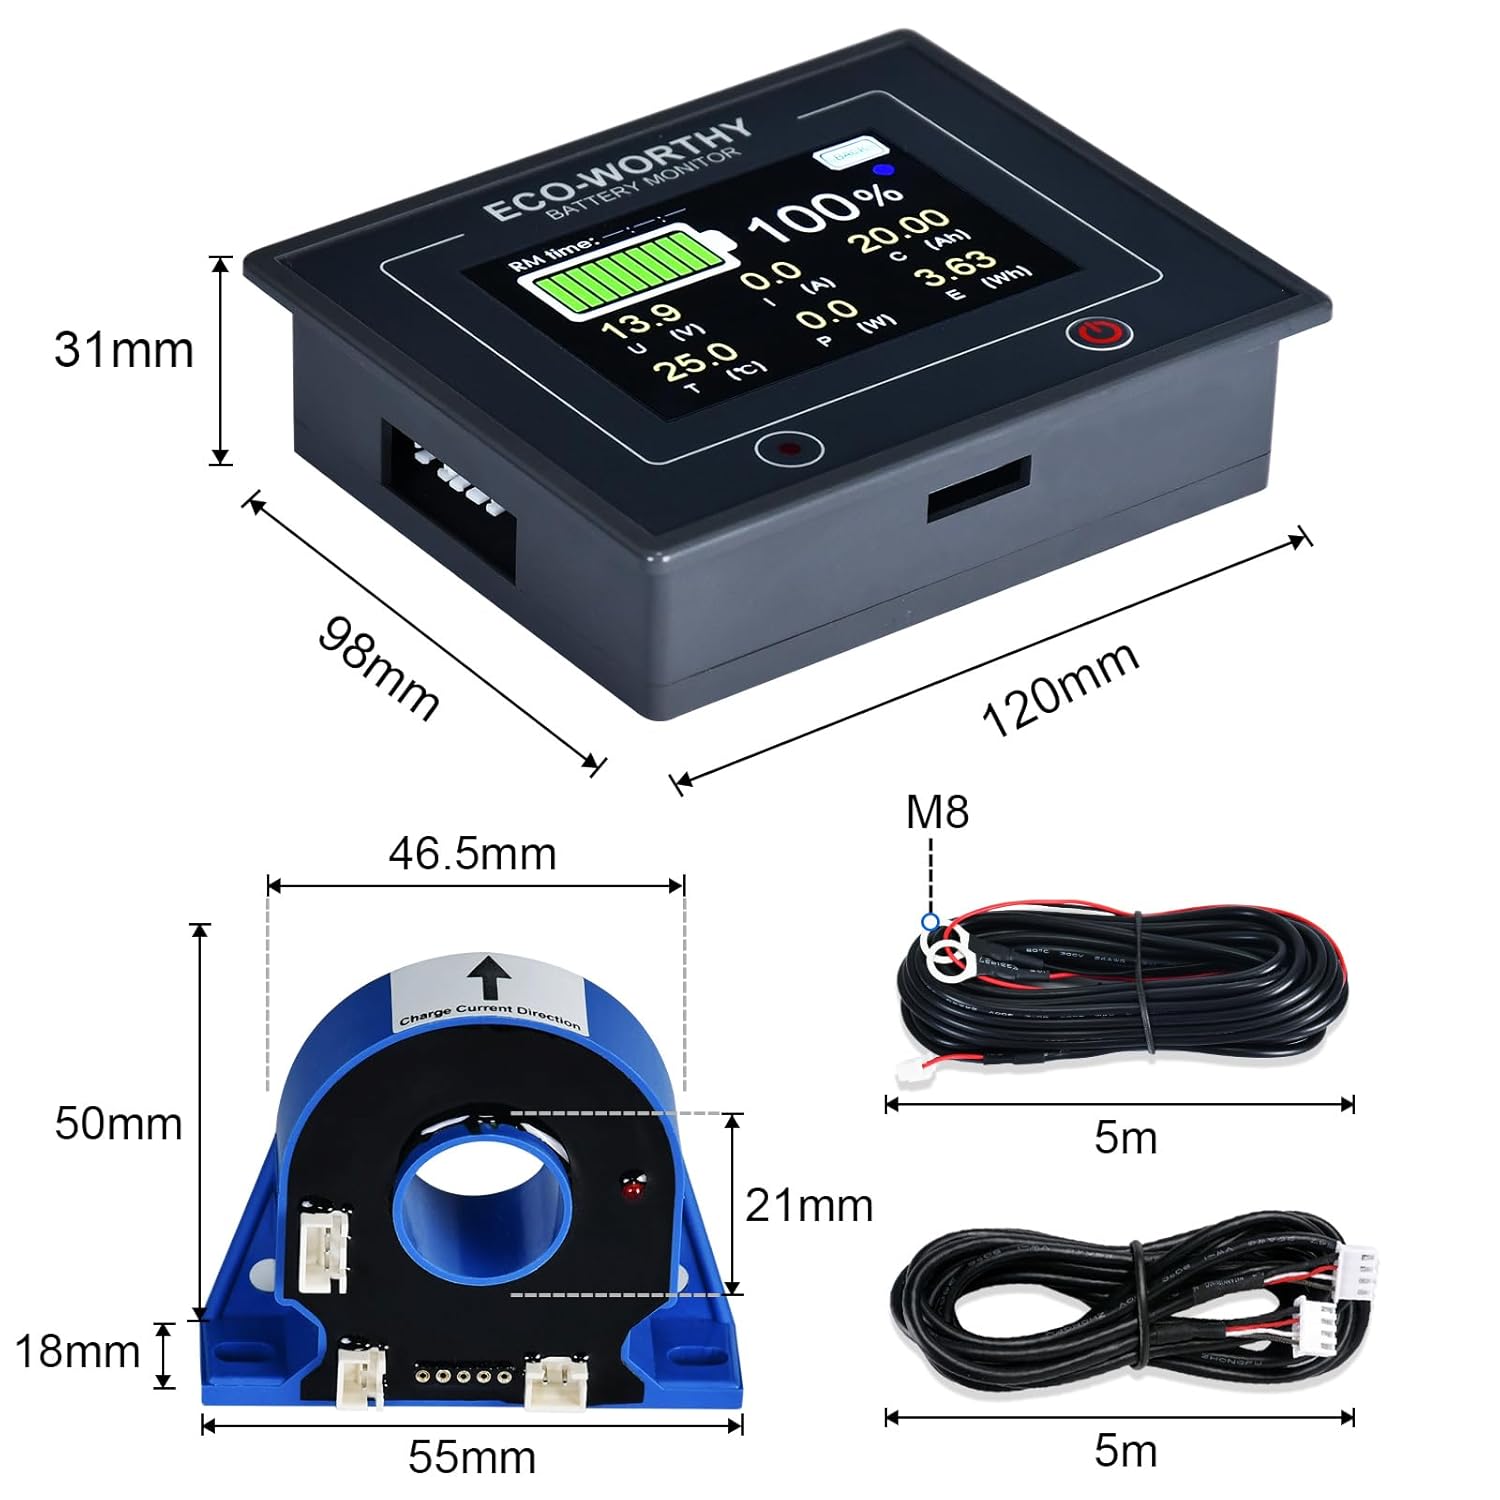
Detailed view of the battery monitor, Hall Sensor, and connecting cables with their respective dimensions.
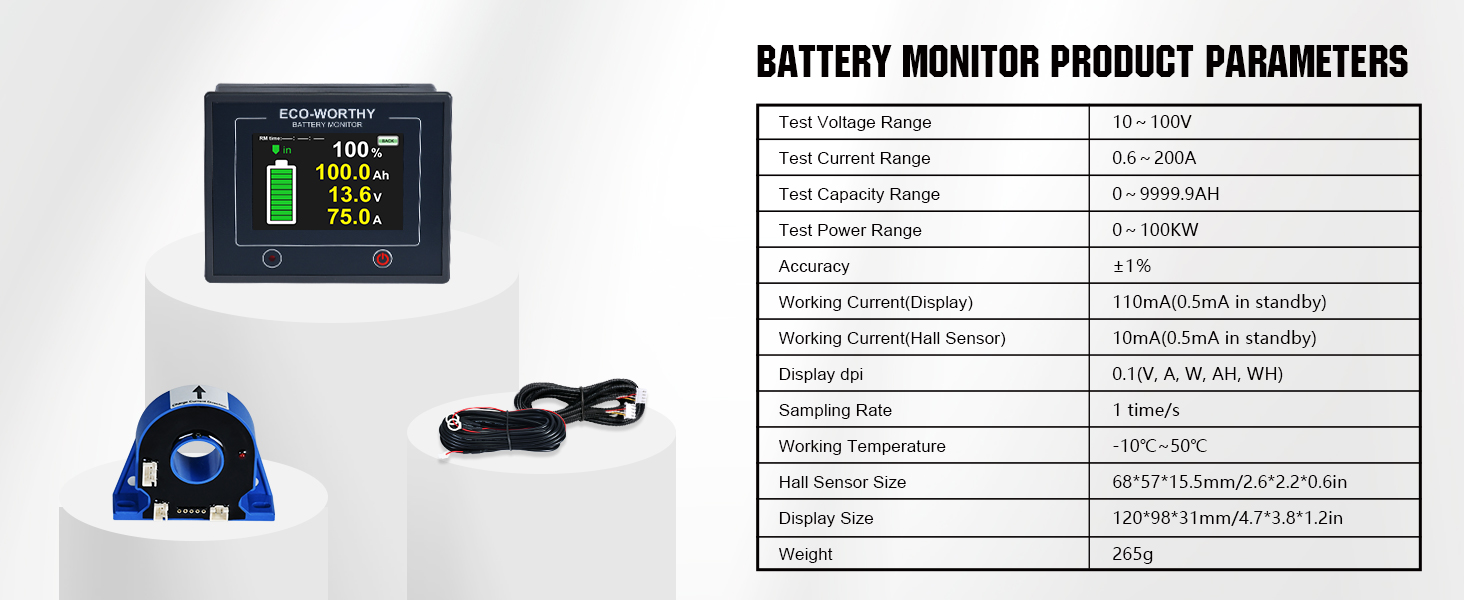
4. Specifications
| Parameter | Value |
|---|---|
| Test Voltage Range | 10 ~ 100V |
| Test Current Range | 0.6 ~ 200A |
| Test Capacity Range | 0 ~ 9999.9AH |
| Test Power Range | 0 ~ 100KW |
| Accuracy | ±1% |
| Working Current (Display) | 110mA (0.5mA in standby) |
| Working Current (Hall Sensor) | 10mA (0.5mA in standby) |
| Display DPI | 0.1 (V, A, W, AH, Wh) |
| Sampling Rate | 1 time/s |
| Working Temperature | -10°C ~ 50°C |
| Hall Sensor Size | 68*57*15.5mm / 2.6*2.2*0.6in |
| Display Size | 120*98*31mm / 4.7*3.8*1.2in |
| Weight | 265g |
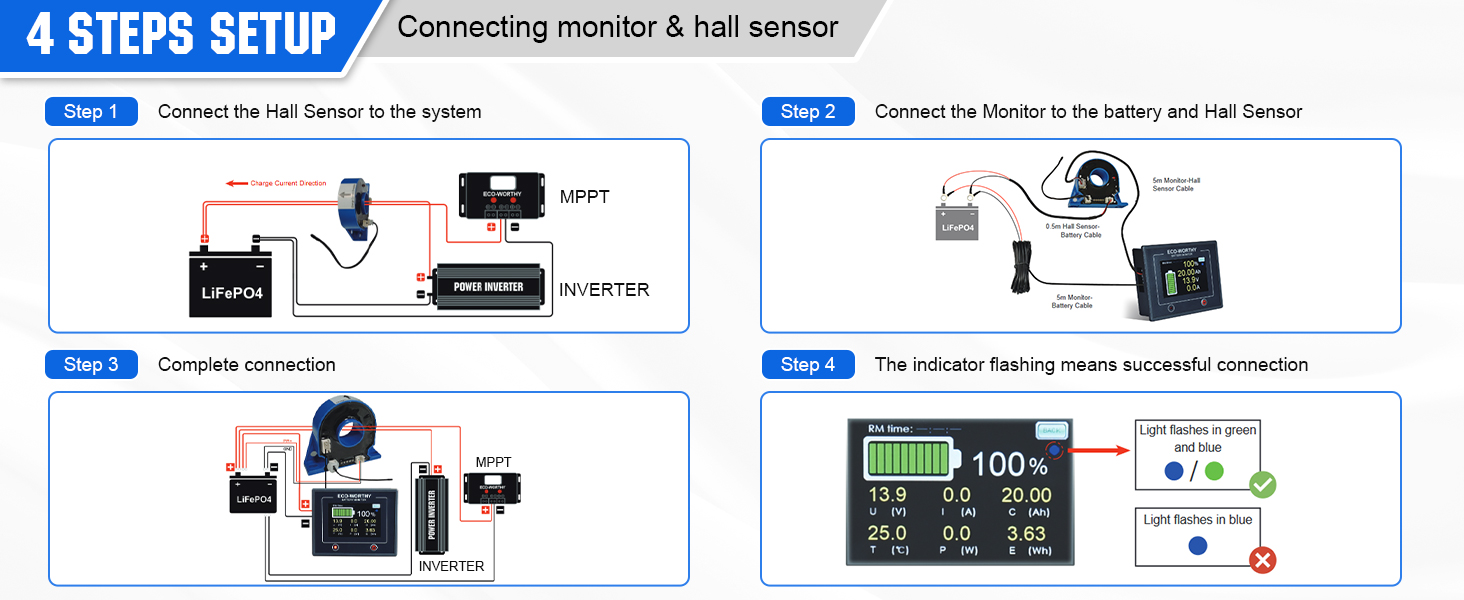
5. Setup & Installation
Follow these steps to correctly install your ECO-WORTHY Battery Monitor:
Official video guide: Installation and Operation of ECO-WORTHY Battery Monitor. This video demonstrates the complete wiring process for the battery monitor and Hall Sensor.
Wiring Steps:
- Step 1: Connect the Hall Sensor to the System
Pass the positive input and output wires of your battery through the Hall Sensor. Ensure to observe the correct direction as indicated on the sensor. - Step 2: Connect the Battery Monitor to the Hall Sensor
Connect the battery monitor to the Hall Sensor using the provided 16.4ft (5m) communication cable. - Step 3: Connect the Hall Sensor to the Battery
Connect the Hall Sensor to the battery using the 1.64ft (0.5m) power cable. The red wire connects to the positive (+) terminal, and the black wire connects to the negative (-) terminal. - Step 4: Connect the Battery to the Monitor
Connect the battery to the monitor using the 16.4ft (5m) power cable. The red wire connects to the positive (+) terminal, and the black wire connects to the negative (-) terminal.
The installation is successful when the monitor reads data and the indicator light flashes alternately blue and green. If the data remains unchanged and the indicator shows only blue, the installation has failed. Recheck all connections.
Visual guide for the 4-step setup process, illustrating the connections between the battery, Hall Sensor, and monitor.

An overview diagram showing the battery monitor integrated into a solar power system, connecting to a solar panel, MPPT controller, battery, and inverter.
6. Operating Instructions
Setting Parameters:
To access and set parameters, input the default password "2016" in the "PARAME" section of the settings page. This will unlock the setting options.
Important Parameters to Set:
- Nominal Capacity (CAP(Ah)): Set this to the total Ampere-hour (Ah) capacity of your battery bank.
- Full Capacity Voltage (FV(V)): Set this to the highest voltage your battery reaches when fully charged. Ensure your battery is fully charged to this voltage for accurate readings.
Use the "RPM" button to read existing data and the "WPM" button to write and save new data. For example, for a 12V 30Ah battery, set CAP(Ah) to 30 and FV(V) to 14.6 (as tested for a fully charged 12V LiFePO4 battery).
The screen for setting and adjusting multiple parameters, including basic, alarm, and correction parameters.
Display Pages:
Tap different icons on the display to switch between various information pages:
- Normal Page: Displays Voltage, Current, Temperature, Power, Capacity (Ah), and Energy (Wh).
- Simple Page: Shows Capacity (Ah), Voltage, and Current in a simplified view.
- Chart Page: Provides a graphical representation of Voltage, Current, Capacity, Percentage, Energy, and Temperature over time.
Sleep Mode and Brightness:
On the settings page, you can adjust the automatic sleep time and display brightness:
- Auto Sleep: Drag the slider to set the automatic sleep time from 0 to 30 seconds.
- Brightness: Adjust the display brightness from 20% to 100%.
To wake the display from sleep mode, simply tap it. To enter standby mode, press and hold the power button for 3 seconds. In standby mode, the current draw is significantly reduced (0.5mA). To wake from standby, press the button for 2 seconds.
7. Maintenance
To ensure the longevity and optimal performance of your battery monitor, consider the following maintenance tips:
- Keep the display clean and free from dust and debris. Use a soft, dry cloth for cleaning.
- Avoid exposing the device to direct sunlight for prolonged periods, as this can affect the display and internal components.
- Regularly check all cable connections to ensure they are secure and free from corrosion.
- Store the device in a cool, dry place if not in use for an extended period.
8. Troubleshooting
If you encounter issues with your battery monitor, refer to the following common problems and solutions:
- Display shows 0% or data unchanged, indicator is blue: This indicates an installation failure. Recheck all wiring connections, especially the Hall Sensor and power cables, ensuring they are correctly oriented and securely connected.
- Incorrect Readings: Verify that the Nominal Capacity and Full Capacity Voltage parameters are correctly set according to your battery specifications and that your battery is fully charged when setting the Full Capacity Voltage. You can manually calibrate voltage, current, and temperature if needed via the parameter settings.
- Alarm Triggered: The monitor will flash relevant parameters and alarm for conditions such as:
- Power Capacity Overload / Overvoltage
- Undervoltage
- Abnormal Current
- Overheating
- Settings Not Saving: Ensure you are pressing the "WPM" button to write and save the data after making changes in the parameter settings.
If the issue persists after following these steps, please contact ECO-WORTHY customer support.
9. Warranty & Support
The ECO-WORTHY Battery Monitor is manufactured by ECO-WORTHY. For detailed warranty information, product support, or to purchase additional accessories, please refer to the official ECO-WORTHY website or visit their Amazon store.
ECO-WORTHY Store: Visit the ECO-WORTHY Store on Amazon