1. Introduction and Overview
This manual provides comprehensive instructions for the installation, operation, and maintenance of the GSPUSA 290D3070P002 Laundry Washer Lid Lock Switch. This component is designed as a replacement part for various washing machine models, ensuring proper lid locking functionality during wash cycles. Please read this manual thoroughly before proceeding with installation or use.

Image 1: GSPUSA 290D3070P002 Laundry Washer Lid Lock Switch. This image displays the complete lid lock switch assembly, including the main housing, electrical wiring, and various mounting brackets and covers.
2. Safety Information
Always prioritize safety when working with electrical appliances. Failure to follow these safety guidelines may result in personal injury or damage to the appliance.
- Disconnect Power: Before attempting any installation, repair, or maintenance, ensure the washing machine is completely disconnected from its power source. Unplug the appliance or turn off the circuit breaker.
- Professional Installation: If you are not comfortable performing electrical or appliance repairs, it is recommended to seek assistance from a qualified technician.
- Wear Protective Gear: Use appropriate personal protective equipment, such as gloves, to prevent injury.
- Inspect Components: Before installation, carefully inspect the new lid lock switch for any signs of damage. Do not install damaged parts.
3. Package Contents
Verify that all components are present in the package:
- 1 x GSPUSA 290D3070P002 Laundry Washer Lid Lock Switch
4. Compatibility
The GSPUSA 290D3070P002 Lid Lock Switch is designed to be compatible with various washing machine models from brands such as GE, Hotpoint, Kenmore, and Mabe. It replaces old part numbers 290D3070P002, 290D3070P001, and 290D3070P003. The new product is also known by part numbers CKD45 and CKD7098.
Important: Appliance parts are not always universal. It is crucial to compare your old part with the images and specifications provided to ensure correct fitment. Different models, even from the same brand, may use different parts.

Image 2: Compatibility Comparison. This image illustrates the importance of comparing your existing part's terminals, support, and overall design with the replacement part to ensure proper fit and function. The left side shows a 'CORRECT' match with specific part numbers (WH08X37938, WH08X32697, etc.), while the right side shows an 'INCORRECT' match with different terminals, support, and design.

Image 3: External vs. Internal Differences. This image highlights that some lid lock switches may appear similar externally but have different internal components, sizes, connectors, or operating voltages. Always verify internal specifications and part numbers to avoid incompatibility.
5. Installation / Setup
The installation process typically takes around 10 minutes. Follow these general steps for replacing the lid lock switch. Specific steps may vary slightly depending on your washing machine model. Refer to your appliance's service manual for detailed instructions if available.
- Disconnect Power: Ensure the washing machine is unplugged from the electrical outlet.
- Access the Lid Lock Switch: Depending on your washer model, you may need to open the control panel, remove the top panel, or access the switch from the front or rear of the machine. This often involves removing screws or clips.
- Locate the Old Switch: Identify the existing lid lock switch and its electrical connections.
- Disconnect Wiring: Carefully disconnect the electrical connectors from the old switch. Note their positions if necessary, though this replacement part is designed for a perfect fit with no additional terminals required.
- Remove Old Switch: Unmount the old lid lock switch from its housing. This may involve releasing clips or removing screws.
- Install New Switch: Position the GSPUSA 290D3070P002 Lid Lock Switch into the designated slot. Ensure it is securely mounted.
- Connect Wiring: Reconnect the electrical connectors to the new switch. Verify that all connections are firm and correct.
- Reassemble Washer: Reattach any panels or components that were removed to access the switch.
- Restore Power: Plug the washing machine back into the electrical outlet.
- Test Functionality: Close the washer lid and initiate a short cycle to confirm the lid locks properly and the machine operates as expected.
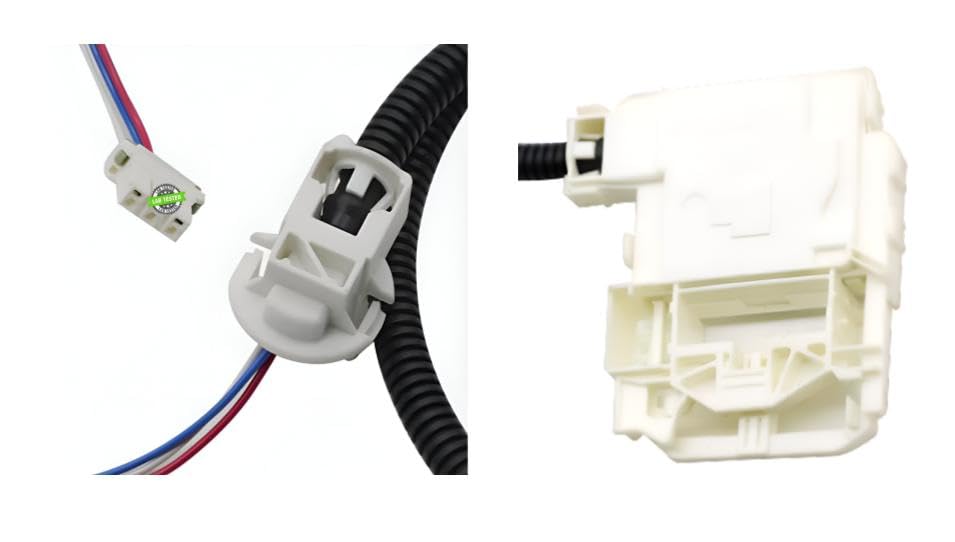
Image 4: Electrical Connector Detail. This image provides a close-up view of the electrical connector on the lid lock switch, which is essential for proper wiring during installation.
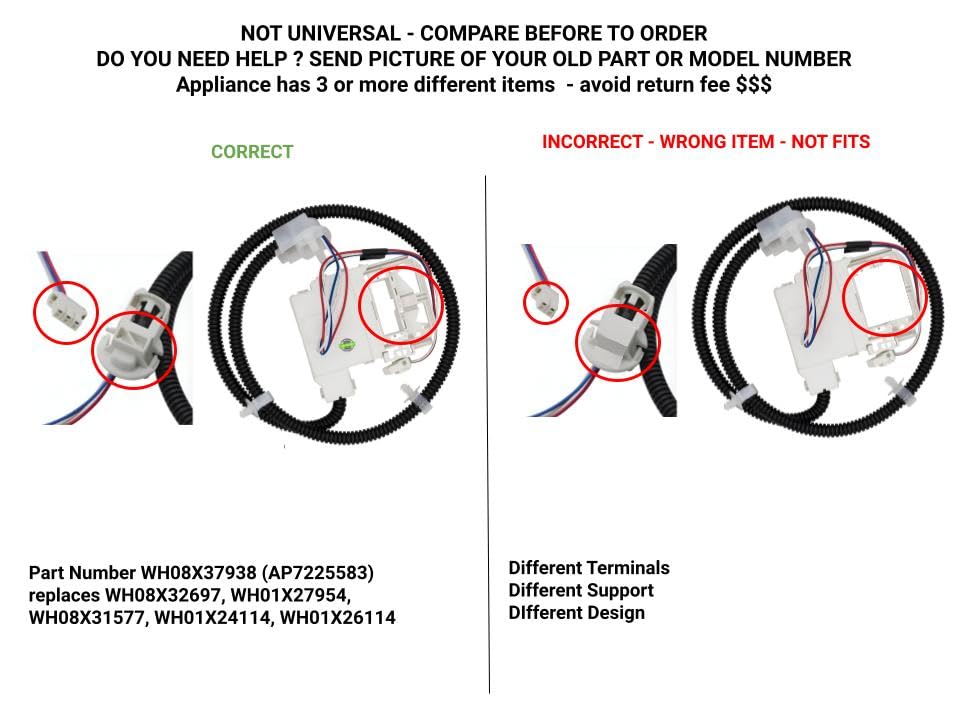
Image 5: Lid Lock Switch Side View. This image shows a side perspective of the lid lock switch, highlighting its housing and potential mounting points, which can be helpful during the removal and installation process.
6. Operating Principle
The lid lock switch is a critical safety component in modern washing machines. Its primary function is to prevent the washer lid from being opened during high-speed cycles, such as the spin cycle, to ensure user safety and prevent water spillage. When a wash cycle begins, the control board sends a signal to the lid lock switch, which then engages a locking mechanism, securing the lid. The machine will not proceed with the cycle if the lid is not properly closed and locked. Once the cycle is complete and the drum has slowed down, the switch disengages, allowing the lid to be opened.
7. Maintenance
The GSPUSA 290D3070P002 Lid Lock Switch is designed for durability and typically requires minimal maintenance. However, periodic inspection can help ensure its longevity and proper function:
- Visual Inspection: Occasionally, inspect the area around the lid lock for any debris, lint, or foreign objects that might obstruct its mechanism.
- Cleanliness: Keep the area around the lid and the lid lock mechanism clean and dry.
- Check Connections: If accessible, periodically check the electrical connections to ensure they remain secure. Always disconnect power before inspecting.
8. Troubleshooting
If your washing machine is experiencing issues related to the lid lock, consider the following troubleshooting steps:
- Washer Not Starting: If the washer does not start and the lid lock light is flashing or illuminated, it may indicate an issue with the lid lock switch. Ensure the lid is fully closed.
- Lid Not Locking: If the lid does not lock when a cycle begins, the switch may be faulty or obstructed.
- Error Codes: Consult your washing machine's user manual for specific error codes related to the lid lock mechanism.
- Check Wiring: With power disconnected, inspect the wiring connections to the lid lock switch for any loose or damaged wires.
- Verify Part: Double-check that the installed lid lock switch is the correct replacement part for your specific washing machine model, referring to Section 4: Compatibility.
If troubleshooting steps do not resolve the issue, professional assistance may be required.
9. Specifications
| Feature | Specification |
|---|---|
| Model Number | 290D3070P002 |
| Brand | GSPUSA |
| Operating Voltage | 110-120 Volts (AC) |
| Contact Type | Normally Open |
| Connector Type | Molex |
| Switch Type | Lid Lock Switch |
| Terminal Type | Screw |
| Material | Plastic |
| Product Dimensions (L x W x H) | 6 x 4 x 4 inches |
| Item Weight | 7.68 ounces |
| Circuit Type | 1-way |
| Mounting Type | Flush Mount |
10. Warranty and Support
For any questions regarding the GSPUSA 290D3070P002 Laundry Washer Lid Lock Switch, including warranty information or technical support, please contact the seller or manufacturer directly. Refer to your purchase documentation for specific contact details.