Introduction
Thank you for choosing the Jyving DC 36V 1000W Brushed Motor Controller. This controller is designed to provide stable speed and sensitive control for electric bicycles and scooters. This manual provides essential information for the safe and efficient installation, operation, and maintenance of your motor controller. Please read it thoroughly before use.
Safety Information
- Always disconnect power before installing or performing maintenance on the controller.
- Ensure all connections are secure and correctly wired according to the diagram to prevent damage to the controller or motor.
- Avoid exposing the controller to water or excessive moisture.
- Do not attempt to open or modify the controller casing, as this may void the warranty and pose a safety risk.
- Keep children and unauthorized personnel away from the electrical components during installation and operation.
- Wear appropriate personal protective equipment (PPE) when handling electrical components.
Product Overview
The Jyving DC Brushed Motor Controller features a durable aluminum alloy shell for effective heat dissipation, protecting internal circuits from thermal overloading. It ensures steady speed control and responsive braking and direction changes. The wires and interfaces are designed for durability and labeled for easy installation.
Key Features:
- Aluminum alloy shell for heat dissipation.
- Provides steady speed control.
- Sensitive control for braking and direction changes.
- Durable, labeled wires and interfaces for easy installation.
- Suitable for electric bicycles and scooters.

Image: The Jyving DC Brushed Motor Controller, showing its compact design and multiple wire connections.
Setup and Wiring
Carefully follow the wiring diagram below to connect the motor controller to your electric bicycle or scooter components. Ensure all connections are firm and correctly matched.
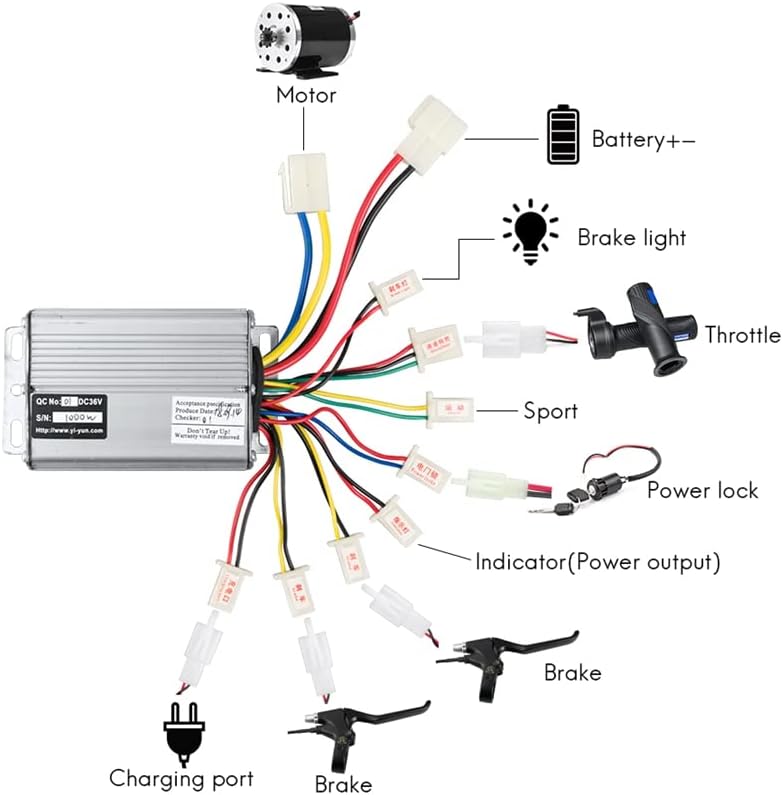
Image: Detailed wiring diagram illustrating connections for the motor, battery, throttle, brakes, and other components.
Connection Guide:
- Motor Connection: Connect the motor wires (typically yellow, blue, green) from the controller to the corresponding motor wires.
- Battery Connection (Battery+-): Connect the main power wires (red for positive, black for negative) from the controller to your 36V DC battery pack.
- Throttle: Connect the throttle unit to the designated throttle connector on the controller. This controls speed.
- Brake Levers: Connect the brake lever wires to the brake connectors. These signals will cut power to the motor when brakes are applied.
- Brake Light: If applicable, connect the brake light wire to the brake light output.
- Power Lock: Connect the power lock (ignition) switch. This acts as the main on/off switch for the system.
- Charging Port: Connect the charging port if your system includes one for direct charging through the controller.
- Indicator (Power Output): Connect any power indicator lights or displays to this output.
- Sport Mode (Optional): If your system supports a sport mode, connect the corresponding switch here.
After making all connections, double-check them for correctness and security before applying power.
Operating Instructions
- Power On: Turn the power lock (ignition) switch to the "ON" position. The system indicator should light up.
- Throttle Control: Gently twist the throttle to engage the motor. The speed will increase proportionally with the throttle input.
- Braking: Apply the brake levers to slow down or stop. The controller is designed to cut motor power when brakes are engaged.
- Power Off: Turn the power lock switch to the "OFF" position when you are finished operating the vehicle.
Always operate your electric bicycle or scooter responsibly and in accordance with local regulations.
Maintenance
- Regular Inspection: Periodically check all wire connections to ensure they are tight and free from corrosion.
- Cleaning: Keep the controller clean and free from dust and debris. Use a dry, soft cloth for cleaning. Do not use liquids.
- Environmental Protection: Store the controller in a dry environment, away from direct sunlight and extreme temperatures.
- Damage Check: Inspect the controller casing for any signs of physical damage. If damage is found, discontinue use and seek professional advice.
Troubleshooting
| Problem | Possible Cause | Solution |
|---|---|---|
| Motor does not run. | No power to controller; loose connections; faulty throttle; faulty motor. | Check battery charge; verify all wire connections; test throttle functionality; inspect motor. |
| Inconsistent speed or jerky operation. | Loose motor or throttle connections; damaged wires; faulty controller. | Inspect and secure all connections; check wires for damage; if problem persists, controller may need replacement. |
| Brakes not cutting motor power. | Brake lever switch not connected or faulty. | Ensure brake lever wires are correctly connected and functioning. |
| Controller gets excessively hot. | Overload; poor ventilation; internal fault. | Reduce load; ensure controller is in a well-ventilated area; if problem persists, discontinue use. |
For issues not listed here or if troubleshooting steps do not resolve the problem, please contact customer support.
Specifications
- Voltage: 36V DC (Compatible with 48V systems, check specific model)
- Power: 1000W (This model is 36V 1000W, other variants available)
- Rated Current: 30A (For 1000W model, 26A for 800W model)
- Controller Type: Brushed
- Material: Aluminum alloy casing, copper wiring
- Dimensions: Approximately 94mm (Length) x 62mm (Width) x 31mm (Height)
- Model Number: JY-2251832707307436-3

Image: Physical dimensions of the 1000W DC Motor Controller, showing length, width, and height measurements.
Warranty Information
Specific warranty details for this product are not provided in the available information. Please refer to the seller's return policy or contact the seller directly for warranty terms and conditions at the time of purchase.
Customer Support
If you have any questions, require technical assistance, or encounter issues not covered in this manual, please contact the seller directly through the platform where you purchased the product. Provide your order number and a detailed description of the issue for prompt assistance.