VIHELM GF2
VIHELM GF2 Underground Metal Detector Instruction Manual
Model: GF2
1. Introduction
Thank you for choosing the VIHELM GF2 Underground Metal Detector. This manual provides essential information for the proper assembly, operation, and maintenance of your device. Please read this manual thoroughly before using the metal detector to ensure safe and effective operation.
The GF2 is designed for detecting various metals including gold, silver, copper, and iron. It features a 3.8-inch LCD display and a partially waterproof design, making it suitable for diverse environments such as shallow creeks, riverbeds, and shorelines. Its user-friendly interface allows both beginners and experienced users to effectively search for metallic objects.
2. Package Contents
Verify that all items listed below are included in your package. If any items are missing or damaged, please contact customer support.
- 1 x GF2 Metal Detector
- 1 x User Manual
- 1 x Headphone
3. Product Overview
Familiarize yourself with the main components of your VIHELM GF2 metal detector.

Image 3.1: Search Coil Cover. This image shows the black search coil cover, an oval-shaped protective accessory for the metal detector's search coil. It features several cutouts to reduce weight and allow for water drainage.
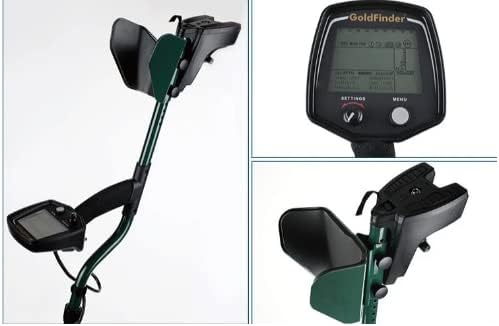
Image 3.2: Main Assembly and Display. This composite image displays the full metal detector assembly, including the adjustable shaft, armrest, and control unit. A close-up of the LCD display shows the interface with 'SETTINGS' and 'MENU' buttons, and a close-up of the armrest and handle provides detail on the ergonomic design.

Image 3.3: Search Coil and Cable Connection. This image shows a close-up of the search coil attached to the lower shaft, with the cable neatly wrapped around the shaft. Another close-up shows the secure cable connection point to the control unit, highlighting the robust design.
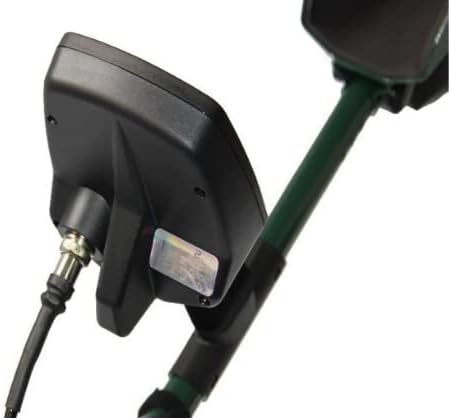
Image 3.4: Control Unit Side View. A side view of the control unit attached to the shaft, showing the cable entry point and the overall compact design of the electronics housing.

Image 3.5: Full View with Components. This image provides a comprehensive view of the assembled metal detector, alongside separate close-ups of the LCD display, the control unit's attachment to the shaft, and the search coil, illustrating the modular design.
4. Setup
4.1 Assembly
- Attach the Search Coil: Secure the search coil to the lower stem using the provided bolt and nut. Ensure it is firmly attached but allows for slight angle adjustment.
- Connect the Lower and Upper Stems: Slide the lower stem into the upper stem and secure it with the locking collar. Adjust the length to a comfortable operating position.
- Mount the Control Unit: Attach the control unit to the upper stem. Ensure the armrest is positioned comfortably for your forearm.
- Connect the Coil Cable: Carefully wrap the search coil cable around the stem, ensuring it is not taut. Plug the cable connector into the corresponding port on the control unit. Tighten the collar to secure the connection.
- Install Batteries: The GF2 requires 4 AA batteries. Open the battery compartment on the control unit, insert the batteries according to the polarity indicators, and close the compartment securely.
- Connect Headphones: If using headphones, plug them into the 1/4-inch headphone jack on the control unit.
4.2 Initial Power On and Basic Settings
- Power On: Press and hold the power button on the control unit until the LCD display illuminates.
- Volume Adjustment: Use the volume controls to set a comfortable audio level.
- Sensitivity Adjustment: Start with a moderate sensitivity setting. High sensitivity can detect smaller objects but may also increase false signals in mineralized ground.
- Ground Balance: The GF2 features automatic ground balance. For optimal performance, perform a manual ground balance if operating in highly mineralized soil. Refer to the "Operating Instructions" section for details.
5. Operating Instructions
5.1 Basic Detection Technique
Proper sweeping technique is crucial for effective metal detection.

Image 5.1: Sweeping Technique. This diagram illustrates the correct and incorrect methods for sweeping the metal detector coil. The correct method shows a smooth, overlapping sweep pattern, while the incorrect method shows a pendulum-like swing, which can lead to missed targets.
- Maintain Coil Height: Keep the search coil parallel to the ground and as close as possible without touching it.
- Sweep Slowly and Steadily: Move the coil from side to side in a smooth, controlled arc.
- Overlap Sweeps: Ensure each sweep slightly overlaps the previous one to avoid missing targets.
- Avoid Pendulum Motion: Do not swing the coil like a pendulum, as this can cause depth loss and inaccurate readings.
5.2 Understanding the LCD Display
The 3.8-inch LCD display provides visual information about detected targets, battery status, and current settings.
- Target ID: Displays a numerical value or icon indicating the probable type of metal detected.
- Depth Indicator: Estimates the depth of the detected object.
- Battery Level Indicator: Shows the remaining battery life, ensuring you are aware of power status.
- Mode/Settings: Indicates the current operating mode and allows adjustment of sensitivity, discrimination, and ground balance.
5.3 Discrimination and Target Selection
The GF2 allows you to discriminate against unwanted metals, such as iron, to focus on more valuable targets.
- Select Metal: Use the "Select Metal" function to choose which types of metals the detector will respond to.
- Adjust Discrimination: Increase the discrimination level to filter out ferrous (iron) objects. Lower the discrimination to detect all metals.
- Audio Tones: Different metals may produce distinct audio tones. Learn to differentiate these tones to identify targets without constantly checking the display. The volume can be adjusted via the LCD display.
6. Maintenance
- Cleaning: After each use, wipe down the detector with a damp cloth. Avoid using abrasive cleaners or solvents.
- Coil Care: The search coil is partially waterproof. If used in water, rinse it with fresh water and dry thoroughly. Do not submerge the control unit.
- Battery Storage: Remove batteries if the detector will not be used for an extended period to prevent leakage.
- Storage: Store the metal detector in a cool, dry place, away from direct sunlight and extreme temperatures.
- Cable Inspection: Regularly check all cables and connections for signs of wear or damage.
7. Troubleshooting
| Problem | Possible Cause | Solution |
|---|---|---|
| No power | Dead or incorrectly installed batteries | Replace batteries with new ones, ensuring correct polarity. |
| Erratic signals/False signals | High sensitivity, highly mineralized ground, electrical interference, loose coil cable | Reduce sensitivity. Perform ground balance. Move away from power lines or other electronics. Check coil cable connection. |
| No detection | Low sensitivity, discrimination set too high, coil not sweeping correctly | Increase sensitivity. Lower discrimination. Review sweeping technique. |
| Weak or no audio | Low volume, faulty headphones, loose headphone connection | Increase volume. Test with different headphones. Ensure headphones are fully plugged in. |
8. Specifications
| Feature | Detail |
|---|---|
| Display | 3.8-inch LCD Display |
| Power Source | 4 AA Batteries (Battery Powered) |
| Battery Life | Up to 40 hours |
| Operating Frequency | 13 KHz |
| Operating Rules | VLF Inductive Balance |
| Detection Coil | 11 Inch DD |
| Waterproof Design | Partially waterproof (coil within 11 feet) |
| Adjustable Length | Yes |
| Item Weight | 4 Pounds (1.8 kg) |
| Operating Temperature | -20 to +50 Degree Celsius |
| Operating Humidity Range | 0 to 90% |
| Ground Balance Range | From iron to salt |
9. Warranty and Support
For warranty information and customer support, please refer to the documentation provided with your purchase or contact the manufacturer directly. Keep your proof of purchase for any warranty claims.
Manufacturer: VIHELM
UPC: 797427714114
ASIN: B0C14H54SN
Ask a question about this manual
Ask about setup, troubleshooting, compatibility, parts, safety, or missing instructions. Manuals+ will review the question and use this page’s manual context to help answer it.