Introduction
This manual provides detailed instructions for the assembly, operation, and maintenance of your VIHELM MD3009II Deep Underground Metal Detector. Please read this manual thoroughly before using the device to ensure safe and effective operation. Keep this manual for future reference.
Safety Information
- Always operate the metal detector in a safe environment, away from live electrical wires or hazardous materials.
- Do not use the detector in areas where digging is prohibited or could cause damage to underground utilities.
- Wear appropriate protective gear, such as gloves, when digging to retrieve detected objects.
- Keep the device away from extreme temperatures and moisture to prevent damage.
- Dispose of batteries responsibly according to local regulations.
Product Components
The VIHELM MD3009II metal detector consists of several key components designed for efficient metal detection. Familiarize yourself with each part before assembly.
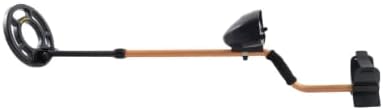
Figure 1: Fully assembled VIHELM MD3009II Metal Detector, showing the search coil, stem, control unit, and armrest.
- Search Coil: The waterproof coil that detects metal objects.
- Stem: Adjustable shaft connecting the search coil to the control unit and armrest.
- Control Unit: Houses the electronics, display, and controls for operation.
- Armrest: Provides support and comfort during use.
- Handle: Ergonomic grip for holding the detector.
Assembly Instructions
Follow these steps to assemble your MD3009II metal detector:

Figure 2: Unboxed components of the metal detector, including the main unit, search coil, and manual.
- Attach the Search Coil: Connect the search coil to the lower stem using the provided bolt and nut. Ensure it is securely fastened but allows for slight angle adjustment.
- Connect the Stem Sections: Slide the lower stem into the middle stem, and then the middle stem into the upper stem. Secure the sections using the spiral operation valve/adjustment knob.
- Mount the Control Unit: Slide the control unit onto the upper stem.
- Attach the Armrest: Secure the armrest to the upper stem, ensuring it is comfortable for your forearm.
- Connect the Coil Cable: Carefully wrap the search coil cable around the stem and plug the connector into the control unit. Ensure the connection is firm.
- Install Batteries: Open the battery compartment on the control unit and insert 6 x 1.5V AA batteries (not included), observing correct polarity.

Figure 3: Detail of the adjustable stem connection, allowing for length customization.
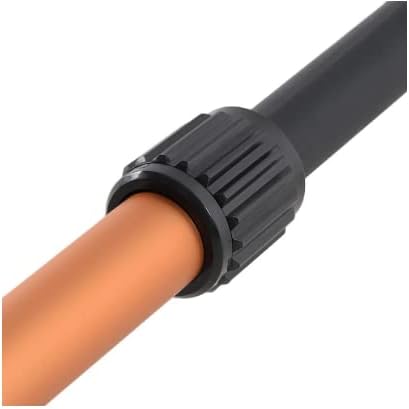
Figure 4: The ergonomic armrest designed for comfortable use.
Operating Instructions
The MD3009II metal detector features an LCD display and various controls for precise detection. Refer to the control unit diagram for button and knob locations.
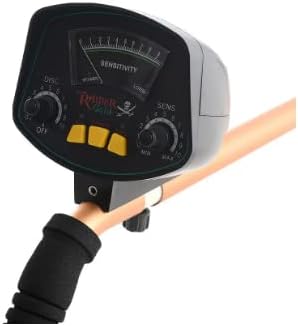
Figure 5: The control unit with sensitivity dial, discrimination dial, and mode buttons.
1. Power On/Off
Rotate the "SENS" (Sensitivity) knob clockwise from the "OFF" position to power on the detector. Rotate counter-clockwise to the "OFF" position to power off.
2. Adjusting Sensitivity (SENS)
The "SENS" knob controls the detector's sensitivity. Turn it clockwise to increase sensitivity for deeper detection or smaller objects. Turn it counter-clockwise to decrease sensitivity, which can help reduce interference in highly mineralized ground or areas with much trash.
3. Discrimination (DISC)
The "DISC" knob allows you to discriminate between different types of metals. By adjusting this knob, you can filter out unwanted metals (e.g., iron trash) and focus on more valuable targets. Rotate the knob to set the discrimination level. Higher settings will reject more types of metal.
4. Target Indication
- LCD Display: The LCD provides a visual indication of detected targets, including signal strength and probable metal type.
- Audio Tone: The detector produces an audible tone when a metal object is detected. The tone's pitch or intensity may vary depending on the target's size and depth.
5. Search Coil Usage
Hold the detector with the search coil parallel to the ground, about 1-2 inches above the surface. Sweep the coil slowly from side to side in overlapping motions. Maintain a consistent height and speed for optimal detection.

Figure 6: The waterproof search coil, labeled MD-3009II.
6. Headphone Jack
A headphone jack is provided for private searching and to hear subtle target signals more clearly. Connect standard headphones (not included) to this port.
7. Low Battery Alert
The detector features a low battery alarm. When the battery power is low, the indicator will alert you, signaling that batteries need to be replaced soon.
Maintenance
- Cleaning: After each use, wipe down the detector with a damp cloth. Do not use abrasive cleaners or solvents. The search coil is waterproof and can be rinsed with water, but ensure the control unit remains dry.
- Storage: Store the detector in a dry, cool place when not in use. If storing for an extended period, remove the batteries to prevent leakage.
- Battery Replacement: Replace all 6 AA batteries when the low battery indicator activates. Use fresh, high-quality batteries for optimal performance.
Troubleshooting
| Problem | Possible Cause | Solution |
|---|---|---|
| No power | Batteries are dead or incorrectly installed. | Check battery polarity; replace with fresh batteries. |
| Erratic signals or false positives | High sensitivity, mineralized ground, or electrical interference. | Reduce sensitivity (SENS knob). Move to a different location away from power lines or other electronics. Adjust DISC setting. |
| Detector does not find metal | Low sensitivity, incorrect DISC setting, or no metal present. | Increase sensitivity. Adjust DISC setting to a lower value. Test with a known metal object. |
| Low battery alert constantly on | Batteries are low or faulty. | Replace all batteries with new ones. |
Specifications
The following table outlines the technical specifications for the VIHELM MD3009II Metal Detector:

Figure 7: Detailed specifications and key features of the MD3009II.
| Feature | Detail |
|---|---|
| Power Supply | 6 x 1.5V AA Batteries (not included) |
| Operating Voltage | 7.2-9.6V |
| Frequency | 5.5 KHz |
| Current | Standby: 30mA, Max: 80mA |
| Sensitivity | >13cm (for a US quarter) |
| Operation Modes | All Metal, Discrimination |
| Coil | Waterproof search coil |
| Audio Indication | 1 tone audio |
| Detected Indication | Mechanical Meter (LCD Display) |
| Battery Condition Indicator | Yes |
| Distinguish | Ferrous and Non-ferrous metals |
| Operating Temperature | -20°C to +60°C |
| Stretch Length | 23-31 inches |
| Detector Diameter | 8.3 inches |
| Item Weight | 4 pounds (1.9 kg) |
| Product Dimensions | 6 x 1 x 2 inches (Control Unit) |
Warranty and Support
The VIHELM MD3009II Metal Detector comes with a 1-year warranty from the date of purchase, covering manufacturing defects. Please retain your proof of purchase for warranty claims.
For technical support, troubleshooting assistance, or warranty inquiries, please contact VIHELM customer service through the retailer where the product was purchased or visit the official VIHELM website for contact information.
When contacting support, please have your model number (MD3009II) and purchase details ready.